一、线程的引入:
定义:同时对多项任务加以控制
我们上下代码:
1.未使用线程
 1 package com.learn.chap08.sec01;
 2 /**
 3  * 未使用线程--同步执行
 4  * @author Administrator
 5  *
 6  */
 7 public class Demo1 {
 8
 9     /**
10      * 听音乐
11      */
12     public static void music(){
13         for (int i = 0; i < 5; i++) {
14             System.out.println("听音乐");
15         }
16     }
17
18     /**
19      * 吃饭
20      */
21     public static void eat(){
22         for (int i = 0; i < 5; i++) {
23             System.out.println("吃饭");
24         }
25     }
26
27     public static void main(String[] args) {
28         music();
29         eat();
30     }
31 }
2. 使用线程
 1 package com.learn.chap08.sec01;
 2 /**
 3  * 使用多线程--异步执行
 4  * @author Administrator
 5  *
 6  */
 7 public class Eat extends Thread{
 8
 9     @Override
10     public void run() {
11         for (int i = 0; i < 5; i++) {
12             try {
13                 Thread.sleep(100); // 100毫秒
14             } catch (InterruptedException e) {
15                 // TODO Auto-generated catch block
16                 e.printStackTrace();
17             }
18             System.out.println("吃饭");
19         }
20     }
21
22 }
 1 package com.learn.chap08.sec01;
 2 /**
 3  * 使用多线程--异步执行
 4  * @author Administrator
 5  *
 6  */
 7 public class Music extends Thread {
 8
 9     @Override
10     public void run() {
11         // TODO Auto-generated method stub
12         for (int i = 0; i < 5; i++) {
13             try {
14                 Thread.sleep(100);
15             } catch (InterruptedException e) {
16                 // TODO Auto-generated catch block
17                 e.printStackTrace();
18             }
19             System.out.println("听音乐");
20         }
21     }
22
23 }
 1 package com.learn.chap08.sec01;
 2 /**
 3  * 使用多线程--异步执行
 4  * @author Administrator
 5  *
 6  */
 7 public class Demo2 {
 8     public static void main(String[] args) {
 9         /**
10          * 利用多线程--实现一边听音乐 一边吃饭
11          */
12         Music musicThread = new Music();
13         Eat eatThread     = new Eat();
14         musicThread.start();
15         eatThread.start();
16     }
17 }
二、使用多线程
1. 继承Thread类
代码如下:
 1 package com.learn.chap08.sec02;
 2
 3 public class Thread1 extends Thread {
 4     private String threadName;
 5     private int baoZi = 1;
 6
 7     public Thread1(String threadName) {
 8         super();
 9         this.threadName = threadName;
10     }
11
12     @Override
13     public void run() {
14         // TODO Auto-generated method stub
15         while(baoZi<=10){
16             System.out.println(this.threadName+" 吃第"+baoZi+"个包子");
17             baoZi++;
18         }
19     }
20
21     public static void main(String[] args) {
22         System.out.println("张三、李四各自吃10个包子");
23         Thread1 t1=new Thread1("张三线程");
24         Thread1 t2=new Thread1("李四线程");
25         t1.start();
26         t2.start();
27     }
28
29 }
2. 实现Runnable接口
代码如下:
 1 package com.learn.chap08.sec02;
 2
 3 public class Thread2 implements Runnable{
 4
 5     private String threadName;
 6     private int baoZi = 1;
 7
 8     public Thread2(String threadName) {
 9         super();
10         this.threadName = threadName;
11     }
12
13     @Override
14     public void run() {
15         // TODO Auto-generated method stub
16         while(baoZi<=10){
17             System.out.println(this.threadName+" 吃第"+baoZi+"个包子");
18             baoZi++;
19         }
20     }
21
22     public static void main(String[] args) {
23         System.out.println("张三、李四各自吃10个包子");
24         Thread1 t1=new Thread1("张三线程");
25         Thread1 t2=new Thread1("李四线程");
26         Thread t11=new Thread(t1);
27         Thread t12=new Thread(t2);
28         t11.start();
29         t12.start();
30     }
31
32 }
 1 package com.learn.chap08.sec02;
 2
 3 public class Thread3 implements Runnable{
 4
 5     private String threadName;
 6     private int baoZi = 1;
 7
 8     public Thread3(String threadName) {
 9         super();
10         this.threadName = threadName;
11     }
12
13     @Override
14     public synchronized void run() {
15         // TODO Auto-generated method stub
16         while(baoZi<=10){
17             System.out.println(this.threadName+" 吃第"+baoZi+"个包子");
18             baoZi++;
19         }
20     }
21
22     public static void main(String[] args) {
23
24         Thread3 t1=new Thread3("超级张三线程");
25
26         Thread t11=new Thread(t1);
27         Thread t12=new Thread(t1);
28         Thread t13=new Thread(t1);
29         // 实现资源共享
30         t11.start();
31         t12.start();
32         t13.start();
33     }
34
35 }
总结: Runnable接口 可以实现资源共享 而Thread不能。
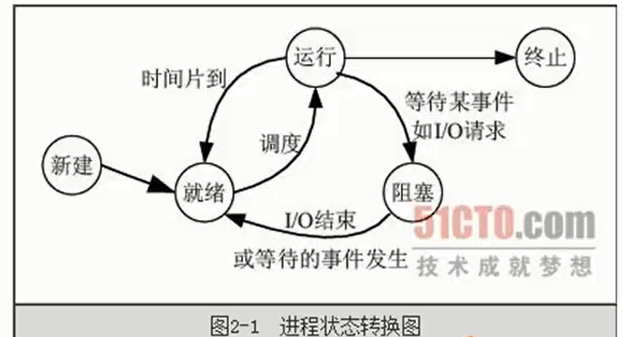
三、线程状态

四、多线程常用的方法

举例代码如下:
 1 package com.learn.chap08.sec04;
 2
 3 public class Demo1 implements Runnable{
 4
 5     @Override
 6     public void run() {
 7         // TODO Auto-generated method stub
 8         for (int i = 0; i < 10; i++) {
 9             // 获取当前线程
10             Thread t=Thread.currentThread();
11             System.out.println(t.getName()+":"+i);
12         }
13
14     }
15
16     public static void main(String[] args) {
17         Demo1 demo1 = new Demo1();
18         new Thread(demo1).start();
19         new Thread(demo1,"线程一").start();
20         new Thread(demo1,"线程二").start();
21
22         Thread it = new Thread(demo1);
23         System.out.println(it.isAlive());
24         it.start();
25         System.out.println(it.isAlive());
26     }
27
28 }
运行结果
false
true
Thread-1:0
Thread-1:1
Thread-1:2
Thread-1:3
Thread-1:4
Thread-1:5
Thread-1:6
Thread-1:7
Thread-1:8
Thread-1:9
线程二:0
线程二:1
线程二:2
线程二:3
线程二:4
线程二:5
线程二:6
线程二:7
线程二:8
线程二:9
Thread-0:0
Thread-0:1
Thread-0:2
Thread-0:3
Thread-0:4
Thread-0:5
Thread-0:6
Thread-0:7
Thread-0:8
Thread-0:9
线程一:0
线程一:1
线程一:2
线程一:3
线程一:4
线程一:5
线程一:6
线程一:7
线程一:8
线程一:9
 1 package com.learn.chap08.sec04;
 2
 3 public class Demo2 implements Runnable{
 4
 5     @Override
 6     public void run() {
 7         // TODO Auto-generated method stub
 8         for (int i = 0; i < 10; i++) {
 9             try {
10                 Thread.sleep(1000); // 线程休眠
11                 // 获取当前线程
12                 Thread t=Thread.currentThread();
13                 System.out.println(t.getName()+":"+i);
14             } catch (InterruptedException e) {
15                 // TODO Auto-generated catch block
16                 e.printStackTrace();
17             }
18
19         }
20
21     }
22
23     public static void main(String[] args) {
24         Demo2 demo1 = new Demo2();
25         new Thread(demo1).start();
26         new Thread(demo1,"线程一").start();
27     }
28
29 }
运行结果
Thread-0:0
线程一:0
Thread-0:1
线程一:1
.
.
.
 1 package com.learn.chap08.sec04;
 2
 3 public class Demo3 implements Runnable{
 4
 5     @Override
 6     public void run() {
 7         // TODO Auto-generated method stub
 8         for (int i = 0; i < 10; i++) {
 9             // 获取当前线程
10             Thread t=Thread.currentThread();
11             System.out.println(t.getName()+":"+i);
12
13         }
14
15     }
16
17     public static void main(String[] args) {
18         Demo3 demo1 = new Demo3();
19         Thread t1 = new Thread(demo1,"线程一");
20         Thread t2 = new Thread(demo1,"线程二");
21         Thread t3 = new Thread(demo1,"线程三");
22         t1.setPriority(Thread.MAX_PRIORITY); // 更改线程的优先级
23         t2.setPriority(Thread.NORM_PRIORITY);
24         t3.setPriority(Thread.MIN_PRIORITY);
25         t1.start();
26         t2.start();
27         t3.start();
28     }
29
30 }
 1 package com.learn.chap08.sec04;
 2
 3 public class Demo4 implements Runnable{
 4
 5     @SuppressWarnings("static-access")
 6     @Override
 7     public void run() {
 8         // TODO Auto-generated method stub
 9         for (int i = 0; i < 10; i++) {
10             try {
11                 Thread.sleep(100);
12                 // 获取当前线程
13                 Thread t=Thread.currentThread();
14                 System.out.println(t.getName()+":"+i);
15                 if(i==5){
16                     System.out.println("线程礼让:");
17                     Thread.currentThread().yield();// 出现@SuppressWarnings("static-access")
18                 }
19             } catch (InterruptedException e) {
20                 // TODO Auto-generated catch block
21                 e.printStackTrace();
22             }
23         }
24     }
25
26     public static void main(String[] args) {
27         Demo4 demo1 = new Demo4();
28         Thread t1 = new Thread(demo1,"线程一");
29         Thread t2 = new Thread(demo1,"线程二");
30         t1.start();
31         t2.start();
32     }
33
34 }
运行结果
线程一:0
线程二:0
线程一:1
线程二:1
线程一:2
线程二:2
线程二:3
线程一:3
线程一:4
线程二:4
线程一:5
线程礼让:
线程二:5
线程礼让:
线程一:6
线程二:6
线程一:7
线程二:7
线程一:8
线程二:8
线程一:9
线程二:9
五、线程同步
1. 同步方法
2. 同步锁(锁机制)
上下代码:
 1 package com.learn.chap08.sec05;
 2
 3 public class Demo2 implements Runnable{
 4
 5     private int baoZi=10;
 6
 7     @Override
 8     /**
 9      * 同步方法
10      */
11     public synchronized void run() { // 用synchronized标识 的方法为同步方法  不加锁的话,下面的张三、李四、王五可能会同时进入run()方法
12         // TODO Auto-generated method stub
13         while(baoZi>0){
14             System.out.println(Thread.currentThread().getName()+"吃了第"+baoZi+"个包子");
15             baoZi--;
16         }
17     }
18
19     public static void main(String[] args) {
20         Demo2 demo1=new Demo2();
21         new Thread(demo1,"张三").start();
22         new Thread(demo1,"李四").start();
23         new Thread(demo1,"王五").start();
24     }
25
26 }
 1 package com.learn.chap08.sec05;
 2
 3 public class Demo3 implements Runnable{
 4
 5     private int baoZi=10;
 6
 7     @Override
 8     public void run() {
 9         /**
10          * 同步块
11          */
12         synchronized (this) { // 同步块
13             while(baoZi>0){
14                 System.out.println(Thread.currentThread().getName()+"吃了第"+baoZi+"个包子");
15                 baoZi--;
16             }
17         }
18     }
19
20     public static void main(String[] args) {
21         Demo3 demo1=new Demo3();
22         new Thread(demo1,"张三").start();
23         new Thread(demo1,"李四").start();
24         new Thread(demo1,"王五").start();
25     }
26
27 }
下面举例:java synchronized同步方法调用另一个同步方法,锁机制问题
1 public synchronized void methodA(int a, int b);
2
3 public synchronized void methodB(int a){
4     methodA(a, 0);
5 }
假设方法A和B是在同一个类Test中的两个方法。
Test t=new Test();
t.methodB();
这个时候,methodB方法被调用时,因为加了synchronized ,需要先获得一个锁,这个锁的对象应该是t,也就是当前的这个Test类的实例,而获得锁的东西是线程,也就是说当前线程拿到了t的锁(而不是你说的B方法获得锁),这个时候B方法内调用methodA,因为A也加了synchronized,也需要获得一个锁,因为A和B都是Test类中的方法,所以当前线程要获得的锁的对象也是t。由于当前线程在执行B方法时已经持有了t对象的锁,因此这时候调用methodA是没有任何影响的,相当于方法A上没有加synchronized。
另一种情况:假设现在有两个Test类
Test t1=new Test();
Test t2=new Test();
t1.methodB();//此时当前线程持有了t1对象的锁
t2.methodB();//此时当前线程也持有了t2对象的锁
当前线程持有了两把锁,锁的对象分别是两个不同的Test类的实例t1和t2,互相没有影响。
再一种情况:假设在多线程环境下,两个线程都可以访问Test t=new Test();
此时假设thread1里调用t.methodB();同时thread2里调用t.methodB()
这时假设thread1先抢到t对象的锁,那么thread2需要等待thread1释放t对象的锁才可以执行B方法。
结果像这样:
thread1获得t的锁--thread1执行methodB--thread1执行methodA--释放t的锁---thread2获得t的锁--thread2执行methodB--thread2执行methodA--释放t的锁。
synchronized还有很多种使用方法,但只有明白是那条线程获得哪个对象的锁,就很容易明白了。
2016年10月31号偶然看到了crossoverjie整理的多线程知识点(原文链接:http://www.jianshu.com/p/72d53d4f833a),感觉不错,于是在这顺便记录下,补充下知识,呵呵!
进程与线程的区别
进程
进程简单的来说就是在内存中运行的应用程序,一个进程可以启动多个线程。
比如在windows中一个运行EXE文件就是一个进程。
线程
同一进程内的线程共享此进程的地址空间,同时共享进程所拥有的内存和其他资源。
--------------------------------------------------------------------------------------------------
线程Demo-继承Thread类
首先我们我们继承java.lang.Thread类来创建线程。
 1 package top.crosssoverjie.study.Thread;
 2
 3 public class TestThread {
 4     public static void main(String[] args) {
 5         System.out.println("主线程ID是:" + Thread.currentThread().getId());
 6         MyThread my = new MyThread("线程1");
 7         my.start() ;
 8
 9         MyThread my2 = new MyThread("线程2") ;
10         /**
11          * 这里直接调用my2的run()方法。
12          */
13         my2.run() ;
14     }
15
16 }
17
18 class MyThread extends Thread {
19     private String name;
20
21     public MyThread(String name) {
22         this.name = name;
23     }
24
25     @Override
26     public void run() {
27         System.out.println("名字:" + name + "的线程ID是="
28                 + Thread.currentThread().getId());
29     }
30
31 }
输出结果:
主线程ID是:1
名字:线程2的线程ID是=1
名字:线程1的线程ID是=9
由输出结果我们可以得出以下结论:
- my和my2的线程ID不相同,my2和主线程ID相同。说明直接调用
run()方法不会创建新的线程,而是在主线程中直接调用的run()方法,和普通的方法调用没有区别。- 虽然my的
start()方法是在my2的run()方法之前调用,但是却是后输出内容,说明新建的线程并不会影响主线程的执行。
----------------------------------------------------------------------------------------------------
线程Demo-实现Runnable接口
除了继承java.lang.Thread类之外,我们还可以实现java.lang.Runnable接口来创建线程。
 1 package top.crosssoverjie.study.Thread;
 2
 3 public class TestRunnable {
 4     public static void main(String[] args) {
 5         System.out.println("主线程的线程ID是"+Thread.currentThread().getId());
 6         MyThread2 my = new MyThread2("线程1") ;
 7         Thread t = new Thread(my) ;
 8         t.start() ;
 9
10         MyThread2 my2 = new MyThread2("线程2") ;
11         Thread t2 = new Thread(my2) ;
12         /**
13          * 方法调用,并不会创建线程,依然是主线程
14          */
15         t2.run() ;
16     }
17 }
18
19 class MyThread2 implements Runnable{
20     private String name ;
21     public MyThread2(String name){
22         this.name = name ;
23     }
24
25     @Override
26     public void run() {
27         System.out.println("线程"+name+"的线程ID是"+Thread.currentThread().getId());
28     }
29
30
31 }
输出结果:
主线程的线程ID是1
线程线程2的线程ID是1
线程线程1的线程ID是9
notes:
- 实现Runnable的方式需要将实现Runnable接口的类作为参数传递给Thread,然后通过Thread类调用
Start()方法来创建线程。- 这两种方式都可以来创建线程,至于选择哪一种要看自己的需求。直接继承Thread类的话代码要简洁一些,但是由于java只支持单继承,所以如果要继承其他类的同时需要实现线程那就只能实现Runnable接口了,这里更推荐实现Runnable接口。
实际上如果我们查看Thread类的源码我们会发现Thread是实现了Runnable接口的:

线程中常用的方法:

方法详解- public static void sleep(long mills)
 1 package top.crosssoverjie.study.Thread;
 2
 3 public class TestSleep {
 4
 5     private int i = 10 ;
 6     private Object ob = new Object() ;
 7
 8     public static void main(String[] args) {
 9         TestSleep t = new TestSleep() ;
10         MyThread3 thread1 = t.new MyThread3() ;
11         MyThread3 thread2 = t.new MyThread3() ;
12         thread1.start() ;
13         thread2.start() ;
14     }
15
16     class MyThread3 extends Thread{
17         @Override
18         public void run() {
19             synchronized (ob) {
20                 i++ ;
21                 System.out.println("i的值:"+i);
22                 System.out.println("线程:"+Thread.currentThread().getName()+"进入休眠状态");
23                 try {
24                     Thread.currentThread().sleep(1000) ;
25                 } catch (Exception e) {
26                     e.printStackTrace();
27                 }
28                 System.out.println("线程:"+Thread.currentThread().getName()+"休眠结束");
29                 i++;
30                 System.out.println("i的值>:"+i);
31             }
32         }
33     }
34
35 }
输出结果:
i的值:11
线程:Thread-0进入休眠状态
线程:Thread-0休眠结束
i的值>:12
i的值:13
线程:Thread-1进入休眠状态
线程:Thread-1休眠结束
i的值>:14
由输出结果我们可以得出:
当Thread0进入休眠状态时,Thread1并没有继续执行,而是等待Thread0休眠结束释放了对象锁,Thread1才继续执行。
当调用sleep()方法时,必须捕获异常或者向上层抛出异常。当线程休眠时间满时,并不一定会马上执行,因为此时有可能CPU正在执行其他的任务,所以调用了sleep()方法相当于线程进入了阻塞状态。
方法详解- public static void yield()
 1 package top.crosssoverjie.study.Thread;
 2
 3 public class Testyield {
 4     public static void main(String[] args) {
 5         MyThread4 my = new MyThread4() ;
 6         my.start() ;
 7     }
 8 }
 9 class MyThread4 extends Thread{
10     @Override
11     public void run() {
12         long open = System.currentTimeMillis();
13         int count= 0 ;
14         for(int i=0 ;i<1000000;i++){
15             count= count+(i+1);
16 //            Thread.yield() ;
17         }
18         long end = System.currentTimeMillis();
19         System.out.println("用时:"+(end-open)+"毫秒");
20     }
21 }
输出结果:用时:1毫秒
如果将 Thread.yield()注释取消掉,输出结果:用时:116毫秒
总结:
- 调用
yield()方法是为了让当前线程交出CPU权限,让CPU去执行其他线程。它和sleep()方法类似同样是不会释放锁。但是yield()不能控制具体的交出CUP的时间。并且它只能让相同优先级的线程获得CPU执行时间的机会。 - 调用
yield()方法不会让线程进入阻塞状态,而是进入就绪状态,它只需要等待重新获取CPU的时间,这一点和sleep()方法是不一样的。
方法详解- public final void join()
在很多情况下我们需要在子线程中执行大量的耗时任务,但是我们主线程又必须得等待子线程执行完毕之后才能结束,这就需要用到 join()方法了。join()方法的作用是等待线程对象销毁,如果子线程执行了这个方法,那么主线程就要等待子线程执行完毕之后才会销毁,请看下面这个例子:
 1 package top.crosssoverjie.study.Thread;
 2
 3 public class Testjoin {
 4     public static void main(String[] args) throws InterruptedException {
 5         new MyThread5("t1").start() ;
 6         for (int i = 0; i < 10; i++) {
 7             if(i == 5){
 8                 MyThread5 my =new MyThread5("t2") ;
 9                 my.start() ;
10                 my.join() ;
11             }
12             System.out.println("main当前线程:"+Thread.currentThread().getName()+" "+i);
13         }
14     }
15 }
16 class MyThread5 extends Thread{
17
18     public MyThread5(String name){
19         super(name) ;
20     }
21     @Override
22     public void run() {
23         for (int i = 0; i < 5; i++) {
24             System.out.println("当前线程:"+Thread.currentThread().getName()+" "+i);
25         }
26     }
27 }
输出结果:
main当前线程:main 0
当前线程:t1 0
当前线程:t1 1
main当前线程:main 1
当前线程:t1 2
main当前线程:main 2
当前线程:t1 3
main当前线程:main 3
当前线程:t1 4
main当前线程:main 4
当前线程:t2 0
当前线程:t2 1
当前线程:t2 2
当前线程:t2 3
当前线程:t2 4
main当前线程:main 5
main当前线程:main 6
main当前线程:main 7
main当前线程:main 8
main当前线程:main 9


如果我们把join()方法注释掉之后:
main当前线程:main 0
当前线程:t1 0
main当前线程:main 1
当前线程:t1 1
main当前线程:main 2
当前线程:t1 2
main当前线程:main 3
当前线程:t1 3
main当前线程:main 4
当前线程:t1 4
main当前线程:main 5
main当前线程:main 6
main当前线程:main 7
main当前线程:main 8
main当前线程:main 9
当前线程:t2 0
当前线程:t2 1
当前线程:t2 2
当前线程:t2 3
当前线程:t2 4
由上我们可以得出以下结论:
- 在使用了
join()方法之后主线程会等待子线程结束之后才会结束。
方法详解- setDaemon(boolean on),getDaemon()
用来设置是否为守护线程和判断是否为守护线程。
notes:
- 守护线程依赖于创建他的线程,而用户线程则不需要。如果在
main()方法中创建了一个守护线程,那么当main方法执行完毕之后守护线程也会关闭。而用户线程则不会,在JVM中垃圾收集器的线程就是守护线程。
优雅的终止线程
有三种方法可以终止线程,如下:
- 使用退出标识,使线程正常的退出,也就是当
run()方法完成后线程终止。 - 使用
stop()方法强行关闭,这个方法现在已经被废弃,不推荐使用 - 使用
interrupt()方法终止线程。
具体的实现代码我将在下一篇博文中将到。。
线程的优先级
在操作系统中线程是分优先级的,优先级高的线程CPU将会提供更多的资源,在java中我们可以通过setPriority(int newPriority)方法来更改线程的优先级。
在java中分为1~10这个十个优先级,设置不在这个范围内的优先级将会抛出IllegalArgumentException异常。
java中有三个预设好的优先级:
public final static int MIN_PRIORITY = 1;public final static int NORM_PRIORITY = 5;public final static int MAX_PRIORITY = 10;
java多线程思维图:
