在工厂中,有很多需要人工检测的产品,有的往往外形很相似,这样人肉眼很难去判断是良品还是不良品,而且随着人精力的下降,难以保证对产品的缺陷检测。因此,机器视觉应用在工件缺陷检测领域是一项非常热门的技术。
目前也有使用深度学习进行缺陷检测,但是深度学习的部署成本较高,需要大型算力的服务器,成本也比较高,因此因地制宜地提出一些符合实际应用场景的办法,其实更适合。当然也要不断试验。这里举一个使用opencv来检测工件缺陷的例子。
首先机器视觉的步骤,由工业相机拍照,拍照后获取图片,然后对图片进行分析。这里着重在于对图片分析的部分。
下面是一个工件的图片样式。
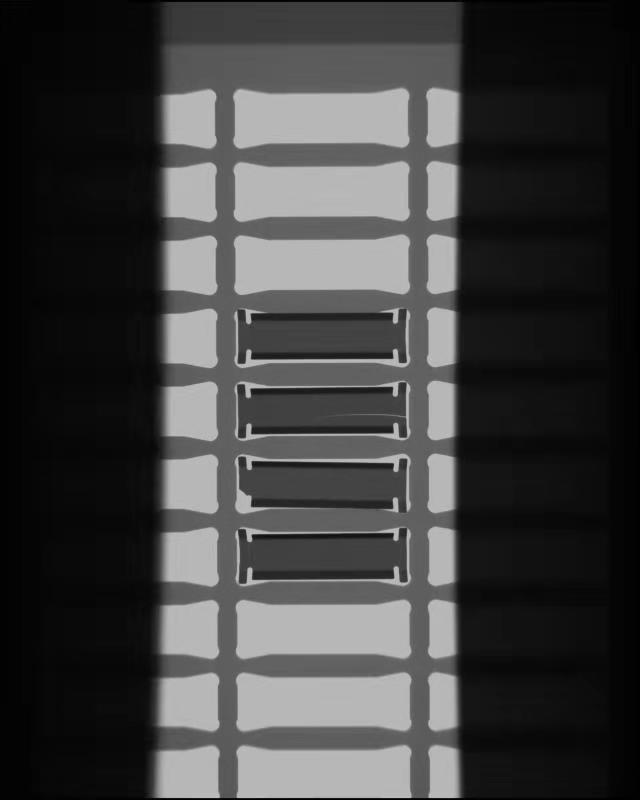
假设第一个工件是正常的没有缺陷的组件,我们使用第一个工件为模板进行对比检测,首先我们将对图片进行一个二值化的处理以及做一个膨胀腐蚀操作来去除一些图像中的噪声。首先使用getStructuringElement定义了一个结构元素,然后使用开运算。对图片
进行处理。
src = cv2.imread("zujian.jpg")

# 图像二值化
gray = cv2.cvtColor(src, cv2.COLOR_BGR2GRAY)
ret, binary = cv2.threshold(gray, 0, 255, cv2.THRESH_BINARY_INV | cv2.THRESH_OTSU)

# 形态学操作
se = cv2.getStructuringElement(cv2.MORPH_RECT, (3, 3), (-1, -1))
binary = cv2.morphologyEx(binary, cv2.MORPH_OPEN, se)
cv2.imwrite("zujian_binary.png", binary)
处理后的图片为:
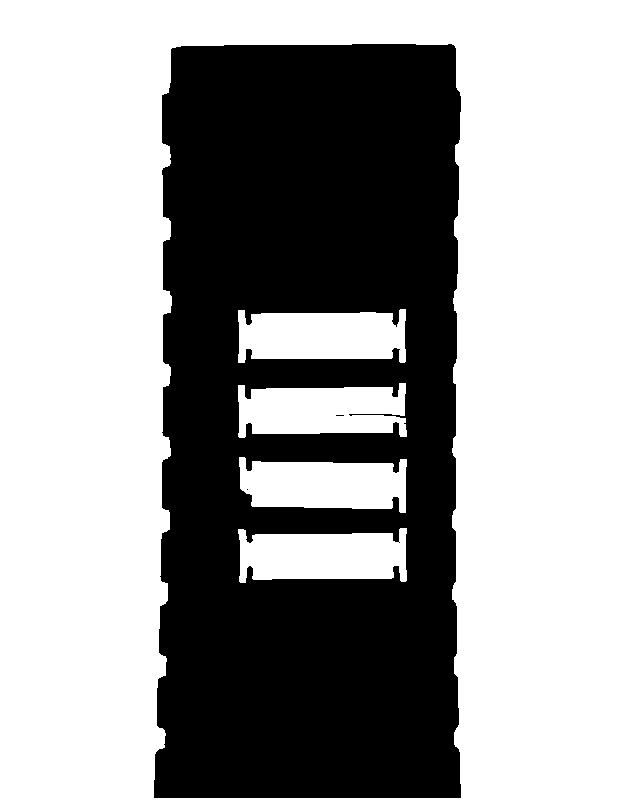
这里对比图片处理之后,更加方便我们找到组件中的不同点。下一步我们进行轮廓提取的工作。并进行排序,以及使用第一个轮廓为模板。
 1 # 对检测到的轮廓框进行排序
 2 def sort_boxes(rois):
 3     for i in range(0, len(rois)-1, 1):
 4         for j in range(i, len(rois), 1):
 5             x, y, w, h = rois[j]
 6             if y < rois[i][1]:
 7                 bx, by, bw, bh = rois[i]
 8                 rois[i] = [x, y, w, h]
 9                 rois[j] = [bx, by, bw, bh]
10     return rois
11
12 # 假设以第一个框作为合格品的模板
13 def get_template(binary, boxes):
14     x, y, w, h = boxes[0]
15     roi = binary[y:y+h, x:x+w]
16     return roi
17
18 # 对轮廓进行提取
19 contours, hierarchy = cv2.findContours(binary, cv2.RETR_LIST, cv2.CHAIN_APPROX_SIMPLE)
20 height, width = src.shape[:2]
21 rects = []
22 for c in range(len(contours)):
23     x, y, w, h = cv2.boundingRect(contours[c])
24     area = cv2.contourArea(contours[c])
25     if h > (height//2):
26         continue
27     if area < 150:
28         continue
29     rects.append([x, y, w, h])
30
31 # 排序轮廓以及使用第一个为模板
32 rects = sort_boxes(rects)
33 template = get_template(binary, rects)
然后我们在进行边缘填充,轮廓外接一个矩形。
 1 # 填充边缘(轮廓的外接矩形)
 2 for c in range(len(contours)):
 3     x, y, w, h = cv2.boundingRect(contours[c])
 4     area = cv2.contourArea(contours[c])
 5     if h > (height//2):
 6         continue
 7     if area < 150:
 8         continue
 9     cv2.drawContours(binary, contours, c, (0), 2, 8)
10 cv2.imwrite("Defect_template.png",template)
得到模板如下图所示

下一步,我们要实现一个图像的相减操作,用模板与四个轮廓进行操作。把白色瑕疵的地方保存下来。
 1 def detect_defect(binary, boxes, tpl):
 2     height, width = tpl.shape
 3     index = 1
 4     defect_rois = []
 5     # 发现缺失
 6     for x, y, w, h in boxes:
 7         roi = binary[y:y + h, x:x + w]
 8         roi = cv2.resize(roi, (width, height))
 9         mask = cv2.subtract(tpl, roi)
10         se = cv2.getStructuringElement(cv2.MORPH_RECT, (5, 5), (-1, -1))
11         mask = cv2.morphologyEx(mask, cv2.MORPH_OPEN, se)
12         ret, mask = cv2.threshold(mask, 0, 255, cv2.THRESH_BINARY)
13         count = 0
14         for row in range(height):
15             for col in range(width):
16                 pv = mask[row, col]
17                 if pv == 255:
18                     count += 1
19         # 白色区域为瑕疵的区域,如果发现存在瑕疵,则保存下来
20         if count > 0:
21             defect_rois.append([x, y, w, h])
22         cv2.imwrite("mask%d.png"%index, mask)
23         index += 1
24     return defect_rois
25
26 # 检测缺陷
27 defect_boxes = detect_defect(binary, rects, template)
28 for dx, dy, dw, dh in defect_boxes:
29     cv2.rectangle(src, (dx, dy), (dx + dw, dy + dh), (0, 0, 255), 1, 8, 0)
30     cv2.putText(src, "bad", (dx, dy), cv2.FONT_HERSHEY_PLAIN, 1.0, (0, 255, 0), 2)
31
32 # 对图像中检测的元件标号
33 index = 1
34 for dx, dy, dw, dh in rects:
35     cv2.putText(src, "num:%d"%index, (dx-40, dy+15), cv2.FONT_HERSHEY_PLAIN, 1.0, (255, 0, 0), 1)
36     index += 1
37
38 cv2.imwrite("zujian_output.png", src)


与后三个工件轮廓对比后,发现 第二个和第三个有缺陷。对有缺陷的工件进行一个标注。
最终结果:

至此,opencv实现工件简单检测的功能已经完成。