一 Hibernate简介
Hibernate是一种Java语言下的对象关系映射(ORM)解决方案。为面向对象的领域模型到传统的关系型数据库的映射提供了一个使用方便的框架。
二 Hibernate设计目标
1.将软件开发人员从大量相同的数据持久层相关编程工作中解放出来。无论是从设计草案还是从一个遗留数据库开始,开发人员都可以采用Hibernate。
2.Hibernate不仅负责从Java类到数据库表的映射,还提供了面向对象的数据查询检索机制HQL,从而极大地缩短了手动处理SQL和JDBC上的开发时间。
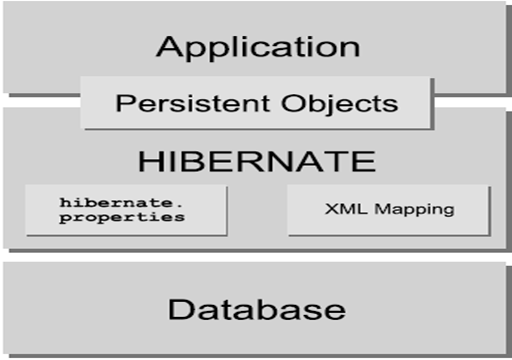
三 Hibernate的体系结构
Hibernate使用数据库和配置信息来为应用程序提供持久化服务。
四 Hibernate操作实例
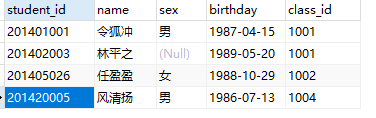
1.数据库的表的创建
用Navicat直接在数据库中创建表即可。同时设置主键和外键。


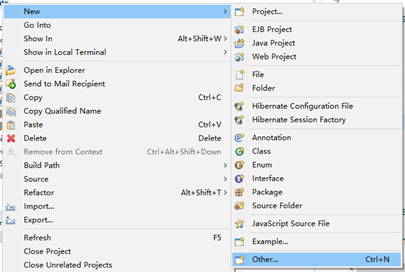
2.在Myeclipse中导入jar包/给项目添加Hibernate
网上有很多种操作方法,有很多坑,其实是可以直接导入Hibernate的相关jar包后,再给相应的项目添加Hibernate即可,但一定要注意Myeclipse可能自动生成一个Hibernate的jar包,这个时候把系统自动添加的删掉,用自己的jar包就可以了。(如何给项目添加Hibernate,直接鼠标移到项目上,然后右键就会出现这个了,只有添加了之后才能减配置文件!)

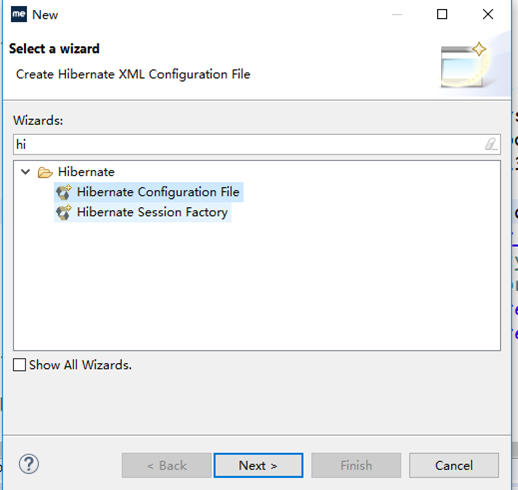
建好后,如果建后面映射文件的时候,只有两个hibernate文件选项也没关系,直接建xml文件,把后缀改对就是一样的。
3.建立配置文件hibernate.cfg.xml
建立好配置文件后就可以码代码了。下面是我的参考代码。


 1 <?xml version='1.0' encoding='utf-8'?>
 2 <!DOCTYPE hibernate-configuration PUBLIC
 3        "-//Hibernate/Hibernate Configuration DTD 3.0//EN"
 4 "http://www.hibernate.org/dtd/hibernate-configuration-3.0.dtd">
 5
 6 <hibernate-configuration>
 7
 8     <session-factory>
 9         <!-- Database connection settings -->
10         <property name="connection.driver_class">com.mysql.jdbc.Driver</property>
11         <property name="connection.url">jdbc:mysql://localhost:3306/student?characterEncoding=UTF-8</property>
12         <property name="connection.username">root</property>
13         <property name="connection.password">123456</property>
14         <!-- SQL dialect -->
15         <property name="dialect">org.hibernate.dialect.MySQLDialect</property>
16         <property name="current_session_context_class">thread</property>
17         <property name="show_sql">true</property>
18         <property name="hbm2ddl.auto">update</property>
19         <mapping resource="com/example/hibernate/Student.hbm.xml"/>
20         <mapping resource="com/example/hibernate/Class.hbm.xml"/>
21     </session-factory>
22
23 </hibernate-configuration>
4.建立两个实体Student和Class
符合JavaBean即可,很简单。
 1 package com.example.hibernate;
 2
 3 import java.util.Date;
 4
 5 public class Student {
 6     private int student_id;
 7     private String name;
 8     private String sex;
 9     private Date birthday;
10     //定义一个对班级的引用
11     private Class cs;
12
13
14     public Class getCs() {
15         return cs;
16     }
17     public void setCs(Class cs) {
18         this.cs = cs;
19     }
20     public int getStudent_id() {
21         return student_id;
22     }
23     public void setStudent_id(int student_id) {
24         this.student_id = student_id;
25     }
26     public String getName() {
27         return name;
28     }
29     public void setName(String name) {
30         this.name = name;
31     }
32     public String getSex() {
33         return sex;
34     }
35     public void setSex(String sex) {
36         this.sex = sex;
37     }
38     public Date getBirthday() {
39         return birthday;
40     }
41     public void setBirthday(Date date) {
42         this.birthday = date;
43     }
44     public Student() {
45         super();
46     }
47     public Student(String name, String sex, Date birthday) {
48         super();
49         this.name = name;
50         this.sex = sex;
51         this.birthday = birthday;
52     }
53 }
 1 package com.example.hibernate;
 2
 3 import java.util.HashSet;
 4 import java.util.Set;
 5
 6 public class Class {
 7
 8     int class_id;
 9     String name;
10     //定义一个一对多的集合
11     private Set<Student> students = new HashSet<Student>();
12
13     public Set<Student> getStudents() {
14         return students;
15     }
16     public void setStudents(Set<Student> students) {
17         this.students = students;
18     }
19     public int getClass_id() {
20         return class_id;
21     }
22     public void setClass_id(int class_id) {
23         this.class_id = class_id;
24     }
25     public String getName() {
26         return name;
27     }
28     public void setName(String name) {
29         this.name = name;
30     }
31     public Class(String name) {
32         super();
33         this.name = name;
34     }
35     public Class() {
36         super();
37     }
38
39
40 }
5.编写映射文件
具体细节见代码
这里的inverse用法和cascade使用是级联操作的关键。
 1 <?xml version='1.0' encoding='utf-8'?>
 2 <!DOCTYPE hibernate-mapping PUBLIC
 3     "-//Hibernate/Hibernate Mapping DTD 3.0//EN"
 4     "http://www.hibernate.org/dtd/hibernate-mapping-3.0.dtd">
 5
 6 <hibernate-mapping>
 7     <class name="com.example.hibernate.Student" table="student_table">
 8         <id name="student_id" column="student_id">
 9             <generator class="increment"/>
10         </id>
11         <property name="name"/>
12         <property name="sex"/>
13         <property name="birthday"/>
14         <!-- 配置多对一的关联关系 -->
15         <many-to-one name="cs" class="com.example.hibernate.Class" column="class_id" cascade="all"></many-to-one>
16     </class>
17
18 </hibernate-mapping>
 1 <?xml version='1.0' encoding='utf-8'?>
 2 <!DOCTYPE hibernate-mapping PUBLIC
 3     "-//Hibernate/Hibernate Mapping DTD 3.0//EN"
 4     "http://www.hibernate.org/dtd/hibernate-mapping-3.0.dtd">
 5
 6 <hibernate-mapping>
 7     <class name="com.example.hibernate.Class" table="class_table">
 8         <id name="class_id" column="class_id">
 9             <generator class="increment"/>
10         </id>
11         <property name="name"/>
12         <!-- 配置单向的一对多关联关系,设置inverse属性为true,由多方维护关联 关系,当进行操作时级联操作所关联的对象-->
13         <set name="students" table="student_table" inverse="true" cascade="all">
14             <!-- 指定关联的外键列 -->
15              <key column="class_id"></key>
16              <one-to-many class="com.example.hibernate.Student"/>
17         </set>
18     </class>
19 </hibernate-mapping>
6.测试
 1 package com.example.hibernate;
 2
 3 import java.text.ParseException;
 4 import java.text.SimpleDateFormat;
 5 import java.util.Date;
 6
 7 import org.hibernate.Session;
 8 import org.hibernate.SessionFactory;
 9 import org.hibernate.cfg.Configuration;
10
11 public class Test2 {
12     public static void main(String[] args) throws ParseException{
13         //save();
14         delete();
15     }
16
17     public static void save() throws ParseException{
18         //创建配置对象
19         Configuration config = new Configuration().configure();
20         //创建会话工厂
21         SessionFactory sf = config.buildSessionFactory();
22         //创建会话对象
23         Session s = sf.openSession();
24         //开启事务
25         s.beginTransaction();
26
27         Class cs=new Class("网络1班");
28         SimpleDateFormat simpleDateFormat = new SimpleDateFormat("yyy-MM-dd");
29         Date dt = simpleDateFormat.parse("1987-04-15");
30         Student st=new Student("胡军开","男",dt);
31         Student st2=new Student("爱美丽","女",dt);
32
33         //设置关联关系
34         cs.getStudents().add(st);
35         cs.getStudents().add(st2);
36         st.setCs(cs);
37         st2.setCs(cs);
38
39         s.save(cs);    //级联操作
40         //s.save(st);
41         //s.save(st2);
42         //提交事务
43         s.getTransaction().commit();
44         //关闭会话
45         s.close();
46         //关闭会话工厂
47         sf.close();
48     }
49
50     public static void delete(){
51         //创建配置对象
52         Configuration config = new Configuration().configure();
53         //创建会话工厂
54         SessionFactory sf = config.buildSessionFactory();
55         //创建会话对象
56         Session s = sf.openSession();
57         //开启事务
58         s.beginTransaction();
59
60         Class cs=(Class) s.get(Class.class, 1005);
61         s.delete(cs);
62         //提交事务
63         s.getTransaction().commit();
64         //关闭会话
65         s.close();
66         //关闭会话工厂
67         sf.close();
68     }
69 }
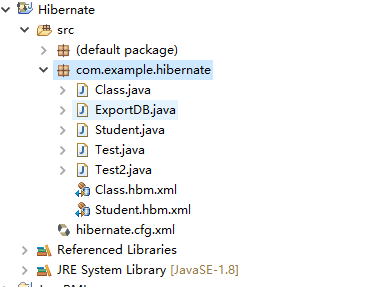
7.具体工程的目录
8.知识点补充
在配置映射文件时,对于主键的generator标签,对应的class由很多种类。
increment:由框架自动递增生成标识符,用于long,short或者int类型生成唯一标识,如果运行了,看控制台会发现,是找到最大的标识符后再加1。
identity:由数据库生成标识符。
sequence:hibernate根据底层数据库序列生成标识符。
hilo:使用一个高/低位算法来高效生成long,short或者int类型的标识符。
assigned:让应用程序在save()之前为对象分配一个标识符(手动的)。
native:根据底层数据库的能力选择identity,sequence或者hilo中的一个。