先分享一个springBoot搭建学习项目,和springboot多数据源项目的传送门:https://github.com/1057234721/springBoot
1. SpringBoot快速入门
该项目分为几个模块:
1,集成了mybatis。
2,事务支持。
3,全局异常处理。
4,静态资源访问。
静态资源:js, css, html, 图片,音视频等
静态资源路径:是指系统可以直接访问的路径,且路径下的所有文件均可被用户直接读取。
Spring Boot默认提供静态资源目录位置需置于classpath下,目录名需符合如下规则:
/static
/public
/resources
/META-INF/resources
在resources目录下面建立static文件夹,在文件夹里面任意放张图片。
命名为:enjoy.jpg

在地址栏上输入localhost:8080/enjoy.jpg,可以看到图片
5,jsp集成
一般来说springboot不建议直接使用jsp页面,但不排除有些公司的项目依然使用jsp做前端界面。
springboot内置的tomcat并没有集成对jsp的支持,也没有对EL表达式的支持,因此要使用jsp应该先把相关的依赖集成进来
在pom文件里面新增
<!--JavaServer Pages Standard Tag Library,JSP标准标签库-->
<dependency>
<groupId>javax.servlet</groupId>
<artifactId>jstl</artifactId>
</dependency>
<!--内置tocat对Jsp支持的依赖,用于编译Jsp-->
<dependency>
<groupId>org.apache.tomcat.embed</groupId>
<artifactId>tomcat-embed-jasper</artifactId>
</dependency>
由于要springmvc解析jsp,要配置试图解析器,在applicaiton.properties 里面新增
spring.mvc.view.prefix=/WEB-INF/jsp/
spring.mvc.view.suffix=.jsp
在resources里面新建WEB-INF文件夹,在里面放一个index.jsp页面
最后新建一个controller,注意这里的注解是@Controller,千万不能用@RestController
在浏览器上输入:localhost:8080/jsp/hi,可以看到JSP页面。
6, 模板引擎
SpringBoot 推荐使用模板引擎来渲染html,如果你不是历史遗留项目,一定不要使用JSP,常用的模板引擎很多,有freemark,thymeleaf等,其实都大同小异
其中springboot 强烈推荐的是用thymeleaf
pom文件种添加thymeleaf的支持,并且删除JSP的支持
<dependency>
<groupId>org.springframework.boot</groupId>
<artifactId>spring-boot-starter-thymeleaf</artifactId>
</dependency>
<!--<!–JavaServer Pages Standard Tag Library,JSP标准标签库–>-->
<!--<dependency>-->
<!--<groupId>javax.servlet</groupId>-->
<!--<artifactId>jstl</artifactId>-->
<!--</dependency>-->
<!--<!–内置tocat对Jsp支持的依赖,用于编译Jsp–>-->
<!--<dependency>-->
<!--<groupId>org.apache.tomcat.embed</groupId>-->
<!--<artifactId>tomcat-embed-jasper</artifactId>-->
<!--</dependency>-->
删除application.properties文件里面视图解析器内容
#spring.mvc.view.prefix=/WEB-INF/jsp/
#spring.mvc.view.suffix=.jsp
Springboot默认的模板配置路径为:src/main/resources/templates
在resources目录里面新建一个templates目录,在目录里面新建testThymeleaf.html文件
在浏览器上输入:localhost:8080/tpl/testThymeleaf,可以看到页面。
7,集成swagger2构建api文档
Swagger2 的作用
l随项目自动生成强大RESTful API文档,减少工作量
lAPI文档与代码整合在一起,便于同步更新API说明
页面测试功能来调试每个RESTful API
访问:http://localhost:8080/swagger-ui.html
8,集成日志
java有许多的日志组件,比如 log4j,log4j2,logback还有java自生提供的Java Util Logging,其实在springboot中对这些组件都提供了支持,log4j,log4j2和logback都提供相应的组件支持。
Logback
在springboot中默认使用的日志工具是logback,不过在提及具体的日志工具之前要提一个名词,这个名词就是slf4j(Simple Logging Facade For Java)
百度百科解释https://baike.baidu.com/item/slf4j/6408868
slf4j不是具体的日志解决方案,它有点类似于jdbc,使用了门面模式,是一个针对各类日志的抽象实现,既然是抽象的日志实现,在springboot中肯定不需要额外导入。
注意:spring-boot-starter中就提供了对spring-boot-starter-logging的依赖
在spring-boot-starter-logging中可以看到以及集成了slf4j与具体实现logback的默认支持
日志级别:
修改controller 把日志的输出改成logger.debug("这个一个hello日志");这个时候重启,再调用,发现后台并不会有任何输出,这原因是日志级别在作祟
默认情况下,Spring Boot 配置的是INFO 日志级别,也就是会输出INFO级别以上的日志(ERROR, WARN, INFO)。如果需要 Debug 级别的日志。
在 src/main/resources/application.properties 中配置。debug=true 此外,配置 logging.level.* 来具体输出哪些包的日志级别。
例如
logging.level.root=INFO
logging.level.org.springframework.web=DEBUG
logging.level.cn.enjoy.controller=DEBUG
日志文件
一般情况下,springboot日志只会输出到控制台,并不会写入到日志文件,但是,在一些正式环境的应用中,我们需要通过在 application.properites 文件中配置 logging.file 文件名称和 logging.path 文件路径,将日志输出到日志文件中。
logging.path = /var/tmp
logging.file = xxx.log
logging.level.root = info
注意:
如果只配置 logging.path,在 /var/tmp文件夹生成一个日志文件为 spring.log。如果只配置 logging.file,会在项目的当前路径下生成一个 xxx.log 日志文件
log4j2
在spring-boot-dependencies POMs中搜索spring-boot-starter-log4j2
发现Spring boot父Pom中自己提供了这个依赖,于是我们加入如下jar依赖:
修改pom.xml文件
<dependency>
<groupId>org.springframework.boot</groupId>
<artifactId>spring-boot-starter-web</artifactId>
<exclusions>
<exclusion>
<groupId>org.springframework.boot</groupId>
<artifactId>spring-boot-starter-logging</artifactId>
</exclusion>
</exclusions>
</dependency>
<dependency>
<groupId>org.springframework.boot</groupId>
<artifactId>spring-boot-starter-log4j2</artifactId>
</dependency>
注意: 由于默认使用logback在扩展log4j2之前先要把logback移除
日志使用跟上面logback一样。
使用AOP统一日志处理
为了防止在工作中经常在代码中加入大量的日志处理代码,在实际项目开发中,一般使用AOP统一完成日志处理工作。
9,springBoot热加载部署
热部署不会用在生产环境,但对于程序员开发的效率,还是有一定帮助的,所谓的热部署,就是在应用程序在不停止的情况下,实现新的部署
spring-boot-devtools 是一个为开发者服务的一个模块,其中最重要的功能就是自动应用代码更改到最新的App上面去。原理是在发现代码有更改之后,重新启动应用,但是速度比手动停止后再启动还要更快,更快指的不是节省出来的手工操作的时间。
其深层原理是使用了两个ClassLoader,一个Classloader加载那些不会改变的类(第三方Jar包),另一个ClassLoader加载会更改的类,称为 restart ClassLoader
,这样在有代码更改的时候,原来的restart ClassLoader 被丢弃,重新创建一个restart ClassLoader,由于需要加载的类相比较少,所以实现了较快的重启时间
修改pom文件,增加
<dependency>
<groupId>org.springframework.boot</groupId>
<artifactId>spring-boot-devtools</artifactId>
</dependency>
修改properties文件
如果使用的 Thymeleaf 模板,那么请直接在application.properties中添加
spring.thymeleaf.cache=false
如果使用的 FreeMarker 模板,那么请直接在application.properties中添加
spring.freemarker.cache=false
idea中使用
如果你是使用eclipse,请忽略,但如果你是使用IDEA,由于idea 没有保存修改的,也就是说在idea中并不会因为你ctrl+s 就重新编译代码。
那么就需要额外的配置
在pom文件中,增加编译插件,让代码有变动的时候也编译
<build>
<plugins>
<plugin>
<groupId>org.springframework.boot</groupId>
<artifactId>spring-boot-maven-plugin</artifactId>
<configuration>
<!-- 如果不设置fork,那么不会restart,devtools热部署不会起作用-->
<fork>true</fork>
</configuration>
</plugin>
</plugins>
</build>
1、手动:修改完代码,按快捷键Ctrl+F9,手动构建项目,或者只修改单个类文件的话,按Ctrl+Shift+F9,重新编译该类文件,即可触发重启服务。
2、自动
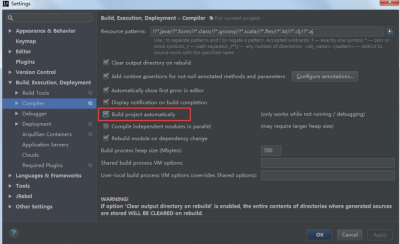
1)File -> Settings -> Compiler,勾选 Build Project automatically
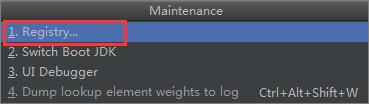
2)按快捷键Ctrl+Shift+Alt+/,选择1.Registry...
3)勾选 compiler.automake.allow.when.app.running 即可
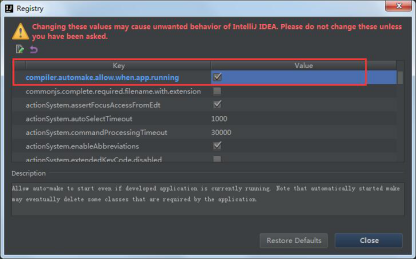
这个时候修改JAVA文件或者模板文件都自动会生效
10,编译,打包
快速入门进行到这里,其实已经差不多了,能应对绝大多数开发常见,接下来就是导包部署。
在pom文件中新增
<build>
<plugins>
<plugin>
<groupId>org.apache.maven.plugins</groupId>
<artifactId>maven-compiler-plugin</artifactId>
<configuration>
<source>1.8</source>
<target>1.8</target>
</configuration>
</plugin>
<plugin>
<groupId>org.springframework.boot</groupId>
<artifactId>spring-boot-maven-plugin</artifactId>
<configuration>
<!-- 如果不设置fork,那么不会restart,devtools热部署不会起作用-->
<fork>true</fork>
</configuration>
<executions>
<execution>
<goals>
<goal>repackage</goal>
</goals>
</execution>
</executions>
</plugin>
</plugins>
</build>
使用mvn clean package 打包
java –jar 运行
11, war部署
如果并不希望使用内置的tomcat,希望部署到其他tomcat服务器,那么就需要使用war包部署了。
修改pom文件,打包方式改成war
修改在pom文件,剔除内置tomcat的支持,否则会和外面的tomcat冲突
<dependency>
<groupId>org.springframework.boot</groupId>
<artifactId>spring-boot-starter-tomcat</artifactId>
<!--打包的时候可以不用包进去,别的设施会提供。事实上该依赖理论上可以参与编译,测试,运行等周期。
相当于compile,但是打包阶段做了exclude操作-->
<scope>provided</scope>
</dependency>
修改启动类,使其继承
@SpringBootApplication
@MapperScan("cn.enjoy.dao")
public class App extends SpringBootServletInitializer {
public static void main(String[] args) throws Exception {
SpringApplication.run(App.class, args);
}
@Override
protected SpringApplicationBuilder configure(SpringApplicationBuilder builder) {
return builder.sources(App.class);
}
}
使用mvn clean package 打包
把war包拷贝到tomcat webapps中
12,集成redis
13,集成RabbitMq
14,Actuator监控管理
Actuator是spring boot的一个附加功能,可帮助你在应用程序生产环境时监视和管理应用程序。可以使用HTTP的各种请求来监管,审计,收集应用的运行情况.特别对于微服务管理十分有意义
缺点:没有可视化界面(Spring cloud 还会用到这功能,就可以看到界面了)
修改pom文件,添加依赖
<dependency>
<groupId>org.springframework.boot</groupId>
<artifactId>spring-boot-starter-actuator</artifactId>
</dependency>
修改application.properties文件,启动监控端点
# 加载所有的端点/默认只加载了 info / health
management.endpoints.web.exposure.include=*
# 描述信息
info.blog-url=http://xiangxueketang.cn
info.author=enjoy
info.version=@project.version@
重新启动,在地址栏输入
http://localhost:8080/actuator/info
Actuator访问路径
通过actuator/+端点名就可以获取相应的信息。
|
路径 |
作用 |
|
/actuator/beans |
显示应用程序中所有Spring bean的完整列表。 |
|
/actuator/configprops |
显示所有配置信息。 |
|
/actuator/env |
陈列所有的环境变量。 |
|
/actuator/mappings |
显示所有@RequestMapping的url整理列表。 |
|
/actuator/health |
显示应用程序运行状况信息 up表示成功 down失败 |
|
/actuator/info |
查看自定义应用信息 |
15,多数据源与jta+atomikos分布式事务
2. SpringBoot启动流程分析
创建SpringApplication
public static ConfigurableApplicationContext run(Class<?>[] primarySources,
String[] args) {
return new SpringApplication(primarySources).run(args);
}
其实SpringBoot启动就着两个步骤,先创建ConfigurableApplicationContext ,然后再调用Run方法。
public SpringApplication(ResourceLoader resourceLoader, Class<?>... primarySources) {
this.resourceLoader = resourceLoader;
Assert.notNull(primarySources, "PrimarySources must not be null");
//保存主类
this.primarySources = new LinkedHashSet<>(Arrays.asList(primarySources));
//判断当前是什么类型项目
this.webApplicationType = WebApplicationType.deduceFromClasspath();
//从类路径下找到META-INF/spring.factories配置的所有ApplicationContextInitializer
setInitializers((Collection) getSpringFactoriesInstances(
ApplicationContextInitializer.class));
//从类路径下找到META-INF/spring.factories配置的所有ApplicationListener
setListeners((Collection) getSpringFactoriesInstances(ApplicationListener.class));
this.mainApplicationClass = deduceMainApplicationClass();
}
可见着一步非常简单,只是把一些相关的类都加载了而已,并没执行。
Run方法
真的重要是run方法
public ConfigurableApplicationContext run(String... args) {
StopWatch stopWatch = new StopWatch();
stopWatch.start();
ConfigurableApplicationContext context = null;
Collection<SpringBootExceptionReporter> exceptionReporters = new ArrayList<>();
configureHeadlessProperty();
//从类路径下META‐INF/spring.factories,取得SpringApplicationRunListeners;
SpringApplicationRunListeners listeners = getRunListeners(args);
//回调所有的获取SpringApplicationRunListener.starting()方法
listeners.starting();
try {
//封装命令行参数
ApplicationArguments applicationArguments = new DefaultApplicationArguments(
args);
//准备环境
ConfigurableEnvironment environment = prepareEnvironment(listeners,
applicationArguments);
configureIgnoreBeanInfo(environment);
//创回调SpringApplicationRunListener.environmentPrepared();
//表示环境准备完成
//打印Banner
Banner printedBanner = printBanner(environment);
//根据环境创建context
context = createApplicationContext();
//错误的异常报表
exceptionReporters = getSpringFactoriesInstances(
SpringBootExceptionReporter.class,
new Class[] { ConfigurableApplicationContext.class }, context);
//准备上下文环境;
//将environment保存到ioc中;
//applyInitializers()调用所有的ApplicationContextInitializer的initialize方法
//调用所有的SpringApplicationRunListener的contextPrepared();
prepareContext(context, environment, listeners, applicationArguments,
printedBanner);
//SpringApplicationRunListener的contextLoaded
//刷新容器
//扫描,创建,加载所有组件;
refreshContext(context);
afterRefresh(context, applicationArguments);
stopWatch.stop();
if (this.logStartupInfo) {
new StartupInfoLogger(this.mainApplicationClass)
.logStarted(getApplicationLog(), stopWatch);
}
//所有的SpringApplicationRunListener回调started方法
listeners.started(context);
//获取所有的ApplicationRunner和CommandLineRunner进行调用
callRunners(context, applicationArguments);
}
catch (Throwable ex) {
handleRunFailure(context, ex, exceptionReporters, listeners);
throw new IllegalStateException(ex);
}
try {
//所有的SpringApplicationRunListener的running();
listeners.running(context);
}
catch (Throwable ex) {
handleRunFailure(context, ex, exceptionReporters, null);
throw new IllegalStateException(ex);
}
return context;
}