1、镜像下载
为了防止安装过程中由于镜像下载缓慢导致自动部署失败,所以首先提前下载好EFK镜像。
docker pull openshift/origin-logging-fluentd
docker pull openshift/origin-logging-elasticsearch
docker pull openshift/origin-logging-kibana
docker pull openshift/origin-logging-auth-proxy
2、创建持久化PV
由于日志需要保存方便查询历史数据,故创建PV保存Elasticsearch的数据。
[root@master1 pv]# cat logging.json
apiVersion: v1
kind: PersistentVolume
metadata:
  name: logging
spec:
  capacity:
    storage: 101Gi
  accessModes:
  - ReadWriteOnce
  nfs:
    path: /export/pv/logging
    server: 192.168.10.110
  persistentVolumeReclaimPolicy: Retain
3、修改ansible hosts
基于上节的hosts,添加的内容为红色字体部分。
[root@master1 ~]# cat /etc/ansible/hosts
# Create an OSEv3 group that contains the masters, nodes, and etcd groups
[OSEv3:children]
masters
nodes
etcd
new_nodes
#lb
# Set variables common for all OSEv3 hosts
[OSEv3:vars]
# SSH user, this user should allow ssh based auth without requiring a password
ansible_ssh_user=root
ansible_become=yes
debug_level=2
openshift_deployment_type=origin
# If ansible_ssh_user is not root, ansible_become must be set to true
#ansible_become=true
openshift_repos_enable_testing=true
openshift_enable_service_catalog=false
template_service_broker_install=false
# uncomment the following to enable htpasswd authentication; defaults to DenyAllPasswordIdentityProvider
openshift_master_identity_providers=[{'name': 'htpasswd_auth', 'login': 'true', 'challenge': 'true', 'kind': 'HTPasswdPasswordIdentityProvider', 'filename': '/etc/origin/master/htpasswd'}]
openshift_disable_check=disk_availability,docker_storage,memory_availability,docker_image_availability,package_version
# config for metrics
openshift_release=3.6.1
openshift_metrics_install_metrics=true
openshift_metrics_image_prefix=openshift/origin-
openshift_metrics_image_version=v3.6.1
openshift_metrics_cassandra_pvc_size=21Gi

# config for logging
openshift_logging_install_logging=true
#openshift_logging_image_prefix=openshift/origin-
#openshift_logging_image_version=v3.6.1
openshift_logging_master_url=https://master1.xxx.net:8443
openshift_logging_master_public_url=https://master1.xxx.net:8443
#openshift_logging_storage_volume_size=101Gi
openshift_logging_kibana_hostname=kibana.xxx.net
openshift_logging_es_allow_external=True
openshift_logging_es_hostname=elasticsearch.xxx.net
openshift_logging_es_pvc_dynamic=true
openshift_logging_es_pvc_size=101Gi
openshift_logging_es_cluster_size=1
openshift_logging_curator_default_days=30
openshift_logging_use_journal=true
openshift_logging_journal_read_from_head=false
openshift_logging_es_cluster_size=1
openshift_logging_es_nodeselector={"region":"infra"}
openshift_logging_kibana_nodeselector={"region":"infra"}


# config by metrics
openshift_clock_enabled=true
#openshift_master_cluster_method=native
#openshift_master_cluster_hostname=openshift.xxx.net
#openshift_master_cluster_public_hostname=openshift.xxx.net
#openshift_node_kubelet_args={'pods-per-core': ['10'], 'max-pods': ['250'], 'image-gc-high-threshold': ['90'], 'image-gc-low-threshold': ['80']}
# host group for masters
[masters]
master1.xxx.net
#master2.xxx.net

# host group for lb
#[lb]
#etcd1.xxx.net

# host group for etcd
[etcd]
etcd1.xxx.net
etcd2.xxx.net
etcd3.xxx.net
# host group for nodes, includes region info
[nodes]
master1.xxx.net
#master2.xxx.net
node1.xxx.net openshift_node_labels="{'region': 'infra', 'zone': 'default'}"
node2.xxx.net openshift_node_labels="{'region': 'infra', 'zone': 'default'}"
node3.xxx.net openshift_node_labels="{'region': 'infra', 'zone': 'default'}"
node4.xxx.net
node5.xxx.net
node6.xxx.net openshift_node_labels="{'region': 'subnet8', 'zone': 'default'}"
node7.xxx.net openshift_node_labels="{'region': 'subnet8', 'zone': 'default'}"
node8.xxx.net openshift_node_labels="{'region': 'subnet7', 'zone': 'default'}"
node9.xxx.net openshift_node_labels="{'region': 'subnet7', 'zone': 'default'}"
#
[new_nodes]
4、执行安装
ansible-playbook -i /etc/ansible/hosts openshift-ansible-openshift-ansible-3.6.173.0.104-1/playbooks/byo/openshift-cluster/openshift-logging.yml
5、成功界面

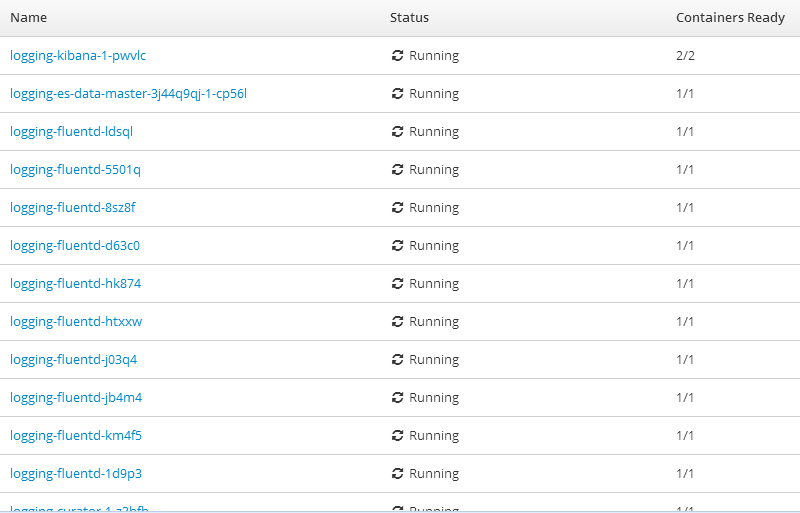
6、Web控制台验证
fluentd主要用于数据采集,会在每个node上创建一个容器,服务会部署在logging下。
7、查看storage

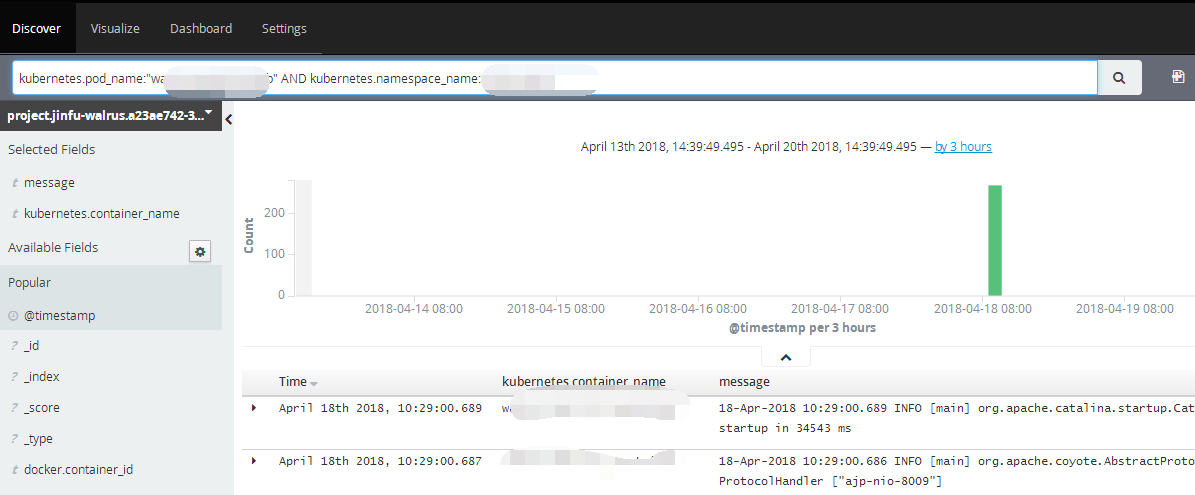
8、查看日志