1、创建持久化metric pv卷
[root@master1 pv]# cat metrics.json
apiVersion: v1
kind: PersistentVolume
metadata:
  name: metrics
spec:
  capacity:
    storage: 21Gi
  accessModes:
  - ReadWriteOnce
  nfs:
    path: /export/pv/metrics
    server: 192.168.10.110
  persistentVolumeReclaimPolicy: Recycle
PS:不做持久化存储无需创建PV
2、更改ansible hosts
ansible文件与之前的教程同步。只是累加了metrics的一些参数。
[root@master1 ~]# cat /etc/ansible/hosts
# Create an OSEv3 group that contains the masters, nodes, and etcd groups
[OSEv3:children]
masters
nodes
etcd
new_nodes
#lb
# Set variables common for all OSEv3 hosts
[OSEv3:vars]
# SSH user, this user should allow ssh based auth without requiring a password
ansible_ssh_user=root
ansible_become=yes
debug_level=2
openshift_deployment_type=origin
# If ansible_ssh_user is not root, ansible_become must be set to true
#ansible_become=true
openshift_repos_enable_testing=true
openshift_enable_service_catalog=false
template_service_broker_install=false
# uncomment the following to enable htpasswd authentication; defaults to DenyAllPasswordIdentityProvider
openshift_master_identity_providers=[{'name': 'htpasswd_auth', 'login': 'true', 'challenge': 'true', 'kind': 'HTPasswdPasswordIdentityProvider', 'filename': '/etc/origin/master/htpasswd'}]
openshift_disable_check=disk_availability,docker_storage,memory_availability,docker_image_availability,package_version
# config for metrics
openshift_release=3.6.1
# config by metrics
openshift_metrics_install_metrics=true
openshift_metrics_image_prefix=openshift/origin-
openshift_metrics_image_version=v3.6.1
openshift_metrics_cassandra_pvc_size=21Gi

openshift_clock_enabled=true
#openshift_master_cluster_method=native
#openshift_master_cluster_hostname=openshift.xxx.net
#openshift_master_cluster_public_hostname=openshift.xxx.net
#openshift_node_kubelet_args={'pods-per-core': ['10'], 'max-pods': ['250'], 'image-gc-high-threshold': ['90'], 'image-gc-low-threshold': ['80']}
# host group for masters
[masters]
master1.xxx.net
#master2.xxx.net

# host group for lb
#[lb]
#etcd1.xxx.net

# host group for etcd
[etcd]
etcd1.xxx.net
etcd2.xxx.net
etcd3.xxx.net
# host group for nodes, includes region info
[nodes]
master1.xxx.net
#master2.xxx.net
node1.xxx.net openshift_node_labels="{'region': 'infra', 'zone': 'default'}"
node2.xxx.net openshift_node_labels="{'region': 'infra', 'zone': 'default'}"
node3.xxx.net openshift_node_labels="{'region': 'infra', 'zone': 'default'}"
node4.xxx.net
node5.xxx.net
node6.xxx.net openshift_node_labels="{'region': 'subnet8', 'zone': 'default'}"
node7.xxx.net openshift_node_labels="{'region': 'subnet8', 'zone': 'default'}"
node8.xxx.net openshift_node_labels="{'region': 'subnet7', 'zone': 'default'}"
node9.xxx.net openshift_node_labels="{'region': 'subnet7', 'zone': 'default'}"
#
[new_nodes]
3、执行安装
如果上述未指定pv,也就是不做持久化存储,设置openshift_metrics_cassandra_storage_type=emptydir
ansible-playbook -i /etc/ansible/hosts openshift-ansible-openshift-ansible-3.6.173.0.104-1/playbooks/byo/openshift-cluster/openshift-metrics.yml
-e openshift_metrics_install_metrics=True
-e openshift_metrics_hawkular_hostname=metrics.xxx.net
-e openshift_metrics_cassandra_storage_type=pv
4、安装成功界面如下

查看pods
[root@master1 ~]# oc get pods -n openshift-infra
NAME                         READY     STATUS    RESTARTS   AGE
hawkular-cassandra-1-jstd5   1/1       Running   0          6d
hawkular-metrics-gk4z1       1/1       Running   1          6d
heapster-glk31               1/1       Running   0          6d
5、查看web console
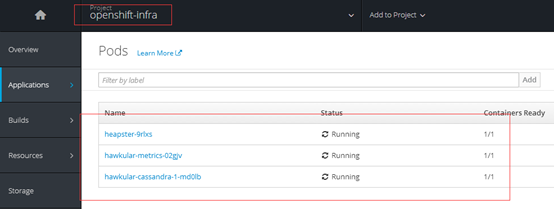
PS:首次安装较慢
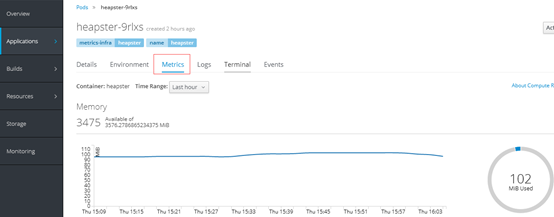
6、查看监控