前言
该文章只是记录了一些自己的见解,可能并不准确,只是为了学习时的一些记录,不喜勿喷,谢谢
rebase命令可以用于分支的合并,可能有些朋友会觉得,分支合并不是可以使用merge命令吗,那么rebase命令和merge命令的区别是什么呢?
rebase命令在效果上和 merge 命令效果类似,但是原理决然不同,下面我们分别来看看
1. merge和rebase比较
1.1 merge命令效果图
使用merge命令后,效果图如下:

可以看到,使用merge命令后,会生成一个节点,该节点有两个父id,分别对应两个分支的节点
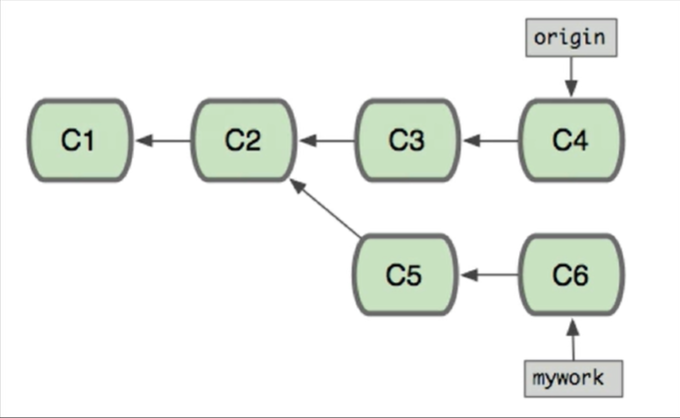
1.2 rebase命令效果图
使用 rebase命令后效果图如下:

最终的效果就是两个分支处于同一个历史线上,只是指向的历史节点不同而已,即消除了节点的分叉,代价就是将历史记录丢失
2. rebase命令的使用
2.1 使用场景
推荐在还未推送到远程版本库时,想对分支进行合并,且消除节点的分叉,但是要注意会丢失以前的历史记录,因为会生成新的节点,如果我们追求完美,即对于历史不是很关注,可以使用该方式,因为该方式会导致历史线最终呈现一条直线。如果想完美保留历史线,则可以使用merge命令。
2.2 模拟场景
下面,我会在本地创建两个分支,在不同分支中修改同一个文件,且在不同分支各自提交,然后使用rebase命令合并,操作如下:
[root@huangzb git5]# ll
total 12
-rw-r--r-- 1 root root 13 Apr 17 21:17 hello1.txt
-rw-r--r-- 1 root root 13 Apr 17 21:17 hello2.txt
-rw-r--r-- 1 root root  5 Apr 17 21:15 init.txt
[root@huangzb git5]#
[root@huangzb git5]# git branch
  dev
* master
  test
[root@huangzb git5]# git checkout dev
Switched to branch 'dev'
[root@huangzb git5]# echo 'hello dev1' > hello1.txt
[root@huangzb git5]#
[root@huangzb git5]# git add .
[root@huangzb git5]# git commit -m 'update dev hello1'
[dev 2b8d24d] update dev hello1
1 file changed, 1 insertion(+)
create mode 100644 hello1.txt
[root@huangzb git5]#
[root@huangzb git5]# echo 'hello dev2' > hello2.txt
[root@huangzb git5]# git add .
[root@huangzb git5]# git commit -m 'update dev2 hello2'
[dev 0acb17c] update dev2 hello2
1 file changed, 1 insertion(+)
create mode 100644 hello2.txt
[root@huangzb git5]#
[root@huangzb git5]# git checkout test
Switched to branch 'test'
[root@huangzb git5]# echo 'hello test1' > hello1.txt
[root@huangzb git5]# git add .
[root@huangzb git5]# git commit -m 'update test1 hello1'
[test c93f562] update test1 hello1
1 file changed, 1 insertion(+)
create mode 100644 hello1.txt
[root@huangzb git5]# echo 'hello test2' > hello2.txt
[root@huangzb git5]# git add .
[root@huangzb git5]# git commit -m 'update test2 hello2'
[test b24eeb3] update test2 hello2
1 file changed, 1 insertion(+)
create mode 100644 hello2.txt
[root@huangzb git5]#
通过上述的操作,形成如下图效果:
2.3 使用步骤
使用前,我们要想好,是哪个分支合并到哪个分支,例如,我们想将dev分支的代码合并到test分支,那么我们就需要先切换到test分支,使用rebase命令
步骤如下:
- 切换到被合并的分支
- 使用
git rebase 将哪个分支合并命令来进行合并操作。
2.3.1 切换到被合并的分支
对于我们的需求:将dev分支的代码合并到test分支中,则被合并的分支是test,那么操作如下:
[root@huangzb git5]# git checkout test
Switched to branch 'test'
[root@huangzb git5]#
2.3.2 使用命令git rebase操作
使用命令 git rebase 待处理的分支 来进行合并,这里可能会遇到冲突,在本例中,我故意的修改同一个文件,必然会产生冲突,我们先来看看执行命令的效果
[root@huangzb git5]# git rebase dev
First, rewinding head to replay your work on top of it...
Applying: update test1 hello1
Using index info to reconstruct a base tree...
Falling back to patching base and 3-way merge...
Auto-merging hello1.txt
CONFLICT (add/add): Merge conflict in hello1.txt
error: Failed to merge in the changes.
Patch failed at 0001 update test1 hello1
The copy of the patch that failed is found in: .git/rebase-apply/patch

Resolve all conflicts manually, mark them as resolved with
"git add/rm <conflicted_files>", then run "git rebase --continue".
You can instead skip this commit: run "git rebase --skip".
To abort and get back to the state before "git rebase", run "git rebase --abort".

[root@huangzb git5]#
从上图中,可以看到使用该命令后,果然出现了冲突,给我们的提示翻一下,如下:
首先,倒带头在上面重放你的作品。。。

应用:更新test1 hello1

使用索引信息重建基树。。。

回到修补基地和3路合并。。。

自动合并hello1.txt

冲突(添加/添加):在hello1.txt中合并冲突

错误:无法合并更改。

修补程序在0001 update test1 hello1失败

在以下位置找到失败的修补程序副本:.git/rebase apply/patch


手动解决所有冲突,将其标记为已解决

“git add/rm<conflicted_files>”,然后运行“git rebase--continue”。

您可以跳过这个提交:运行“git rebase--skip”。

要中止并返回到“git rebase”之前的状态,请运行“git rebase--abort”。
从该段提示中,可以提取出以下重点:
- 从dev和test分支节点看,从最后的源头开始,dev分支有两次提交,这里会一个一个的尝试合并,每一次的合并属于自动合并,如果有冲突,会提示出冲突文件,如果解决了冲突,需要先使用 git add 命令告诉git以解决了冲突,然后使用命令
git rebase--continue告诉git接着刚才的操作继续合并。 - 当然,也可以使用命令
git rebase--skip忽略当前分支的修改,在本例中即直接使用dev分支的代码,以达到解决冲突的目的。 - 当然,如果我们在合并过程中,突然不想合并了,可以使用命令
git rebase--abort来取消合并,回到未合并之前的状态。
下面,我们就来解决冲突,以及继续合并,看看效果。
[root@huangzb git5]# cat hello1.txt
<<<<<<< HEAD
hello dev1
=======
hello test1
>>>>>>> update test1 hello1
[root@huangzb git5]# echo 'hello test1' > hello1.txt
[root@huangzb git5]# git add .
[root@huangzb git5]# git rebase --continue
Applying: update test1 hello1
Applying: update test2 hello2
Using index info to reconstruct a base tree...
Falling back to patching base and 3-way merge...
Auto-merging hello2.txt
CONFLICT (add/add): Merge conflict in hello2.txt
error: Failed to merge in the changes.
Patch failed at 0002 update test2 hello2
The copy of the patch that failed is found in: .git/rebase-apply/patch

Resolve all conflicts manually, mark them as resolved with
"git add/rm <conflicted_files>", then run "git rebase --continue".
You can instead skip this commit: run "git rebase --skip".
To abort and get back to the state before "git rebase", run "git rebase --abort".

[root@huangzb git5]# cat hello2.txt
<<<<<<< HEAD
hello dev2
=======
hello test2
>>>>>>> update test2 hello2
[root@huangzb git5]#
[root@huangzb git5]# git rebase --skip
再上图中,我分别的以两种方式来解决冲突,
- 手动解决
- 使用 --skip 放弃当前分支的修改。
至此,合并完成,我们来看看最终的效果。
[root@huangzb git5]# git log --graph
* commit 9561e7957b3c3f051e1f530beca43cf25d82932a (HEAD -> test)
| Author: lonely <lonely@lonely.com>
| Date:   Fri Apr 17 21:21:05 2020 +0800
|
|     update test1 hello1
|
* commit 0acb17ce12df3d563b4d48f8a23b325fc0046fae (dev)
| Author: lonely <lonely@lonely.com>
| Date:   Fri Apr 17 21:19:56 2020 +0800
|
|     update dev2 hello2
|
* commit 2b8d24d7f9741ac8cc6cc3638ac2ab8e62cceb8f
| Author: lonely <lonely@lonely.com>
| Date:   Fri Apr 17 21:19:31 2020 +0800
|
|     update dev hello1
|
* commit ffa64b26e3b9737164d9a9a64bb2e387abb020b5
  Author: lonely <lonely@lonely.com>
  Date:   Fri Apr 17 21:16:19 2020 +0800

      init
[root@huangzb git5]#
从上图中,可以看出,最终的节点曲线就是一条直线,dev和test分支同属一条历史现。