在学会了加载顶点,矩阵变换之后,是时候开启纹理之旅了!
首先,要知道纹理是如何被贴到3D模型上去的。这里要涉及到一个概念,就是UV坐标。简单地来说,UV坐标是贴图的坐标,可以理解为一个二维坐标系,纵坐标是V,横坐标是U,只不过这个坐标系里的每一个点代表一个像素罢了(这个坐标系的右上角是(1,1),只有第一象限)。此时OpenGL还不知道我们要把每一个像素放在哪,所以我们就要告诉他每个顶点的UV坐标,OpenGL将通过每个顶点的UV坐标推算出每个三角形里的贴图。
接下来,将UV坐标交给OpenGL分为两步:首先C++代码将每个顶点的UV坐标传给顶点着色器,然后经过OpenGL处理,将光栅化后没有颜色的片元交给片元着色器。此时片元着色器通过传进来的经过线性插值的UV数据给每一个片元上色,意味着我们只需要指定每个顶点的UV坐标。(顺便一提,绘制彩色正方形时变换的颜色也是线性插值得到的,线性插值可以理解为知道两点求其间线段上的点)
现在懂了原理,上代码!这次我们给一个正方体赋予一个纹理。
In C++:
创造一个UV数组来存,由于正方形6个面,每个面由两个三角形构成,因此顶点个数为6*2*3=36,所以我们用36个二元组来表示UV坐标(UV坐标和纹理由建模软件生成,不要尝试自己想象一个出来):
static const GLfloat g_uv_buffer_data[] = {
        0.000059f, 0.000004f,
        0.000103f, 0.336048f,
        0.335973f, 0.335903f,
        1.000023f, 0.000013f,
        0.667979f, 0.335851f,
        0.999958f, 0.336064f,
        0.667979f, 0.335851f,
        0.336024f, 0.671877f,
        0.667969f, 0.671889f,
        1.000023f, 0.000013f,
        0.668104f, 0.000013f,
        0.667979f, 0.335851f,
        0.000059f, 0.000004f,
        0.335973f, 0.335903f,
        0.336098f, 0.000071f,
        0.667979f, 0.335851f,
        0.335973f, 0.335903f,
        0.336024f, 0.671877f,
        1.000004f, 0.671847f,
        0.999958f, 0.336064f,
        0.667979f, 0.335851f,
        0.668104f, 0.000013f,
        0.335973f, 0.335903f,
        0.667979f, 0.335851f,
        0.335973f, 0.335903f,
        0.668104f, 0.000013f,
        0.336098f, 0.000071f,
        0.000103f, 0.336048f,
        0.000004f, 0.671870f,
        0.336024f, 0.671877f,
        0.000103f, 0.336048f,
        0.336024f, 0.671877f,
        0.335973f, 0.335903f,
        0.667969f, 0.671889f,
        1.000004f, 0.671847f,
        0.667979f, 0.335851f
    };
呼,可真够长的。接下来像将顶点放进缓冲区一样把它放进去。
GLuint uvbuffer;
    glGenBuffers(1, &uvbuffer);
    glBindBuffer(GL_ARRAY_BUFFER, uvbuffer);
    glBufferData(GL_ARRAY_BUFFER, sizeof(g_uv_buffer_data), g_uv_buffer_data, GL_STATIC_DRAW);
然后,让它传入着色器里location=0的vec2(因为它是个二元组),所以很平常地:
glEnableVertexAttribArray(1);
        glBindBuffer(GL_ARRAY_BUFFER, uvbuffer);
        glVertexAttribPointer(
            1,                                // attribute. No particular reason for 1, but must match the layout in the shader.
            2,                                // size : U+V => 2
            GL_FLOAT,                         // type
            GL_FALSE,                         // normalized?
            0,                                // stride
            (void*)0                          // array buffer offset
        );
激活顶点属性位置1,绑定GL_ARRAY_BUFFER状态,然后指定顶点属性(这个函数的参数在前面已经提到过了),在此不表。
到此为止很简单。接下来加载纹理:
GLuint Texture = loadDDS("uvtemplate.DDS");
DDS是压缩图片,另外这个函数也需要我们自己编写。让我们稍等一会再来编写它,现在只需要知道Texture是一个纹理句柄就可以了。
接下来就要联系着色器了,睁大你的眼睛:
glActiveTexture(GL_TEXTURE0);
这句话用来开启纹理单元0,类似于我们的location(还记得吗?在GLSL学习笔记里),一般OpenGL会要求硬件提供至少32个,它的作用也类似于location,但是是用于传输纹理。
(是不是想到了这句话?
glEnableVertexAttribArray(0);
)
接下来我们把之前获得到的句柄绑定在GL_TEXTURE_2D状态上,由于OpenGL是类似于状态机的设置,所以这句话和之前的各种Bind一样,意思就是只要之后对GL_TEXTURE_2D操作,就是对我们加载的纹理Texture操作。(OpenGL:我记住你了,Texture)
glBindTexture(GL_TEXTURE_2D, Texture);
等会......慢着,我们还不知道怎么把纹理传给着色器呢!
答案很简单,还是使用Uniform,看代码:
GLuint TextureID = glGetUniformLocation(programID, "myTextureSampler");
programID是我们的着色器句柄,后面的字符串是我们将要在着色器里定义的纹理采样器,让我们一会再提它。
但是这个Uniform它有点特殊,是一个采样器,所以必须给它分配一个纹理单元以给它分配数据:
glUniform1i(TextureID, 0);
把它绑定到0的纹理单元,记得吗,纹理单元0已经和我们的Texture绑定了,这样它就和我们的Texture建立了联系,从而获得数据!
C++部分结束了。看GLSL!
In GLSL,Vertex Shader:
首先处理传进来的UV坐标:
layout(location = 1) in vec2 vertexUV;
然后定义输出给片元着色器的变量:
out vec2 UV;
一个转交:
UV = vertexUV;
此处的out虽然只有顶点的UV,可是聪明的线性插值已经帮我们做好了一切(Fragment Shader:嘿!你怎么只有顶点的数据?Vertex Shader:你为什么不问问神奇的线性插值呢?)
Vertex Shader的任务完成了,接下来看Fragment Shader:
In GLSL,Fragment Shader:
刚刚传进来的UV坐标:
in vec2 UV;
输出到片元的颜色:
out vec3 color;
还记得吗?我们在C++里寻找的myTextureSampler这个Uniform?
uniform sampler2D myTextureSampler;
这个sampler2D,代表一个纹理,它从内存中寻找我们在纹理单元0上传的纹理Texture,但是不知道为什么喧宾夺主,不叫Texture2D而叫采样器呢?(懂哥教我!)
最后,在主函数中通过调用texture()来获取这个UV坐标下的颜色并输出为像素颜色。
color = texture( myTextureSampler, UV ).rgb;
好了,着色器部分已经讲完了,我是不是还忘了点啥?
哦对哦,还没说加载图片呢。
加载DDS并不是难事,只要懂得了它的文件结构即可,获取文件头,然后读取信息存到buffer里。
unsigned char header[124];

    FILE *fp;

    /* try to open the file */
    fp = fopen(imagepath, "rb");
    if (fp == NULL){
        printf("%s could not be opened. Are you in the right directory ? Don't forget to read the FAQ !
", imagepath); getchar();
        return 0;
    }

    /* verify the type of file */
    char filecode[4];
    fread(filecode, 1, 4, fp);
    if (strncmp(filecode, "DDS ", 4) != 0) {
        fclose(fp);
        return 0;
    }

    /* get the surface desc */
    fread(&header, 124, 1, fp);

    unsigned int height      = *(unsigned int*)&(header[8 ]);
    unsigned int width         = *(unsigned int*)&(header[12]);
    unsigned int linearSize     = *(unsigned int*)&(header[16]);
    unsigned int mipMapCount = *(unsigned int*)&(header[24]);
    unsigned int fourCC      = *(unsigned int*)&(header[80]);


    unsigned char * buffer;
    unsigned int bufsize;
    /* how big is it going to be including all mipmaps? */
    bufsize = mipMapCount > 1 ? linearSize * 2 : linearSize;
    buffer = (unsigned char*)malloc(bufsize * sizeof(unsigned char));
    fread(buffer, 1, bufsize, fp);
    /* close the file pointer */
    fclose(fp);
}
此时,buffer已经存储了DDS的图片信息。
那么如何把它变成一个纹理呢?
说到纹理,就不得不提一个东西:Mipmap。这个东西是什么呢?这里就要拿出一张来自wiki的经典的图片:
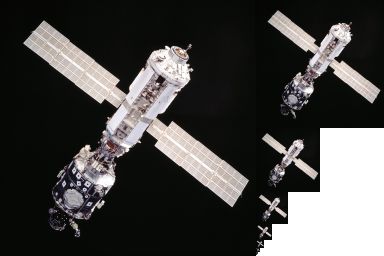
假设这是一颗飞在OpenGL世界的卫星。随着轨道运行,它越来越远。由于电脑屏幕像素有限,如果它缩成了一个像素,那怎么确定它的颜色呢?有的人就会说了,哎呀你不会采个样吗?使用最近滤波不就行了。可以,但是那么多纹素集中在一起,实时取个平均值似乎不太现实。所以Mipmap诞生了,它是一个预处理,事先处理好2的各个次方倍大小的图片,然后再根据远近选择不同的缩放级别,就可以很轻松的计算远处物体的颜色。幸运的是,我们不用自己选择缩放级别,OpenGL会帮我们干。
所以,就需要这么一段代码:
// Create one OpenGL texture
    GLuint textureID;
    glGenTextures(1, &textureID);

    // "Bind" the newly created texture : all future texture functions will modify this texture
    glBindTexture(GL_TEXTURE_2D, textureID);
    glPixelStorei(GL_UNPACK_ALIGNMENT,1);

    unsigned int blockSize = (format == GL_COMPRESSED_RGBA_S3TC_DXT1_EXT) ? 8 : 16;
    unsigned int offset = 0;

    /* load the mipmaps */
    for (unsigned int level = 0; level < mipMapCount && (width || height); ++level)
    {
        unsigned int size = ((width+3)/4)*((height+3)/4)*blockSize;
        glCompressedTexImage2D(GL_TEXTURE_2D, level, format, width, height,
            0, size, buffer + offset);

        offset += size;
        width  /= 2;
        height /= 2;

        // Deal with Non-Power-Of-Two textures. This code is not included in the webpage to reduce clutter.
        if(width < 1) width = 1;
        if(height < 1) height = 1;

    }

    free(buffer);

    return textureID;
让我一句句解释。
GLuint textureID;
glGenTextures(1, &textureID);
生成一个纹理,句柄保存在textureID中,这个大家都懂。
glBindTexture(GL_TEXTURE_2D, textureID);
把这个句柄绑定到GL_TEXTURE_2D状态中,意味着之后对GL_TEXTURE_2D的操作都将对它进行(这话我是不是说过?)
接下来的glPixelStorei,我想引用一段另一个博客的话:
3.glPixelStore
像glPixelStorei(GL_PACK_ALIGNMENT, 1)这样的调用,通常会用于像素传输(PACK/UNPACK)的场合。尤其是导入纹理(glTexImage2D)的时候:
C++代码
- glPixelStorei(GL_UNPACK_ALIGNMENT, 1);
- glTexImage2D(,,,, &pixelData);
- glPixelStorei(GL_UNPACK_ALIGNMENT, 4);
很明显地,它是在改变某个状态量,然后再Restore回来。——为什么是状态?你难道8知道OpenGL就是以状态机不?——什么状态?其实名字已经很直白了,glPixelStore这组函数要改变的是像素的存储格式。
涉及到像素在CPU和GPU上的传输,那就有个存储格式的概念。在本地内存中端像素集合是什么格式?传输到GPU时又是什么格式?格式会是一样么?在glTexImage2D这个函数中,包含两个关于颜色格式的参数,一个是纹理(GPU端,也可以说server端)的,一个是像素数据(程序内存上,也就是client端)的,两者是不一定一样的,哪怕一样也无法代表GPU会像内存那样去存储。或者想象一下,从一张硬盘上的图片提取到内存的像素数据,上传给GPU成为一张纹理,这个“纹理”还会是原来的那种RGBARGBA的一个序列完事么?显然不是的。作为一张纹理,有其纹理ID、WRAP模式、插值模式,指定maipmap时还会有一串各个Level下的map,等等。就纹理的数据来说,本质纹理是边长要满足2的n次方(power of two)的数据集合,这样首先大小上就有可能不一样,另外排列方式也未必就是RGBA的形式。在OpenGL的“解释”中,纹理就是一个“可以被采样的复杂的数据集合”,无论外面世界千变万化,GPU只认纹理作为自己“图像数据结构”,这体现着“规范化”这条世界纽带的伟大之处。——https://www.cnblogs.com/dongguolei/p/11982230.html
侵删。
纹理在OpenGL实际上并不只是一堆RGBA。
看下一个
glCompressedTexImage2D
函数。
第一个参数GL_TEXTURE_2D指代之前获取的纹理,状态机不解释,level是等级,代表缩放的二次幂,format由DDS本身的数据头得到,计算被我省略,一会看源代码;
width和height就是宽和高,0不解释,size代表纹理大小,它的计算方法是像素大小(blocksize)×面积(width*height),buffer+offset是去掉文件头的图片数据部分。
通过这个函数,在GL_TEXTURE_2D里绑定的纹理就成为了一个Mipmaps,接下来返回纹理的句柄。
当然,BMP也有类似的加载方式,在文末会给出完整的源代码。


GLuint loadBMP_custom(const char * imagepath){

    printf("Reading image %s
", imagepath);

    // Data read from the header of the BMP file
    unsigned char header[54];
    unsigned int dataPos;
    unsigned int imageSize;
    unsigned int width, height;
    // Actual RGB data
    unsigned char * data;

    // Open the file
    FILE * file = fopen(imagepath,"rb");
    if (!file){
        printf("%s could not be opened. Are you in the right directory ? Don't forget to read the FAQ !
", imagepath);
        getchar();
        return 0;
    }

    // Read the header, i.e. the 54 first bytes

    // If less than 54 bytes are read, problem
    if ( fread(header, 1, 54, file)!=54 ){
        printf("Not a correct BMP file
");
        fclose(file);
        return 0;
    }
    // A BMP files always begins with "BM"
    if ( header[0]!='B' || header[1]!='M' ){
        printf("Not a correct BMP file
");
        fclose(file);
        return 0;
    }
    // Make sure this is a 24bpp file
    if ( *(int*)&(header[0x1E])!=0  )         {printf("Not a correct BMP file
");    fclose(file); return 0;}
    if ( *(int*)&(header[0x1C])!=24 )         {printf("Not a correct BMP file
");    fclose(file); return 0;}

    // Read the information about the image
    dataPos    = *(int*)&(header[0x0A]);
    imageSize  = *(int*)&(header[0x22]);
    width      = *(int*)&(header[0x12]);
    height     = *(int*)&(header[0x16]);

    // Some BMP files are misformatted, guess missing information
    if (imageSize==0)    imageSize=width*height*3; // 3 : one byte for each Red, Green and Blue component
    if (dataPos==0)      dataPos=54; // The BMP header is done that way

    // Create a buffer
    data = new unsigned char [imageSize];

    // Read the actual data from the file into the buffer
    fread(data,1,imageSize,file);

    // Everything is in memory now, the file can be closed.
    fclose (file);

    // Create one OpenGL texture
    GLuint textureID;
    glGenTextures(1, &textureID);

    // "Bind" the newly created texture : all future texture functions will modify this texture
    glBindTexture(GL_TEXTURE_2D, textureID);

    // Give the image to OpenGL
    glTexImage2D(GL_TEXTURE_2D, 0,GL_RGB, width, height, 0, GL_BGR, GL_UNSIGNED_BYTE, data);

    // OpenGL has now copied the data. Free our own version
    delete [] data;

    // Poor filtering, or ...
    //glTexParameteri(GL_TEXTURE_2D, GL_TEXTURE_MAG_FILTER, GL_NEAREST);
    //glTexParameteri(GL_TEXTURE_2D, GL_TEXTURE_MIN_FILTER, GL_NEAREST);

    // ... nice trilinear filtering ...
    glTexParameteri(GL_TEXTURE_2D, GL_TEXTURE_WRAP_S, GL_REPEAT);
    glTexParameteri(GL_TEXTURE_2D, GL_TEXTURE_WRAP_T, GL_REPEAT);
    glTexParameteri(GL_TEXTURE_2D, GL_TEXTURE_MAG_FILTER, GL_LINEAR);
    glTexParameteri(GL_TEXTURE_2D, GL_TEXTURE_MIN_FILTER, GL_LINEAR_MIPMAP_LINEAR);
    // ... which requires mipmaps. Generate them automatically.
    glGenerateMipmap(GL_TEXTURE_2D);

    // Return the ID of the texture we just created
    return textureID;
}
顺便一提,OpenGL2.0中是存在官方的加载纹理的函数的,3中就没有了。
#define FOURCC_DXT1 0x31545844 // Equivalent to "DXT1" in ASCII
#define FOURCC_DXT3 0x33545844 // Equivalent to "DXT3" in ASCII
#define FOURCC_DXT5 0x35545844 // Equivalent to "DXT5" in ASCII

GLuint loadDDS(const char * imagepath){

    unsigned char header[124];

    FILE *fp;

    /* try to open the file */
    fp = fopen(imagepath, "rb");
    if (fp == NULL){
        printf("%s could not be opened. Are you in the right directory ? Don't forget to read the FAQ !
", imagepath); getchar();
        return 0;
    }

    /* verify the type of file */
    char filecode[4];
    fread(filecode, 1, 4, fp);
    if (strncmp(filecode, "DDS ", 4) != 0) {
        fclose(fp);
        return 0;
    }

    /* get the surface desc */
    fread(&header, 124, 1, fp);

    unsigned int height      = *(unsigned int*)&(header[8 ]);
    unsigned int width         = *(unsigned int*)&(header[12]);
    unsigned int linearSize     = *(unsigned int*)&(header[16]);
    unsigned int mipMapCount = *(unsigned int*)&(header[24]);
    unsigned int fourCC      = *(unsigned int*)&(header[80]);


    unsigned char * buffer;
    unsigned int bufsize;
    /* how big is it going to be including all mipmaps? */
    bufsize = mipMapCount > 1 ? linearSize * 2 : linearSize;
    buffer = (unsigned char*)malloc(bufsize * sizeof(unsigned char));
    fread(buffer, 1, bufsize, fp);
    /* close the file pointer */
    fclose(fp);

    unsigned int components  = (fourCC == FOURCC_DXT1) ? 3 : 4;
    unsigned int format;
    switch(fourCC)
    {
    case FOURCC_DXT1:
        format = GL_COMPRESSED_RGBA_S3TC_DXT1_EXT;
        break;
    case FOURCC_DXT3:
        format = GL_COMPRESSED_RGBA_S3TC_DXT3_EXT;
        break;
    case FOURCC_DXT5:
        format = GL_COMPRESSED_RGBA_S3TC_DXT5_EXT;
        break;
    default:
        free(buffer);
        return 0;
    }

    // Create one OpenGL texture
    GLuint textureID;
    glGenTextures(1, &textureID);

    // "Bind" the newly created texture : all future texture functions will modify this texture
    glBindTexture(GL_TEXTURE_2D, textureID);
    glPixelStorei(GL_UNPACK_ALIGNMENT,1);

    unsigned int blockSize = (format == GL_COMPRESSED_RGBA_S3TC_DXT1_EXT) ? 8 : 16;
    unsigned int offset = 0;

    /* load the mipmaps */
    for (unsigned int level = 0; level < mipMapCount && (width || height); ++level)
    {
        unsigned int size = ((width+3)/4)*((height+3)/4)*blockSize;
        glCompressedTexImage2D(GL_TEXTURE_2D, level, format, width, height,
            0, size, buffer + offset);

        offset += size;
        width  /= 2;
        height /= 2;

        // Deal with Non-Power-Of-Two textures. This code is not included in the webpage to reduce clutter.
        if(width < 1) width = 1;
        if(height < 1) height = 1;

    }

    free(buffer);

    return textureID;


}