开启线程执行任务,可以使用Runnable(无返回值不支持上报异常)或Callable(有返回值支持上报异常)接口去实现。若是开启线程池并需要获取结果归集的情况下,如何实现,以下主要介绍几种方式。
以下介绍的接口或类都存在于并发包java.util.concurrent.*中,我们主要从类图着手看齐关键方法或构造函数,类图中实现为继承关系,虚线为实现接口。
一、Future(jdk 1.5)
如图,Future接口封装了取消,获取线程结果,以及状态判断是否取消,是否完成这几个方法。
public interface Future<V>

使用线程池提交Callable接口任务,返回Future接口,添加进list,最后遍历FutureList且内部使用while轮询,并发获取结果
package main.completablefuture;

import java.util.*;
import java.util.concurrent.Callable;
import java.util.concurrent.ExecutorService;
import java.util.concurrent.Executors;
import java.util.concurrent.Future;

/**
 * Future多线程并发任务结果归集
 */

public class FutureTest {
public static void main(String[] args) {
        Long start = System.currentTimeMillis();
        //线程池开始多线程
        ExecutorService executor = Executors.newFixedThreadPool(8);
        try{
            //结果集
            List<Integer> result = new ArrayList<>();
            List<Future<Integer>> futureList = new ArrayList<>();
            //提交任务,返回future
            for(int i = 0 ; i < 8; i ++){
                futureList.add(executor.submit(new CallableTask(i + 1)));
            }

            long beforeGetResult = System.currentTimeMillis();
            System.out.println("开始获取结果:"+ new Date());
            //获取结果集,使用迭代器处理
            while(futureList.size() > 0){
                Iterator<Future<Integer>> iterator = futureList.iterator();
                //开始遍历
                while(iterator.hasNext()){
                    Future<Integer> future = iterator.next();
                    //任务完成取结果
                    if(future.isDone() && !future.isCancelled()){
                        Integer i = future.get();
                        System.out.println("任务i="+ i + "获取完成,移除 " + new Date());
                        result.add(i);
                        //移除任务
                        iterator.remove();
                    }else{
                        Thread.sleep(1);//休息1毫秒,避免CPU高速运转
                    }
                }
            }
            System.out.println("结果集result="+result);
            System.out.println("总耗时=" + (System.currentTimeMillis() - start) + ",取结果归集耗时=" + (System.currentTimeMillis() - beforeGetResult));

        }catch (Exception e){
            e.printStackTrace();
        }finally {
            executor.shutdown();
        }
    }


    static class CallableTask implements Callable<Integer>{
        int i;
        public CallableTask(Integer i){
            super();
            this.i = i;
        }
        @Override
        public Integer call() throws Exception {
            if(i == 1){
                Thread.sleep(3000);//任务1耗时3秒
            }else if(i == 5){
                Thread.sleep(6000);//任务5耗时6秒
            }else{
                Thread.sleep(1000);//其他任务耗时1秒
            }
            System.out.println("task线程:"+Thread.currentThread().getName() + "任务i="+i+"完成,"+ new Date());
            return i;
        }
    }
}
如上图,开启定长为8的线程池:ExecutorService exs = Executors.newFixedThreadPool(8);+任务1耗时3秒,任务5耗时6秒,其他1秒。控制台打印如下:
开始获取结果:Wed Jun 12 15:12:48 CST 2019 ---》起始48秒
task线程:pool-1-thread-4任务i=4完成,Wed Jun 12 15:12:49 CST 2019
task线程:pool-1-thread-2任务i=2完成,Wed Jun 12 15:12:49 CST 2019
task线程:pool-1-thread-6任务i=6完成,Wed Jun 12 15:12:49 CST 2019
task线程:pool-1-thread-8任务i=8完成,Wed Jun 12 15:12:49 CST 2019
task线程:pool-1-thread-7任务i=7完成,Wed Jun 12 15:12:49 CST 2019
task线程:pool-1-thread-3任务i=3完成,Wed Jun 12 15:12:49 CST 2019
任务i=4获取完成,移除 Wed Jun 12 15:12:49 CST 2019  ---》一般任务执行1秒 48+1=49
任务i=6获取完成,移除 Wed Jun 12 15:12:49 CST 2019
任务i=7获取完成,移除 Wed Jun 12 15:12:49 CST 2019
任务i=8获取完成,移除 Wed Jun 12 15:12:49 CST 2019
任务i=2获取完成,移除 Wed Jun 12 15:12:49 CST 2019
任务i=3获取完成,移除 Wed Jun 12 15:12:49 CST 2019
task线程:pool-1-thread-1任务i=1完成,Wed Jun 12 15:12:51 CST 2019 ---》任务1耗时3秒 48+3=51
任务i=1获取完成,移除 Wed Jun 12 15:12:51 CST 2019
task线程:pool-1-thread-5任务i=5完成,Wed Jun 12 15:12:54 CST 2019  ---》任务5耗时6秒 48+6=54
任务i=5获取完成,移除 Wed Jun 12 15:12:54 CST 2019
结果集result=[4, 6, 7, 8, 2, 3, 1, 5]--》多执行几遍,最后2个总是1,5最后加进去的,可实现按照任务完成先手顺序获取结果!
总耗时=6009,取结果归集耗时=6001---》符合逻辑,8个任务,定长10线程池,其中一个任务耗时3秒,一个任务耗时6秒,由于并发高速轮训,耗时取最长6秒
建议:此种方法可实现基本目标,任务并行且按照完成顺序获取结果。使用很普遍,就是CPU有消耗,可以使用!
二、FutureTask(jdk 1.5)
如图, FutureTask是接口RunnableFuture的唯一实现类。
public class FutureTask<V> implements RunnableFuture<V>
public interface RunnableFuture<V> extends Runnable, Future<V>
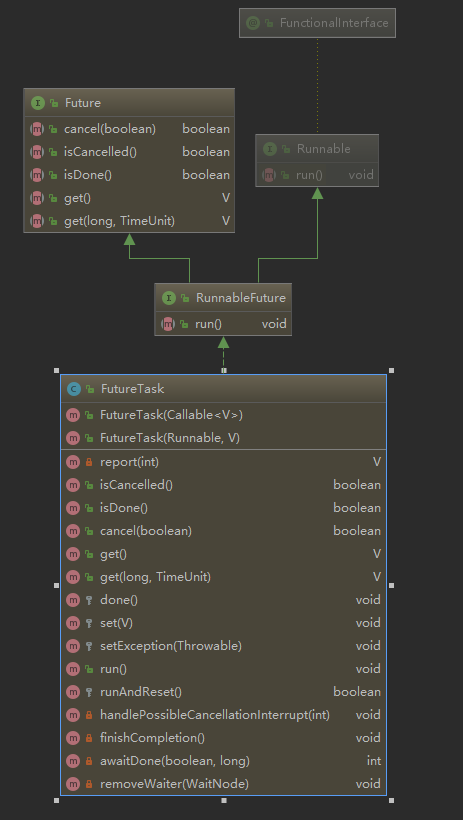
如上图,可见RunnableFuture接口继承自Future<V>+Runnable:
1、Runnable接口,可开启单个线程执行。
2、Future<v>接口,可接受Callable接口的返回值,futureTask.get()阻塞获取结果。
上图也列出了两个构造方法,具体如下:
 /**
     * Creates a {@code FutureTask} that will, upon running, execute the
     * given {@code Callable}.
     *
     * @param  callable the callable task
     * @throws NullPointerException if the callable is null
     */
    public FutureTask(Callable<V> callable) {
        if (callable == null)
            throw new NullPointerException();
        this.callable = callable;
        this.state = NEW;       // ensure visibility of callable
    }

    /**
     * Creates a {@code FutureTask} that will, upon running, execute the
     * given {@code Runnable}, and arrange that {@code get} will return the
     * given result on successful completion.
     *
     * @param runnable the runnable task
     * @param result the result to return on successful completion. If
     * you don't need a particular result, consider using
     * constructions of the form:
     * {@code Future<?> f = new FutureTask<Void>(runnable, null)}
     * @throws NullPointerException if the runnable is null
     */
    public FutureTask(Runnable runnable, V result) {
        this.callable = Executors.callable(runnable, result);
        this.state = NEW;       // ensure visibility of callable
    }
示例1:两个步骤:1.开启单个线程执行任务,2.阻塞等待执行结果,分离这两步骤,可在这两步中间穿插别的相关业务逻辑。
package main.completablefuture;

import java.util.Date;
import java.util.concurrent.Callable;
import java.util.concurrent.FutureTask;

/**
 * FutureTask弥补了Future必须用线程池提交返回Future的缺陷,实现功能如下:
 * 1.Runnable接口,可开启线程执行
 * 2.Future<v>接口,可接受Callable接口的返回值,futureTask.get()阻塞获取结果。
 * 这两个步骤:一个开启线程执行任务,一个阻塞等待执行结果,分离这两步骤,可在这两步中间穿插别的相关业务逻辑。
 */
public class FutureTaskTest1 {
    public static void main(String[] args) {
     try {
        System.out.println("统计总公司和分公司利润是否达到100万");
        Integer count = 0;
        FutureTask<Integer> futureTask = new FutureTask<Integer>(new TestCallable());
        Thread futureTaskThread = new Thread(futureTask);
         futureTaskThread.start();
         System.out.println("futureTaskThread start!"+new Date());

        //主线程处理其他的逻辑
        System.out.println("主线程开始查询总部公司利润 "+ new Date());
        Thread.sleep(5000);//耗时5秒
        count += 10;
        System.out.println("主线程结束查询总部公司利润 "+ new Date());

        //判定利润
         if(count >= 100){
             System.out.println("总公司利润达标,取消futureTask " + new Date());
             futureTask.cancel(true);//不需要获取结果,直接取消即可
         }else{
             System.out.println("总公司利润未达标,阻塞查看分公司利润 " + new Date());
             Integer i = futureTask.get();//阻塞获取分公司利润
             System.out.println("分公司利润 i="+ i + " " + new Date() );
         }

     } catch (Exception e) {
         e.printStackTrace();
     }
    }

    static class TestCallable implements Callable<Integer>{

        @Override
        public Integer call() throws Exception {
            System.out.println("TestCallable-开始获取分公司的利润 " + new Date());
            Thread.sleep(10000);//10秒
            System.out.println("TestCallable-结束获取分公司的利润 " + new Date());
            return 20;
        }
    }


}
执行结果如下:
统计总公司和分公司利润是否达到100万
TestCallable-开始获取分公司的利润 Wed Jun 12 16:47:18 CST 2019
futureTaskThread start!Wed Jun 12 16:47:18 CST 2019 ---》futureTaskThread已开始运行
主线程开始查询总部公司利润 Wed Jun 12 16:47:18 CST 2019  ---》主线程耗时5秒
主线程结束查询总部公司利润 Wed Jun 12 16:47:23 CST 2019
总公司利润未达标,阻塞查看分公司利润 Wed Jun 12 16:47:23 CST 2019
TestCallable-结束获取分公司的利润 Wed Jun 12 16:47:28 CST 2019 ---》futureTaskThread执行完毕,耗时10秒
分公司利润 i=20 Wed Jun 12 16:47:28 CST 2019
如上图,分离之后,futureTaskThread耗时10秒期间,主线程还穿插的执行了耗时5秒的操作,大大减小总耗时。且可根据业务逻辑实时判断是否需要继续执行futureTask。
示例2:FutureTask并发执行任务并获取结果
package main.completablefuture;

import java.util.ArrayList;
import java.util.Date;
import java.util.Iterator;
import java.util.List;
import java.util.concurrent.*;

/**
 * FutureTask实现多线程并发执行任务并取得结果集
 */
public class FutureTaskTest2 {
    public static void main(String[] args) {
        Long start = System.currentTimeMillis();
        //线程池开启多线程
        ExecutorService executor = Executors.newFixedThreadPool(10);
        try{
            //结果集
            List<Integer> result = new ArrayList<>();
            List<FutureTask<Integer>> futureTaskList = new ArrayList<>();
            //提交任务,返回future
            for(int i = 0 ; i < 10; i ++){
                FutureTask<Integer> futureTask = new FutureTask<>(new CallableFutureTask(i + 1));
                executor.submit(futureTask);
                //Future特性
                futureTaskList.add(futureTask);
            }

            long beforeGetResult = System.currentTimeMillis();
            System.out.println("开始获取结果:"+ new Date());
            //获取结果集,使用迭代器处理
            while(futureTaskList.size() > 0){
                Iterator<FutureTask<Integer>> iterator = futureTaskList.iterator();
                //开始遍历
                while(iterator.hasNext()){
                    FutureTask<Integer> futureTask = iterator.next();
                    //任务完成取结果
                    if(futureTask.isDone() && !futureTask.isCancelled()){
                        //Future特性
                        Integer i = futureTask.get();
                        System.out.println("任务i="+ i + "获取完成,移除任务 " + new Date());
                        result.add(i);
                        //移除任务
                        iterator.remove();
                    }else{
                        Thread.sleep(1);//休息1毫秒,避免CPU高速运转
                    }
                }
            }
            System.out.println("结果集result="+result);
            System.out.println("总耗时=" + (System.currentTimeMillis() - start) + ",取结果归集耗时=" + (System.currentTimeMillis() - beforeGetResult));

        }catch (Exception e){
            e.printStackTrace();
        }finally {
            executor.shutdown();
        }
    }


    static class CallableFutureTask implements Callable<Integer> {
        int i;
        public CallableFutureTask(Integer i){
            super();
            this.i = i;
        }
        @Override
        public Integer call() throws Exception {
            if(i == 1){
                Thread.sleep(3000);//任务1耗时3秒
            }else if(i == 6){
                Thread.sleep(6000);//任务6耗时6秒
            }else{
                Thread.sleep(1000);//其他任务耗时1秒
            }
            System.out.println("task线程:"+Thread.currentThread().getName() + "任务i="+i+"完成,"+ new Date());
            return i;
        }
    }
}
执行结果如下
开始获取结果:Wed Jun 12 17:18:15 CST 2019
task线程:pool-1-thread-7任务i=7完成,Wed Jun 12 17:18:16 CST 2019
task线程:pool-1-thread-5任务i=5完成,Wed Jun 12 17:18:16 CST 2019
task线程:pool-1-thread-4任务i=4完成,Wed Jun 12 17:18:16 CST 2019
task线程:pool-1-thread-3任务i=3完成,Wed Jun 12 17:18:16 CST 2019
task线程:pool-1-thread-2任务i=2完成,Wed Jun 12 17:18:16 CST 2019
任务i=5获取完成,移除任务 Wed Jun 12 17:18:16 CST 2019
task线程:pool-1-thread-10任务i=10完成,Wed Jun 12 17:18:16 CST 2019
task线程:pool-1-thread-9任务i=9完成,Wed Jun 12 17:18:16 CST 2019
task线程:pool-1-thread-8任务i=8完成,Wed Jun 12 17:18:16 CST 2019
任务i=7获取完成,移除任务 Wed Jun 12 17:18:16 CST 2019
任务i=8获取完成,移除任务 Wed Jun 12 17:18:16 CST 2019
任务i=9获取完成,移除任务 Wed Jun 12 17:18:16 CST 2019
任务i=10获取完成,移除任务 Wed Jun 12 17:18:16 CST 2019
任务i=2获取完成,移除任务 Wed Jun 12 17:18:16 CST 2019
任务i=3获取完成,移除任务 Wed Jun 12 17:18:16 CST 2019
任务i=4获取完成,移除任务 Wed Jun 12 17:18:16 CST 2019
task线程:pool-1-thread-1任务i=1完成,Wed Jun 12 17:18:18 CST 2019
任务i=1获取完成,移除任务 Wed Jun 12 17:18:18 CST 2019
task线程:pool-1-thread-6任务i=6完成,Wed Jun 12 17:18:21 CST 2019
任务i=6获取完成,移除任务 Wed Jun 12 17:18:21 CST 2019
结果集result=[5, 7, 8, 9, 10, 2, 3, 4, 1, 6]
总耗时=6015,取结果归集耗时=6007
建议:示例1在特定场合例如有十分耗时的业务但有依赖于其他业务不一定非要执行的,可以尝试使用。示例2多线程并发执行并结果归集,这里多套一层FutureTask比较鸡肋(直接返回Future简单明了)不建议使用。
三、CompletionService
内部通过阻塞队列+FutureTask,实现了任务先完成可优先获取到,即结果按照完成先后顺序排序。
public interface CompletionService<V>
只有ExecutorCompletionService实现了接口CompletionService
public class ExecutorCompletionService<V> implements CompletionService<V> {
    private final Executor executor;
    private final AbstractExecutorService aes;
    private final BlockingQueue<Future<V>> completionQueue;

package main.completablefuture;

import java.util.ArrayList;
import java.util.Date;
import java.util.List;
import java.util.concurrent.*;

/**
 * CompletionService多线程并发任务结果归集
 */
public class CompletionServiceTest {
    public static void main(String[] args) {
         long start = System.currentTimeMillis();
         //开启3个线程
        ExecutorService executorService = Executors.newFixedThreadPool(3);
        try{
            int taskCount = 10;
            //结果集
            List<Integer> list = new ArrayList<>();
            //定制CompletionService
            CompletionService<Integer> completionService = new ExecutorCompletionService<>(executorService);
            List<Future<Integer>> futureList = new ArrayList<>();
            //添加任务
            for(int i = 0; i < taskCount ; i ++){
                futureList.add(completionService.submit(new CallableTaskTest(i + 1)));
            }

            //获取结果集
            //方式1:future是提交时返回的,遍历queue则按照任务提交顺序,获取结果
            for(Future<Integer> future : futureList){
                System.out.println("通过get()阻塞方式获取结果集");
                Integer result = future.get();
                System.out.println("get()方式,任务result="+result+" 获取到结果 " + new Date());
                list.add(result);
            }

            //方式2:使用内部阻塞队列的take()
//            for(int i = 0; i < taskCount ; i ++){
//                //采用completionService.take(),内部维护阻塞队列,任务先完成的先获取到
//                Integer result = completionService.take().get();
//                System.out.println("take()方式,任务i="+result+"完成 " + new Date());
//                list.add(result);
//            }
            System.out.println("list="+list);
            System.out.println("总耗时:"+ (System.currentTimeMillis() - start));
        }catch (Exception e){
            e.printStackTrace();
        }finally {
            executorService.shutdown();//关闭线程池
        }
    }

    static class CallableTaskTest implements Callable<Integer>{

        int i;

        public CallableTaskTest(int i){
            this.i = i;
        }
        @Override
        public Integer call() throws Exception {
            if(i == 5){
                Thread.sleep(5000);
            }else{
                Thread.sleep(1000);
            }
            System.out.println("线程:"+Thread.currentThread().getName() + "任务i=" + i + "执行完成");
            return i;
        }
    }
}
方式1获取结果如下:
通过get()阻塞方式获取结果集
线程:pool-1-thread-1任务i=1执行完成
线程:pool-1-thread-2任务i=2执行完成
线程:pool-1-thread-3任务i=3执行完成
get()方式,任务result=1 获取到结果 Wed Jun 12 17:50:21 CST 2019
通过get()阻塞方式获取结果集
get()方式,任务result=2 获取到结果 Wed Jun 12 17:50:21 CST 2019
通过get()阻塞方式获取结果集
get()方式,任务result=3 获取到结果 Wed Jun 12 17:50:21 CST 2019
通过get()阻塞方式获取结果集
线程:pool-1-thread-1任务i=4执行完成
get()方式,任务result=4 获取到结果 Wed Jun 12 17:50:22 CST 2019
通过get()阻塞方式获取结果集
线程:pool-1-thread-3任务i=6执行完成
线程:pool-1-thread-1任务i=7执行完成
线程:pool-1-thread-3任务i=8执行完成
线程:pool-1-thread-1任务i=9执行完成
线程:pool-1-thread-3任务i=10执行完成
线程:pool-1-thread-2任务i=5执行完成
get()方式,任务result=5 获取到结果 Wed Jun 12 17:50:26 CST 2019
通过get()阻塞方式获取结果集
get()方式,任务result=6 获取到结果 Wed Jun 12 17:50:26 CST 2019
通过get()阻塞方式获取结果集
get()方式,任务result=7 获取到结果 Wed Jun 12 17:50:26 CST 2019
通过get()阻塞方式获取结果集
get()方式,任务result=8 获取到结果 Wed Jun 12 17:50:26 CST 2019
通过get()阻塞方式获取结果集
get()方式,任务result=9 获取到结果 Wed Jun 12 17:50:26 CST 2019
通过get()阻塞方式获取结果集
get()方式,任务result=10 获取到结果 Wed Jun 12 17:50:26 CST 2019
list=[1, 2, 3, 4, 5, 6, 7, 8, 9, 10]
总耗时:6010
方式2获取结果如下:
线程:pool-1-thread-3任务i=3执行完成
线程:pool-1-thread-2任务i=2执行完成
线程:pool-1-thread-1任务i=1执行完成
take()方式,任务i=2完成 Wed Jun 12 17:59:45 CST 2019
take()方式,任务i=3完成 Wed Jun 12 17:59:45 CST 2019
take()方式,任务i=1完成 Wed Jun 12 17:59:45 CST 2019
线程:pool-1-thread-2任务i=4执行完成
take()方式,任务i=4完成 Wed Jun 12 17:59:46 CST 2019
线程:pool-1-thread-1任务i=6执行完成
take()方式,任务i=6完成 Wed Jun 12 17:59:46 CST 2019
线程:pool-1-thread-2任务i=7执行完成
take()方式,任务i=7完成 Wed Jun 12 17:59:47 CST 2019
线程:pool-1-thread-1任务i=8执行完成
take()方式,任务i=8完成 Wed Jun 12 17:59:47 CST 2019
线程:pool-1-thread-2任务i=9执行完成
take()方式,任务i=9完成 Wed Jun 12 17:59:48 CST 2019
线程:pool-1-thread-1任务i=10执行完成
take()方式,任务i=10完成 Wed Jun 12 17:59:48 CST 2019
线程:pool-1-thread-3任务i=5执行完成
take()方式,任务i=5完成 Wed Jun 12 17:59:50 CST 2019
list=[2, 3, 1, 4, 6, 7, 8, 9, 10, 5]
总耗时:6012
建议:使用率也挺高,而且能按照完成先后排序,建议如果有排序需求的优先使用。只是多线程并发执行任务结果归集,也可以使用。
四、CompletableFuture(jdk 1.8)
JDK1.8才新加入的一个实现类,实现了Future<T>, CompletionStage<T>2个接口,JDK注释如下图:

译文(没兴趣的可以跳过):
当一个Future可能需要显示地完成时,使用CompletionStage接口去支持完成时触发的函数和操作。当2个以上线程同时尝试完成、异常完成、取消一个CompletableFuture时,只有一个能成功。
CompletableFuture实现了CompletionStage接口的如下策略:
1、为了完成当前的CompletableFuture接口或者其他完成方法的回调函数的线程,提供了非异步的完成操作。
2、没有显式入参Executor的所有async方法都使用ForkJoinPool.commonPool()为了简化监视、调试和跟踪,所有生成的异步任务都是标记接口AsynchronousCompletionTask的实例。
3、所有的CompletionStage方法都是独立于其他共有方法实现的,因此一个方法的行为不会受到子类中其他方法的覆盖。
CompletableFuture实现了Futurre接口的如下策略:
1、CompletableFuture无法直接控制完成,所以cancel操作被视为是另一种异常完成形式。方法isCompletedExceptionally可以用来确定一个CompletableFuture是否以任何异常的方式完成。
2、以一个CompletionException为例,方法get()和get(long,TimeUnit)抛出一个ExecutionException,对应CompletionException。为了在大多数上下文中简化用法,这个类还定义了方法join()和getNow,而不是直接在这些情况中直接抛出CompletionException。
public class CompletableFuture<T> implements Future<T>, CompletionStage<T>
由于方法太多就没有体现出来, 如需要自己查看

CompletionStage接口实现流式编程:
JDK8新增接口,此接口包含38个方法...是的,你没看错,就是38个方法。这些方法主要是为了支持函数式编程中流式处理。
最简单的,我们可以通过构造函数来进行实例化:
CompletableFuture<String> cf = new CompletableFuture<String>();
这个实例此时还没有什么用,因为它没有实际的任务,我们选择结束这个任务:
// 可以选择在当前线程结束,也可以在其他线程结束
cf.complete("coding...");
CompletableFuture 是一个 Future,我们用 String result = cf.get() 就能获取到结果了,同时CompletableFuture 提供了 join() 方法,它的功能和 get() 方法是一样的,都是阻塞获取值,它们的区别在于 join() 抛出的是 unchecked Exception。
1、整体介绍static方法:
1.1 几个获取CompletableFuture实例的方法
static CompletableFuture<Void> runAsync(Runnable runnable);
static CompletableFuture<Void> runAsync(Runnable runnable, Executor executor);
static <U> CompletableFuture<U> supplyAsync(Supplier<U> supplier);
static <U> CompletableFuture<U> supplyAsync(Supplier<U> supplier, Executor executor);
- runAsync 方法接收的是 Runnable 的实例,意味着它没有返回值
- supplyAsync 方法对应的是有返回值的情况
- 这两个方法的带 executor 的变种,表示让任务在指定的线程池中执行,否则默认
ForkJoinPool.commonPool()系统级公共线程池,注意:这些线程都是Daemon线程,主线程结束Daemon线程不结束,只有JVM关闭时,生命周期终止。

CompletableFuture<Void> future = CompletableFuture.runAsync(()->{
            System.out.println("hello");
        });
  CompletableFuture<String> future1 = CompletableFuture.supplyAsync(()->{
            return "world";
        });
  future.get();
  System.out.println(future1.get());
1.2 任务之间的顺序执行
我们先来看执行两个任务的情况,首先执行任务 A,然后将任务 A 的结果传递给任务 B。
其实这里有很多种情况,任务 A 是否有返回值,任务 B 是否需要任务 A 的返回值,任务 B 是否有返回值,等等。有个明确的就是,肯定是任务 A 执行完后再执行任务 B。
CompletableFuture.runAsync(() -> {}).thenRun(() -> {}); //public CompletableFuture<Void> thenRun(Runnable action)CompletableFuture.runAsync(() -> {}).thenAccept(resultA -> {}); //public CompletableFuture<Void> thenAccept(Consumer<? super T> action)CompletableFuture.runAsync(() -> {}).thenApply(resultA -> "resultB");//public <U> CompletableFuture<U> thenApply(Function<? super T,? extends U> fn);CompletableFuture.supplyAsync(() -> "resultA").thenRun(() -> {});
CompletableFuture.supplyAsync(() -> "resultA").thenAccept(resultA -> {});
CompletableFuture.supplyAsync(() -> "resultA").thenApply(resultA -> resultA + " resultB");前面 3 行代码演示的是,任务 A 无返回值,所以对应的,第 2 行和第 3 行代码中,resultA 其实是 null。
第 4 行用的是 thenRun(Runnable runnable),任务 A 执行完执行 B,并且 B 不需要 A 的结果。
第 5 行用的是 thenAccept(Consumer action),任务 A 执行完执行 B,B 需要 A 的结果,但是任务 B 不返回值。
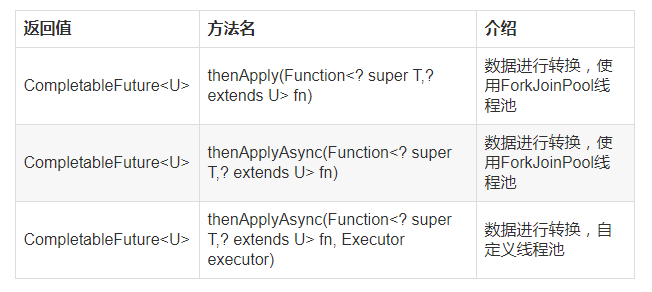
第 6 行用的是 thenApply(Function fn),任务 A 执行完执行 B,B 需要 A 的结果,同时任务 B 有返回值。
如果任务 B 后面还有任务 C,往下继续调用 .thenXxx() 即可。
CompletableFuture<String> future = CompletableFuture
.supplyAsync(()->"hello")
.thenApplyAsync(w->w + " world
")
.thenApplyAsync(w->w+" 真有意思
")
.thenApplyAsync(String::toUpperCase);
System.out.println(future.get());
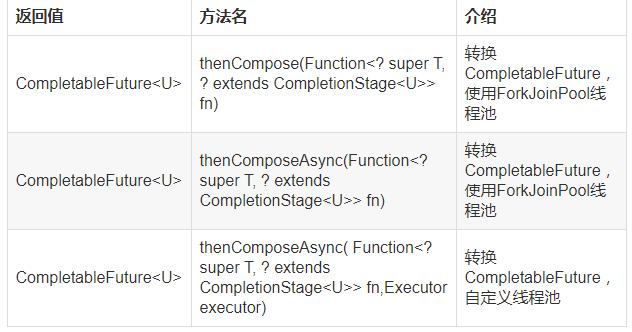
thenCompose():第一个CompletableFuture执行完毕后,传递给下一个CompletionStage作为入参进行操作。
CompletableFuture<String> future = CompletableFuture
                .supplyAsync(()->Thread.currentThread().getName()+"hello")
                .thenComposeAsync((w)->CompletableFuture.supplyAsync(()->w+"world"))
                .thenApply(String::toUpperCase);
  System.out.println(future.get());
1.3 CompletableFuture异常处理
异常处理有两个方法:
public CompletableFuture<T> exceptionally(Function<Throwable, ? extends T> fn);
public <U> CompletionStage<U> handle(BiFunction<? super T, Throwable, ? extends U> fn);
看下面的代码:
CompletableFuture.supplyAsync(() -> "resultA")
    .thenApply(resultA -> resultA + " resultB")
    .thenApply(resultB -> resultB + " resultC")
    .thenApply(resultC -> resultC + " resultD");
上面的代码中,任务 A、B、C、D 依次执行,如果任务 A 抛出异常(当然上面的代码不会抛出异常),那么后面的任务都得不到执行。如果任务 C 抛出异常,那么任务 D 得不到执行。
处理方式如下:
CompletableFuture<String> future = CompletableFuture.supplyAsync(() -> {
    throw new RuntimeException();
})
        .exceptionally(ex -> "errorResultA")
        .thenApply(resultA -> resultA + " resultB")
        .thenApply(resultB -> resultB + " resultC")
        .thenApply(resultC -> resultC + " resultD");

System.out.println(future.join());
上面的代码中,任务 A 抛出异常,然后通过 .exceptionally() 方法处理了异常,并返回新的结果,这个新的结果将传递给任务 B。所以最终的输出结果是:
errorResultA resultB resultC resultD再看下面的代码,我们来看下另一种处理方式,使用 handle(BiFunction fn) 来处理异常:
CompletableFuture<String> future = CompletableFuture.supplyAsync(() -> "resultA")
        .thenApply(resultA -> resultA + " resultB")
        // 任务 C 抛出异常
        .thenApply(resultB -> {throw new RuntimeException();})
        // 处理任务 C 的返回值或异常
        .handle(new BiFunction<Object, Throwable, Object>() {
            @Override
            public Object apply(Object re, Throwable throwable) {
                if (throwable != null) {
                    return "errorResultC";
                }
                return re;
            }
        })
        .thenApply(resultC -> resultC + " resultD");

System.out.println(future.join());
上面的代码使用了 handle 方法来处理任务 C 的执行结果,上面的代码中,re 和 throwable 必然有一个是 null,它们分别代表正常的执行结果和异常的情况。当然,它们也可以都为 null,因为如果它作用的那个 CompletableFuture 实例没有返回值的时候,re 就是 null。
CompletableFuture实现了Future接口,因此你可以像Future那样使用它。
其次,CompletableFuture并非一定要交给线程池执行才能实现异步,你可以像下面这样实现异步运行:
public void test1() throws ExecutionException, InterruptedException {
    CompletableFuture<String> completableFuture = new CompletableFuture<>();
    new Thread(() -> {
        // 模拟执行耗时任务
        System.out.println("task doing...");
        try {
            Thread.sleep(3000);
        } catch (InterruptedException e) {
            e.printStackTrace();
        }
        // 告诉completableFuture任务已经完成
        completableFuture.complete("ok");
    }).start();
    // 获取任务结果,如果没有完成会一直阻塞等待
    String result = completableFuture.get();
    System.out.println("计算结果:" + result);
}
如果没有意外,上面发的代码工作得很正常。但是,如果任务执行过程中产生了异常会怎样呢?
非常不幸,这种情况下你会得到一个相当糟糕的结果:异常会被限制在执行任务的线程的范围内,最终会杀死该线程,而这会导致等待get方法返回结果的线程永久地被阻塞。
客户端可以使用重载版本的get 方法,它使用一个超时参数来避免发生这样的情况。这是一种值得推荐的做法,你应该尽量在你的代码中添加超时判断的逻辑,避免发生类似的问题。
使用这种方法至少能防止程序永久地等待下去,超时发生时,程序会得到通知发生了TimeoutException 。不过,也因为如此,你不能确定执行任务的线程内到底发生了什么问题。
为了能获取任务线程内发生的异常,你需要使用
CompletableFuture的completeExceptionally方法将导致CompletableFuture内发生问题的异常抛出。这样,当执行任务发生异常时,调用get()方法的线程将会收到一个 ExecutionException异常,该异常接收了一个包含失败原因的Exception 参数。
public void test2() throws ExecutionException, InterruptedException {
    CompletableFuture<String> completableFuture = new CompletableFuture<>();
    new Thread(() -> {
        // 模拟执行耗时任务
        System.out.println("task doing...");
        try {
            Thread.sleep(3000);
            int i = 1/0;
        } catch (Exception e) {
            // 告诉completableFuture任务发生异常了
            completableFuture.completeExceptionally(e);
        }
        // 告诉completableFuture任务已经完成
        completableFuture.complete("ok");
    }).start();
    // 获取任务结果,如果没有完成会一直阻塞等待
    String result = completableFuture.get();
    System.out.println("计算结果:" + result);
}
1.4 取两个任务的结果
上面一节,我们说的是,任务 A 执行完 -> 任务 B 执行完 -> 执行任务 C,它们之间有先后执行关系,因为后面的任务依赖于前面的任务的结果。
这节我们来看怎么让任务 A 和任务 B 同时执行,然后取它们的结果进行后续操作。这里强调的是任务之间的并行工作,没有先后执行顺序。
如果使用 Future 的话,我们通常是这么写的:
ExecutorService executorService = Executors.newCachedThreadPool();

Future<String> futureA = executorService.submit(() -> "resultA");
Future<String> futureB = executorService.submit(() -> "resultB");

String resultA = futureA.get();
String resultB = futureB.get();
接下来,我们看看 CompletableFuture 中是怎么写的,看下面的几行代码:
CompletableFuture<String> cfA = CompletableFuture.supplyAsync(() -> "resultA");
CompletableFuture<String> cfB = CompletableFuture.supplyAsync(() -> "resultB");

cfA.thenAcceptBoth(cfB, (resultA, resultB) -> {});
cfA.thenCombine(cfB, (resultA, resultB) -> "result A + B");
cfA.runAfterBoth(cfB, () -> {});
第 3 行代码和第 4 行代码演示了怎么使用两个任务的结果 resultA 和 resultB,它们的区别在于,thenAcceptBoth 表示后续的处理不需要返回值,而 thenCombine 表示需要返回值。
如果你不需要 resultA 和 resultB,那么还可以使用第 5 行描述的 runAfterBoth 方法。
注意,上面的写法和下面的写法是没有区别的:
CompletableFuture<String> cfA = CompletableFuture.supplyAsync(() -> "resultA");
cfA.thenAcceptBoth(CompletableFuture.supplyAsync(() -> "resultB"),
        (resultA, resultB) -> {});
千万不要以为这种写法任务 A 执行完了以后再执行任务 B。
CompletableFuture<String> future = CompletableFuture.supplyAsync(()->{
            return "hello";
        });
  CompletableFuture<String> future1 = CompletableFuture.supplyAsync(()->{
            return "world";
        });
  future1.thenAcceptBoth(future,(a,b)->{System.out.println(b+a+"真有意思");});

结合传入的future,实现一个BiConsumer函数接口,从而实现将两个future结合起来。 CompletableFuture<String> future = CompletableFuture.supplyAsync(()->{
return "hello";
});
CompletableFuture<String> future1 = CompletableFuture.supplyAsync(()->{
return "world";
});
CompletableFuture<String> test= future1
.thenCombineAsync(future,(a,b)->{System.out.println(b+a+"真有意思");return "任务完成";});
System.out.println(test.get());
thenCombine(): 先完成当前CompletionStage和other 2个CompletionStage任务,然后把结果传参给BiFunction进行结果合并操作。
thenCombineAsync方法与thenAcceptBoth方法的区别为:- thenCombineAsync可以有一个CompletableFuture返回值;
- thenCombineAsync第二个参数为BiFunction接口,thenAcceptBoth第二个参数为BiCosumer接口
1.5 取多个任务的结果
主要介绍两个非常简单的静态方法:allOf() 和 anyOf() 方法。
public static CompletableFuture<Void> allOf(CompletableFuture<?>... cfs){...}
public static CompletableFuture<Object> anyOf(CompletableFuture<?>... cfs) {...}
这两个方法都非常简单,简单介绍一下。
CompletableFuture cfA = CompletableFuture.supplyAsync(() -> "resultA");
CompletableFuture cfB = CompletableFuture.supplyAsync(() -> 123);
CompletableFuture cfC = CompletableFuture.supplyAsync(() -> "resultC");

CompletableFuture<Void> future = CompletableFuture.allOf(cfA, cfB, cfC);
// 所以这里的 join() 将阻塞,直到所有的任务执行结束
future.join();
由于 allOf 聚合了多个 CompletableFuture 实例,所以它是没有返回值的。这也是它的一个缺点。
anyOf 也非常容易理解,就是只要有任意一个 CompletableFuture 实例执行完成就可以了,看下面的例子:
CompletableFuture cfA = CompletableFuture.supplyAsync(() -> "resultA");
CompletableFuture cfB = CompletableFuture.supplyAsync(() -> 123);
CompletableFuture cfC = CompletableFuture.supplyAsync(() -> "resultC");

CompletableFuture<Object> future = CompletableFuture.anyOf(cfA, cfB, cfC);
Object result = future.join();
最后一行的 join() 方法会返回最先完成的任务的结果,所以它的泛型用的是 Object,因为每个任务可能返回的类型不同。
1.6 either 方法
如果你的 anyOf(...) 只需要处理两个 CompletableFuture 实例,那么也可以使用 xxxEither() 来处理,
cfA.acceptEither(cfB, result -> {});
cfA.acceptEitherAsync(cfB, result -> {});
cfA.acceptEitherAsync(cfB, result -> {}, executorService);

cfA.applyToEither(cfB, result -> {return result;});
cfA.applyToEitherAsync(cfB, result -> {return result;});
cfA.applyToEitherAsync(cfB, result -> {return result;}, executorService);

cfA.runAfterEither(cfA, () -> {});
cfA.runAfterEitherAsync(cfB, () -> {});
cfA.runAfterEitherAsync(cfB, () -> {}, executorService);
上面的各个带 either 的方法,表达的都是一个意思,指的是两个任务中的其中一个执行完成,就执行指定的操作。它们几组的区别也很明显,分别用于表达是否需要任务 A 和任务 B 的执行结果,是否需要返回值。
大家可能会对这里的几个变种有盲区,这里顺便说几句。
cfA.acceptEither(cfB, result -> {});和cfB.acceptEither(cfA, result -> {});是一个意思;- 第二个变种,加了 Async 后缀的方法,代表将需要执行的任务放到 ForkJoinPool.commonPool() 中执行(非完全严谨);第三个变种很好理解,将任务放到指定线程池中执行;
- 难道第一个变种是同步的?不是的,而是说,它由任务 A 或任务 B 所在的执行线程来执行,取决于哪个任务先结束。
2、示例
方式一:循环创建CompletableFuture list,调用sequence()组装返回一个有返回值的CompletableFuture,返回结果get()获取
方式二:全流式处理转换成CompletableFuture[]+allOf组装成一个无返回值CompletableFuture,join等待执行完毕。返回结果whenComplete获取。---》推荐
package thread;

import java.util.ArrayList;
import java.util.Arrays;
import java.util.Date;
import java.util.List;
import java.util.concurrent.CompletableFuture;
import java.util.concurrent.ExecutorService;
import java.util.concurrent.Executors;
import java.util.stream.Collectors;
import java.util.stream.Stream;

/**
 * 方式一:循环创建CompletableFuture list,调用sequence()组装返回一个有返回值的CompletableFuture,返回结果get()获取
 * 方式二:全流式处理转换成CompletableFuture[]+allOf组装成一个无返回值CompletableFuture,join等待执行完毕。返回结果whenComplete获取。---》推荐
 * @ClassName:CompletableFutureDemo
 * @Description:多线程并发任务,取结果归集
 * @author diandian.zhang
 * @date 2017年6月14日下午12:44:01
 */
public class CompletableFutureTest {
    public static void main(String[] args) {
        Long start = System.currentTimeMillis();
        //结果集
        List<String> list = new ArrayList<>();
        List<String> list2 = new ArrayList<>();
        //定长10线程池
        ExecutorService exs = Executors.newFixedThreadPool(10);
        List<CompletableFuture<String>> futureList = new ArrayList<>();
        final List<Integer> taskList = Arrays.asList(2, 1, 3, 4, 5, 6, 7, 8, 9, 10);
        try {
            ////方式一:循环创建CompletableFuture list,调用sequence()组装返回一个有返回值的CompletableFuture,返回结果get()获取
            //for(int i=0;i<taskList.size();i++){
            //    final int j=i;
            //    //异步执行
            //    CompletableFuture<String> future = CompletableFuture.supplyAsync(()->calc(taskList.get(j)), exs)
            //        //Integer转换字符串    thenAccept只接受不返回不影响结果
            //        .thenApply(e->Integer.toString(e))
            //        //如需获取任务完成先后顺序,此处代码即可
            //        .whenComplete((v, e) -> {
            //            System.out.println("任务"+v+"完成!result="+v+",异常 e="+e+","+new Date());
            //            list2.add(v);
            //        })
            //        ;
            //    futureList.add(future);
            //}
            ////流式获取结果:此处是根据任务添加顺序获取的结果
            //list = sequence(futureList).get();

            //方式二:全流式处理转换成CompletableFuture[]+组装成一个无返回值CompletableFuture,join等待执行完毕。返回结果whenComplete获取
            CompletableFuture[] cfs = taskList.stream().map(object-> CompletableFuture.supplyAsync(()->calc(object), exs)
                    .thenApply(h->Integer.toString(h))
                    //如需获取任务完成先后顺序,此处代码即可
                    .whenComplete((v, e) -> {
                        System.out.println("任务"+v+"完成!result="+v+",异常 e="+e+","+new Date());
                        list2.add(v);
                    })).toArray(CompletableFuture[]::new);
            //等待总任务完成,但是封装后无返回值,必须自己whenComplete()获取
            CompletableFuture.allOf(cfs).join();
            System.out.println("任务完成先后顺序,结果list2="+list2+";任务提交顺序,结果list="+list+",耗时="+(System.currentTimeMillis()-start));
        } catch (Exception e) {
            e.printStackTrace();
        }finally {
            exs.shutdown();
        }
    }

    public static Integer calc(Integer i){
        try {
            if(i==1){
                //任务1耗时3秒
                Thread.sleep(3000);
            }else if(i==5){
                //任务5耗时5秒
                Thread.sleep(5000);
            }else{
                //其它任务耗时1秒
                Thread.sleep(1000);
            }
            System.out.println("task线程:"+Thread.currentThread().getName()+"任务i="+i+",完成!+"+new Date());
        } catch (InterruptedException e) {
            e.printStackTrace();
        }
        return i;
    }

    /**
     *
     * @Description 组合多个CompletableFuture为一个CompletableFuture,所有子任务全部完成,组合后的任务才会完成。带返回值,可直接get.
     * @param futures List
     * @return
     * @author diandian.zhang
     * @date 2017年6月19日下午3:01:09
     * @since JDK1.8
     */
    public static <T> CompletableFuture<List<T>> sequence(List<CompletableFuture<T>> futures) {
        //1.构造一个空CompletableFuture,子任务数为入参任务list size
        CompletableFuture<Void> allDoneFuture = CompletableFuture.allOf(futures.toArray(new CompletableFuture[futures.size()]));
        //2.流式(总任务完成后,每个子任务join取结果,后转换为list)
        return allDoneFuture.thenApply(v -> futures.stream().map(CompletableFuture::join).collect(Collectors.toList()));
    }

    /**
     *
     * @Description Stream流式类型futures转换成一个CompletableFuture,所有子任务全部完成,组合后的任务才会完成。带返回值,可直接get.
     * @param futures Stream
     * @return
     * @author diandian.zhang
     * @date 2017年6月19日下午6:23:40
     * @since JDK1.8
     */
    public static <T> CompletableFuture<List<T>> sequence(Stream<CompletableFuture<T>> futures) {
        List<CompletableFuture<T>> futureList = futures.filter(f -> f != null).collect(Collectors.toList());
        return sequence(futureList);
    }
}
方式一执行结果:
task线程:pool-1-thread-9任务i=9,完成!+Wed Jun 12 20:12:15 CST 2019
task线程:pool-1-thread-1任务i=2,完成!+Wed Jun 12 20:12:15 CST 2019
task线程:pool-1-thread-10任务i=10,完成!+Wed Jun 12 20:12:15 CST 2019
任务10完成!result=10,异常 e=null,Wed Jun 12 20:12:15 CST 2019
task线程:pool-1-thread-4任务i=4,完成!+Wed Jun 12 20:12:15 CST 2019
task线程:pool-1-thread-8任务i=8,完成!+Wed Jun 12 20:12:15 CST 2019
任务4完成!result=4,异常 e=null,Wed Jun 12 20:12:15 CST 2019
任务8完成!result=8,异常 e=null,Wed Jun 12 20:12:15 CST 2019
task线程:pool-1-thread-3任务i=3,完成!+Wed Jun 12 20:12:15 CST 2019
任务3完成!result=3,异常 e=null,Wed Jun 12 20:12:15 CST 2019
任务2完成!result=2,异常 e=null,Wed Jun 12 20:12:15 CST 2019
任务9完成!result=9,异常 e=null,Wed Jun 12 20:12:15 CST 2019
task线程:pool-1-thread-6任务i=6,完成!+Wed Jun 12 20:12:15 CST 2019
任务6完成!result=6,异常 e=null,Wed Jun 12 20:12:15 CST 2019
task线程:pool-1-thread-7任务i=7,完成!+Wed Jun 12 20:12:15 CST 2019
任务7完成!result=7,异常 e=null,Wed Jun 12 20:12:15 CST 2019
task线程:pool-1-thread-2任务i=1,完成!+Wed Jun 12 20:12:17 CST 2019
任务1完成!result=1,异常 e=null,Wed Jun 12 20:12:17 CST 2019
task线程:pool-1-thread-5任务i=5,完成!+Wed Jun 12 20:12:19 CST 2019
任务5完成!result=5,异常 e=null,Wed Jun 12 20:12:19 CST 2019
任务完成先后顺序,结果list2=[10, 4, 8, 3, 2, 9, 6, 7, 1, 5];任务提交顺序,结果list=[2, 1, 3, 4, 5, 6, 7, 8, 9, 10],耗时=5050
方式二执行结果:
task线程:pool-1-thread-7任务i=7,完成!+Wed Jun 12 20:07:38 CST 2019
task线程:pool-1-thread-6任务i=6,完成!+Wed Jun 12 20:07:38 CST 2019
任务7完成!result=7,异常 e=null,Wed Jun 12 20:07:38 CST 2019
task线程:pool-1-thread-1任务i=2,完成!+Wed Jun 12 20:07:38 CST 2019
任务2完成!result=2,异常 e=null,Wed Jun 12 20:07:38 CST 2019
任务6完成!result=6,异常 e=null,Wed Jun 12 20:07:38 CST 2019
task线程:pool-1-thread-4任务i=4,完成!+Wed Jun 12 20:07:38 CST 2019
任务4完成!result=4,异常 e=null,Wed Jun 12 20:07:38 CST 2019
task线程:pool-1-thread-3任务i=3,完成!+Wed Jun 12 20:07:38 CST 2019
任务3完成!result=3,异常 e=null,Wed Jun 12 20:07:38 CST 2019
task线程:pool-1-thread-9任务i=9,完成!+Wed Jun 12 20:07:38 CST 2019
任务9完成!result=9,异常 e=null,Wed Jun 12 20:07:38 CST 2019
task线程:pool-1-thread-10任务i=10,完成!+Wed Jun 12 20:07:38 CST 2019
任务10完成!result=10,异常 e=null,Wed Jun 12 20:07:38 CST 2019
task线程:pool-1-thread-8任务i=8,完成!+Wed Jun 12 20:07:38 CST 2019
任务8完成!result=8,异常 e=null,Wed Jun 12 20:07:38 CST 2019
task线程:pool-1-thread-2任务i=1,完成!+Wed Jun 12 20:07:40 CST 2019
任务1完成!result=1,异常 e=null,Wed Jun 12 20:07:40 CST 2019
task线程:pool-1-thread-5任务i=5,完成!+Wed Jun 12 20:07:42 CST 2019
任务5完成!result=5,异常 e=null,Wed Jun 12 20:07:42 CST 2019
任务完成先后顺序,结果list2=[7, 2, 6, 4, 3, 9, 10, 8, 1, 5];任务提交顺序,结果list=[],耗时=5049
建议:CompletableFuture满足并发执行,顺序完成先手顺序获取的目标。而且支持每个任务的异常返回,配合流式编程,用起来速度飞起。JDK源生支持,API丰富,推荐使用。
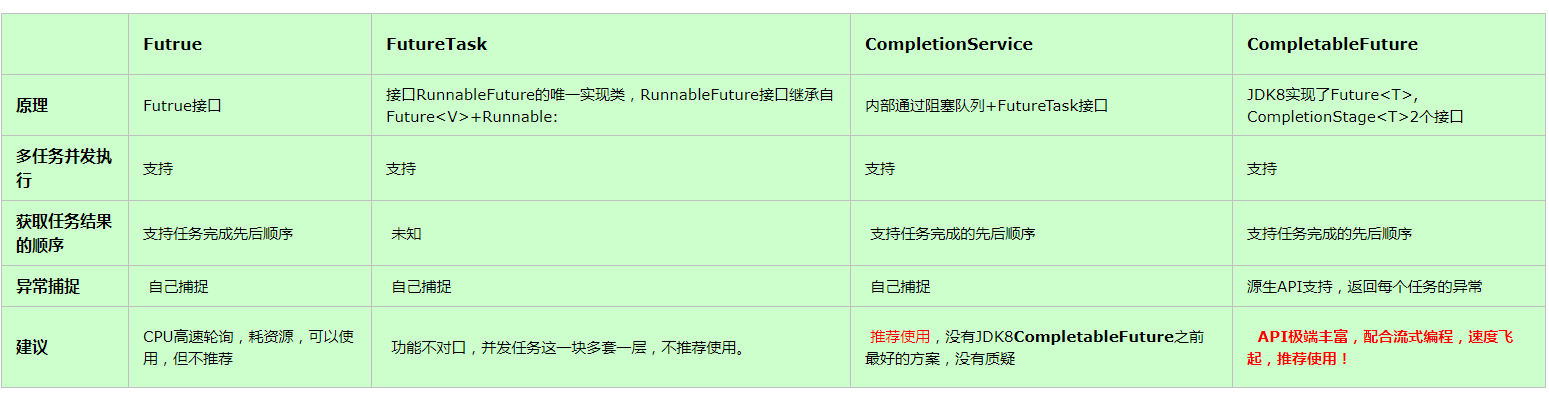
五、总结
常用多线程方式处理并获取结果集的几种方式
参考:https://javadoop.com/post/completable-future
https://www.cnblogs.com/dennyzhangdd/p/7010972.html
https://www.jianshu.com/p/6f3ee90ab7d3