一、 调用生成的类对象
1. 通过反射的方式调用
2. 通过读取 .class 文件的方式调用
3. 通过接口的方式
二、创建对象(动态创建对象)
动态创建对象,动态创建一个Teacher对象,为其增加2个方法:
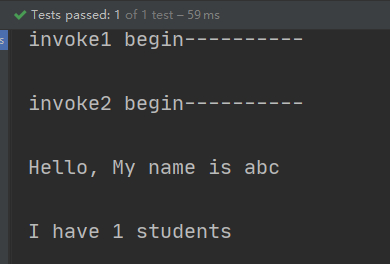
package com.dxz;

import com.dxz.dto.GoodStudent;
import javassist.*;
import org.junit.Test;

import java.lang.reflect.Method;

public class Create {
    @Test
    public void test1() throws Exception {
        ClassPool pool = ClassPool.getDefault();
        // 创建teacher类
        CtClass teacherClass = pool.makeClass("com.dxz.dto.Teacher");
        // 设置为公有类
        teacherClass.setModifiers(Modifier.PUBLIC);
        // 获取String类型
        CtClass stringClass = pool.get("java.lang.String");
        // 获取list类型
        CtClass listClass = pool.get("java.util.List");
        // 获取学生的类型
        CtClass studentClass = pool.get("com.dxz.dto.GoodStudent");
        // 给teacher添加name属性
        CtField nameField = new CtField(stringClass, "name", teacherClass);
        nameField.setModifiers(Modifier.PUBLIC);
        teacherClass.addField(nameField);
        // 给teacher类添加students属性
        CtField studentList = new CtField(listClass, "students", teacherClass);
        studentList.setModifiers(Modifier.PUBLIC);
        teacherClass.addField(studentList);
        // 给teacher类添加无参构造方法
        CtConstructor ctConstructor = CtNewConstructor.make("public Teacher() {this.name =\"abc\";this.students = new java.util.ArrayList();}", teacherClass);
        teacherClass.addConstructor(ctConstructor);
        // 给teacher类添加addStudent方法
        CtMethod m = new CtMethod(CtClass.voidType, "addStudent", new CtClass[]{studentClass}, teacherClass);
        m.setModifiers(Modifier.PUBLIC);
        // 添加学生对象到students属性中, $1代表参数1
        m.setBody("this.students.add($1);");
        teacherClass.addMethod(m);
        // 给teacher类添加sayHello方法
        m = new CtMethod(CtClass.voidType, "sayHello", new CtClass[]{}, teacherClass);
        m.setModifiers(Modifier.PUBLIC);
        m.setBody("System.out.println(\"Hello, My name is \" + this.name);");
        m.insertAfter("System.out.println(\"I have \" + this.students.size() + \" students\");");
        teacherClass.addMethod(m);
        // 加载修改后的类
        Class<?> cls = teacherClass.toClass();
        // 实例teacher对象
        Object teacher = cls.newInstance();
        // 获取teacher的addStudent方法
        Method method = cls.getDeclaredMethod("addStudent", GoodStudent.class);
        System.out.println("invoke1 begin----------");
        Object invoke1 = method.invoke(teacher, new GoodStudent());

        //获取teacher的sayHellow方法
        Method method2 = cls.getDeclaredMethod("sayHello");
        System.out.println("invoke2 begin----------");
        Object invoke2 = method2.invoke(teacher);

        //这里会将这个动态创建的类对象编译为.class文件
        teacherClass.writeFile("E:\\agentdemo-out\\");
    }
}
结果:
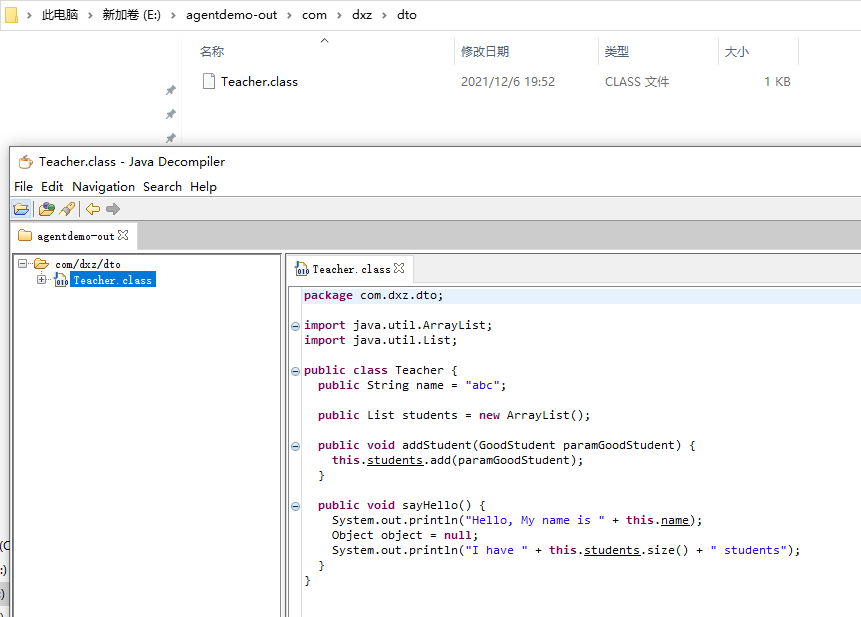
查看动态生产的Teacher如下:
三、 修改现有的类对象
前面说到新增一个类对象。这个使用场景目前还没有遇到过,一般会遇到的使用场景应该是修改已有的类。比如常见的日志切面,权限切面。我们利用javassist来实现这个功能。
四、新增一个方法
有如下类对象:
package com.dxz.service;

public class PersonService {
    public void getPerson(){
        System.out.println("get Person");
    }
    public void personFly(){
        System.out.println("oh my god,I can fly");
    }
}
然后对他进行修改:
package com.dxz;

import javassist.ClassPool;
import javassist.CtClass;
import javassist.CtMethod;
import javassist.Modifier;

import java.lang.reflect.Method;

public class UpdatePerson {

    public static void update() throws Exception {
        ClassPool pool = ClassPool.getDefault();
        CtClass cc = pool.get("com.dxz.service.PersonService");

        CtMethod personFly = cc.getDeclaredMethod("personFly");
        personFly.insertBefore("System.out.println(\"起飞之前准备降落伞\");");
        personFly.insertAfter("System.out.println(\"成功落地。。。。\");");


        //新增一个方法
        CtMethod ctMethod = new CtMethod(CtClass.voidType, "joinFriend", new CtClass[]{}, cc);
        ctMethod.setModifiers(Modifier.PUBLIC);
        ctMethod.setBody("{System.out.println(\"i want to be your friend\");}");
        cc.addMethod(ctMethod);

        Object person = cc.toClass().newInstance();
        // 调用 personFly 方法
        Method personFlyMethod = person.getClass().getMethod("personFly");
        personFlyMethod.invoke(person);
        //调用 joinFriend 方法
        Method execute = person.getClass().getMethod("joinFriend");
        execute.invoke(person);
    }

    public static void main(String[] args) {
        try {
            update();
        } catch (Exception e) {
            e.printStackTrace();
        }
    }
}
结果:
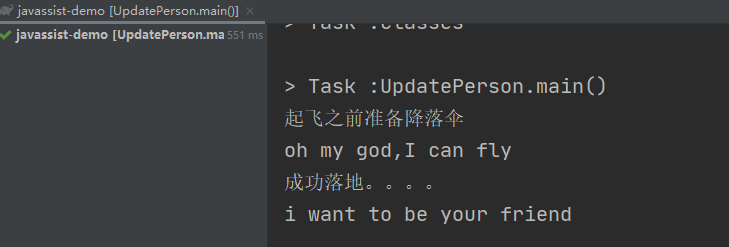
在personFly方法前后加上了打印日志。然后新增了一个方法joinFriend。执行main函数可以发现已经添加上了。
另外需要注意的是:上面的insertBefore() 和 setBody()中的语句,如果你是单行语句可以直接用双引号,但是有多行语句的情况下,你需要将多行语句用{}括起来。javassist只接受单个语句或用大括号括起来的语句块。
五、新增一个成员变量
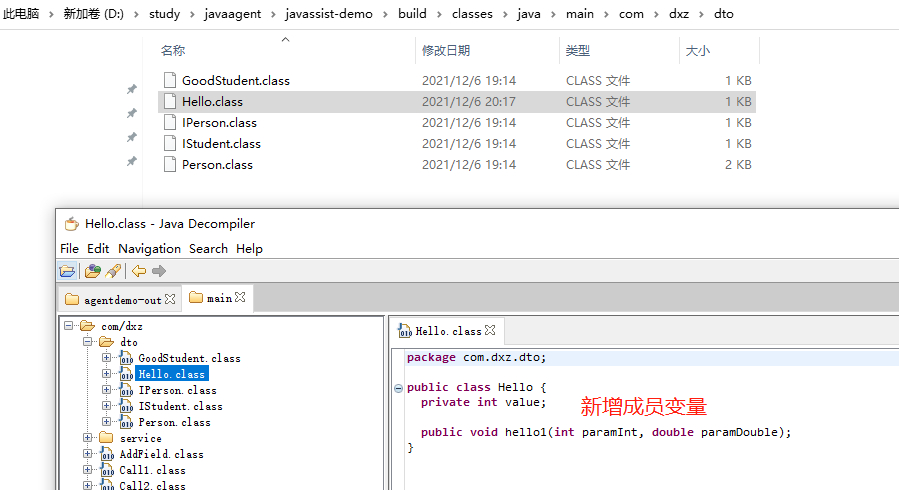
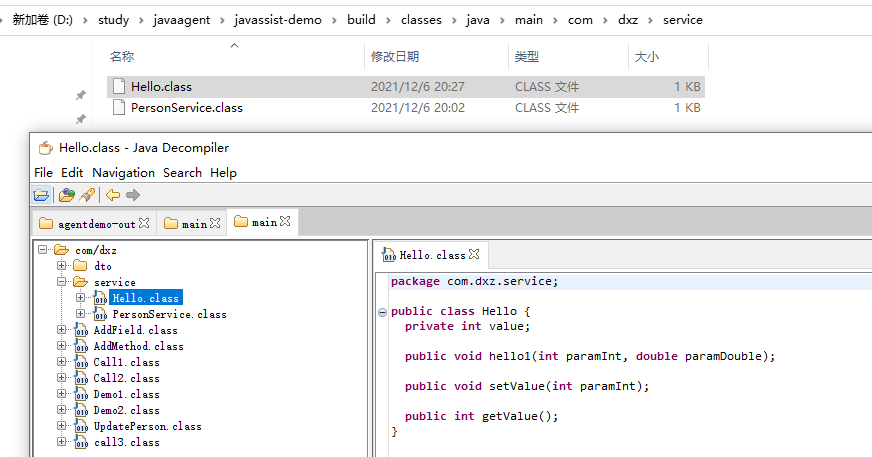
package com.dxz;

import javassist.*;

import java.io.IOException;
import java.net.URL;

public class AddField {
    public static void main(String[] args) throws CannotCompileException, IOException {
        URL resource = AddField.class.getClassLoader().getResource("");
        String file = resource.getFile();
        System.out.println("文件存储路径:" + file);

        ClassPool cp = ClassPool.getDefault();
        CtClass ctClass = cp.makeClass("com.dxz.dto.Hello");

        //添加一个hello1的方法
        CtMethod ctMethod = new CtMethod(CtClass.voidType, "hello1", new CtClass[]{CtClass.intType, CtClass.doubleType}, ctClass);
        ctMethod.setModifiers(Modifier.PUBLIC);
        ctClass.addMethod(ctMethod);

        //添加一个int类型的,名字为value的变量
        CtField ctField = new CtField(CtClass.intType, "value", ctClass);
        ctField.setModifiers(Modifier.PRIVATE);
        ctClass.addField(ctField);

        //保持为.class文件
        ctClass.writeFile(file);
    }
}
结果:
(六)、给变量新增get和set方法
package com.dxz;

import javassist.*;

import java.io.IOException;
import java.net.URL;

public class AddMethod {
    public static void main(String[] args) throws CannotCompileException, IOException, IOException {

        URL resource = AddMethod.class.getClassLoader().getResource("");
        String file = resource.getFile();
        System.out.println("文件存储路径:" + file);

        ClassPool cp = ClassPool.getDefault();
        CtClass ctClass = cp.makeClass("com.dxz.service.Hello");

        //添加一个hello1的方法
        CtMethod ctMethod = new CtMethod(CtClass.voidType, "hello1", new CtClass[]{CtClass.intType, CtClass.doubleType}, ctClass);
        ctMethod.setModifiers(Modifier.PUBLIC);
        ctClass.addMethod(ctMethod);

        //添加一个int类型的,名字为value的变量
        CtField ctField = new CtField(CtClass.intType, "value", ctClass);
        ctField.setModifiers(Modifier.PRIVATE);
        ctClass.addField(ctField);

        //为value变量添加set方法
        CtMethod setValue = new CtMethod(CtClass.voidType, "setValue", new CtClass[]{CtClass.intType}, ctClass);
        setValue.setModifiers(Modifier.PUBLIC);
        ctClass.addMethod(setValue);

        //为value变量添加get方法
        CtMethod getValue = new CtMethod(CtClass.intType, "getValue", new CtClass[]{}, ctClass);
        getValue.setModifiers(Modifier.PUBLIC);
        ctClass.addMethod(getValue);
        //保持为.class文件
        ctClass.writeFile(file);
    }
}
结果
(七)、给方法内部添加代码
你是不是很好奇,set和get方法内部并没有代码,当程序运行的时候,肯定会出错的。
我们预想的结果:
  private int value;
    public void setValue(int var1) {
        this.value = var1;
    }
    public int getValue() {
        return this.value;
    }
修改如下:
//设置方法体
setValue.setBody("this.value = var1;");
ctClass.addMethod(setValue);

//为value变量添加get方法
CtMethod getValue = new CtMethod(CtClass.intType, "getValue", new CtClass[]{}, ctClass);
getValue.setModifiers(Modifier.PUBLIC);
//设置方法体
getValue.setBody("return this.value;");
ctClass.addMethod(getValue);
结果:
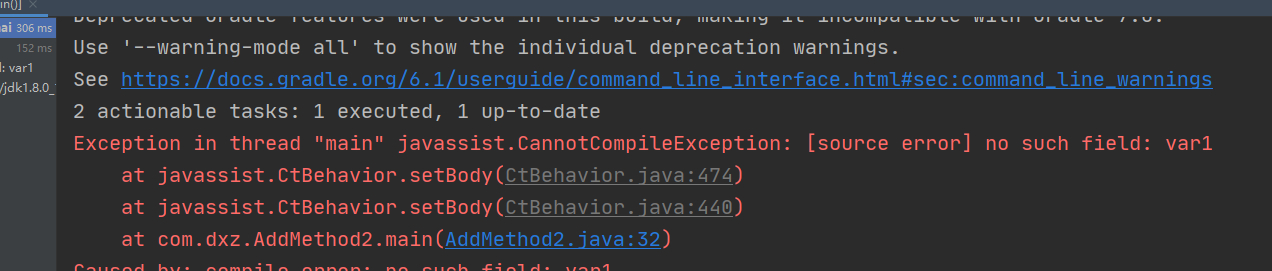
这个原因我们前面其实提到了,因为在编译的时候,会把变量名抹掉,传递的参数会依次在局部变量表中的顺序。
举个例子,如果要传递:
public void test(int a,int b,int c){ ... }
那么a,b,c就对应本地变量表中的1,2,3的位置:

那么我们获取变量时就不能使用原始的名字了,在Javassist中访问方法中的参数使用的是$1, 2 , 2, 2,…,而不是直接使用原始的名字。
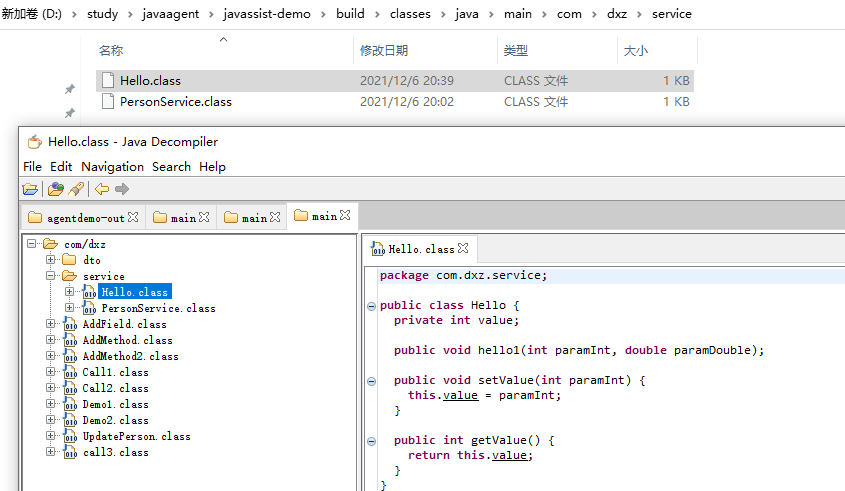
//设置方法体
setValue.setBody("this.value = $1;");
新的结果:
再扩展一下,2个参数的情况:
//添加一个hello2的方法
CtMethod ctMethod2 = new CtMethod(CtClass.voidType, "hello2", new CtClass[]{CtClass.intType, CtClass.doubleType}, ctClass);
ctMethod2.setModifiers(Modifier.PUBLIC);
ctMethod2.setBody("this.value = $1 + $2;");
ctClass.addMethod(ctMethod2);
结果:
因为我们value是int,$1是int,$2是double,所以做了强制转型处理。

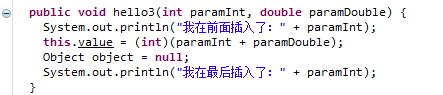
(八)、在方法体的前后分别插入代码
//添加一个hello3的方法
CtMethod ctMethod3 = new CtMethod(CtClass.voidType, "hello3", new CtClass[]{CtClass.intType, CtClass.doubleType}, ctClass);
ctMethod3.setModifiers(Modifier.PUBLIC);
ctMethod3.setBody("this.value = $1 + $2;");
ctMethod3.insertBefore("System.out.println(\"我在前面插入了:\"+$1);");
ctMethod3.insertAfter("System.out.println(\"我在最后插入了:\"+$1);");
ctClass.addMethod(ctMethod3);
结果:
参考:https://www.cnblogs.com/rickiyang/p/11336268.html