在使用SpringMVC的时候我们可以使用Spring封装的一系列表单标签,这些标签都可以访问到ModelMap中的内容。下面将对这些标签一一介绍。
在正式介绍SpringMVC的表单标签之前,我们需要先在JSP中声明使用的标签,具体做法是在JSP文件的顶部加入以下指令:
<%@taglib uri="http://www.springframework.org/tags/form" prefix="form" %>
1.1 form标签
使用Spring的form标签主要有两个作用,第一是它会自动的绑定来自Model中的一个属性值到当前form对应的实体对象,默认是command属性,这样我们就可以在form表单体里面方便的使用该对象的属性了;第二是它支持我们在提交表单的时候使用除GET和POST之外的其他方法进行提交,包括DELETE和PUT等。
1.1.1 支持绑定表单对象
我们先来看如下使用form标签的一个示例:
<form:form action="formTag/form.do" method="post">
    <table>
        <tr>
            <td>Name:</td><td><form:input path="name"/></td>
        </tr>
        <tr>
            <td>Age:</td><td><form:input path="age"/></td>
        </tr>
        <tr>
            <td colspan="2"><input type="submit" value="提交"/></td>
        </tr>
    </table>
</form:form>
这个时候如果Model中存在一个属性名称为command的javaBean,而且该javaBean拥有属性name和age的时候,在渲染上面的代码时就会取command的对应属性值赋给对应标签的值。如在上面的代码中,假设Model中存在一个属性名称为command的javaBean,且它的name和age属性分别为“Zhangsan”和“36”时,那么它在渲染时就会生成如下一段代码:
<form id="command" action="formTag/form.do" method="post">
    <table>
        <tr>
            <td>Name:</td><td><input id="name" name="name" type="text" value="ZhangSan"/></td>
        </tr>
        <tr>
            <td>Age:</td><td><input id="age" name="age" type="text" value="36"/></td>
        </tr>
        <tr>
            <td colspan="2"><input type="submit" value="提交"/></td>
        </tr>
    </table>
</form>
从上面生成的代码中,我们可以看出,当没有指定form标签的id时它会自动获取该form标签绑定的Model中对应属性名称作为id,而对于input标签在没有指定id的情况下它会自动获取path指定的属性作为id和name。
我们指定form默认自动绑定的是Model的command属性值,那么当我的form对象对应的属性名称不是command的时候,应该怎么办呢?对于这种情况,Spring给我们提供了一个commandName属性,我们可以通过该属性来指定我们将使用Model中的哪个属性作为form需要绑定的command对象。除了commandName属性外,指定modelAttribute属性也可以达到相同的效果。这里假设上面代码中我们存放在Model中的是user对象而不是默认的command对象,那么我们的代码就可以如下定义了:
<form:form action="formTag/form.do" method="post" commandName="user">
    <table>
        <tr>
            <td>Name:</td><td><form:input path="name"/></td>
        </tr>
        <tr>
            <td>Age:</td><td><form:input path="age"/></td>
        </tr>
        <tr>
            <td colspan="2"><input type="submit" value="提交"/></td>
        </tr>
    </table>
</form:form>
1.1.2 支持全部的Http请求方法
<form:form action="formTag/form.do" method="delete" modelAttribute="user">
    <table>
        <tr>
            <td>Name:</td><td><form:input path="name"/></td>
        </tr>
        <tr>
            <td>Age:</td><td><form:input path="age"/></td>
        </tr>
        <tr>
            <td colspan="2"><input type="submit" value="提交"/></td>
        </tr>
    </table>
</form:form>
在上面代码中我们设定了该form的提交方法是delete,这样在后台我们就可以给对应的请求方法的RequestMapping加上method为RequestMethod.DELETE的限制。我们来看一下上面的代码在进行渲染的时候会生成怎样的Html代码,其生成的代码如下所示:
<form id="user" action="formTag/form.do" method="post">
    <input type="hidden" name="_method" value="delete"/>
    <table>
        <tr>
            <td>Name:</td><td><input id="name" name="name" type="text" value="ZhangSan"/></td>
        </tr>
        <tr>
            <td>Age:</td><td><input id="age" name="age" type="text" value="36"/></td>
        </tr>
        <tr>
            <td colspan="2"><input type="submit" value="提交"/></td>
        </tr>
    </table>
</form>
从它生成的代码我们可以看出,Spring在实现除GET和POST之外的请求方法时,还是使用的POST方法进行请求,然后给表单加上了一个隐藏域,用以表示真正的请求方法,这个隐藏域的名称默认是“_method”。上面这样定义之后是不是就意味着我们可以以delete方式访问到“formTag/form.do”了呢?答案是不行的。这样定义我们只是多加了一个用以表示请求方法的隐藏域而已,实际的请求方式还是POST。Spring为我们提供了一个Filter——HiddenHttpMethodFilter,通过这个Filter我们可以把以POST方式传递过来的表示实际请求方式的参数转换为对应的真正的Http请求方法。所以这个时候我们还需要在web.xml中加上如下代码:
<filter>
   <filter-name>hiddenHttpMethodFilter</filter-name>
   <filter-class>org.springframework.web.filter.HiddenHttpMethodFilter</filter-class>
</filter>
<filter-mapping>
   <filter-name>hiddenHttpMethodFilter</filter-name>
   <url-pattern>/*</url-pattern>
</filter-mapping>
注意:HiddenHttpMethodFilter只能对以POST方式进行传递的表示请求方式的隐藏域转换为真正的Http请求方式。当我们直接在form:form标签的method中使用除GET和POST方法以外的其他方法时,Spring会自动生成以POST方式进行传递的表单以及对应的隐藏域。所以当我们需要手动的设置表示请求方法的隐藏域时,我们就需要指定表单的请求方式为POST,为GET将不会生效。
<form:form action="formTag/form.do" method="post" modelAttribute="user">
    <input type="hidden" name="_method" value="head"/>
    <table>
        <tr>
            <td>Name:</td><td><form:input path="name"/></td>
        </tr>
        <tr>
            <td>Age:</td><td><form:input path="age"/></td>
        </tr>
        <tr>
            <td colspan="2"><input type="submit" value="提交"/></td>
        </tr>
    </table>
</form:form>
上面代码就是一个手动定义请求方式的隐藏域的示例。这里表示请求方式的隐藏域的名称默认是“_method”,如果不想使用这个默认值的话,我们也可以通过form:form标签的methodParam属性来指定。如下面这个示例:
<form:form action="formTag/form.do" method="post" methodParam="requestMethod" modelAttribute="user">
    <input type="hidden" name="requestMethod" value="head"/>
    <table>
        <tr>
            <td>Name:</td><td><form:input path="name"/></td>
        </tr>
        <tr>
            <td>Age:</td><td><form:input path="age"/></td>
        </tr>
        <tr>
            <td colspan="2"><input type="submit" value="提交"/></td>
        </tr>
    </table>
</form:form>
同时我们也要告诉HiddenHttpMethodFilter我们是使用哪个表单参数作为methodParam,所以我们需要在配置HiddenHttpMethodFilter的时候指明methodParam对应的值。
<filter>
   <filter-name>hiddenHttpMethodFilter</filter-name>
   <filter-class>org.springframework.web.filter.HiddenHttpMethodFilter</filter-class>
   <init-param>
       <param-name>methodParam</param-name>
       <param-value>requestMethod</param-value>
   </init-param>
</filter>
<filter-mapping>
   <filter-name>hiddenHttpMethodFilter</filter-name>
   <url-pattern>/*</url-pattern>
</filter-mapping>
另外需要注意的是在有Multipart请求处理的时候HiddenHttpMethodFilter需要在Multipart处理之后执行,因为在处理Multipart时需要从POST请求体中获取参数。所以我们通常会在HiddenHttpMethodFilter之前设立一个MultipartFilter。MultipartFilter默认会去寻找一个名称为filterMultipartResolver的MultipartResolver bean对象来对当前的请求进行封装。所以当你定义的MultipartResolver的名称不为filterMultipartResolver的时候就需要在定义MultipartFilter的时候通过参数multipartResolverBeanName来指定。
<filter>
   <filter-name>multipartFilter</filter-name>
   <filter-class>org.springframework.web.multipart.support.MultipartFilter</filter-class>
   <init-param>
       <param-name>multipartResolverBeanName</param-name>
       <param-value>multipartResolver</param-value>
   </init-param>
</filter>
<filter-mapping>
   <filter-name>multipartFilter</filter-name>
   <url-pattern>/*</url-pattern>
</filter-mapping>

<filter>
   <filter-name>hiddenHttpMethodFilter</filter-name>
   <filter-class>org.springframework.web.filter.HiddenHttpMethodFilter</filter-class>
   <init-param>
       <param-name>methodParam</param-name>
       <param-value>requestMethod</param-value>
   </init-param>
</filter>
<filter-mapping>
   <filter-name>hiddenHttpMethodFilter</filter-name>
   <url-pattern>/*</url-pattern>
</filter-mapping>
1.2 input标签
SpringMVC的input标签会被渲染为一个type为text的普通Html input标签。使用SpringMVC的input标签的唯一作用就是它能绑定表单数据。SpringMVC表单标签最大的好处就是它支持数据绑定,当我们的表单标签不需要绑定的数据的时候,我们应该使用普通的Html标签。关于input标签绑定表单数据的方法已经在介绍form标签的时候顺带介绍过了,这里就不再过多的赘述了。
<form:form action="formTag/form.do" method="head" modelAttribute="user" methodParam="requestMethod">
    <table>
        <tr>
            <td>Name:</td><td><form:input path="name"/></td>
        </tr>
        <tr>
            <td>Age:</td><td><form:input path="age"/></td>
        </tr>
        <tr>
            <td colspan="2"><input type="submit" value="提交"/></td>
        </tr>
    </table>
</form:form>
1.3 hidden标签
hidden标签会被渲染为一个type为hidden的普通Html input标签。用法跟input标签一样,也能绑定表单数据,只是它生成的是一个隐藏域。
1.4 checkbox标签
checkbox标签会被渲染为一个type为checkbox的普通HTML input标签。checkbox标签也是支持绑定数据的。我们知道checkbox就是一个复选框,有选中和不选中两种状态,那么我们在使用checkbox标签的时候是如何来设定它的状态的呢?checkbox标签的选中与否状态是根据它绑定的值来判断的。
1.4.1 绑定boolean数据
当checkbox绑定的是一个boolean数据的时候,那么checkbox的状态跟该boolean数据的状态是一样的,即true对应选中,false对应不选中。
<form:form action="formTag/form.do" method="post" commandName="user">
    <table>
        <tr>
            <td>Male:</td><td><form:checkbox path="male"/></td>
        </tr>
        <tr>
            <td colspan="2"><input type="submit" value="提交"/></td>
        </tr>
    </table>
</form:form>
看上面这段代码,这个时候假设我们在渲染该视图之前往ModelMap中添加了一个user属性,并且该user对象有一个类型为boolean的属性male,那么这个时候如果male属性为true则Male那一栏的复选框将会被选中。
1.4.2 绑定列表数据
这里的列表数据包括数组、List和Set。下面将以List为例讲一下checkbox是如何根据绑定的列表数据来设定选中状态的。现在假设有一个类User,其有一个类型为List的属性roles,如下所示:
public class User {

    private List<String> roles;

    public List<String> getRoles() {
       return roles;
    }

    public void setRoles(List<String> roles) {
       this.roles = roles;
    }
}
那么当我们需要展现该User是否拥有某一个Role的时候,我们可以使用checkbox标签来绑定roles数据进行展现。当checkbox标签的value在我们绑定的列表数据中存在的时候该checkbox将为选中状态。来看下面一段代码:
<form:form action="formTag/form.do" method="post" commandName="user">
    <table>
        <tr>
            <td>Roles:</td>
            <td>
               <form:checkbox path="roles" value="role1"/>Role1<br/>
               <form:checkbox path="roles" value="role2"/>Role2<br/>
               <form:checkbox path="roles" value="role3"/>Role3
            </td>
        </tr>
    </table>
</form:form>
就上面代码而言就是当User拥有role1的时候对应的<form:checkbox path="roles" value="role1"/>就会为选中状态,也就是说roles列表中包含role1的时候该checkbox就会为选中状态。
1.4.3 绑定一个Object数据
checkbox还支持绑定数据类型为Object的数据,这种情况下Spring会拿所绑定对象数据的toString结果跟当前checkbox的value进行比较,如果能够进行匹配则该checkbox将为选中状态。看这样一个例子,有一个User类代码如下:
public class User {

    private Blog blog;

    public Blog getBlog() {
       return blog;
    }

    public void setBlog(Blog blog) {
       this.blog = blog;
    }
}
Blog类的代码如下:
public class Blog {

    public String toString() {
       return "HelloWorld";
    }

}
我们可以看到Blog类的toString方法已经被写死为“HelloWorld”了。这个时候假设我们往ModelMap中放了一个user对象,而且给该user对象设定了一个blog属性,那么当我们使用该ModelMap对象渲染如下视图代码时,checkbox标签的选中状态是怎样的呢?根据前面描述的当checkbox标签绑定的是一个Object对象的时候我们会拿该Object对象的toString和checkbox的value值进行比较,如果匹配则当前checkbox为选中状态,我们知道这里的checkbox将为选中状态。
<form:form action="formTag/form.do" method="post" commandName="user">
    <table>
        <tr>
            <td>HelloWorld:</td>
            <td>
               <form:checkbox path="blog" value="HelloWorld"/>
            </td>
        </tr>
        <tr>
            <td colspan="2"><input type="submit" value="提交"/></td>
        </tr>
    </table>
</form:form>
1.5 Checkboxes标签
相对于一个checkbox标签只能生成一个对应的复选框而言,一个checkboxes标签将根据其绑定的数据生成N个复选框。checkboxes绑定的数据可以是数组、集合和Map。在使用checkboxes时我们有两个属性是必须指定的,一个是path,另一个是items。Items表示当前要用来展现的项有哪些,而path所绑定的表单对象的属性表示当前表单对象拥有的项,即在items所展现的所有项中表单对象拥有的项会被设定为选中状态。先来看以下一段代码:
<form:form action="formTag/form.do" method="post" commandName="user">
    <table>
        <tr>
           <td>Roles:</td>
            <td>
               <form:checkboxes path="roles" items="${roleList}"/>
            </td>
        </tr>
        <tr>
            <td colspan="2"><input type="submit" value="提交"/></td>
        </tr>
    </table>
</form:form>
上面的JSP视图对应着如下的处理器方法:
@RequestMapping(value="form", method=RequestMethod.GET)
public String formTag(Map<String, Object> map) {
   User user = new User();
   List<String> roles = new ArrayList<String>();
   roles.add("role1");
   roles.add("role3");
   user.setRoles(roles);
   List<String> roleList = new ArrayList<String>();
   roleList.add("role1");
   roleList.add("role2");
   roleList.add("role3");
   map.put("user", user);
   map.put("roleList", roleList);
   return "formTag/form";
}
从以上代码中我们可以看到我们放在ModelMap中的roleList对象有三个元素,分别是role1、role2和role3,而我们的表单对象User的roles属性只拥有两个元素,分别是role1和role3,,所以当我们访问该处理器方法返回如上所示的视图页面时,我们要展现的复选框项是roleList,也就是role1、role2和role3,而我们表单对象只拥有role1和role3,所以在页面进行渲染的时候会展示3个复选框项,但只有role1和role3会被设定为选中状态。

上面介绍的这种情况是使用List作为展现复选框项的数据源,这种情况我们已经看到了它所呈现出来的标签Label和它的值是一样的。使用Array和Set作为数据源也是这种情况。那么如果要让checkboxes呈现出来的Label和实际上送的value不同的话应该怎么做呢?这个时候我们就可以使用Map作为数据源了。使用Map作为checkboxes的items属性的数据源时Key将作为真正的复选框的value,而Map的value将作为Label进行展示。当使用Map作为checkboxes的items属性的数据源时我们绑定的表单对象属性的类型可以是Array、集合和Map,这种情况就是判断items Map中是否含有对应的key来决定当前的复选框是否处于选中状态。我们来看以下一个处理器方法以及其对应的视图代码。
处理器方法:
@RequestMapping(value="form", method=RequestMethod.GET)
public String formTag(Map<String, Object> map) {
   User user = new User();
   List<String> roles = new ArrayList<String>();
   roles.add("role1");
   roles.add("role3");
   user.setRoles(roles);
   Map<String, String> roleMap = new HashMap<String, String>();
   roleMap.put("role1", "角色1");
   roleMap.put("role2", "角色2");
   roleMap.put("role3", "角色3");
   map.put("user", user);
   map.put("roleMap", roleMap);
   return "formTag/form";
}
对应的视图代码:
<form:form action="formTag/form.do" method="post" commandName="user">
    <table>
        <tr>
            <td>Roles:</td>
            <td>
               <form:checkboxes path="roles" items="${roleMap}"/>
            </td>
        </tr>
        <tr>
            <td colspan="2"><input type="submit" value="提交"/></td>
        </tr>
    </table>
</form:form>
这个时候我们知道会呈现出3个复选框,而checkboxes绑定的表单对象user的roles属性是一个集合对象,其包含的两个元素都能在checkboxes的items数据源中找到对应的Key,所以以这两个元素为value的checkbox将处于选中状态。效果如下:

当我们使用Array或者集合作为数据源,且里面的元素都是一个一个POJO时,我们还可以使用checkboxes标签的itemLabel和itemValue属性来表示使用数组或者集合中元素对象的哪一个属性作为需要呈现的单选框的label和value。
1.6 radiobutton标签
radiobutton标签会被渲染为一个type为radio的普通HTML input标签。radiobutton标签也是可以绑定数据的。以下是一个radiobutton的简单应用示例:
<form:form action="formTag/form.do" method="post" commandName="user">
    <table>
        <tr>
            <td>性别:</td>
            <td>
               <form:radiobutton path="sex" value="1"/>男
               <form:radiobutton path="sex" value="0"/>女
            </td>
        </tr>
        <tr>
            <td colspan="2"><input type="submit" value="提交"/></td>
        </tr>
    </table>
</form:form>
在上面代码中我们的radiobutton标签都是绑定了表单对象user的sex属性,当sex为1的时候就代表性别为男,上面性别为男的那一行就会被选中,当sex为0的时候就代表性别为女,上面性别为女的那一行就会被选中。
1.7 radiobuttons标签
radiobuttons标签跟radiobutton标签的区别如同checkbox标签对checkboxes标签的区别。使用radiobuttons标签的时候将生成多个单选按钮。使用radiobuttons有两个属性也是我们必须指定的,一个是path属性,表示绑定的表单对象对应的属性,另一个是items属性,表示用于生成单选按钮的数据源。跟checkboxes一样,radiobuttons的items属性和path属性都可以是Array、集合或者是Map。现在我们假设user在篮球、足球、乒乓球、羽毛球和排球这5种运动中选择一种作为自己最喜欢的球类运动。处理器方法和返回的对应的视图代码如下:
@RequestMapping(value="form", method=RequestMethod.GET)
public String formTag(Map<String, Object> map) {
   User user = new User();
   user.setFavoriteBall(4);//设置我最喜爱的球类运动是4羽毛球
   Map<Integer, String> ballMap = new HashMap<Integer, String>();
   ballMap.put(1, "篮球");
   ballMap.put(2, "足球");
   ballMap.put(3, "乒乓球");
   ballMap.put(4, "羽毛球");
   ballMap.put(5, "排球");
   map.put("user", user);
   map.put("ballMap", ballMap);
   return "formTag/form";
}
<form:form action="formTag/form.do" method="post" commandName="user"> <table> <tr> <td>最喜欢的球类:</td> <td> <form:radiobuttons path="favoriteBall" items="${ballMap}" delimiter=" "/> </td> </tr> <tr> <td colspan="2"><input type="submit" value="提交"/></td> </tr> </table> </form:form>
在上述代码中我们可以看到我们使用了radiobuttons的delimiter属性,该属性表示进行展示的radiobutton之间的分隔符。这里用的是一个空格。结果页面如下所示:

1.8 password标签
password标签将会被渲染为一个type为password的普通HTML input标签。
1.9 select标签
select标签将会被渲染为一个普通的HTML select标签。这里还拿前面的user最喜欢的球类运动来做示例,有如下这样一个处理器方法和对应的视图页面:
@RequestMapping(value="form", method=RequestMethod.GET)
public String formTag(Map<String, Object> map) {
   User user = new User();
   user.setFavoriteBall(4);//设置我最喜爱的球类运动是4羽毛球
   Map<Integer, String> ballMap = new HashMap<Integer, String>();
   ballMap.put(1, "篮球");
   ballMap.put(2, "足球");
   ballMap.put(3, "乒乓球");
   ballMap.put(4, "羽毛球");
   ballMap.put(5, "排球");
   map.put("user", user);
   map.put("ballMap", ballMap);
   return "formTag/form";
}
<form:form action="formTag/form.do" method="post" commandName="user">
    <table>
        <tr>
            <td>最喜欢的运动:</td>
            <td>
               <form:select path="favoriteBall" items="${ballMap}"/>
            </td>
        </tr>
       <tr>
            <td colspan="2"><input type="submit" value="提交"/></td>
        </tr>
    </table>
</form:form>
这个时候会渲染出如下结果:
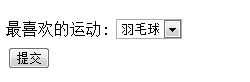
从上面示例我们可以看出,我们通过items属性给select标签指定了一个数据源,并且绑定了表单对象user的favoriteBall属性。Items属性是用于指定当前select的所有可选项的,但是它对于select标签而言不是必须的,因为我们还可以手动的在select标签中间加上option标签来指定select可选的option。Select标签支持的items属性的数据类型可以是Array、Collection和Map,当数据类型为Array或Collection时且其中的元素为一个POJO时,我们可以通过属性itemLabel和itemValue来指定将用于呈现的option Label和Value,其他情况下Array和Collection数据源中的元素将既作为可选项option的value又作为它的Label。当items的数据类型为Map时,Map的key将作为可选项option的value,而Map的value将作为option的Label标签。
1.10 option标签
option标签会被渲染为一个普通的HTML option标签。当一个SpringMVC select标签没有通过items属性指定自己的数据源的时候,我们就可以在select标签中通过普通HTML option标签或者SpringMVC option标签来指定可以选择的项。
<form:form action="formTag/form.do" method="post" commandName="user">
    <table>
        <tr>
            <td>最喜欢的运动:</td>
            <td>
               <form:select path="favoriteBall">
                   <option>请选择</option>
                   <form:option value="1">篮球</form:option>
                   <option value="4">羽毛球</option>
               </form:select>
            </td>
        </tr>
       <tr>
            <td colspan="2"><input type="submit" value="提交"/></td>
        </tr>
    </table>
</form:form>
我们可以看到在上面代码中我们是没有指定select标签的数据源的,而是通过在select标签体里面指定普通HTML option标签和SpringMVC option标签来指定可选项。其渲染的效果如下:

这个时候你可能会有两个疑问:
如果我在使用select标签的时候通过items属性指定了其数据源,同时又在其标签体里面使用了option标签,那么这个时候会渲染出什么样的效果呢?是两种形式有一个优先级呢,还是会两种共存呢?
从上面代码产生的效果来看SpringMVC option标签跟普通的HTML option标签的效果无异,那为什么还要引进一个SpringMVC option标签呢?
先来解释第一个问题,我们把上面的视图代码改为如下形式:
<form:form action="formTag/form.do" method="post" commandName="user">
    <table>
        <tr>
            <td>最喜欢的运动:</td>
            <td>
               <form:select path="favoriteBall" items="${ballMap}">
                   <option>请选择</option>
                   <form:option value="1">篮球</form:option>
                   <option value="4">羽毛球</option>
               </form:select>
            </td>
        </tr>
       <tr>
            <td colspan="2"><input type="submit" value="提交"/></td>
        </tr>
    </table>
</form:form>
从上述代码中我们可以看出来我们就是给select标签加了一个items属性,然后指定其数据源为当前pageContext的ballMap属性。此时,将渲染出如下效果:

答案很明显,当select标签指定了items属性的时候,它会忽略其标签体的内容,而使用items指定的内容来渲染出可选项。
对于第二个问题,我们把视图代码改为如下形式:
<form:form action="formTag/form.do" method="post" commandName="user">
    <table>
        <tr>
            <td>最喜欢的运动:</td>
            <td>
               <form:select path="favoriteBall">
                   <option>请选择</option>
                   <form:option value="1">篮球</form:option>
                   <option value="4">羽毛球-A</option>
                   <form:option value="4">羽毛球-B</form:option>
               </form:select>
            </td>
        </tr>
       <tr>
            <td colspan="2"><input type="submit" value="提交"/></td>
        </tr>
    </table>
</form:form>
我们可以看到,在上面代码中,我们定义了一个select标签,其绑定了当前表单对象user的favoriteBall属性,而且我们没有给该select指定items数据源。值得注意的是在该select标签体中我们通过普通HTML option和SpringMVC option标签定义了两个value均为4的option元素,而且我们也知道当前表单对象user的favoriteBall属性的值是4。接着我们来看一下上面代码渲染出的效果:

接着我们把上述代码中以SpringMVC option标签定义的option给删除,再看一下其渲染出的效果如下:

由此我们可以看出SpringMVC option标签和普通HTML option标签的区别就在于普通HTML option标签不具备数据绑定功能,而SpringMVC option标签具有数据绑定功能,它能把当前绑定的表单对象的属性对应的值对应的option置为选中状态。
1.11 options标签
使用options标签的时候需要我们指定其items属性,它会根据其items属性生成一系列的普通HTML option标签。这里的items属性的可取数据类型及其对应的渲染规则跟select的items属性是一样的。
<form:form action="formTag/form.do" method="post" commandName="user">
    <table>
        <tr>
            <td>最喜欢的运动:</td>
            <td>
               <form:select path="favoriteBall">
                   <option>请选择</option>
                   <form:options items="${ballMap}"/>
               </form:select>
            </td>
        </tr>
       <tr>
            <td colspan="2"><input type="submit" value="提交"/></td>
        </tr>
    </table>
</form:form>
上面代码将渲染出如下效果:

1.12 textarea标签
SpringMVC textarea标签将被渲染为普通HTML textarea标签。简单示例如下:
<form:form action="formTag/form.do" method="post" commandName="user">
    <table>
        <tr>
            <td>自我介绍:</td>
            <td>
               <form:textarea path="introduction" cols="20" rows="10"/>
            </td>
        </tr>
       <tr>
            <td colspan="2"><input type="submit" value="提交"/></td>
        </tr>
    </table>
</form:form>
1.13 errors标签
SpringMVC errors标签是对应于SpringMVC的Errors对象的。它的作用就是用于展现Errors对象中包含的错误信息的。我们利用errors标签来展现Errors的时候是通过errors标签的path属性来绑定一个错误信息的。我们可以通过path属性来展现两种类型的错误信息。
所有的错误信息,这个时候path的值应该置为“*”
当前对象的某一个域的错误信息,这个时候path的值应为所需展现的域的名称
看下面这样一个例子:
定义了一个UserValidator对象,专门用来对User对象进行验证,其代码如下:
import org.springframework.validation.Errors;
import org.springframework.validation.ValidationUtils;
import org.springframework.validation.Validator;

public class UserValidator implements Validator {

    @Override
    public boolean supports(Class<?> clazz) {
       // TODO Auto-generated method stub
       return User.class.equals(clazz);
    }

    @Override
    public void validate(Object target, Errors errors) {
       // TODO Auto-generated method stub
       ValidationUtils.rejectIfEmpty(errors, "name", null, "Name Is Empty");
       ValidationUtils.rejectIfEmpty(errors, "username", null, "Username Is Empty.");
    }

}
然后我们有这样一个控制器类:
@Controller
@RequestMapping("formTag")
public class FormTagController {

    @RequestMapping(value="form", method=RequestMethod.GET)
    public String formTag(Map<String, Object> map) {
       User user = new User();
       map.put("user", user);
       return "formTag/form";
    }

    @InitBinder
    public void initBinder(DataBinder binder) {
       binder.setValidator(new UserValidator());
    }

    @RequestMapping(value="form", method=RequestMethod.POST)
    public String form(@Valid User user, Errors errors) {
       if (errors.hasFieldErrors())
           return "formTag/form";
       return "formTag/submit";
    }
}
我们可以看到我们在上述控制器类中通过DataBinder对象给该类设定了一个用于验证的UserValidator,这样当我们请求该控制器的时候UserValidator将生效。
我们有如下这样一段表单代码:
<form:form action="formTag/form.do" method="post" commandName="user">
    <table border="1px" bordercolor="blue">
        <tr align="center">
            <td width="100">姓名:</td>
            <td width="150"><form:input path="name"/></td>
        </tr>
        <tr align="center">
            <td>用户名:</td>
            <td><form:input path="username"/></td>
        </tr>
        <tr>
            <td>所有错误信息:</td>
            <td><form:errors path="*"/></td>
        </tr>
        <tr>
            <td>Name的错误信息:</td>
            <td><form:errors path="name"/></td>
        </tr>
        <tr align="center">
            <td colspan="2"><input type="submit" value="提交"/></td>
        </tr>
    </table>
</form:form>
当我们提交上面的表单的时候会往Errors中注入两个错误信息,展示的页面信息将如下所示:
