在公司项目新版本方案选择中,对主导航中要使用的抽屉效果进行了调研。主要原因是旧的项目中所用的库ECS评价不是很好。现对当下比较火的几大热门抽屉效果的第三方库进行了调研。代码全部选自github
一.RESideMenu
https://github.com/romaonthego/RESideMenu


4300个星
示例程序跑到30M,可能是因为里面有图片。
支持iOS7+
测试效果很好
优点:
1.里面的文件较少,不需要使用cocoapods即可运行。
2.里面自定义API也比较多,可以设置变小的抽屉效果或者不变小。
3.里面有两个事例程序,一个是纯手码,一个是Storyboard得。可见作者也非常喜欢IB开发,此框架用IB开发应该可以完美兼容。
4.可以使用手势拖来拖去。
5.项目里各个文件不需要继承,导入头文件就行。
缺点:
1.左边显示的菜单可选项是固定的几个button,暂时想把左边换成tableView还不知道可不可行。(现已解决,可以改)
2.不能实现状态栏右移。(董铂然博客园)
3.暂时没找到两边控制器的占比怎么自定义。(现已解决,可以改)
核心代码
- (BOOL)application:(UIApplication *)application didFinishLaunchingWithOptions:(NSDictionary *)launchOptions {
//方法
//注释1
UINavigationController *nav = [[UINavigationController alloc]initWithRootViewController:[[FirstViewController alloc] init]];
//lvc
LeftViewController *lvc = [[LeftViewController alloc]init];
//
RESideMenu *sideMenuVc=[[RESideMenu alloc]initWithContentViewController:navleftMenuViewController:lvc rightMenuViewController:nil];
//整个抽屉的背景图片
sideMenuVc.backgroundImage = [UIImageimageNamed:@"aa_video_progress_bg.9.png"];
sideMenuVc.menuPreferredStatusBarStyle = 1;
sideMenuVc.delegate = self;
sideMenuVc.contentViewShadowColor = [UIColor blackColor];
sideMenuVc.contentViewShadowOffset = CGSizeMake(0, 0);
sideMenuVc.contentViewShadowOpacity = 0.6;
sideMenuVc.contentViewShadowRadius = 12;
sideMenuVc.contentViewShadowEnabled = YES;
// 抽屉的比例(可调整)
sideMenuVc.contentViewScaleValue = 1;
self.window.rootViewController = sideMenuVc;
return YES;
}
二.Mutual Mobile Drawer Controller
https://github.com/mutualmobile/MMDrawerController

3100个星
示例程序内存跑到15M
iOS7+
测试效果屌爆了。
优点。
1.里面有9个文件比上面的略多。但也还凑合吧
2.虽然没有缩小抽屉的动画,但是在平向切入时,leftVC有几种转场动画可选。
3.左边已经是tableVIew。
4.自定义的接口挺多。
5.作者最近还在更新
缺点。
1.相比于上面的,这个项目是用纯手码写的。
2.现在有一个抽搐的小bug,不过感觉我应该能改好。
3.在设置左右占比时,用的是固定数值,这样的话4s和6的手机界面显示是不一样的。(应该能改成百分比)
4.依旧状态栏不能右移。
5.项目内各个文件需要继承工具类。
侧拉栏抽屉效果图
需要导入的头文件:
- #import "MMDrawerController.h"
- #import "MMExampleDrawerVisualStateManager.h"
代码实现:
首先需要创建三个试图控制器
- //主视图
- FirstViewController *firstVC = [[FirstViewController alloc] init];
- //左边视图
- SecondViewController *secondVC = [[SecondViewController alloc] init];
- //右边视图
- ThirdViewController *thirdVC = [[ThirdViewController alloc] init];
- CustomizedNavigationController *navigationVC = [[CustomizedNavigationController alloc] initWithRootViewController:firstVC];
- CustomizedNavigationController *leftNavigationVC = [[CustomizedNavigationController alloc] initWithRootViewController:secondVC];
- CustomizedNavigationController *rightNavigationVC = [[CustomizedNavigationController alloc] initWithRootViewController:thirdVC];
- //抽屉管理 第三方
- //该第三方既可以只实现打开左侧栏也可以实现打开右侧栏,还可以同时都实现
- MMDrawerController *rooVC = [[MMDrawerController alloc] initWithCenterViewController:navigationVC leftDrawerViewController:leftNavigationVC rightDrawerViewController:rightNavigationVC];
- //只实现打开左侧栏
- //MMDrawerController *rooVCLeft = [[MMDrawerController alloc] initWithCenterViewController:navigationVC leftDrawerViewController:firstVC];
- //只实现打开右侧栏
- //MMDrawerController *rooVCRight = [[MMDrawerController alloc] initWithCenterViewController:navigationVC rightDrawerViewController:thirdVC];
- //指定window的根视图
- self.window.rootViewController = rooVC;
- //测了门的宽度
- [rooVC setMaximumLeftDrawerWidth:270];
- //设置侧拉门开与关的动画
- [rooVC setOpenDrawerGestureModeMask:MMOpenDrawerGestureModeAll];
- [rooVC setCloseDrawerGestureModeMask:MMCloseDrawerGestureModeAll];
- //侧开内容展示效果
- //设置向左滑动打开右侧栏
- [[MMExampleDrawerVisualStateManager sharedManager] setRightDrawerAnimationType:MMDrawerAnimationTypeNone];
- //设置向右滑动打开左侧栏
- [[MMExampleDrawerVisualStateManager sharedManager] setLeftDrawerAnimationType:MMDrawerAnimationTypeNone];
- [rooVC setDrawerVisualStateBlock:^(MMDrawerController *drawerController, MMDrawerSide drawerSide, CGFloat percentVisible) {
- MMDrawerControllerDrawerVisualStateBlock block;
- block = [[MMExampleDrawerVisualStateManager sharedManager]
- drawerVisualStateBlockForDrawerSide:drawerSide];
- if(block){
- block(drawerController, drawerSide, percentVisible);
- }
- }];
例子2:
ios开发中,展示类应用通常要用到抽屉效果,由于项目需要,本人找到一个demo,缩减掉一些不常用的功能,整理出一个较短的实例。
首先需要给工程添加第三方类库
这里讲的实例只加入了左滑抽屉。右滑和左滑只是初始化时多添加一个右视图控制器,其他方法基本相同。
下面是用手势实现抽屉的拉出和收回
1.初始化跟视图控制器时,在AppDelegate中导入头文件
#import "MMDrawerController.h"
2.初始化方法先初始化左视图和中心视图,也就是图中的
BoutiqueCollectionViewController
LeftDrawerTableViewController
3.初始化完两个子视图控制器后,初始化抽屉根视图控制器MMDrawerController,初始化抽屉控制器时需要将左视图控制器和中心视图控制器添加到抽屉视图控制器上。
//CollectionView的样式
UICollectionViewFlowLayout * flowLayout = [[UICollectionViewFlowLayout alloc] init];
//初始化中心视图
BoutiqueCollectionViewController * boutiqueCVC = [[BoutiqueCollectionViewController alloc] initWithCollectionViewLayout:flowLayout];
boutiqueCVC.collectionView.backgroundColor = [UIColor whiteColor];
UINavigationController * boutiqueNC = [[UINavigationController alloc] initWithRootViewController:boutiqueCVC];
//初始化左视图
LeftDrawerTableViewController * leftTVC = [[LeftDrawerTableViewController alloc] init];
UINavigationController * leftNC = [[UINavigationController alloc] initWithRootViewController:leftTVC];
//初始化抽屉视图控制器
MMDrawerController * drawerController = [[MMDrawerController alloc] initWithCenterViewController:boutiqueNC leftDrawerViewController:leftNC];
//设置抽屉抽出的宽度
drawerController.maximumLeftDrawerWidth = 200;
4.初始化完成之后添加滑动手势,通过滑动手势拉出和收回抽屉。手势封装在第三方类库中,程序如下。
//滑动手势快关抽屉
[drawerController setOpenDrawerGestureModeMask:MMOpenDrawerGestureModeAll];
[drawerController setCloseDrawerGestureModeMask:MMCloseDrawerGestureModeAll];
self.window.rootViewController = drawerController;
到此,将抽屉根视图控制器添加到window的根视图控制器上,运行程序,就可以实现用手势来控制抽屉的拉出和收回。
如果需要用按钮控制拉出和收回抽屉,需要加上下面的部分。
1.在中心视图控制器中添加头文件
#import "UIViewController+MMDrawerController.h"//第三方封装的头文件
#import "MMDrawerBarButtonItem.h"//第三方封装的头文件
#import "LeftDrawerTableViewController.h"、、左视图头文件
2.在viewDidLoad中实现添加左抽屉控制按钮的方法
[self setupLeftMenuButton];//在viewDidLoad中实现添加左抽屉控制按钮的方法
3.在下面实现添加按钮的方法
-(void)setupLeftMenuButton
{
//创建按钮
MMDrawerBarButtonItem * leftDrawerButton = [[MMDrawerBarButtonItem alloc] initWithTarget:self action:@selector(leftDrawerButtonPress:)];
//为navigationItem添加LeftBarButtonItem
[self.navigationItem setLeftBarButtonItem:leftDrawerButton animated:YES];
}
4.在下面实现抽屉按钮的动作方法。
//抽屉按钮动作
-(void)leftDrawerButtonPress:(id)sender
{
//开关左抽屉
[self.mm_drawerController toggleDrawerSide:MMDrawerSideLeft animated:YES completion:nil];
}
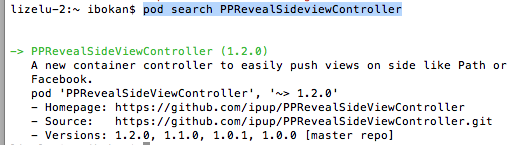
三.PPRevealSideViewController
https://github.com/ipup/PPRevealSideViewController

736星
iOS6+
测试效果一般。
优点:
1.支持iOS6
2.基本的自定义也都是支持的。
3.页面大部分是Storyboard搭建。
4.导入头文件,而不是继承。
缺点:
1.也是支持iOS6,导致界面始终控制的必须有一个黑条。并且在切换的时候太低端了。
2.除了自己的PPRSVC,还必须使用cocoapods依赖了另一个库,PPHelpMe。这个库有29个文件。
3.手势支持做的不怎么好,能拉出来但不能拉回去。(董铂然博客园)
说到抽屉效果在iOS中比较有名的第三方类库就是PPRevealSideViewController。一说到第三方类库就自然而然的想到我们的CocoaPods,本文用CocoaPods引入PPRevealSideViewController,然后在我们的工程中以代码结合storyboard来做出抽屉效果。
一.在工程中用CocoaPods引入第三方插件PPRevealSideViewController.
(1).在终端中搜索PPRevealSideViewController的版本
(2).在Podfile中添加相应的版本库

(3).之后保存一下Podfile文件,然后执行pod install即可
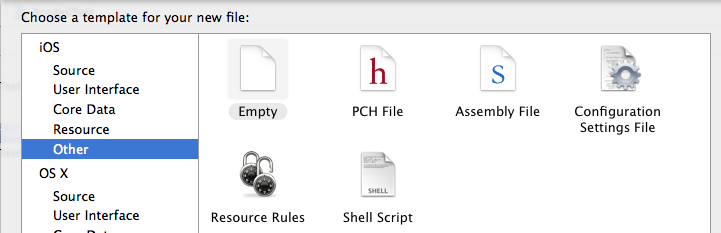
二、为我们的工程添加pch文件
因为用的是XCode6, 上面默认是没有pch文件的,如果我们想使用pch文件,需要手动添加,添加步骤如下
1.在XCode6中是么有pch文件的,如下图

2.创建pch文件

3.配置pch文件
(1)、找工程的Targets->Build Settings->Apple LLVM 6.0 - Language

(2)在Prefix Header下面的Debug和Release下添加$(SRCROOT)/工程名/pch文件,入下图

三、使用PPRevealSideViewController来实现抽屉效果
当然了首先在pch文件中引入我们的第三方类库,然后使用即可
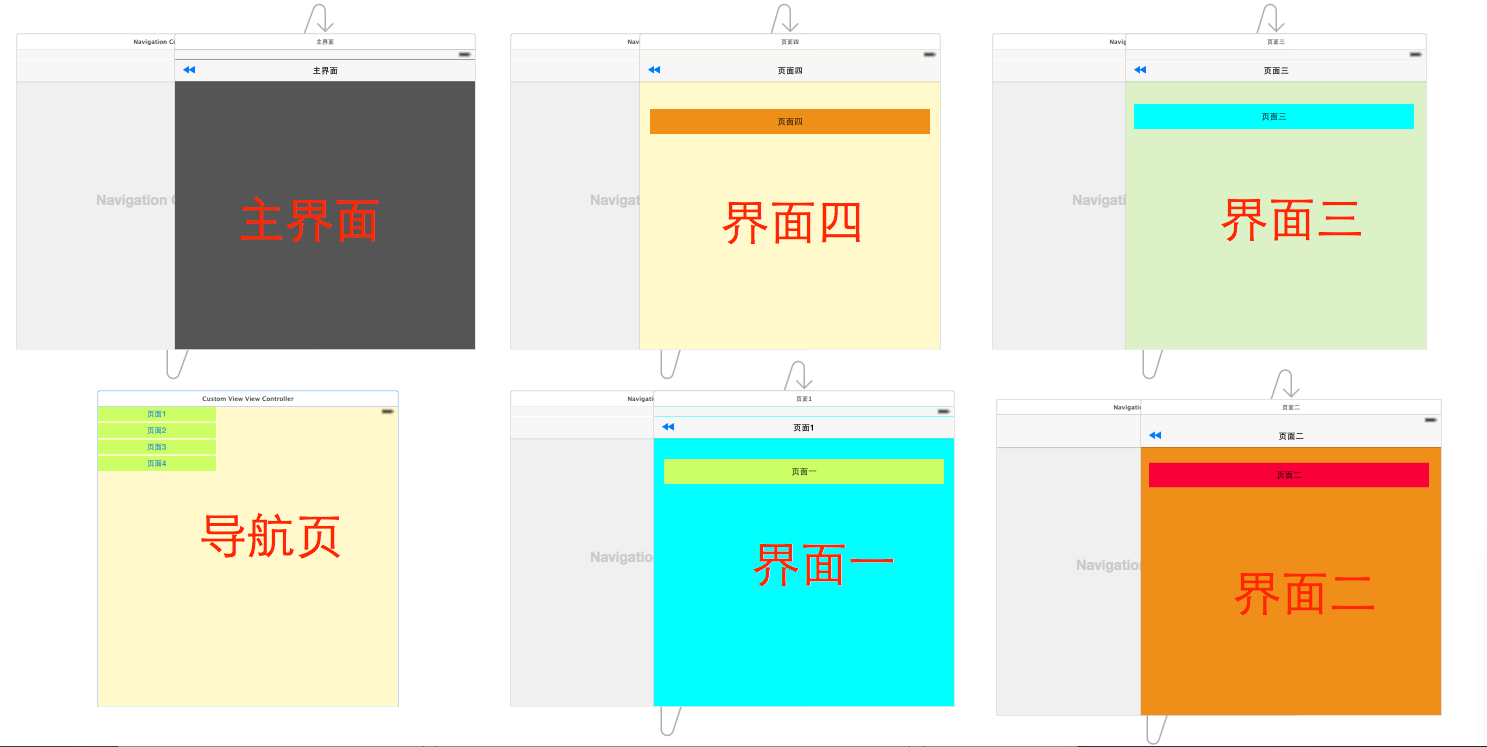
1.在storyboard拖出来我们要用的视图控制器,点击主界面上的按钮会以抽屉的形式展示出导航页,然后在导航页导航到各个界面,之后在从各个页面回到主界面
2.在AppDelegate中初始化我们的PPRevealSideViewController并设置为启动页面代码如下:
- (BOOL)application:(UIApplication *)application didFinishLaunchingWithOptions:(NSDictionary *)launchOptions {
  // Override point for customization after application launch.

  self.window = [[UIWindow alloc] initWithFrame:[[UIScreen mainScreen] bounds]];

  //获取主视图的导航控制器
  UIStoryboard *storyboard = [UIStoryboard storyboardWithName:@"Main" bundle:[NSBundle mainBundle]];
  UIViewController *vc = [storyboard instantiateViewControllerWithIdentifier:@"NavigationController"];

  //新建PPRevealSideViewController,并设置根视图(主页面的导航视图)
  PPRevealSideViewController *sideViewController = [[PPRevealSideViewController alloc] initWithRootViewController:vc];

  sideViewController.fakeiOS7StatusBarColor = [UIColor whiteColor];

  //把sideViewController设置成根视图控制器
  self.window.rootViewController = sideViewController;

  [self.window makeKeyAndVisible];

  return YES;
}
3.在主界面使用PPRevealSideViewController来推出导航页
- (IBAction)tapItem:(id)sender {

  UIStoryboard *storybaord = [UIStoryboard storyboardWithName:@"Main" bundle:[NSBundle mainBundle]];
  UITableViewController *table = [storybaord instantiateViewControllerWithIdentifier:@"CustomViewViewController"];
  [self.revealSideViewController pushViewController:table onDirection:PPRevealSideDirectionLeft animated:YES];
}
4.在导航页点击不同的按钮使用PPRevealSideViewController跳转到不同的controller
- (IBAction)tap1:(id)sender {
   UIStoryboard *storyboard = [UIStoryboard storyboardWithName:@"Main" bundle:[NSBundle mainBundle]];
  UIViewController *one = [storyboard instantiateViewControllerWithIdentifier:@"one"];
  [self.revealSideViewController popViewControllerWithNewCenterController:one animated:YES];
}

- (IBAction)tap2:(id)sender {

  UIStoryboard *storyboard = [UIStoryboard storyboardWithName:@"Main" bundle:[NSBundle mainBundle]];
  UIViewController *one = [storyboard instantiateViewControllerWithIdentifier:@"two"];
  [self.revealSideViewController popViewControllerWithNewCenterController:one animated:YES];

}

- (IBAction)tap3:(id)sender {
  UIStoryboard *storyboard = [UIStoryboard storyboardWithName:@"Main" bundle:[NSBundle mainBundle]];
  UIViewController *one = [storyboard instantiateViewControllerWithIdentifier:@"three"];
  [self.revealSideViewController popViewControllerWithNewCenterController:one animated:YES];
}

- (IBAction)tap4:(id)sender {
  UIStoryboard *storyboard = [UIStoryboard storyboardWithName:@"Main" bundle:[NSBundle mainBundle]];
  UIViewController *one = [storyboard instantiateViewControllerWithIdentifier:@"four"];
  [self.revealSideViewController popViewControllerWithNewCenterController:one animated:YES];
}
5.各个页面返回到主界面的代码如下:
- (IBAction)tapPage:(id)sender {
  UIStoryboard *storyboard = [UIStoryboard storyboardWithName:@"Main" bundle:[NSBundle mainBundle]];

  UIViewController *view = [storyboard instantiateViewControllerWithIdentifier:@"NavigationController"];

  [self.revealSideViewController popViewControllerWithNewCenterController:view animated:YES];
}
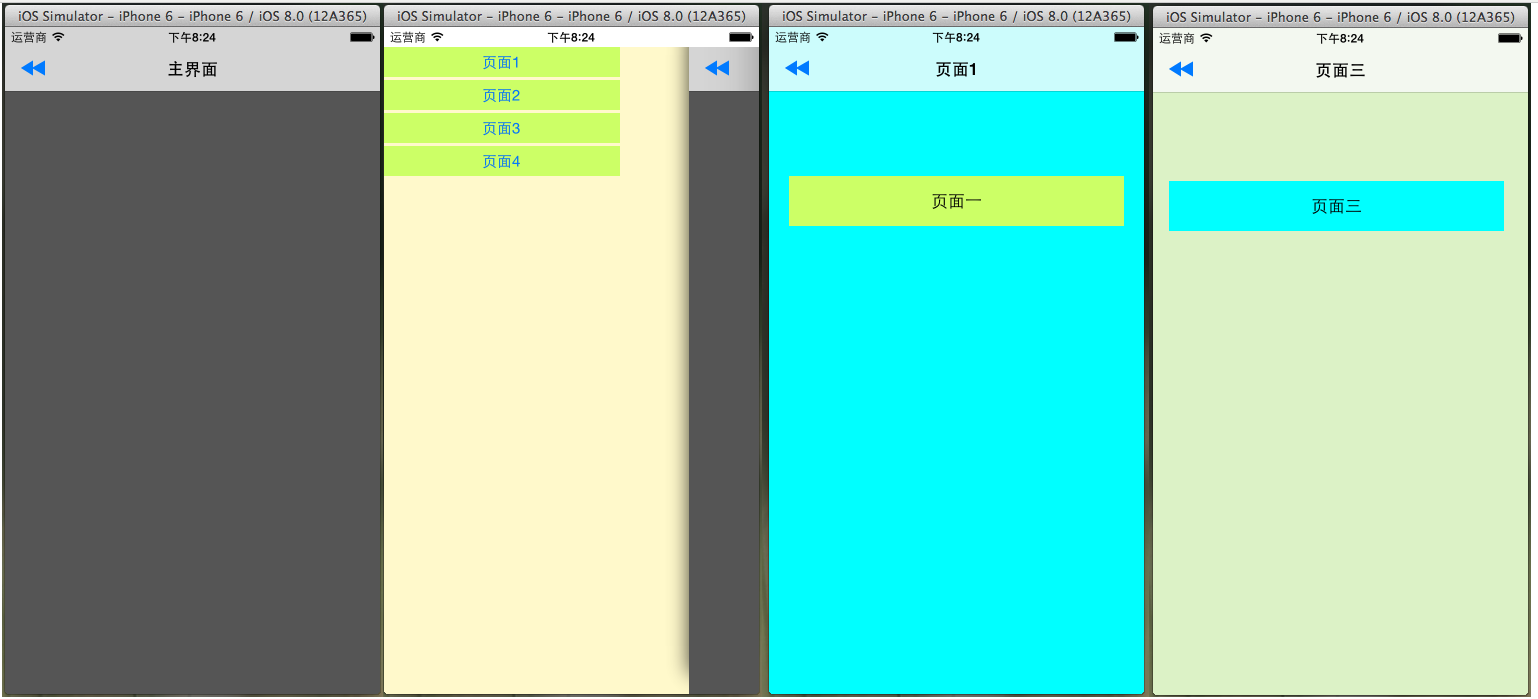
四.到此效果实现完毕,下面是效果图:
以上就是本文的全部内容,希望对大家的学习有所帮助。
四.SWRevealViewController
https://github.com/John-Lluch/SWRevealViewController


2100星
非常干净的界面也没有图片,为什么内存会跑到28M?
iOS7+
测试的效果一般
优点:
1.使用的是导入头文件,而不是继承。
2.非常干净,基本只有核心功能,只有两个文件一个.h一个.m
3.可以实现三层抽屉。
4.支持手势的各种操作。
5.里面使用了不少xib文件。
6.左右占比控制的很好。
缺点:
1.能够自定义的接口不是很多。(但改源码的话应该也不会很难)
2.横屏时的屏幕适配需要再改进下。
2.貌似没有缺点了。
五.ECSlidingViewController (现在用的)
https://github.com/ECSlidingViewController/ECSlidingViewController

3500个星
支持iOS5
测试效果一般。
优点:
1.除了星多,貌似没有优点(和上面几个相比的话)
缺点:
1.用了13个文件,但是貌似只是实现了最基本的抽屉效果功能。
2.缩在右边时还向右边拉,会产生bug。
3.用的是继承。每个文件都要继承。
4.去年8月以后就停止更新了。
结果分析
暂时我更倾向于第一种,首先接口清晰,代码清晰,并且对项目的侵入性很小这事根本原因。目前也正在详细调研此库。
(如果有使用过上述库,有其他观点的欢迎指点)