首先下载安装 redux react-redux
npm install redux --save-dev
npm install react-redux --save-dev
1、先创建一个store的一个文件夹(这个是一个公共的仓库)
并在store的文件夹中创建一个store.js文件、一个actions文件夹(这个是所要执行的动作指令)、reducer文件夹(这个是一个纯函数)
2、在store文件夹下的store.js文件中写入如下代码:
import {createStore,applyMiddleware} from "redux";
import reducer from "./reducer/reducer.js"; //这个是所导入的纯函数
import thunk from 'redux-thunk' //这个是用于异步请求的中间件
const store=createStore(reducer,applyMiddleware(thunk));
export default store;
3、在store文件夹下的actions文件夹下的action.js文件中写入如下代码:
import axios from "axios";
export default {
handlePutback(){
return {
type:"PUTBACK", //这个是所发送的指令
}
},
handleGetCinemaDetail(id){
return (dispatch)=>{ //用dispatch这个函数执行这个异步
var url_cinemaDetail="/v3/ajax/cinemaDetail?cinemaId="+id
axios.get(url_cinemaDetail).then((res)=>{
dispatch({
type:"GETCINEMADETAIL", //这个是所发送的指令
res //这个是axios发送请求所请求回来的数据
})
})
}
}
}
4、在store文件夹下的reducer文件夹下的reducer.js文件中写入如下代码:(这个是封装的总的reducer纯函数)
import {combineReducers} from "redux";
import filmReducer from "./Film/filmReducer.js"; //这个子的纯函数
import cinemaReducer from "./Cinema/cinemaReducer.js"; //这个子的纯函数
import myReducer from "./My/myReducer.js"; //这个子的纯函数
import detailspageReducer from "./Detailspage/detailspageReducer.js"; //这个子的纯函数
const reducer=combineReducers({
film:filmReducer,
cinema:cinemaReducer,
my:myReducer,
detailspage:detailspageReducer,
})
export default reducer;
5、在子的reducer中,代码如下:
var initState = { //这个是用于初始化数据
list: [],
coming: [],
Times: [],
cinemas: localStorage.cinemas ? JSON.parse(localStorage.cinemas).cinemas : [],
brand: {},
district: {},
hallType: {},
service: {},
subway: {},
timeRanges: {},
cine:{},
cinemaTitle: localStorage.cinemaTitle ? JSON.parse(localStorage.cinemaTitle) : {},
detailMovie:localStorage.detailMovie?JSON.parse(localStorage.detailMovie):{},
}
const reducer = (state = initState, actions) => {
var newState = { ...state } //用于拷贝初始化数据
if (actions.type === "DATA") { //匹配相对应的action,之后进行相对性的操作
newState.list = actions.list;
}
if (actions.type === "DISPLAY") {
newState.brand = actions.brand;
localStorage.brand=JSON.stringify(newState.brand);
newState.district = actions.district;
localStorage.district=JSON.stringify(newState.district);
newState.hallType = actions.hallType;
localStorage.hallType=JSON.stringify(newState.hallType);
newState.service = actions.service;
localStorage.service=JSON.stringify(newState.service);
newState.subway = actions.subway;
localStorage.subway=JSON.stringify(newState.subway);
newState.timeRanges = actions.timeRanges;
localStorage.timeRanges=JSON.stringify(newState.timeRanges);
}
return newState
}
export default reducer;
6、之后再你所要用的主页面引入你所创建的store,代码如下:
import React from 'react';
import ReactDOM from 'react-dom';
import App from './App';
import "./flexble.js"
import './index.css';
import store from "./store/store.js" //引入你所创建的store
import {Provider} from "react-redux" //通过react-redux中的Provider 来连接store
ReactDOM.render(
<Provider store={store}> //之后通过标签进行包裹 并传入store
<App />
</Provider>
, document.getElementById('root')
);
这个一个react的仓库就创建完毕啦!!!
7、在组建中运用store中的公共数据和函数方法,代码如下:
import React, { Component } from 'react';
import styled from 'styled-components' //用于react的样式格力的插件
import action from "../../../store/reducer/Film/action"
import { connect } from "react-redux" //react-redux中的高阶组件
import Swiper from "swiper"
import 'swiper/dist/css/swiper.css'
class Show extends Component {
componentDidMount() {
this.props.handleData();
this.props.handleTime();
}
componentDidUpdate() {
new Swiper('.swiper-container', {
freeMode: true,
slidesPerView: 3,
// autoplay:true,
// loop:true,
});
}
render() {
return (
<Div>
{/*轮播导航 */}
<div className="show-lately">
<p className="show-title">近期最受期待</p>
<div className="swiper-container" >
<div className="show swiper-wrapper">
{
this.props.com ? this.props.com.map((item, index) => {
return <div className="swiper-slide" key={index}>
<div className="show-content">
<div className="show-poster"><img src={item.img.slice(5,22)+148+"."+208+item.img.slice(25)} /><span>{item.wish}人想看</span></div>
<h5>{item.nm}</h5>
<p>{item.comingTitle}</p>
</div>
</div>
}) : ""
}
</div>
</div>
</Div >
);
}
}
//通过映射的方式将store中的数据和方法映射到组件中
var mapState = (state) => { //通过映射的方式将store中的数据映射到组件中
console.log(state.film.Times)
return {
com: state.film.coming.coming,
time: state.film.Times
}
}
var mapActions = (dispatch) => { //通过映射的方式将store中的方法映射到组件中
return {
handleData() {
dispatch(action.getDatas())
},
handleTime() {
dispatch(action.getTimes())
}
}
}
export default connect(mapState, mapActions)(Show); //react-redux中的高阶组件
const Div = styled.div` //样式的修改------------------类似less一样(注意 需要定义 之后用``这个进行定义)
background:#f5f5f5;
height:100%;
100%;
position:absolute;
top:1.86rem;
//轮播导航样式
.show-lately{
padding: .2rem 0 .2rem .3rem;
background-color: #fff;
margin-bottom: .1rem;
overflow:hidden;
.show-title{
margin: 0 0 .2rem;
font-size: .3rem;
color: #333;
}
.swiper-container{
// display:initial;
.swiper-wrapper{
// overflow: scroll;
white-space: nowrap;
// display: initial;
.swiper-slide{
display: inherit;
auto;
.show-content{
display: inline-block;
// 2rem;
overflow: hidden;
margin-right: .1rem;
.show-poster{
2rem;
height: 2.7rem;
position: relative;
margin-bottom: .1rem;
img{
100%;
height:100%;
}
span{
display: inline-block;
position: absolute;
left: .1rem;
bottom: .02rem;
color: #faaf00;
font-size: .2rem;
font-weight: 600
}
}
h5{
margin: 0 0 .03rem;
font-size: .26rem;
color: #222;
text-overflow: ellipsis;
overflow: hidden;
white-space: nowrap;
70%;
}
p{
margin: 0;
font-size: .24rem;
color: #999;
}
}
}
}
}
}
.show-list{
background:#fff;
.show-list-title{
padding: .2rem 0 0 .2rem;
font-size: .3rem;
color: #333;
}
.show-list-box{
display:flex;
align-items: center;
.list-img{
1.4rem;
height:100%
margin-left:.2rem;
img{
1.4rem;
height: 100%;
display: block;
}
}
.list-cont{
justify-content:space-between;
display:flex;
70%;
border-bottom: 1px solid #e6e6e6;
padding: .2rem 0 .2rem .1rem;
.list-cont-l{
padding:.1rem .2rem;
70%;
.list-left-t{
margin-bottom: .07rem;
display:flex;
align-items: center;
span:nth-of-type(1){
60%;
font-size:.4rem;
color: #333;
font-weight: 700;
padding-right:.1rem;
flex-shrink: 1;
display:inline-block;
overflow: hidden;
text-overflow: ellipsis;
white-space: nowrap;
}
span:nth-of-type(2){
border:1px solid #3c9fe6;
1.1rem;
height: .35rem;
border-radius: .1rem;
background: #f4f4f4;
color: #3c9fe6;
}
}
.list-left-b{
color:#666;
font-size:.32rem;
div:nth-of-type(1){
span{
font-weight: 700;
color: #faaf00;
font-size: .34rem;
margin-left:.1rem;
}
}
div:nth-of-type(2){
90%;
margin-top:.1rem;
span{
display: inline-block;
overflow: hidden;
text-overflow: ellipsis;
white-space: nowrap;
100%;
}
}
div:nth-of-type(3){
overflow: hidden;
text-overflow: ellipsis;
white-space: nowrap;
90%;
}
}
}
.list-cont-r{
20%;
position: relative;
right:.4rem;
span{
position:absolute;
top: 0;
bottom: 0;
margin: auto;
left: 0;
display: inline-table;
// background:#3c9fe6;
background:red;
1.1rem;
height: .6rem;
line-height:.6rem;
text-align:center;
border-radius: .1rem;
color: #fff;
cursor: pointer;
}
}
}
}
}
}
`
react-redux的工作流程如下,用于更好的理解
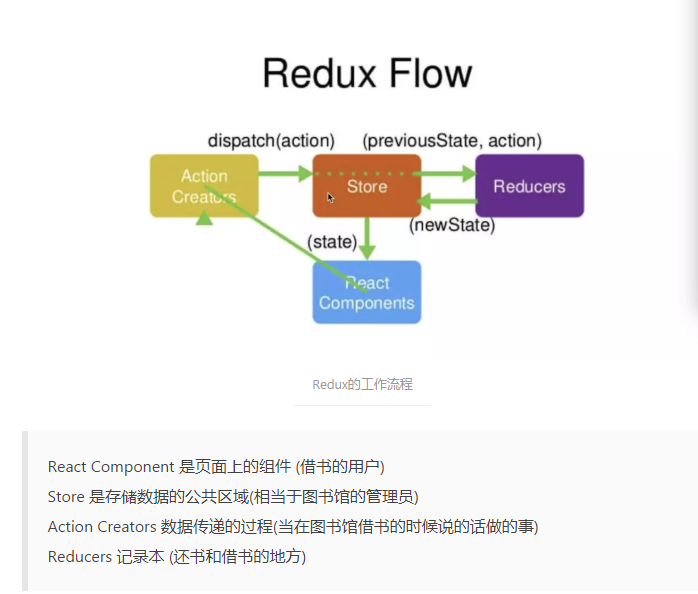
Redux 三大原则
-
单一数据源 整个应用的 state 被存储在一个 Object tree 中,且只存在于唯一的Store中。
-
state 是只读的 唯一改变 state 的方法就是触发 action,action 是一个用于描述发生事件的普通对象,视图部分只需要表达想要修改的意图,所有修改都会被集中化处理。
-
使用纯函数来执行修改 为了实现根据 action 修改 state值,我们就需要编写 Reducer。它是一个纯函数,接收先前的 state 和 action 返回新的 state ,随着应用的变大,你可以将它拆成多个小的 Reducer ,分别独立操作 state tree 中的不同部分。
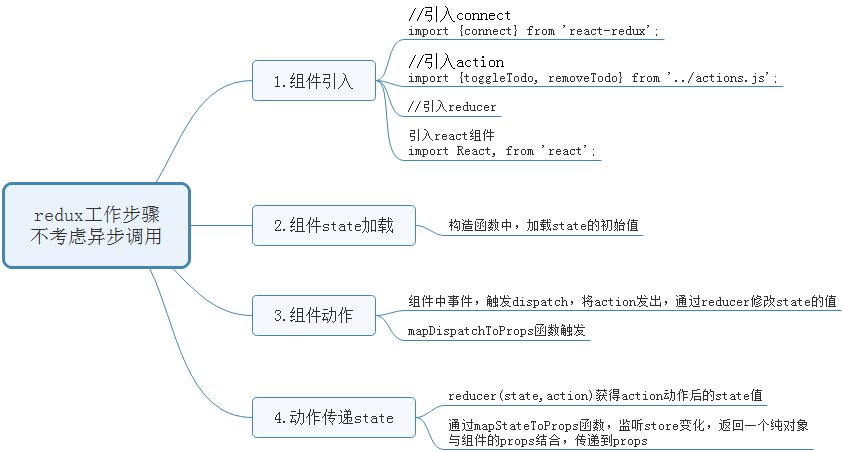
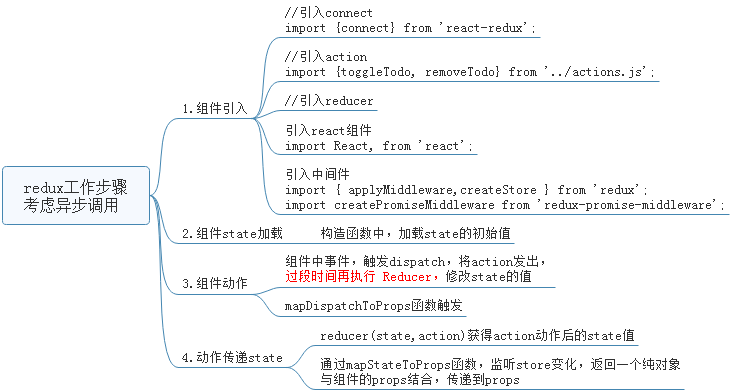
2.具体工作步骤
Action
const add =()=>{
	return {
		type:"add",
		data:id,
	}
}
上边函数返回的就是一个 Action,它是一个包含 type 和 data 的对象。 Action 的作用就是告诉状态管理器需要做什么样的操作,正如上边的例子,就是要添加一条信息,这样就定义了一个Action,而 data 就是你做这个操作需要的数据。
Reducer
reducer 是一个函数(纯函数),接受 旧 state 和 action,根据不同的 Action 做出不同的操作并返回新的 state 。即:(state, action) => state
const reducer = (state,action)=>{
	switch(action.type){
		case "add":
			state['newItemId'] = action.data;
			return {...state};
		case "delete":
			delete state.newItemId;
			return {...state};
		default :
			return state;
	}
}
在没有任何操作的情况下,我们返回的 state 与原 state 相同。
Store
import { createStore } from 'redux';
const store = createStore(reducer);
这就是 store, 用来管理 state 的单一对象,其中有三个方法:
-
store.getState():获取state ,如上,经过 reducer 返回了一个新的 state,可以用该函数获取。
-
store.dispatch(action):发出 action,用于触发 reducer 更新 state,
-
store.subscribe(listener):监听变化,当 state 发生变化时,就可以在这个函数的回调中监听。
React-Redux
Redux 官方提供的 React 绑定库。
容器组件与傻瓜组件
在应用中,通常容器组件对于 Redux 可知,他们的子组件应该是"傻瓜的"(傻瓜组件),并且通过porps获取数据。 容器组件: 通过组件 state 属性维护自身及其子组件的数据,它可以向 Redux 发起 action ,从 Redux 获取 新state值。 傻瓜组件: 通过 props 调用回调函数,从 props 获取数据展示。
注入 Store
import React from 'react';
import ReactDOM from 'react-dom';
import { createStore } from 'redux';
import { Provide } from 'react-redux';
import reducer from './reducer';
import App from './app';
const store = createStore(reducer);
class RootComp extends React.Component{
render(){
connect#
该方法用于从 UI 组件生成容器组件,
import React from 'react';
import { connect } from 'react-redux';
import Home from './home';
class AppContainer extends React.Component{
render(
return (
<Home/>
);
)
}
const App = connect()(AppContainer);
connect( mapStateToProps , mapDispatchToProps , mergeProps , options )();
连接 React 组件与 Redux Store
-
mapStateToProps 该参数为一个 function mapStateToProps (state,[ownProps]){...},定义该参数后组件就可以监听 Redux Store 的变化,任何时候只要store发生变化,该函数就会被调用,该函数必须返回一个纯对象,它会与组件的 props 结合,而第二个参数 ownProps 被指定时,它代表传递到该组件的props,且只要组件收到新的 props ,mapStateToProps 就被调用。
-
mapDispatchToProps 通常我们会将该参数省略,此时默认情况下,dispatch 会注入到组件的props中,在你需要出发 action 的地方(可能是某个事件函数)使用该disaptch 函数将 action 发出。
例子:
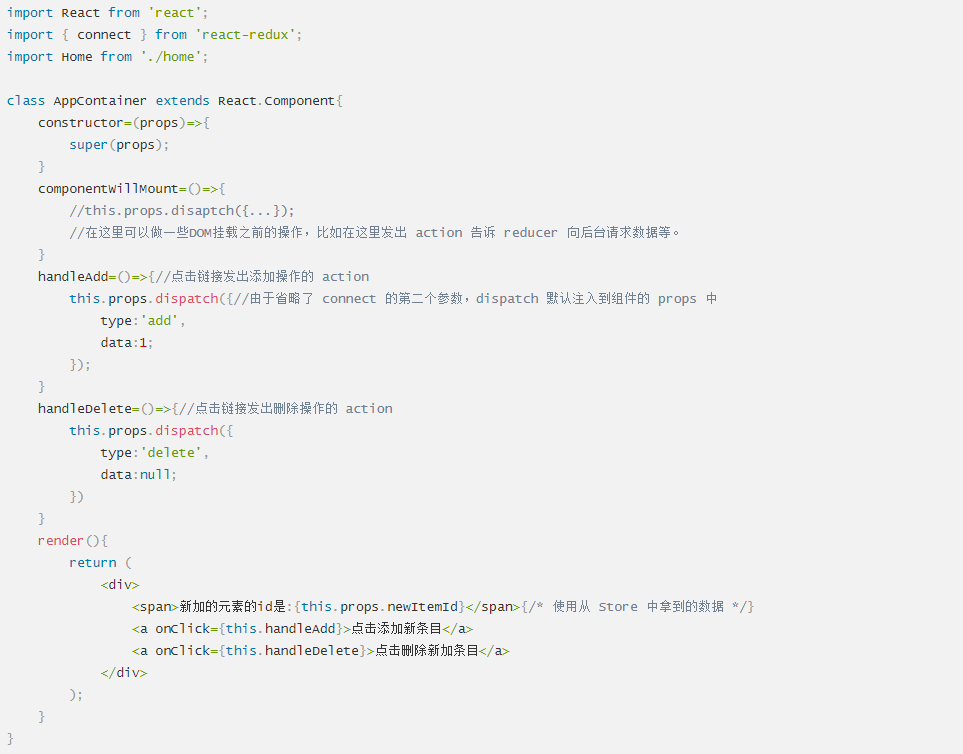

在上边例子中,我们只要点击下添加链接,组件就会通过点击事件触发 dispath 函数 发送 action 到 store 中的 reducer, reducer 则根据 action 的 type 来决定执行什么操作,之后在 store 中新增一条记录(newItemId)后返回一个新的 state (里边包含Store中发生改变后的所有值),由于组件使用 connect 将自己与 Store 绑定起来,Store 中的值发生变化就会执行 mapStateToProps,将新的 state 放入组件的 props,从而引发组件的渲染。