前言
1.理论知识:UFLDL教程、Deep learning:十六(deep networks)
2.实验环境:win7, matlab2015b,16G内存,2T硬盘
3.实验内容:Exercise: Implement deep networks for digit classification。利用深度网络完成MNIST手写数字数据库中手写数字的识别。即:用6万个已标注数据(即:6万张28*28的图像块(patches)),作为训练数据集,然后把它输入到栈式自编码器中,它的第一层自编码器提取出训练数据集的一阶特征,接着把这个一阶特征输入到第二层自编码器中提取出二阶特征,然后把把这个二阶特征输入到softmax分类器,再用原始数据的标签和二阶特征来训练softmax分类器,最后利用BP算法对整个网络的权重值进行微调以更好地学习数据,再用1万个已标注数据(即:1万张28*28的图像块(patches))作为测试数据集,用前面训练好的softmax分类器对测试数据集进行分类,并计算分类的正确率。本节整个网络结构如下:

注意:本节实验与Deep Learning六:Softmax Regression_Exercise(斯坦福大学深度学习教程UFLDL)和Deep Learning七:Self-Taught Learning_Exercise(斯坦福大学深度学习教程UFLDL)的区别如下:
Deep Learning六:Softmax Regression_Exercise(斯坦福大学深度学习教程UFLDL)用原始数据本身作训练集直接输入softmax分类器分类,Deep Learning七:Self-Taught Learning_Exercise(斯坦福大学深度学习教程UFLDL)是从原始数据中提取特征作训练集,再把其特征输入softmax分类器分类,而本节实验是从原始数据中提取特征作训练集,再把其特征输入softmax分类器分类,最后再用大量已标注数据对整个网络的权重值进行微调,从而得到更好的分类结果。所以,最后结果能看出,本节实验方法得到的准确率97.590%高于Deep Learning六:Softmax Regression_Exercise(斯坦福大学深度学习教程UFLDL)中得到的准确率92.640%。对于Deep Learning七:Self-Taught Learning_Exercise(斯坦福大学深度学习教程UFLDL),因为它的训练样本不一样,故其准确率结果不能直接比较。但是,本节实验对进行微调前后的准确率作了对比,见本节实验结果。
4.本节方法适用范围
在什么时候应用微调?通常仅在有大量已标注训练数据的情况下使用。在这样的情况下,微调能显著提升分类器性能。然而,如果有大量未标注数据集(用于非监督特征学习/预训练),却只有相对较少的已标注训练集,微调的作用非常有限,这时可用Deep Learning七:Self-Taught Learning_Exercise(斯坦福大学深度学习教程UFLDL)中介绍的方法。
5.一些matlab函数
[params, netconfig] = stack2params(stack)
是将stack层次的网络参数(可能是多个参数)转换成一个向量params,这样有利用使用各种优化算法来进行优化操作。Netconfig中保存的是该网络的相关信息,其中netconfig.inputsize表示的是网络的输入层节点的个数。netconfig.layersizes中的元素分别表示每一个隐含层对应节点的个数。
[ cost, grad ] = stackedAECost(theta, inputSize, hiddenSize, numClasses, netconfig,lambda, data, labels)
该函数内部实现整个网络损失函数和损失函数对每个参数偏导的计算。其中损失函数是个实数值,当然就只有1个了,其计算方法是根据sofmax分类器来计算的,只需知道标签值和softmax输出层的值即可。而损失函数对所有参数的偏导却有很多个,因此每个参数处应该就有一个偏导值,这些参数不仅包括了多个隐含层的,而且还包括了softmax那个网络层的。其中softmax那部分的偏导是根据其公式直接获得,而深度网络层那部分这通过BP算法方向推理得到(即先计算每一层的误差值,然后利用该误差值计算参数w和b)。
stack = params2stack(params, netconfig)
和上面的函数功能相反,是吧一个向量参数按照深度网络的结构依次展开。
[pred] = stackedAEPredict(theta, inputSize, hiddenSize, numClasses, netconfig, data)
这个函数其实就是对输入的data数据进行预测,看该data对应的输出类别是多少。其中theta为整个网络的参数(包括了分类器部分的网络),numClasses为所需分类的类别,netconfig为网络的结构参数。
[h, array] = display_network(A, opt_normalize, opt_graycolor, cols, opt_colmajor)
该函数是用来显示矩阵A的,此时要求A中的每一列为一个权值,并且A是完全平方数。函数运行后会将A中每一列显示为一个小的patch图像,具体的有多少个patch和patch之间该怎么摆设是程序内部自动决定的。
struct:
s = sturct;表示创建一个结构数组s。
nargout:
表示函数输出参数的个数。
save:
比如函数save('saves/step2.mat', 'sae1OptTheta');则要求当前目录下有saves这个目录,否则该语句会调用失败的。
栈式自编码神经网络是一个由多层稀疏自编码器组成的神经网络,其前一层自编码器的输出作为其后一层自编码器的输入。
6.解疑
1. 解决了Deep Learning六:Softmax Regression_Exercise(斯坦福大学深度学习教程UFLDL)中提出的一个问题:
在softmaxExercise.m中有如下一句代码:
images = loadMNISTImages('train-images.idx3-ubyte');
labels = loadMNISTLabels('train-labels.idx1-ubyte');
labels(labels==0) = 10; % 把标签0变为标签10,故labels的值是[1,10],而原来是[0,9] ?为什么非要这样?
为什么非要把原来的标签0变为标签10呢?搞不懂!
这个问题在本节实验中的stackedAEExercise.m中也有:
trainLabels(trainLabels == 0) = 10; % 一直没搞懂,为什么非要把标签0变为10?
原因:为了方便后面预测分类结果时,能直接通过max函数返回的是大值的列号就是所预测的分类结果。如本节实验中stackedAEPredict.m中的这句话:
[prob pred] = max(softmaxTheta*a{depth+1});
其中pred就是保存的所要预测的结果。
7. 疑问
1.如果我们后面的分类器不是用的softmax分类器,而是用的其它的,比如svm等,这个时候前面特征提取的网络参数已经预训练好了,用该参数是可以初始化前面的网络,但是此时该怎么微调呢?
2.从代码中,可以看出整个网络的代价函数实际上就是softmax分类器的代价函数,这是怎么推导来的?
3.第二个隐含层的特征怎么显示出来?这个问题折腾了我好几天,然后最近还因为发一篇论文各种折腾,所以一直没有静下心来想这个问题。
为了解答这个问题,有必要把显示每一层特征的函数display_network.m完全看懂,搞懂为什么不能按照用它显示第一层特征的方式来显示第二特征,所以在这里我详细注释了display_network.m的代码,见下面。
首先,要清楚第二个隐含层特征显示不出来的原因是什么,很多人(比如:Deep learning:二十四(stacked autoencoder练习))以为是这个原因: 因为display_network.m这个函数要求隐含层神经元数的均方根必须是整数,而在本节实验中隐含层神经元数设置的是200,它不是一个整数的平方,所以不能显示出来,但这只是一个程序编写的问题,实际上这个问题很好解决,我们只需要把隐含层神经元数设置为196,就可以用按照显示第一层特征的方式用函数display_network.m把它显示出。但实际上并不是这个原因,具体我们可以从下面得到的结果证明,结果如下:
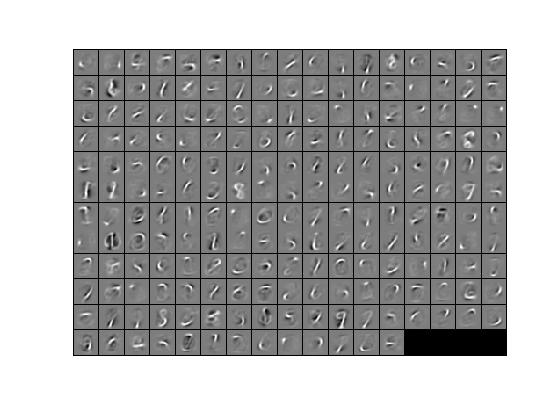
隐含层神经元数设置为196时,第一层特征可视化为:

隐含层神经元数设置为196时,第二层特征可视化为:
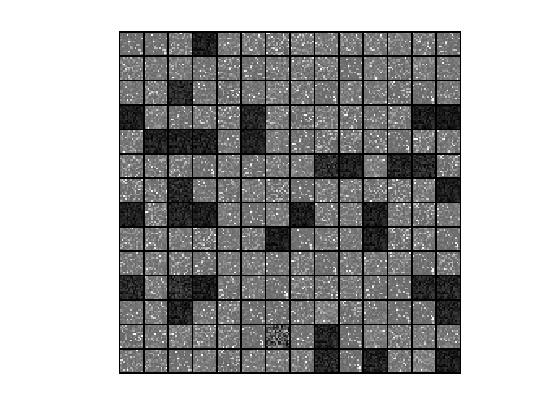
从第二层特征的可视化结果可看出,上面实现第二层可视化的方式肯定是错的,因为它并没有显示出什么点、角等特征。
那么,它究竟为什么不能这样显示,究竟该怎么样显示呢?这实际上是一个深度学习的一个研究方向,具体可参考:Deep Learning论文笔记之(七)深度网络高层特征可视化
8 代价函数
Ng没有直接给出代价函数,但可能通过代码看出他的代价函数.他的计算代价函数的代码如下:
 1 depth = size(stack, 1);  % 隐藏层的数量
 2 a = cell(depth+1, 1);    % 输入层和隐藏层的输出值,即:输入层的输出值和隐藏层的激活值
 3 a{1} = data; % 输入层的输出值
 4 Jweight = 0; % 权重惩罚项
 5 m = size(data, 2); % 样本数
 6
 7 % 计算隐藏层的激活值
 8 for i=2:numel(a)
 9     a{i} = sigmoid(stack{i-1}.w*a{i-1}+repmat(stack{i-1}.b, [1 size(a{i-1}, 2)]));
10     %Jweight = Jweight + sum(sum(stack{i-1}.w).^2);
11 end
12
13 M = softmaxTheta*a{depth+1};  % a{depth+1}为最后一层隐藏层的输出,此时M为输入softmax层的数据,即它是未计算softmax层激活函数前的数值.
14 M = bsxfun(@minus, M, max(M, [], 1));  %防止下一步计算指数函数时溢出
15 M = exp(M);
16 p = bsxfun(@rdivide, M, sum(M));  % p为softmax层的输出,就是每种类别的分类概率
17
18 Jweight = Jweight + sum(softmaxTheta(:).^2); % softmaxTheta是softmax层的权重参数
19
20 % 计算softmax分类器的代价函数,为什么它就是整个模型的代价函数?
21 cost = -1/m .* groundTruth(:)'*log(p(:)) + lambda/2*Jweight;% 代价函数=均方差项+权重衰减项(也叫:规则化项)
所以,其代价函数实际上就是softmax分类器的代价函数,而softmax的代价函数可见Softmax回归,即代价函数为:

实验步骤
1.初始化参数,加载MNIST手写数字数据库。
2.利用原始数据训练第一个自编码器,得到它的权重参数值sae1OptTheta,通过sae1OptTheta可得到原始数据的一阶特征sae1Features。
3.利用一阶特征sae1Features训练第二个自编码器,得到它的权重参数值sae2OptTheta,通过sae2OptTheta可得到原始数据的二阶特征sae2Features。
4.利用二阶特征sae2Features和原始数据的标签来训练softmax分类器,得到softmax分类器的权重参数saeSoftmaxOptTheta。
5.利用前面得到的所有权重参数sae1OptTheta、sae2OptTheta、saeSoftmaxOptTheta,得到微调前整个网络的权重参数stackedAETheta,然后在利用原始数据及其标签的基础上通过BP算法对stackedAETheta进行微调,得到微调后的整个网络的权重参数stackedAEOptTheta。
6.通过微调前整个网络的权重参数stackedAETheta和微调后的整个网络的权重参数stackedAEOptTheta,分别对测试数据进行分类,得到两者的分类准确率。
运行结果:
Before Finetuning Test Accuracy: 92.140%
After Finetuning Test Accuracy: 97.590%
第一层特征显示如下:
代码
stackedAEExercise.m:
%% CS294A/CS294W Stacked Autoencoder Exercise

%  Instructions
%  ------------
%
%  This file contains code that helps you get started on the
%  sstacked autoencoder exercise. You will need to complete code in
%  stackedAECost.m
%  You will also need to have implemented sparseAutoencoderCost.m and
%  softmaxCost.m from previous exercises. You will need the initializeParameters.m
%  loadMNISTImages.m, and loadMNISTLabels.m files from previous exercises.
%
%  For the purpose of completing the assignment, you do not need to
%  change the code in this file.
%
%%======================================================================
%% STEP 0: Here we provide the relevant parameters values that will
%  allow your sparse autoencoder to get good filters; you do not need to
%  change the parameters below.
DISPLAY = true;
inputSize = 28 * 28;
numClasses = 10;
hiddenSizeL1 = 200;    % Layer 1 Hidden Size
hiddenSizeL2 = 200;    % Layer 2 Hidden Size
sparsityParam = 0.1;   % desired average activation of the hidden units.
                       % (This was denoted by the Greek alphabet rho, which looks like a lower-case "p",
                       %  in the lecture notes).
lambda = 3e-3;         % weight decay parameter
beta = 3;              % weight of sparsity penalty term

%%======================================================================
%% STEP 1: Load data from the MNIST database
%
%  This loads our training data from the MNIST database files.

% Load MNIST database files
trainData = loadMNISTImages('train-images.idx3-ubyte');
trainLabels = loadMNISTLabels('train-labels.idx1-ubyte');

trainLabels(trainLabels == 0) = 10; % 一直没搞懂,为什么非要把标签0变为10? Remap 0 to 10 since our labels need to start from 1

%%======================================================================
%% STEP 2: Train the first sparse autoencoder
%  This trains the first sparse autoencoder on the unlabelled STL training
%  images.
%  If you've correctly implemented sparseAutoencoderCost.m, you don't need
%  to change anything here.


%  Randomly initialize the parameters
sae1Theta = initializeParameters(hiddenSizeL1, inputSize);

%% ---------------------- YOUR CODE HERE  ---------------------------------
%  Instructions: Train the first layer sparse autoencoder, this layer has
%                an hidden size of "hiddenSizeL1"
%                You should store the optimal parameters in sae1OptTheta

addpath minFunc/;
options = struct;
options.Method = 'lbfgs';
options.maxIter = 400;
options.display = 'on';
[sae1OptTheta, cost] =  minFunc(@(p)sparseAutoencoderCost(p,...
    inputSize,hiddenSizeL1,lambda,sparsityParam,beta,trainData),sae1Theta,options);%训练出第一层网络的参数
save('saves/step2.mat', 'sae1OptTheta');

if DISPLAY
  W1 = reshape(sae1OptTheta(1:hiddenSizeL1 * inputSize), hiddenSizeL1, inputSize);
  display_network(W1');
end


% -------------------------------------------------------------------------


%%======================================================================
%% STEP 3: Train the second sparse autoencoder
%  This trains the second sparse autoencoder on the first autoencoder
%  featurse.
%  If you've correctly implemented sparseAutoencoderCost.m, you don't need
%  to change anything here.
%  利用第一个稀疏自编码器的权重参数sae1OptTheta,得到输入数据的一阶特征表示

[sae1Features] = feedForwardAutoencoder(sae1OptTheta, hiddenSizeL1, ...
                                        inputSize, trainData);

%  Randomly initialize the parameters
sae2Theta = initializeParameters(hiddenSizeL2, hiddenSizeL1);

%% ---------------------- YOUR CODE HERE  ---------------------------------
%  Instructions: Train the second layer sparse autoencoder, this layer has
%                an hidden size of "hiddenSizeL2" and an inputsize of
%                "hiddenSizeL1"
%
%                You should store the optimal parameters in sae2OptTheta

[sae2OptTheta, cost] =  minFunc(@(p)sparseAutoencoderCost(p,...
    hiddenSizeL1,hiddenSizeL2,lambda,sparsityParam,beta,sae1Features),sae2Theta,options);%训练出第二层网络的参数
save('saves/step3.mat', 'sae2OptTheta');

figure;
if DISPLAY
  W11 = reshape(sae1OptTheta(1:hiddenSizeL1 * inputSize), hiddenSizeL1, inputSize);
  W12 = reshape(sae2OptTheta(1:hiddenSizeL2 * hiddenSizeL1), hiddenSizeL2, hiddenSizeL1);
  % TODO(zellyn): figure out how to display a 2-level network
%  display_network(log(W11' ./ (1-W11')) * W12');
%   W12_temp = W12(1:196,1:196);
%   display_network(W12_temp');
%   figure;
%   display_network(W12_temp');
end

% -------------------------------------------------------------------------


%%======================================================================
%% STEP 4: 用二阶特征训练softmax分类器 Train the softmax classifier
%  This trains the sparse autoencoder on the second autoencoder features.
%  If you've correctly implemented softmaxCost.m, you don't need
%  to change anything here.

%  利用第二个稀疏自编码器的权重参数sae2OptTheta,得到输入数据的二阶特征表示
[sae2Features] = feedForwardAutoencoder(sae2OptTheta, hiddenSizeL2, ...
                                        hiddenSizeL1, sae1Features);

%  Randomly initialize the parameters
saeSoftmaxTheta = 0.005 * randn(hiddenSizeL2 * numClasses, 1);%这个参数拿来干嘛?计算softmaxCost函数吗?可以舍去!
                                                              %因为softmaxCost函数在softmaxExercise练习中已经实现,并且已经证明其梯度计算是正确的!


%% ---------------------- YOUR CODE HERE  ---------------------------------
%  Instructions: Train the softmax classifier, the classifier takes in
%                input of dimension "hiddenSizeL2" corresponding to the
%                hidden layer size of the 2nd layer.
%
%                You should store the optimal parameters in saeSoftmaxOptTheta
%
%  NOTE: If you used softmaxTrain to complete this part of the exercise,
%        set saeSoftmaxOptTheta = softmaxModel.optTheta(:);

softmaxLambda = 1e-4;
numClasses = 10;
softoptions = struct;
softoptions.maxIter = 400;
softmaxModel = softmaxTrain(hiddenSizeL2,numClasses,softmaxLambda,...
                            sae2Features,trainLabels,softoptions);
saeSoftmaxOptTheta = softmaxModel.optTheta(:);%得到softmax分类器的权重参数

save('saves/step4.mat', 'saeSoftmaxOptTheta');

% -------------------------------------------------------------------------


%%======================================================================
%% STEP 5: 微调 Finetune softmax model

% Implement the stackedAECost to give the combined cost of the whole model
% then run this cell.

% Initialize the stack using the parameters learned
stack = cell(2,1);
stack{1}.w = reshape(sae1OptTheta(1:hiddenSizeL1*inputSize), ...
                     hiddenSizeL1, inputSize);
stack{1}.b = sae1OptTheta(2*hiddenSizeL1*inputSize+1:2*hiddenSizeL1*inputSize+hiddenSizeL1);
stack{2}.w = reshape(sae2OptTheta(1:hiddenSizeL2*hiddenSizeL1), ...
                     hiddenSizeL2, hiddenSizeL1);
stack{2}.b = sae2OptTheta(2*hiddenSizeL2*hiddenSizeL1+1:2*hiddenSizeL2*hiddenSizeL1+hiddenSizeL2);

% Initialize the parameters for the deep model
[stackparams, netconfig] = stack2params(stack);%把stack层(即:两个隐藏层)的权重参数变为一个向量stackparams
stackedAETheta = [ saeSoftmaxOptTheta ; stackparams ];% 得到微调前整个网络参数向量stackedAETheta,它包括softmax分类器那部分的参数向量saeSoftmaxOptTheta,且分类器那部分的参数放前面

%% ---------------------- YOUR CODE HERE  ---------------------------------
%  Instructions: Train the deep network, hidden size here refers to the '
%                dimension of the input to the classifier, which corresponds
%                to "hiddenSizeL2".
%
%  用BP算法微调,得到微调后的整个网络参数stackedAEOptTheta

[stackedAEOptTheta, cost] =  minFunc(@(p)stackedAECost(p,inputSize,hiddenSizeL2,...
                         numClasses, netconfig,lambda, trainData, trainLabels),...
                        stackedAETheta,options);%训练出第三层网络的参数
save('saves/step5.mat', 'stackedAEOptTheta');

figure;
if DISPLAY
  optStack = params2stack(stackedAEOptTheta(hiddenSizeL2*numClasses+1:end), netconfig);
  W11 = optStack{1}.w;
  W12 = optStack{2}.w;
  % TODO(zellyn): figure out how to display a 2-level network
  % display_network(log(1 ./ (1-W11')) * W12');
end


% -------------------------------------------------------------------------


%%======================================================================
%% STEP 6: Test
%  Instructions: You will need to complete the code in stackedAEPredict.m
%                before running this part of the code
%

% Get labelled test images
% Note that we apply the same kind of preprocessing as the training set
testData = loadMNISTImages('t10k-images.idx3-ubyte');
testLabels = loadMNISTLabels('t10k-labels.idx1-ubyte');

testLabels(testLabels == 0) = 10; % Remap 0 to 10

[pred] = stackedAEPredict(stackedAETheta, inputSize, hiddenSizeL2, ...
                          numClasses, netconfig, testData);

acc = mean(testLabels(:) == pred(:));
fprintf('Before Finetuning Test Accuracy: %0.3f%%
', acc * 100);

[pred] = stackedAEPredict(stackedAEOptTheta, inputSize, hiddenSizeL2, ...
                          numClasses, netconfig, testData);

acc = mean(testLabels(:) == pred(:));
fprintf('After Finetuning Test Accuracy: %0.3f%%
', acc * 100);

% Accuracy is the proportion of correctly classified images
% The results for our implementation were:
%
% Before Finetuning Test Accuracy: 87.7%
% After Finetuning Test Accuracy:  97.6%
%
% If your values are too low (accuracy less than 95%), you should check
% your code for errors, and make sure you are training on the
% entire data set of 60000 28x28 training images
% (unless you modified the loading code, this should be the case)
stackedAECost.m
  1 function [ cost, grad ] = stackedAECost(theta, inputSize, hiddenSize, ...
  2                                               numClasses, netconfig, ...
  3                                               lambda, data, labels)
  4 % 计算整个模型的代价函数及其梯度
  5 % 注意:完成这个函数后最好用checkStackedAECost函数检查梯度计算是否正确
  6
  7 % stackedAECost: Takes a trained softmaxTheta and a training data set with labels,
  8 % and returns cost and gradient using a stacked autoencoder model. Used for
  9 % finetuning.
 10
 11 % theta: trained weights from the autoencoder
 12 % visibleSize: the number of input units
 13 % hiddenSize:  the number of hidden units *at the 2nd layer*
 14 % numClasses:  the number of categories
 15 % netconfig:   the network configuration of the stack
 16 % lambda:      the weight regularization penalty
 17 % data: Our matrix containing the training data as columns.  So, data(:,i) is the i-th training example.
 18 % labels: A vector containing labels, where labels(i) is the label for the
 19 % i-th training example
 20
 21
 22 %% Unroll softmaxTheta parameter
 23
 24 % We first extract the part which compute the softmax gradient
 25 softmaxTheta = reshape(theta(1:hiddenSize*numClasses), numClasses, hiddenSize);%从整个网络参数向量中提取出softmax分类器部分的参数,并以矩阵表示
 26
 27 % Extract out the "stack"
 28 stack = params2stack(theta(hiddenSize*numClasses+1:end), netconfig);%从整个网络参数向量中提取出隐藏层部分的参数,并以结构表示
 29
 30 % You will need to compute the following gradients
 31 softmaxThetaGrad = zeros(size(softmaxTheta));% softmaxTheta的梯度
 32 stackgrad = cell(size(stack));               % stack的梯度
 33 for d = 1:numel(stack)
 34     stackgrad{d}.w = zeros(size(stack{d}.w));
 35     stackgrad{d}.b = zeros(size(stack{d}.b));
 36 end
 37
 38 cost = 0; % You need to compute this
 39
 40 % You might find these variables useful
 41 M = size(data, 2);
 42 groundTruth = full(sparse(labels, 1:M, 1));
 43
 44
 45 %% --------------------------- YOUR CODE HERE -----------------------------
 46 %  Instructions: Compute the cost function and gradient vector for
 47 %                the stacked autoencoder.
 48 %
 49 %                You are given a stack variable which is a cell-array of
 50 %                the weights and biases for every layer. In particular, you
 51 %                can refer to the weights of Layer d, using stack{d}.w and
 52 %                the biases using stack{d}.b . To get the total number of
 53 %                layers, you can use numel(stack).
 54 %
 55 %                The last layer of the network is connected to the softmax
 56 %                classification layer, softmaxTheta.
 57 %
 58 %                You should compute the gradients for the softmaxTheta,
 59 %                storing that in softmaxThetaGrad. Similarly, you should
 60 %                compute the gradients for each layer in the stack, storing
 61 %                the gradients in stackgrad{d}.w and stackgrad{d}.b
 62 %                Note that the size of the matrices in stackgrad should
 63 %                match exactly that of the size of the matrices in stack.
 64 %
 65
 66 depth = size(stack, 1);  % 隐藏层的数量
 67 a = cell(depth+1, 1);    % 输入层和隐藏层的输出值,即:输入层的输出值和隐藏层的激活值
 68 a{1} = data; % 输入层的输出值
 69 Jweight = 0; % 权重惩罚项
 70 m = size(data, 2); % 样本数
 71
 72 % 计算隐藏层的激活值
 73 for i=2:numel(a)
 74     a{i} = sigmoid(stack{i-1}.w*a{i-1}+repmat(stack{i-1}.b, [1 size(a{i-1}, 2)]));
 75     %Jweight = Jweight + sum(sum(stack{i-1}.w).^2);
 76 end
 77
 78 M = softmaxTheta*a{depth+1};
 79 M = bsxfun(@minus, M, max(M, [], 1));  %防止下一步计算指数函数时溢出
 80 M = exp(M);
 81 p = bsxfun(@rdivide, M, sum(M));
 82
 83 Jweight = Jweight + sum(softmaxTheta(:).^2);
 84
 85 % 计算softmax分类器的代价函数,为什么它就是整个模型的代价函数?
 86 cost = -1/m .* groundTruth(:)'*log(p(:)) + lambda/2*Jweight;% 代价函数=均方差项+权重衰减项(也叫:规则化项)
 87
 88 %计算softmax分类器代价函数的梯度,即输出层的梯度
 89 softmaxThetaGrad = -1/m .* (groundTruth - p)*a{depth+1}' + lambda*softmaxTheta;
 90
 91 delta = cell(depth+1, 1);  %隐藏层和输出层的残差
 92
 93 %计算输出层的残差
 94 delta{depth+1} = -softmaxTheta' * (groundTruth - p) .* a{depth+1} .* (1-a{depth+1});
 95
 96 %计算隐藏层的残差
 97 for i=depth:-1:2
 98     delta{i} = stack{i}.w'*delta{i+1}.*a{i}.*(1-a{i});
 99 end
100
101 % 通过前面得到的输出层和隐藏层的残差,计算隐藏层参数的梯度
102 for i=depth:-1:1
103     stackgrad{i}.w = 1/m .* delta{i+1}*a{i}';
104     stackgrad{i}.b = 1/m .* sum(delta{i+1}, 2);
105 end
106
107 % -------------------------------------------------------------------------
108
109 %% Roll gradient vector
110 grad = [softmaxThetaGrad(:) ; stack2params(stackgrad)];
111
112 end
113
114
115 % You might find this useful
116 function sigm = sigmoid(x)
117     sigm = 1 ./ (1 + exp(-x));
118 end
stackedAEPredict.m
 1 function [pred] = stackedAEPredict(theta, inputSize, hiddenSize, numClasses, netconfig, data)
 2
 3 % stackedAEPredict: Takes a trained theta and a test data set,
 4 % and returns the predicted labels for each example.
 5
 6 % theta: trained weights from the autoencoder
 7 % visibleSize: the number of input units
 8 % hiddenSize:  the number of hidden units *at the 2nd layer*
 9 % numClasses:  the number of categories
10 % data: Our matrix containing the training data as columns.  So, data(:,i) is the i-th training example.
11
12 % Your code should produce the prediction matrix
13 % pred, where pred(i) is argmax_c P(y(c) | x(i)).
14
15 %% Unroll theta parameter
16
17 % We first extract the part which compute the softmax gradient
18 softmaxTheta = reshape(theta(1:hiddenSize*numClasses), numClasses, hiddenSize);
19
20 % Extract out the "stack"
21 stack = params2stack(theta(hiddenSize*numClasses+1:end), netconfig);
22
23 %% ---------- YOUR CODE HERE --------------------------------------
24 %  Instructions: Compute pred using theta assuming that the labels start
25 %                from 1.
26
27 depth = numel(stack);
28 a = cell(depth+1);
29 a{1} = data;
30 m = size(data, 2);
31
32 for i=2:depth+1
33     a{i} = sigmoid(stack{i-1}.w*a{i-1}+ repmat(stack{i-1}.b, [1 m]));
34 end
35
36 [prob pred] = max(softmaxTheta*a{depth+1});
37
38
39
40
41 % -----------------------------------------------------------
42
43 end
44
45
46 % You might find this useful
47 function sigm = sigmoid(x)
48     sigm = 1 ./ (1 + exp(-x));
49 end
display_network.m
  1 function [h, array] = display_network(A, opt_normalize, opt_graycolor, cols, opt_colmajor)
  2 % This function visualizes filters in matrix A. Each column of A is a
  3 % filter. We will reshape each column into a square image and visualizes
  4 % on each cell of the visualization panel.
  5 % All other parameters are optional, usually you do not need to worry
  6 % about it.
  7 % opt_normalize:whether we need to normalize the filter so that all of
  8 % them can have similar contrast. Default value is true.
  9 % opt_graycolor: whether we use gray as the heat map. Default is true.
 10 % cols: how many columns are there in the display. Default value is the
 11 % squareroot of the number of columns in A.
 12 % opt_colmajor: you can switch convention to row major for A. In that
 13 % case, each row of A is a filter. Default value is false.
 14
 15 % opt_normalize:是否需要归一化的参数。真:每个图像块归一化(即:每个图像块元素值除以该图像块中像素值绝对值的最大值);
 16 %                                   假:整幅大图像一起归一化(即:每个图像块元素值除以整幅图像中像素值绝对值的最大值)。默认为真。
 17 % opt_graycolor: 该参数决定是否显示灰度图。
 18 %                真:显示灰度图;假:不显示灰度图。默认为真。
 19 % cols:   该参数决定将要显示的整幅大图像每一行中小图像块的个数。默认为A列数的均方根。
 20 % opt_colmajor:该参数决定将要显示的整个大图像中每个小图像块是按行从左到右依次排列,还是按列从上到下依次排列
 21 %              真:整个大图像由每个小图像块按列从上到下依次排列组成;
 22 %              假:整个大图像由每个小图像块按行从左到右依次排列组成。默认为假。
 23
 24 warning off all  %关闭警告
 25
 26 % 参数的默认值
 27 if ~exist('opt_normalize', 'var') || isempty(opt_normalize)
 28     opt_normalize= true;
 29 end
 30
 31 if ~exist('opt_graycolor', 'var') || isempty(opt_graycolor)
 32     opt_graycolor= true;
 33 end
 34
 35 if ~exist('opt_colmajor', 'var') || isempty(opt_colmajor)
 36     opt_colmajor = false;
 37 end
 38
 39 % 整幅大图像或整个数据0均值化  rescale
 40 A = A - mean(A(:));
 41
 42 if opt_graycolor, colormap(gray); end  %如果要显示灰度图,就把该图形的色图(即:colormap)设置为gray
 43
 44 % 计算整幅大图像中每一行中小图像块的个数和第一列中小图像块的个数,即列数n和行数m  compute rows, cols
 45 [L M]=size(A); % M即为小图像块的总数
 46 sz=sqrt(L);  % 每个小图像块内像素点的行数和列数
 47 buf=1;         % 用于把每个小图像块隔开,即小图像块之间的缓冲区。每个小图像块的边缘都是一行和一列像素值为-1的像素点。
 48 if ~exist('cols', 'var') % 如变量cols不存在时
 49     if floor(sqrt(M))^2 ~= M        % 如果M的均方根不是整数,列数n就先暂时取值为M均方根的向右取整
 50         n=ceil(sqrt(M));
 51         while mod(M, n)~=0 && n<1.2*sqrt(M), n=n+1; end % 当M不是n的整数倍且n小于1.2倍的M均方根值时,列数n加1
 52         m=ceil(M/n);                                    % 行数m取值为小图像块总数M除以大图像中每一行中小图像块的个数n,再向右取整
 53     else
 54         n=sqrt(M);                  % 如果M的均方根是整数,那m和n都取值为M的均方根
 55         m=n;
 56     end
 57 else
 58     n = cols;           % 如果变量cols存在,就直接令列数n等于cols,行数m为M除以n后向右取整
 59     m = ceil(M/n);
 60 end
 61
 62 array=-ones(buf+m*(sz+buf),buf+n*(sz+buf));%要保证每个小图像块的四周边缘都是单行和单列像素值为-1的像素点。所以得到这个目标矩阵
 63
 64 if ~opt_graycolor  % 如果分隔区不显示黑色,而显示灰度,那就要是要保证:每个小图像块的四周边缘都是单行和单列像素值为-0.1的像素点
 65     array = 0.1.* array;
 66 end
 67
 68
 69 if ~opt_colmajor   % 如果opt_colmajor为假,即:整个大图像由每个小图像块按行从左到右依次排列组成
 70     k=1;            %第k个小图像块
 71     for i=1:m       % 行数
 72         for j=1:n   % 列数
 73             if k>M,
 74                 continue;
 75             end
 76             clim=max(abs(A(:,k)));
 77             if opt_normalize
 78                 array(buf+(i-1)*(sz+buf)+(1:sz),buf+(j-1)*(sz+buf)+(1:sz))=reshape(A(:,k),sz,sz)/clim; %从这可看是n是列数,m是行数
 79             else
 80                 array(buf+(i-1)*(sz+buf)+(1:sz),buf+(j-1)*(sz+buf)+(1:sz))=reshape(A(:,k),sz,sz)/max(abs(A(:)));
 81             end
 82             k=k+1;
 83         end
 84     end
 85 else        % 如果opt_colmajor为真,即:整个大图像由每个小图像块按列从上到下依次排列组成
 86     k=1;
 87     for j=1:n          %列数
 88         for i=1:m      %行数
 89             if k>M,
 90                 continue;
 91             end
 92             clim=max(abs(A(:,k)));
 93             if opt_normalize
 94                 array(buf+(i-1)*(sz+buf)+(1:sz),buf+(j-1)*(sz+buf)+(1:sz))=reshape(A(:,k),sz,sz)/clim;
 95             else
 96                 array(buf+(i-1)*(sz+buf)+(1:sz),buf+(j-1)*(sz+buf)+(1:sz))=reshape(A(:,k),sz,sz);
 97             end
 98             k=k+1;
 99         end
100     end
101 end
102
103 if opt_graycolor   % 要显示灰度图,此时每个小图像块的四周边缘都是单行和单列像素值为-1的像素点。
104     h=imagesc(array,'EraseMode','none',[-1 1]); %图形的EraseMode属性设置为none:即为在该图像上不做任何擦除,直接在原来图形上绘制
105 else              % 不显示灰度图,此时每个小图像块的四周边缘都是单行和单列像素值为-0.1的像素点。
106     h=imagesc(array,'EraseMode','none',[-1 1]);
107 end
108 axis image off  %去掉坐标轴
109
110 drawnow;  %刷新屏幕,使图像可一点一点地显示
111
112 warning on all  %打开警告
参考资料:
Deep learning:二十四(stacked autoencoder练习)
http://blog.csdn.net/freeliao/article/details/19618855
http://www.tuicool.com/articles/MnANFn
……