wget http://dev.mysql.com/get/mysql57-community-release-el7-8.noarch.rpm
安装mysql源
yum localinstall mysql57-community-release-el7-8.noarch.rpm
检查mysql源是否安装成功
yum repolist enabled | grep "mysql.*-community.*"
安装MySQL
yum install mysql-community-server
启动MySQL服务
systemctl start mysqld
开机启动
systemctl enable mysqld
systemctl daemon-reload
mysql安装完成之后,在/var/log/mysqld.log文件中给root生成了一个默认密码

mysql -uroot -p 密码登录 然后会让修改新的密码
set global validate_password_policy=LOW; 设置密码的级别 这样才能把密码修改为简单的密码
set global validate_password_length=6;
ALTER USER 'root'@'localhost' IDENTIFIED BY '123456'; 修改密码
允许远程连接
grant all on *.* to root@'%' identified by 'password' with grant option;
flush privileges;
systemctl stop firewalld; 关闭防火墙
数据库主从配置
主库配置:
vi /etc/my.cnf

server_id=1
log_bin=master-bin

show master status;

Master-bin.000001 这个是binlog的名 这个slave连接的时候要用到这个名字
Position slave连接的时候也是要用到的
create user "slave"@"%" identified by "123456"; //创建用户
grant replication Slave on *.* to 'slave'@'%'; //这个是给从服务器 用户名slave 来授权
从服务器的配置
vi /etc/my.cnf //加入下面的配置
server-id=116
relay-log-index=slave-relay-bin.index
relay-log=slave-relay-bin
read_only=1
change master to master_host='192.168.0.110', master_user='slave', master_password='12345678', master_log_file='mysql-bin.000003', master_log_pos=767; //连接主服务器 指定binlog日志和位置
start slave; //启动从服务
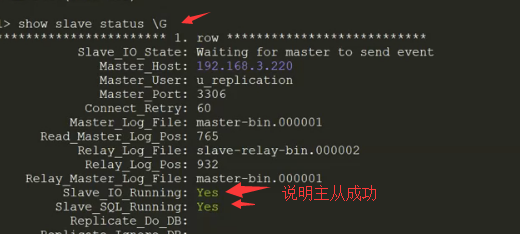
show slave status G; //查看从服务器的状态
如果 说有问题
可以先查看master 的 状态
show master status;

stop slave;
change master to master_host='192.168.0.110', master_user='slave', master_password='12345678', master_log_file='mysql-bin.000003', master_log_pos=767; //把这个master_log_file 的名字改下 master_log_pos 位置下
start slave;