前言:本节开始学习Sass的基础语法。
1.创建工程。
<1>使用不带参数的compass create 命令?
cmd中运行compass create demo就创建成功了一个名为demo的Sass工程。
工程结构:

sass文件夹:存放项目中新建的.scss文件。
stylesheets:存放.scss编译后的.css文件。
config.rb:ruby的配置项,配置项目编译的入口和出口。
<2>使用带参数的compass create新建工程?
参数:
--bare (不包含默认样式表进行安装);
--syntax sass (在默认样式表中使用缩进语法);
--sass-dir "cool" (使用'cool'目录存放Sass文件);
--css-dir "style" (使用'style'目录存放CSS文件);
--images-dir "img" (使用'img'目录存放图片);
--fonts-dir "type" (使用'type'目录存放字体文件);
--javascripts-dir "js" (使用'js'目录存放JavaScript文件)。
这些参数会修改config.rb中的配置文件。
2.使用命令编译。
<1>使用sass命令编译:
编译Sass文件/文件夹?
命令:sass <sass file> <css file>
命令行中运行此命令,其中<sass file>表示要编译的文件,<css file>表示生成目标CSS文件。
弊端:每次修改文件后都需要重新运行命令编译。
监控Sass文件/文件夹实时编译?
命令:sass --watch <sass file>:<css file>
命令行中运行此命令,其中<sass file>表示要监控的文件,<css file>表示生成目标CSS文件。
优势:每次修改sass文件后会自动编译成CSS文件,无需重新运行命令。
指定Sass的编译格式?
格式:nested、expand、compact、compressed。
命令:sass sass文件 css文件 -t ‘格式’
nested格式:sass demo.scss demo.css -t nested
    body {
      background-color: lightgray; }
      body header {
        font-size: 14px;
        color: red; }
      body section {
        font-weight: 600; }
expanded格式:sass demo.scss demo.css -t expanded
    body {
      background-color: lightgray;
    }
    body header {
      font-size: 14px;
      color: red;
    }
    body section {
      font-weight: 600;
    }
compact格式:sass demo.scss demo.css -t compact
    body { background-color: lightgray; }
    body header { font-size: 14px; color: red; }
    body section { font-weight: 600; }
compressed格式:sass demo.scss demo.css -t compressed
body{background-color:lightgray}body header{font-size:14px;color:red}body section{font-weight:600}
<2>使用compass命令编译:
compass compile编译sass文件:
在当前工程目录下运行compass compile命令,compass会根据config.rb配置文件找到sass、css配置文件入口进行编译。
注意:compass compile命令只会编译修改了的文件,没有修改的文件不会再次编译。
如果需要强制编译所有sass文件,使用命令 compass compile --force
弊端:每次修改文件后需要重新运行命令编译。
require 'compass/import-once/activate'
# Require any additional compass plugins here.

# Set this to the root of your project when deployed:
http_path = "/"
css_dir = "stylesheets"    //表示CSS文件存放位置
sass_dir = "sass"       //表示sass文件的存放位置
images_dir = "images"
javascripts_dir = "javascripts"
compass watch监控sass文件:
在当前工程目录下运行compass watch命令,会实时编译所有变化了的sass文件。
compass watch --force会编译所有sass文件,包括未变化的也会进行编译。
注意:compass命令指定输出格式(nested compressed expanded compact)时,使用参数-s而非-t。
3.理解config.rb配置项含义。
各配置项的含义:
require 'compass/import-once/activate'
# Require any additional compass plugins here.
environment = :development
# Set this to the root of your project when deployed:
http_path = "/"
css_dir = "stylesheets"         # 表示css生成文件的存放目录
sass_dir = "sass"               # 表示sass文件的存放目录
images_dir = "images"           # 表示图片文件的存放目录
javascripts_dir = "javascripts" # 表示JavaScript文件的存放目录

# You can select your preferred output style here (can be overridden via the command line):
# 表示生成的css的压缩风格,如果是开发环境就使用expanded,否则就使用compressed
output_style = (environment == :development) ? expanded : compressed

# To enable relative paths to assets via compass helper functions. Uncomment:
# relative_assets = true        # 表示是否使用绝对路径

# To disable debugging comments that display the original location of your selectors. Uncomment:
# line_comments = false         # 表示是否使用行注释
4.Sass的注释语法。
三种注释:
单行注释(//):不会被编译到css文件中。
标准css格式(/**/):会被编译到css文件中,如果输出格式为compressed,注释也不会被编译到css文件中。
重要格式(/*! */):如果输出格式为compressed,注释也会被编译到css文件中。
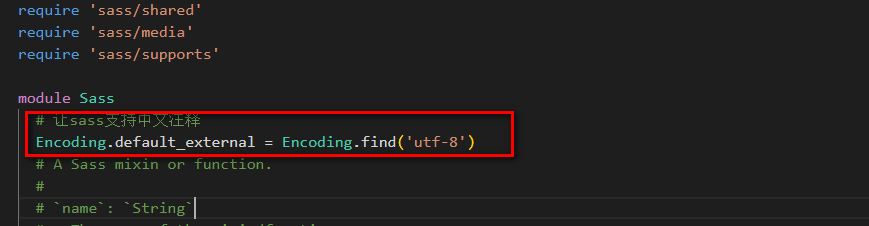
注意:sass默认不支持中文注释,如果写中文注释,编译会报错。
解决方法:修改sass中的engine.rb文件。
文件路径:D:programmingRubyexeRuby24-x64lib ubygems2.4.0gemssass-3.4.25libsassengine.rb
添加中文注释配置项:Encoding.default_external = Encoding.find('utf-8')。
总结:本节主要学习sass工程的创建,sass文件的常用编译命令。