LevelDB的公共部件并不复杂,但为了更好的理解其各个核心模块的实现,此处挑几个关键的部件先行备忘。
Arena(内存领地)
Arena类用于内存管理,其存在的价值在于:
- 提高程序性能,减少Heap调用次数,由Arena统一分配后返回到应用层。
- 分配后无需执行dealloc,当Arena对象释放时,统一释放由其创建的所有内存。
- 便于内存统计,如Arena分配的整体内存大小等信息。
 1     class Arena {
 2     public:
 3         Arena();
 4         ~Arena();
 5
 6         // Return a pointer to a newly allocated memory block of "bytes" bytes.
 7         char* Allocate(size_t bytes);
 8
 9         // Allocate memory with the normal alignment guarantees provided by malloc
10         char* AllocateAligned(size_t bytes);
11
12         // Returns an estimate of the total memory usage of data allocated
13         // by the arena (including space allocated but not yet used for user
14         // allocations).
15         size_t MemoryUsage() const {
16             return blocks_memory_ + blocks_.capacity() * sizeof(char*);
17         }
18
19     private:
20         char* AllocateFallback(size_t bytes);
21         char* AllocateNewBlock(size_t block_bytes);
22
23         // Allocation state
24         char* alloc_ptr_;                //当前block当前位置指针
25         size_t alloc_bytes_remaining_;    //当前block可用内存大小
26
27         // Array of new[] allocated memory blocks
28         std::vector<char*> blocks_;        //创建的全部内存块
29
30         // Bytes of memory in blocks allocated so far
31         size_t blocks_memory_;            //目前为止分配的内存总量
32
33         // No copying allowed
34         Arena(const Arena&);
35         void operator=(const Arena&);
36     };
Slice(数据块)
Slice的含义和其名称一致,代表了一个数据块,data_为数据地址,size_为数据长度。
Slice一般和Arena配合使用,其仅保持了数据信息,并未拥有数据的所有权。而数据在Arena对象的整个声明周期内有效。
Slice在LevelDB中一般用于传递Key、Value或编解码处理后的数据块。
和string相比,Slice具有的明显好处包括:避免不必要的拷贝动作、具有比string更丰富的语义(可包含任意内容)。
-
1 class Slice {
2     public:
3             ......
4     private:
5         const char* data_;
6         size_t size_;
7     };
LevelDB源码之一SkipList
SkipList称之为跳表,可实现Log(n)级别的插入、删除。跳表是平衡树的一种替代方案,和平衡树不同的是,跳表并不保证严格的“平衡性”,而是采用更为随性的方法:随机平衡算法。
关于SkipList的完整介绍请参见跳表(SkipList),这里借用几幅图做简要说明:

图1.1 跳表

图1.2 查找、插入

图1.3 查找、删除
- 图1.1中红色部分为初始化状态,即head各个level中next节点均为NULL。
- 跳表是分层的,由下往上分别为1、2、3...,因此需要分层算法。
- 跳表中每一层的数据都是按顺序存储的,因此需要Compactor。
- 查找动作由最上层开始依序查找,直到找到数据或查找失败。
- 插入动作仅影响插入位置前后节点,对其他节点无影响。
- 删除动作仅影响插入位置前后节点,对其他节点无影响。
分层算法
分层算法决定了数据插入的Level,SkipList的平衡性如何全权由分层算法决定。极端情况下,假设SkipList只有Level-0层,SkipList将弱化成自排序List。此时查找、插入、删除的时间复杂度均为O(n),而非O(Log(n))。
LevelDB中的分层算法实现如下(leveldb::skiplist::RandomHeight())
 1     // enum { kMaxHeight = 12 };
 2 template<typename Key, class Comparator>
 3     int SkipList<Key, Comparator>::RandomHeight()
 4     {
 5         // Increase height with probability 1 in kBranching
 6         static const unsigned int kBranching = 4;
 7         int height = 1;
 8         while (height < kMaxHeight && ((rnd_.Next() % kBranching) == 0)) {
 9             height++;
10         }
11         assert(height > 0);
12         assert(height <= kMaxHeight);
13         return height;
14     }
代码1.1 RandomHeight
kMaxHeight 代表Skiplist的最大高度,即最多允许存在多少层,为关键参数,与性能直接相关。修改kMaxHeight ,在数值变小时,性能上有明显下降,但当数值增大时,甚至增大到10000时,和默认的kMaxHeight =12相比仍旧无明显差异,内存使用上也是如此。
为何如此?关键在于while循环中的判定条件:height < kMaxHeight && ((rnd_.Next() % kBranching) == 0)。除了kMaxHeight 判定外,(rnd_.Next() % kBranching) == 0)判定使得上层节点的数量约为下层的1/4。那么,当设定MaxHeight=12时,根节点为1时,约可均匀容纳Key的数量为4^11=4194304(约为400W)。因此,当单独增大MaxHeight时,并不会使得SkipList的层级提升。MaxHeight=12为经验值,在百万数据规模时,尤为适用。
Compactor
如同二叉树,Skiplist也是有序的,键值比较需由比较器(Compactor)完成。
SkipList对Compactor的要求只有一点:()操作符重载,格式如下:
//a<b返回值小于0,a>b返回值大于0,a==b返回值为0
int operator()(const Key& a, const Key& b) const;
Key与Compactor均为模板参数,因而Compactor亦由使用者实现。LevelDB中,存在一个Compactor抽象类,但该抽象类并没有重载()操作符,至于Compacotr如何使用及Compactor抽象类和此处的Compactor的关系如何请参见MemTable一节。
查找、插入、删除
LevelDB中实现的SkipList并无删除行为,这由其业务特性决定,故此处不提。
查找、插入亦即读、写行为。由图1.2可知,插入首先需完成一次查找动作,随后在指定位置上完成一次插入行为。
LevelDB中的查找、插入行为几乎做到了“无锁”并发,这一点是非常可取的。关于这一点,是本次备忘的重点。先来看查找:
 1     template<typename Key, class Comparator>
 2     typename SkipList<Key, Comparator>::Node*
 3         SkipList<Key, Comparator>::FindGreaterOrEqual(const Key& key, Node** prev) const
 4     {
 5         Node* x = head_;
 6         int level = GetMaxHeight() - 1;
 7         while (true) {
 8             Node* next = x->Next(level);
 9             if (KeyIsAfterNode(key, next)) {
10                 // Keep searching in this list
11                 x = next;
12             }
13             else {
14                 if (prev != NULL) prev[level] = x;
15                 if (level == 0) {
16                     return next;
17                 }
18                 else {
19                     // Switch to next list
20                     level--;
21                 }
22             }
23         }
24     }
代码1.2 FindGreaterOrEqual
实现并无特别之处:由最上层开始查找,一直查找到Level-0。找到大于等于指定Key值的数据,如不存在返回NULL。来看SkipList的Node结构:
 1     template<typename Key, class Comparator>
 2     struct SkipList<Key, Comparator>::Node {
 3         explicit Node(const Key& k) : key(k) { }
 4
 5         Key const key;
 6
 7         // Accessors/mutators for links.  Wrapped in methods so we can
 8         // add the appropriate barriers as necessary.
 9         Node* Next(int n) {
10             assert(n >= 0);
11             // Use an 'acquire load' so that we observe a fully initialized
12             // version of the returned Node.
13             return reinterpret_cast<Node*>(next_[n].Acquire_Load());
14         }
15         void SetNext(int n, Node* x) {
16             assert(n >= 0);
17             // Use a 'release store' so that anybody who reads through this
18             // pointer observes a fully initialized version of the inserted node.
19             next_[n].Release_Store(x);
20         }
21
22         // No-barrier variants that can be safely used in a few locations.
23         Node* NoBarrier_Next(int n) {
24             assert(n >= 0);
25             return reinterpret_cast<Node*>(next_[n].NoBarrier_Load());
26         }
27         void NoBarrier_SetNext(int n, Node* x) {
28             assert(n >= 0);
29             next_[n].NoBarrier_Store(x);
30         }
31
32     private:
33         // Array of length equal to the node height.  next_[0] is lowest level link.
34         port::AtomicPointer next_[1];    //看NewNode代码,实际大小为node height
35     };
代码1.3 Node
Node有两个成员变量,Key及next_数组。Key当然是节点数据,next_数组(注意其类型为AtomicPointer )则指向了其所在层及之下各个层中的下一个节点(参见图1.1)。Next_数组的实际大小和该节点的height一致,来看Node的工厂方法NewNode:
1     template<typename Key, class Comparator>
2     typename SkipList<Key, Comparator>::Node*
3         SkipList<Key, Comparator>::NewNode(const Key& key, int height)
4     {
5         char* mem = arena_->AllocateAligned( sizeof(Node) +
6                  sizeof(port::AtomicPointer) * (height - 1));
7         return new (mem) Node(key);    //显示调用构造函数,并不常见。
8     }
代码1.4 NewNode
再来看Node的两组方法:SetNext/Next、NoBarrier_SetNext/NoBarrier_Next。这两组方法用于读写指定层的下一节点指针,前者并发安全、后者非并发安全。来看插入操作实现:
    template<typename Key, class Comparator>
    void SkipList<Key, Comparator>::Insert(const Key& key)
    {
        // TODO(opt): We can use a barrier-free variant of FindGreaterOrEqual()
        // here since Insert() is externally synchronized.
        Node* prev[kMaxHeight];
        Node* x = FindGreaterOrEqual(key, prev);

        // Our data structure does not allow duplicate insertion
        assert(x == NULL || !Equal(key, x->key));

        int height = RandomHeight();
        if (height > GetMaxHeight())
        {
            for (int i = GetMaxHeight(); i < height; i++) {
                prev[i] = head_;
            }
            //fprintf(stderr, "Change height from %d to %d
", max_height_, height);

            // It is ok to mutate max_height_ without any synchronization
            // with concurrent readers.  A concurrent reader that observes
            // the new value of max_height_ will see either the old value of
            // new level pointers from head_ (NULL), or a new value set in
            // the loop below.  In the former case the reader will
            // immediately drop to the next level since NULL sorts after all
            // keys.  In the latter case the reader will use the new node.
            max_height_.NoBarrier_Store(reinterpret_cast<void*>(height));
        }

        x = NewNode(key, height);
        for (int i = 0; i < height; i++) {
            // NoBarrier_SetNext() suffices since we will add a barrier when
            // we publish a pointer to "x" in prev[i].
            x->NoBarrier_SetNext(i, prev[i]->NoBarrier_Next(i));
            prev[i]->SetNext(i, x);
        }
    }
代码1.5 Insert
插入行为主要修改两类数据:max_height_及所有level中前一节点的next指针。
max_height_没有任何并发保护,关于此处作者注释讲的很清楚:读线程在读到新的max_height_同时,对应的层级指针(new level pointer from head_)可能是原有的NULL,也有可能是部分更新的层级指针。如果是前者将直接跳到下一level继续查找,如果是后者,新插入的节点将被启用。
随后节点插入方是将无锁并发变为现实:
- 首先更新插入节点的next指针,此处无并发问题。
- 修改插入位置前一节点的next指针,此处采用SetNext处理并发。
- 由最下层向上插入可以保证当前层一旦插入后,其下层已更新完毕并可用。
当然,多个写之间的并发SkipList时非线程安全的,在LevelDB的MemTable中采用了另外的技巧来处理写并发问题。
LevelDB源码之二MemTable
MemTable是内存表,在LevelDB中最新插入的数据存储于内存表中,内存表大小为可配置项(默认为4M)。当MemTable中数据大小超限时,将创建新的内存表并将原有的内存表Compact(压缩)到SSTable(磁盘)中。
MemTable* mem_; //新的内存表
MemTable* imm_; //待压缩的内存表
MemTable内部使用了前面介绍的SkipList做为数据存储,其自身封装的主要目的如下:
- 以一种业务形态出现,即业务抽象。
- LevelDB是Key-Value存储系统,而SkipList为单值存储,需执行用户数据到SkipList数据的编解码处理。
- LevelDB支持插入、删除动作,而MemTable中删除动作将转换为一次类型为Deletion的添加动作。
业务形态
MemTable做为内存表可用于存储Key-Value形式的数据、根据Key值返回Value数据,同时需支持表遍历等功能。
 1     class MemTable {
 2     public:
 3         ......
 4
 5         // Returns an estimate of the number of bytes of data in use by this
 6         // data structure.
 7         //
 8         // REQUIRES: external synchronization to prevent simultaneous
 9         // operations on the same MemTable.
10         size_t ApproximateMemoryUsage();    //目前内存表大小
11
12         // Return an iterator that yields the contents of the memtable.
13         //
14         // The caller must ensure that the underlying MemTable remains live
15         // while the returned iterator is live.  The keys returned by this
16         // iterator are internal keys encoded by AppendInternalKey in the
17         // db/format.{h,cc} module.
18         Iterator* NewIterator();        //    内存表迭代器
19
20         // Add an entry into memtable that maps key to value at the
21         // specified sequence number and with the specified type.
22         // Typically value will be empty if type==kTypeDeletion.
23         void Add(SequenceNumber seq, ValueType type, const Slice& key, const Slice& value);
24
25         // If memtable contains a value for key, store it in *value and return true.
26         // If memtable contains a deletion for key, store a NotFound() error
27         // in *status and return true.
28         // Else, return false.
29      //根据key值返回正确的数据
30         bool Get(const LookupKey& key, std::string* value, Status* s);
31
32     private:
33         ~MemTable();  // Private since only Unref() should be used to delete it
34
35         ......
36     };
这即所谓的业务形态:以一种全新的,SkipList不可见的形式出现,代表了LevelDB中的一个业务模块。
KV转储
LevelDB是键值存储系统,MemTable也被封装为KV形式的接口,而SkipList是单值存储结构,因此在插入、读取数据时需完成一次编解码工作。
如何编码?来看Add方法:
 1     void MemTable::Add(SequenceNumber s, ValueType type, const Slice& key, const Slice& value)
 2     {
 3         // Format of an entry is concatenation of:
 4         //  key_size     : varint32 of internal_key.size()
 5         //  key bytes    : char[internal_key.size()]
 6         //  value_size   : varint32 of value.size()
 7         //  value bytes  : char[value.size()]
 8         size_t key_size = key.size();
 9         size_t val_size = value.size();
10         size_t internal_key_size = key_size + 8;
11         //总长度
12         const size_t encoded_len =
13             VarintLength(internal_key_size) + internal_key_size +
14             VarintLength(val_size) + val_size;
15         char* buf = arena_.Allocate(encoded_len);
16         //Internal Key Size
17         char* p = EncodeVarint32(buf, internal_key_size);
18          //User Key
19         memcpy(p, key.data(), key_size);
20         p += key_size;
21         //Seq Number + Value Type
22         EncodeFixed64(p, (s << 8) | type);
23         p += 8;
24         //User Value Size
25         p = EncodeVarint32(p, val_size);
26          //User Value
27         memcpy(p, value.data(), val_size);
28
29         assert((p + val_size) - buf == encoded_len);
30
31         table_.Insert(buf);
32     }
参数传入的key、value是需要记录的键值对,本文称之为User Key,User Value。
而最终插入到SkipList的数据为buf,buf数据和User Key、User Value的转换关系如下:
|
Part 1 |
Part 2 |
Part 3 |
Part 4 |
Part 5 |
|
User Key Size + 8 |
User Key |
Seq Number << 8 | Value Type |
User Value Size |
User Value |
表1 User Key/User Value -> SkipList Data Item
如何解码?来看Get:
 1     bool MemTable::Get(const LookupKey& key, std::string* value, Status* s)
 2     {
 3         Slice memkey = key.memtable_key();
 4
 5         Table::Iterator iter(&table_);
 6         iter.Seek(memkey.data());
 7
 8         if (iter.Valid()) {
 9             // entry format is:
10             //    klength  varint32
11             //    userkey  char[klength - 8]
12             //    tag      uint64
13             //    vlength  varint32
14             //    value    char[vlength]
15             // Check that it belongs to same user key.  We do not check the
16             // sequence number since the Seek() call above should have skipped
17             // all entries with overly large sequence numbers.
18             const char* entry = iter.key();
19             uint32_t key_length;
20             const char* key_ptr = GetVarint32Ptr(entry, entry + 5, &key_length);
21             if (comparator_.comparator.user_comparator()->Compare(
22                 Slice(key_ptr, key_length - 8), key.user_key()) == 0)
23             {
24                 // Correct user key
25                 const uint64_t tag = DecodeFixed64(key_ptr + key_length - 8);
26                 switch (static_cast<ValueType>(tag & 0xff)) {
27                 case kTypeValue: {
28                     Slice v = GetLengthPrefixedSlice(key_ptr + key_length);
29                     value->assign(v.data(), v.size());
30                     return true;
31                 }
32                 case kTypeDeletion:
33                     *s = Status::NotFound(Slice());
34                     return true;
35                 }
36             }
37         }
38         return false;
39     }
根据memtable_key,通过Table::Iterator的Seek接口找到指定的数据,随后以编码的逆序提前User Value并返回。这里有一个新的概念叫memtable_key,即memtable_key中的键值,它实际上是由表1中的Part1-Part3组成。
更直观一些,我们顺着Table的typedef看过来:
typedef SkipList<const char*, KeyComparator> Table;
---->
1 struct KeyComparator
2 {
3     const InternalKeyComparator comparator;
4     explicit KeyComparator(const InternalKeyComparator& c) : comparator(c) { }
5     int operator()(const char* a, const char* b) const;
6 };
SkipList通过()操作符完成键值比较:
int MemTable::KeyComparator::operator()(const char* aptr, const char* bptr)const {
    // Internal keys are encoded as length-prefixed strings.
Slice a = GetLengthPrefixedSlice(aptr);
    Slice b = GetLengthPrefixedSlice(bptr);
    return comparator.Compare(a, b);    //InternalKeyComparator comparator
}
此处提前的a、b键值即SkipList中使用的key,为表1中part1-part3部分。真正的比较由InternalKeyComparator完成:
 1 int InternalKeyComparator::Compare(const Slice& akey, const Slice& bkey) const
 2 {
 3     // Order by:
 4     //    increasing user key (according to user-supplied comparator)
 5     //    decreasing sequence number
 6     //    decreasing type (though sequence# should be enough to disambiguate)
 7     int r = user_comparator_->Compare(ExtractUserKey(akey),                     ExtractUserKey(bkey));
 8     if (r == 0) {
 9         const uint64_t anum = DecodeFixed64(akey.data() + akey.size() - 8);
10         const uint64_t bnum = DecodeFixed64(bkey.data() + bkey.size() - 8);
11         if (anum > bnum) {
12             r = -1;
13         }
14         else if (anum < bnum) {
15             r = +1;
16         }
17     }
18     return r;
19 }
核心的比较分为两部分:User Key比较、Seq Number及Value Type比较。
User Key比较由User Compactor完成,如果用户未指定比较器,系统将使用默认的按位比较器(BytewiseComparatorImpl)完成键值比较。
Seq Number即版本号,每一次数据更新将递增该序号。当用户希望查看指定版本号的数据时,希望查看的是指定版本或之前的数据,故此处采用降序比较。
Value Type分为kTypeDeletion、kTypeValue两种,实际上由于任意操作序号的唯一性,类型比较时非必须的。这里同时进行了类型比较也是出于性能的考虑(减少了从中分离序号、类型的工作)。
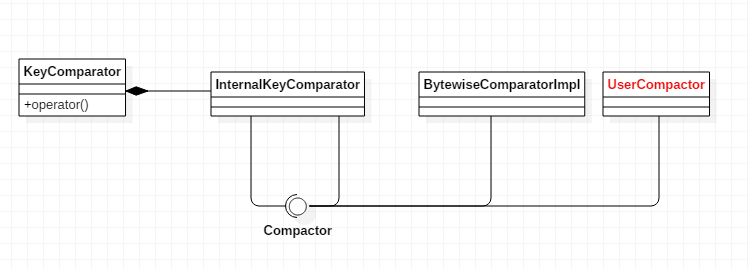
图2.1 Compactor
注:
- Add/Get接口对的接口参数形式不一致,属于不良接口封装。Add中采用Slice Key而Get中则使用了LookupKey Key做为键值,此处应统一。
- 在Add方法中,部分地方使用了变长数据EncodeVarint32、而部分又采用了定长数据EncodeFixed64。此处尚未摸清作者的使用规律,或者和极致的性能优化有关,又或者存在部分随性的因素在。
删除记录
客户端的删除动作将被转换为一次ValueType为Deletion的添加动作,Compact动作将执行真正的删除:
void MemTable::Add(SequenceNumber s, ValueType type, const Slice& key, const Slice& value)
--->
    // Value types encoded as the last component of internal keys.
    // DO NOT CHANGE THESE ENUM VALUES: they are embedded in the on-disk
    // data structures.
    enum ValueType {
        kTypeDeletion = 0x0,    //Deletion必须小于Value,查找时按顺序排列
        kTypeValue = 0x1
    };
Get时如查找到符合条件的数据为一条删除记录,查找失败:
 1     bool MemTable::Get(const LookupKey& key, std::string* value, Status* s)
 2     {
 3         Slice memkey = key.memtable_key();
 4
 5         Table::Iterator iter(&table_);
 6         iter.Seek(memkey.data());
 7
 8         if (iter.Valid()) {
 9             const char* entry = iter.key();
10             uint32_t key_length;
11             const char* key_ptr = GetVarint32Ptr(entry, entry + 5, &key_length);
12             if (comparator_.comparator.user_comparator()->Compare(
13                 Slice(key_ptr, key_length - 8), key.user_key()) == 0)
14             {
15                 // Correct user key
16                 const uint64_t tag = DecodeFixed64(key_ptr + key_length - 8);
17                 switch (static_cast<ValueType>(tag & 0xff)) {
18                 case kTypeValue: {
19                     Slice v = GetLengthPrefixedSlice(key_ptr + key_length);
20                     value->assign(v.data(), v.size());
21                     return true;
22                 }
23                 case kTypeDeletion:
24                     *s = Status::NotFound(Slice());
25                     return true;
26                 }
27             }
28         }
29         return false;
30     }
LevelDB源码之三SSTable
上一节提到的MemTable是内存表,当内存表增长到一定程度时(memtable.size> Options::write_buffer_size),Compact动作会将当前的MemTable数据持久化,持久化的文件(sst文件)称之为SSTable。LevelDB中的SSTable分为不同的层级,这也是LevelDB称之为Level DB的原因,当前版本的最大层级为7(0-6),level-0的数据最新,level-6的数据最旧。除此之外,Compact动作会将多个SSTable合并成少量的几个SSTable,以剔除无效数据,保证数据访问效率并降低磁盘占用。
SSTable物理布局
在存储设备上,一个SSTable被划分为多个Block数据块。每个Block中存储的可能是用户数据、索引数据或任何其他数据。SSTable除Block外,每个Block尾部还带了额外信息,布局如下:
|
Block(数据块) |
Compression Type(是否压缩) |
CRC(数字签名) |
|
Block(数据块) |
Compression Type(是否压缩) |
CRC(数字签名) |
表 3.1 SSTable内部单元
Compression Type标识Block中的数据是否被压缩,采用了何种压缩算法,CRC则是Block的数字签名,用于校验数据的有效性。
Block是SSTable物理布局的关键。来看Block结构:

图3.1 Block的物理布局
Block由以下两部分组成:
l 数据记录:每一个Record代表了一条用户记录(Key-Value对)。严格上讲,并不是完整的用户记录,在Key上Block做了优化。
l 重启点信息:亦即索引信息,用于Record快速定位。如Restart[0]永远指向block的相对偏移0,Restart[1]指向重启点Record4的相对偏移。作者在Key存储上做了优化,每个重启点指向的第一条Record记录了完整的Key值,而本重启点之内的其他key仅包含和前一条的差异项。
让我们通过Block的构建过程了解上述结构:
 1 void BlockBuilder::Add(const Slice& key, const Slice& value) {
 2     Slice last_key_piece(last_key_);
 3
 4     assert(!finished_);
 5     assert(counter_ <= options_->block_restart_interval);
 6     assert(buffer_.empty() || options_->comparator->Compare(key, last_key_piece) > 0);
 7
 8     //1. 构建Restart Point
 9 size_t shared = 0;
10     if (counter_ < options_->block_restart_interval)//配置参数,默认为16
11 {                //尚未达到重启点间隔,沿用当前的重启点
12         // See how much sharing to do with previous string
13         const size_t min_length = std::min(last_key_piece.size(), key.size());
14         while ((shared < min_length) && (last_key_piece[shared] == key[shared]))
15          {
16             shared++;
17         }
18     }
19     else            //触发并创建新的重启点
20     {
21         //此时,shared = 0; 重启点中将保存完整key
22         // Restart compression
23         restarts_.push_back(buffer_.size());//buffer_.size()为当前数据块偏移
24         counter_ = 0;
25     }
26     const size_t non_shared = key.size() - shared;
27
28 //2. 记录数据
29     // shared size | no shared size | value size | no shared key data | value data
30     // Add "<shared><non_shared><value_size>" to buffer_
31     PutVarint32(&buffer_, shared);
32     PutVarint32(&buffer_, non_shared);
33     PutVarint32(&buffer_, value.size());
34     // Add string delta to buffer_ followed by value
35     buffer_.append(key.data() + shared, non_shared);
36     buffer_.append(value.data(), value.size());
37
38     // Update state
39     last_key_.resize(shared);
40     last_key_.append(key.data() + shared, non_shared);
41     assert(Slice(last_key_) == key);
42     counter_++;
43 }
代码3.1 BlockBuilder::Add
Buffer_代表当前数据块,restart_中则包含了重启点信息。当向block中新增一条记录时,首先设置重启点信息,包括:是否创建新的重启点,当前key和last key中公共部分大小。重启点信息整理完毕后,插入Record信息,Record信息的结构如下:
Record: shared size | no shared size | value size | no shared key data | value data
表3.2 Record结构
再来看Block构建完成时调用的Finish方法:
1     Slice BlockBuilder::Finish() {
2         // Append restart array
3         for (size_t i = 0; i < restarts_.size(); i++) {
4             PutFixed32(&buffer_, restarts_[i]);
5         }
6         PutFixed32(&buffer_, restarts_.size());
7         finished_ = true;
8         return Slice(buffer_);
9     }
代码3.2 BlockBuilder::Finish
此处和图3.1一致,在所有Record之后记录重启点信息,包括每条重启点信息(block中相对偏移)及重启点数量。
重启点机制主要有两点好处:
- 索引信息:用于快速定位,读取时通过重启点的二分查找先获取查找数据所属的重启点,随后在重启点内部遍历,时间复杂度为Log(n)。
- 空间压缩:有序key值使得相邻记录的key值的重叠度极高,通过上述方式可以有效降低持久化设备占用。
至此,SSTable的物理布局已然清晰,由上到下依次为:表3.1->图3.1->表3.2。
SSTable逻辑布局
刚刚看过Block的结构,紧接着来看SSTable的逻辑布局,这次我们先从实现说起:
 1     void TableBuilder::Add(const Slice& key, const Slice& value) {
 2         Rep* r = rep_;
 3         assert(!r->closed);
 4         if (!ok()) return;
 5         if (r->num_entries > 0) {
 6             assert(r->options.comparator->Compare(key, Slice(r->last_key)) > 0);
 7         }
 8
 9         //1. 构建Index
10         if (r->pending_index_entry) {
11             assert(r->data_block.empty());
12             r->options.comparator->FindShortestSeparator(&r->last_key, key);
13             std::string handle_encoding;
14             r->pending_handle.EncodeTo(&handle_encoding);
15             r->index_block.Add(r->last_key, Slice(handle_encoding));
16             r->pending_index_entry = false;
17         }
18
19      //2. 记录数据
20         r->last_key.assign(key.data(), key.size());
21         r->num_entries++;
22         r->data_block.Add(key, value);
23
24         //3. 数据块大小已达上限,写入文件
25         const size_t estimated_block_size = r->data_block.CurrentSizeEstimate();
26         if (estimated_block_size >= r->options.block_size) {
27             Flush();
28         }
29     }
代码3.3 TableBuilder::Add
这段代码和代码3.1类似,先构建索引,随后插入数据,此处额外增加了数据块处理逻辑:数据块大小达到了指定上限,写入文件。您可能已经注意到,Block中采用了重启点机制实现索引功能,在保证性能的同时又降低了磁盘占用。那么此处为何没有采用类似的机制呢?
实际上,此处索引键值的存储也做了优化,具体实现在FindShortestSeparator中,其目的在于获取最短的可以做为索引的“key”值。举例来说,“helloworld”和”hellozoomer”之间最短的key值可以是”hellox”。除此之外,另一个FindShortSuccessor方法则更极端,用于找到比指定key值大的最小key,如传入“helloworld”,返回的key值可能是“i”而已。作者专门为此抽象了两个接口,放置于Compactor中,可见其对编码也是是有“洁癖”的(*_*)。
 1     // A Comparator object provides a total order across slices that are
 2     // used as keys in an sstable or a database.  A Comparator implementation
 3     // must be thread-safe since leveldb may invoke its methods concurrently
 4     // from multiple threads.
 5     class Comparator {
 6     public:
 7          ......
 8         // Advanced functions: these are used to reduce the space requirements
 9         // for internal data structures like index blocks.
10
11         // If *start < limit, changes *start to a short string in [start,limit).
12         // Simple comparator implementations may return with *start unchanged,
13         // i.e., an implementation of this method that does nothing is correct.
14         virtual void FindShortestSeparator(std::string* start, const Slice& limit) const = 0;
15
16         // Changes *key to a short string >= *key.
17         // Simple comparator implementations may return with *key unchanged,
18         // i.e., an implementation of this method that does nothing is correct.
19         virtual void FindShortSuccessor(std::string* key) const = 0;
20     };
代码3.4 索引键值优化接口
再来看Table构建完成时调用的Finish方法:
 1     Status TableBuilder::Finish() {
 2         //1. Data Block
 3         Rep* r = rep_;
 4         Flush();
 5
 6         assert(!r->closed);
 7         r->closed = true;
 8
 9         //2. Meta Block
10         BlockHandle metaindex_block_handle;
11         BlockHandle index_block_handle;
12         if (ok())
13         {
14             BlockBuilder meta_index_block(&r->options);
15             // TODO(postrelease): Add stats and other meta blocks
16             WriteBlock(&meta_index_block, &metaindex_block_handle);
17         }
18
19         //3. Index Block
20         if (ok()) {
21             if (r->pending_index_entry) {
22                 r->options.comparator->FindShortSuccessor(&r->last_key);
23                 std::string handle_encoding;
24                 r->pending_handle.EncodeTo(&handle_encoding);
25                 r->index_block.Add(r->last_key, Slice(handle_encoding));
26                 r->pending_index_entry = false;
27             }
28             WriteBlock(&r->index_block, &index_block_handle);
29         }
30
31         //4. Footer
32         if (ok())
33         {
34             Footer footer;
35             footer.set_metaindex_handle(metaindex_block_handle);
36             footer.set_index_handle(index_block_handle);
37             std::string footer_encoding;
38             footer.EncodeTo(&footer_encoding);
39             r->status = r->file->Append(footer_encoding);
40             if (r->status.ok()) {
41                 r->offset += footer_encoding.size();
42             }
43         }
44         return r->status;
45     }
代码3.5 TableBuilder::Finish
通过Finish方法,我们可以一窥SSTable的全貌:

图3.2 SSTable逻辑布局
l Data Block:数据块,用户数据存放于此。
l Meta Block:元数据块,暂未使用,占位而已。
l Index Block:索引块,用于用户数据快速定位。
l Footer:见图3.3,“metaindex_handle指出了metaindex block的起始位置和大小;inex_handle指出了index Block的起始地址和大小;这两个字段可以理解为索引的索引,是为了正确读出索引值而设立的,后面跟着一个填充区和魔数。”(引自数据分析与处理之二(Leveldb 实现原理))。

图3.3 Footer
- 重启点机制问题:SSTable一旦创建后,将只存在查询行为,在键值查找或SSTable遍历时,必定从重启点开始查找,因此除重启点位置的Record为完整key外,其他均为差异项亦可快速定位。
- Table、Block一旦创建后无法修改,TableBuilder负责Table创建,BlockBuilder负责。Table、Block最重要的接口为Iterator* NewIterator(...) const,用于查找、遍历数据。LevelDB中的Iterator稍显复杂,后面会统一备忘。
- Table、Block各自采用了类似的索引机制,并形成了Table到Block的多级索引。重启点、Table的索引机制在保证性能的同时又降低了存储空间。
- 表3.1、图3.2中一直强调SSTable中存储的是Block,这种描述并不十分准确。表3.1中讲到,SSTable中存储了“Compression Type(是否压缩)”,如果数据被压缩,SSTable中存储的并不是Block数据本身,而是压缩后的数据,使用时则需先对Block解压。
Version、Current File、Manifest等暂未备忘,待后续补充。