引言:
首先我们可以实现一键部署网站,但在实际生产环境网站部署完成之后,我们的开发隔三差五要修改下网站的内容,难道都要我们运维手动执行命令吗?没有一种方法使得开发人员修改完代码自己测试,部署上线呢,那这就是我们这次要做的持续集成自动化部署的内容。
环境:
自动化部署nginx静态网站两台主机节点
自动化部署nginx静态网站两台主机节点
192.168.30.159:Gitlab服务,节点一
192.168.30.164:jenkins服务,Ansible工具
192.168.30.165:节点二
一、Gitlab仓库的搭建
第一步 :仓库搭建
见Gitlab仓库搭建及在linux,windows中免密使用gitlab(二)
https://blog.csdn.net/rzlongg/article/details/90576768
第二步:创建项目
这里创建一个叫insnginx

二、jenkins持续集成平台搭建
见jenkins持续集成学习(一)
https://blog.csdn.net/rzlongg/article/details/91344621
三、下载ansible自动化部署工具并编写剧本
第一步:下载ansible和git
[root@localhost insnginx]# yum -y install epel-release
[root@localhost ~]# yum -y install ansible
需下载git命令工具下载仓库以及支持jenkins凭证连接gitlab
[root@localhost ~]# yum -y install git
还需要下载nginx服务提供nginx配置文件nginx.conf
[root@localhost ~]# yum -y install nginx
第二步:创建工作目录并克隆仓库
[root@localhost ~]# mkdir /ryan
[root@localhost ~]# cd /ryan
[root@localhost ryan]# ls
[root@localhost ryan]# git clone http://192.168.30.159/root/insnginx.git
正克隆到 'insnginx'...
warning: 您似乎克隆了一个空版本库。
[root@localhost ryan]# ls
insnginx
[root@localhost ryan]# cd insnginx/
[root@localhost insnginx]# ls -a
.  ..  .git
————————————————
版权声明:本文为CSDN博主「Ryan-ruan」的原创文章,遵循 CC 4.0 BY-SA 版权协议,转载请附上原文出处链接及本声明。
原文链接:https://blog.csdn.net/rzlongg/article/details/91344877
第三步:发送秘钥或用配置文件方法
1发送秘钥
[root@localhost insnginx]# ssh-keygen
Generating public/private rsa key pair.
Enter file in which to save the key (/root/.ssh/id_rsa):
Created directory '/root/.ssh'.
Enter passphrase (empty for no passphrase):
Enter same passphrase again:
Your identification has been saved in /root/.ssh/id_rsa.
Your public key has been saved in /root/.ssh/id_rsa.pub.
The key fingerprint is:
SHA256:jt0kVdhKdcTHfWTjYfEHJoCD4xeU5I0T9JR+eDoKE8w root@localhost.localdomain
The key's randomart image is:
+---[RSA 2048]----+
|       ==oo*+o=B=|
|      o.=*+..++oO|
|     + .+=+o   o+|
|      E .o+ o   .|
|       oS .+     |
|      o+ +o      |
|      .oo...     |
|        .        |
|                 |
+----[SHA256]-----+
[root@localhost insnginx]# ssh-copy-id 192.168.30.159      #165也需发送
/usr/bin/ssh-copy-id: INFO: Source of key(s) to be installed: "/root/.ssh/id_rsa.pub"
The authenticity of host '192.168.30.164 (192.168.30.164)' can't be established.
ECDSA key fingerprint is SHA256:lu7kZg1/1+q8+Uj50A8mc4swRUIn57m+98xxDVs1NXU.
ECDSA key fingerprint is MD5:5b:9d:b8:ae:14:2e:65:0f:b8:bb:66:19:95:5d:33:51.
Are you sure you want to continue connecting (yes/no)? yes
/usr/bin/ssh-copy-id: INFO: attempting to log in with the new key(s), to filter out any that are already installed
/usr/bin/ssh-copy-id: INFO: 1 key(s) remain to be installed -- if you are prompted now it is to install the new keys
root@192.168.30.164's password:

Number of key(s) added: 1

Now try logging into the machine, with:   "ssh '192.168.30.164'"
and check to make sure that only the key(s) you wanted were added.
————————————————
版权声明:本文为CSDN博主「Ryan-ruan」的原创文章,遵循 CC 4.0 BY-SA 版权协议,转载请附上原文出处链接及本声明。
原文链接:https://blog.csdn.net/rzlongg/article/details/91344877
2.修改配置文件/etc/ansible/hosts
#在文件最后添加
[ryan]
192.168.30.167 ansible_ssh_user=root ansible_ssh_port=22 ansible_ssh_pass=root
192.168.30.168 ansible_ssh_user=root ansible_ssh_port=22 ansible_ssh_pass=root
注意:
修改配置方法不需要再清单目录和文件,且ansible一定要和jenkins安装在一台主机上,而秘钥验证ansible没有特别要求要安装在哪台主机。
第四步:创建roles相关目录编写ansible剧本
[root@localhost insnginx]# mkdir roles/nginx/{tasks,vars,template,files} -p
编写vars下文件:
[root@localhost insnginx]# vim roles/nginx/vars/main.yml
port: 83
host_user: root
conn: 2048
docu_root: /var/www/html
复制/etc/nginx/nginx.conf配置文件到templates下改名nginx.conf.exp并修改相关参数为变量
[root@localhost insnginx]# vim roles/nginx/templates/nginx.conf.exp
user {{ host_user }};
worker_processes auto;
......

events {
    worker_connections {{ conn }};
}
......
    server {
        listen       {{ por }};
        server_name  _;
        root         {{ docu_root }};
......
————————————————
版权声明:本文为CSDN博主「Ryan-ruan」的原创文章,遵循 CC 4.0 BY-SA 版权协议,转载请附上原文出处链接及本声明。
原文链接:https://blog.csdn.net/rzlongg/article/details/91344877
编写任务文件
- copy: src=roles/nginx/files/myone.repo dest=/etc/yum.repos.d/
- yum: name=nginx state=present
- template: src=roles/nginx/templates/nginx.conf.exp dest=/etc/nginx/nginx.conf
- systemd: name=nginx state=restarted
- copy: src=roles/nginx/files/index.html dest=/var/www/html
编写测试文件
[root@localhost insnginx]# echo "this is test nginx webserver" > roles/nginx/files/index.html
编写主机清单
[root@localhost insnginx]# ls
inventory roles
[root@localhost insnginx]# cat inventory/ryan
[ryan]
192.168.30.159
192.168.30.164
编写剧本
[root@localhost insnginx]# vim ryan.yml
[root@localhost insnginx]# cat ryan.yml
- hosts: all
roles:
- nginx
第五步:模拟执行剧本
剧本语法检测
[root@localhost insnginx]# ansible-playbook --syntax-check ryan.yml
 [WARNING]: provided hosts list is empty, only localhost is available. Note that the
implicit localhost does not match 'all'


playbook: ryan.yml
————————————————
版权声明:本文为CSDN博主「Ryan-ruan」的原创文章,遵循 CC 4.0 BY-SA 版权协议,转载请附上原文出处链接及本声明。
原文链接:https://blog.csdn.net/rzlongg/article/details/91344877
模拟执行
[root@localhost insnginx]# ansible-playbook -C -i inventory/ryan ryan.yml

PLAY [all] ******************************************************************************************************

TASK [Gathering Facts] ******************************************************************************************
ok: [192.168.30.165]
ok: [192.168.30.159]

TASK [nginx : copy] *********************************************************************************************
changed: [192.168.30.165]
changed: [192.168.30.159]

TASK [nginx : yum] **********************************************************************************************
changed: [192.168.30.165]
changed: [192.168.30.159]

TASK [nginx : template] *****************************************************************************************
changed: [192.168.30.165]
changed: [192.168.30.159]

TASK [nginx : systemd] ******************************************************************************************
changed: [192.168.30.165]
changed: [192.168.30.159]

TASK [nginx : copy] *********************************************************************************************
changed: [192.168.30.159]
changed: [192.168.30.165]

PLAY RECAP ******************************************************************************************************
192.168.30.159 : ok=6 changed=5 unreachable=0 failed=0 skipped=0 rescued=0 ignored=0
192.168.30.165 : ok=6 changed=5 unreachable=0 failed=0 skipped=0 rescued=0 ignored=0
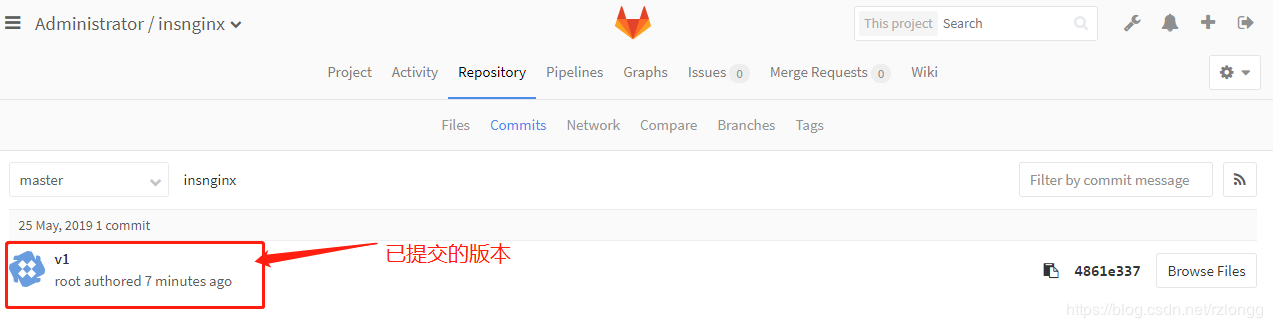
第六步:提交代码至Gitlab
[root@localhost insnginx]# git config --global user.name "Administrator"
[root@localhost insnginx]# git config --global user.email "admin@example.com"
[root@localhost insnginx]# git add .
[root@localhost insnginx]# git commit -m "v1"
[master(根提交) 4861e33] v1
Committer: root <root@localhost.localdomain>
7 files changed, 128 insertions(+)
create mode 100644 inventory/ryan
create mode 100644 roles/nginx/files/index.html
create mode 100644 roles/nginx/files/myone.repo
create mode 100644 roles/nginx/tasks/main.yml
create mode 100644 roles/nginx/templates/nginx.conf.exp
create mode 100644 roles/nginx/vars/main.yml
create mode 100644 ryan.yml
[root@localhost insnginx]# git push -u origin master
Username for 'http://192.168.30.159': root #Gitlab 账号
Password for 'http://root@192.168.30.159': #Gitlab的8位密码
Counting objects: 16, done.
Compressing objects: 100% (8/8), done.
Writing objects: 100% (16/16), 2.11 KiB | 0 bytes/s, done.
Total 16 (delta 0), reused 0 (delta 0)
To http://192.168.30.159/root/insnginx.git
* [new branch] master -> master

分支 master 设置为跟踪来自 origin 的远程分支 master。
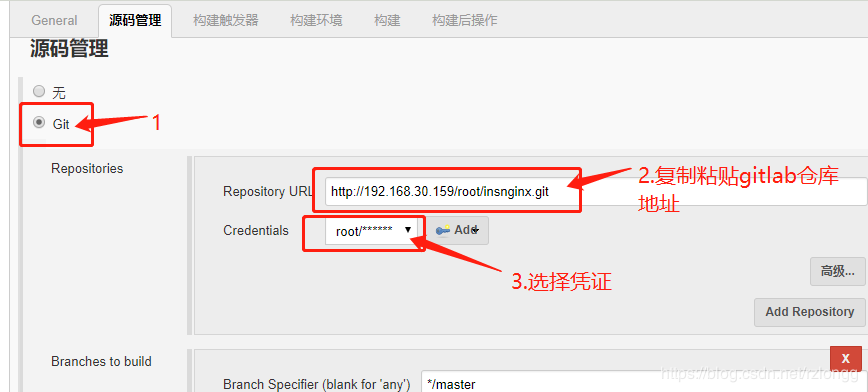
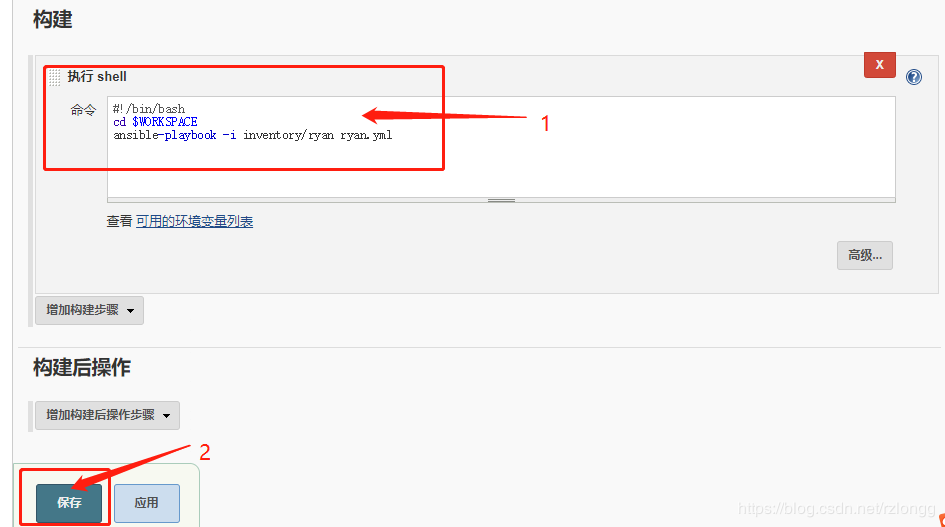
第七步:使用jenkins运行剧本
jenkins用户可能无法运行ansible剧本
修改/etc/sysconfig/jenkins文件以root用户运行ansible
JENKINS_USER=”root”
重启jenkins
第八步:创建jenkins任务进行构建


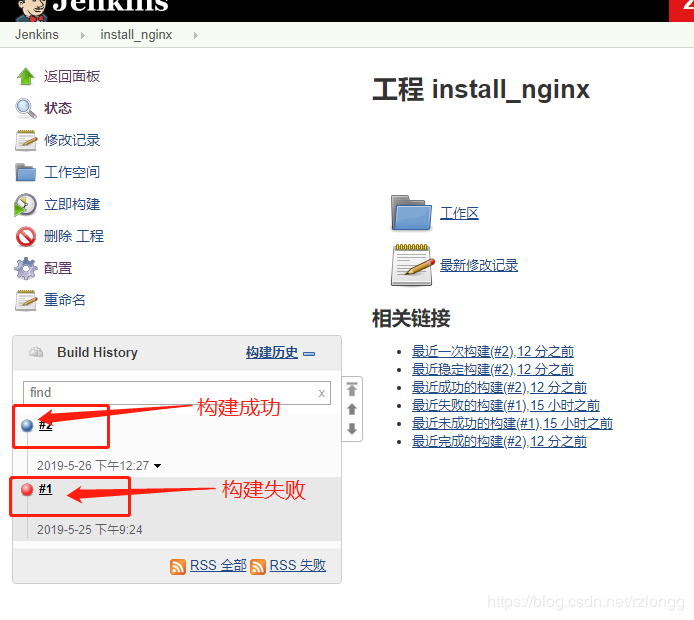
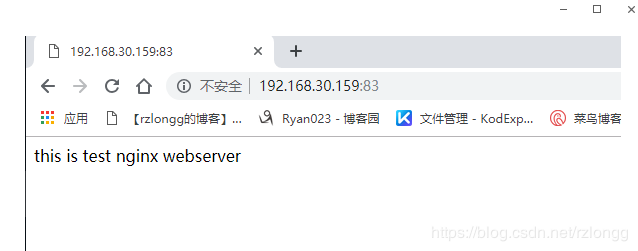
第九步:查看节点一二的nginx的状态,访问测试页面
[root@localhost ~]# ss -tnl | grep 83
LISTEN 0 128 *:83 *:*

四、问题汇总
报错1:

解决办法:
[root@localhost ~]# mkdir /var/www/html -p
报错2:

解决办法:跳过主机秘钥验证
vim /etc/ansible/ansible.cfg
host_key_checking = false 这行的注释打开即可
报错3:

解决办法:在ansible主机上执行 ssh-copy-id 本机ip
————————————————
版权声明:本文为CSDN博主「Ryan-ruan」的原创文章,遵循 CC 4.0 BY-SA 版权协议,转载请附上原文出处链接及本声明。
原文链接:https://blog.csdn.net/rzlongg/article/details/91344877