近段时间一直在忙,所以博客也没有更新,这两天我翻了一下写的这几篇博客,感觉写的都很片面,所以,我想重新写一个系列教程,从最基础的开始,来让大家更容易学会React-Native。
这个系列大部分只介绍Android和iOS通用的部分
一、关于RN环境搭建
这个问题我在博客上写过,既然是系列教程,那么就在这个系列里面重新再写一遍
1、Mac上搭建RN开发环境
安装homebrew:打开终端输入
/usr/bin/ruby -e "$(curl -fsSL https://raw.githubusercontent.com/Homebrew/install/master/install)"
在Max OS X 10.11(El Capitan)版本中,homebrew在安装软件时可能会碰到/usr/local目录不可写的权限问题。可以使用下面的命令修复:
sudo chown -R `whoami` /usr/local
通过HomeBrew来安装Node.js
brew install node
安装React Native的命令行工具(react-native-cli)
npm install -g react-native-cli
如果你看到EACCES: permission denied这样的权限报错,那么修复权限问题
sudo chown -R `whoami` /usr/local
既然要做iOS开发,那么Xcode不会不知道吧,开发iOS必不可少的工具Xcode,这个可以直接在AppStore里面下载。
安装WatchMan
brew install watchman
环境搭建完毕,创建运行RN项目
react-native init AwesomeProject
cd AwesomeProject
react-native run-ios
2、Mac上搭建RN安卓开发环境
这里有一篇教程挺详细的react native android开发环境搭建(mac系统),这里我就不再多说(我不会告诉大家我搭建完成之后就没在意搭建的具体步骤...)。
二、关于RN文件介绍
刚创建好的应用程序文件夹如下图所示
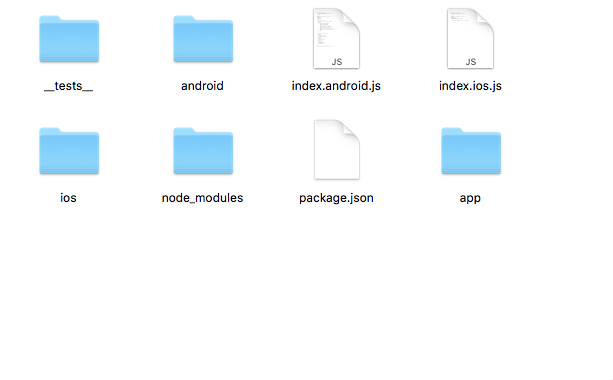
其中app文件夹是我自己创建的,咱们看一下文件夹中的内容:__tests__文件夹是最近才加进去的,前几个版本没有,应该是测试用的,暂时没做研究,ios和android文件夹对应iOS和安卓程序的文件存放的文件夹,浙西而我们不用管,node_modules是我们开发所需要的依赖库。package.json是配置文件,index.android.js和index.ios.js是我们程序的入口文件,我们写的代码就是在这里写的。打开index.ios.js我们可以看到这些
import React, { Component } from 'react';
import {
  AppRegistry,
  StyleSheet,
  Text,
  View
} from 'react-native';

export default class AwesomeProject extends Component {
  render() {
    return (
      <View style={styles.container}>
        <Text style={styles.welcome}>
          Welcome to React Native!
        </Text>
        <Text style={styles.instructions}>
          To get started, edit index.android.js
        </Text>
        <Text style={styles.instructions}>
          Double tap R on your keyboard to reload,{'
'}
          Shake or press menu button for dev menu
        </Text>
      </View>
    );
  }
}

const styles = StyleSheet.create({
  container: {
    flex: 1,
    justifyContent: 'center',
    alignItems: 'center',
    backgroundColor: '#F5FCFF',
  },
  welcome: {
    fontSize: 20,
    textAlign: 'center',
    margin: 10,
  },
  instructions: {
    textAlign: 'center',
    color: '#333333',
    marginBottom: 5,
  },
});

AppRegistry.registerComponent('AwesomeProject', () => AwesomeProject);
具体介绍可以看我的这篇博客
好了,接下来开始我们的系列教程
三、Text
这里我直接用我已经写好的框架来介绍RN的组件Text
显而易见,Text就是文本,就如同你现在看到的文字。
那么如何使用呢?
其实在index.ios.js文件中有这样的组件。那是最基础的用法
<Text> Welcome to React Native!</Text>
其实Text有很多属性和样式,以下是一些常用的属性和样式!
import React, { Component } from 'react';
import {
  StyleSheet,
  Text,
  View
} from 'react-native';
export default class TextClass extends Component {
  onPressTitle(){
    //Text  onPress的点击方法,点击之后的操作写在这里!
  }
  render() {
    //numberOfLines表示的是文本的行数,包括折叠产生的换行在内,总的行数不会超过这个属性的限制
    //onPress当文本被点击以后调用此回调函数。
    //style文本的样式,这里把常用的样式列出来供大家参考,除了自身的样式外,还继承了View的样式
    //View的样式咱们后边再说,现在先看Text的样式
    //ellipsizeMode:设置文本省略的位置,必须和numberOfLines配合使用
    //
    //如下,Text可以嵌套使用,不过一般为了文字上下左右居中,用View嵌套Text
    return (
      <View style={styles.container}>
        <Text numberOfLines={1}
              onPress={this.onPressTitle}
              style={styles.textstyle}
              ellipsizeMode='head'>
          你好!我是Demon404,欢迎关注我!
        </Text>

        <Text style={{fontWeight: 'normal'}}>
          I am bold
          <Text style={{color: 'red'}}>
            and red
          </Text>
        </Text>

      </View>
    );
  }
}

const styles = StyleSheet.create({
  container: {
    flex: 1,
    justifyContent: 'center',
    alignItems: 'center',
    backgroundColor: '#F5FCFF',
  },
  textstyle: {
    color: 'black',//文字的颜色
    fontFamily: 'Times',//设置字体
    fontSize: 20,//设置文字大小
    fontStyle: 'italic',//设置文字:normal:正常体;italic:斜体
    fontWeight: 'normal',//设置粗体字,'normal' /*default*/, 'bold', '100', '200', '300', '400', '500', '600', '700', '800', '900'
    lineHeight: 30,//设置行高
    textAlign: 'center',//设置字体位置,'auto' /*default*/, 'left', 'right', 'center', 'justify'
    textDecorationLine: 'underline',//下划线和删除线的样式:['none' /*default*/, 'underline', 'line-through', 'underline line-through'
  }
});
四、View
接下来我们说最常用的控件View,在开发过程中,View是必不可少的
export default class ViewClass extends Component {
  render() {
    return (
      <View style={styles.container}>

      </View>
    );
  }
}
View是一个支持Flexbox布局、样式、一些触摸处理、和一些无障碍功能的容器,并且它可以放到其它的视图里,也可以有任意多个任意类型的子视图。不论在什么平台上,View都会直接对应一个平台的原生视图。
View使用挺简单的,直接使用就可以,这里我着重介绍一下View的属性和它的一些样式,其中View有一个最重要的Flex布局,这个篇幅比较长,咱们新开一个文章讲解
import React, { Component } from 'react';
import {
  StyleSheet,
  Text,
  View
} from 'react-native';
export default class ViewClass extends Component {
  //View常用属性暂时就介绍这么多,其他的咱们以后重点介绍
  doubleClick() {
    //双击之后的事件处理写在这里
  }
  moveTest() {
    console.log('移动');
  }
  render() {
    //accessible表示此视图时一个启用了无障碍功能的元素。默认为true
    //onMagicTap:当accessible为true时,双击View会调用此函数。
    //onMoveShouldSetResponder: 触摸控件并滑动时调用的方法
    //onMoveShouldSetResponderCapture:触摸控件并滑动时调用的方法,避免子视图响应
    //onResponderMove:用户在View上移动手指调用
    //onResponderRelease:结束触摸时调用
    //pointerEvents:控制当前视图是否可以触控'box-none', 'none', 'box-only', 'auto'
    //其他的属性以后在介绍
    return (
      <View style={styles.container}>
        <View style={styles.viewStyle}
              accessible={true}
              onMagicTap={this.doubleClick}
              onMoveShouldSetResponderCapture={this.moveTest}
              pointerEvents='auto'>

        </View>
      </View>
    );
  }
}

const styles = StyleSheet.create({
  //View样式有Flex布局
  //一般来说,使用flexDirection、alignItems和 justifyContent三个样式属性就已经能满足大多数布局需求
  //flexDirection的默认值是column而不是row,alignItems的默认值是stretch而不是flex-start,以及flex只能指定一个数字值。
  //关于flex布局咱们另起一篇文章。
  container: {
    flex: 1,
    //当设置justifyContent: 'center',//上下居中 alignItems: 'center',//左右居中
    //那么这个View中的子视图都会在这个View的中间
    justifyContent: 'center',//上下居中
    alignItems: 'center',//左右居中
    backgroundColor: '#F5FCFF',
  },
  viewStyle: {
     100,//设置宽度
    height: 100,//设置高度
    backgroundColor: 'red',//背景颜色
    backfaceVisibility: 'visible',//定义界面翻转的‘visible', 'hidden’
    borderBottomColor: 'blue',//设置底部边框颜色
    borderBottomLeftRadius: 20,//设置左下圆角大小
    borderBottomRightRadius: 40,//设置右下圆角大小
    borderBottomWidth: 2,//设置底部边框的粗细大小
    //borderColor:'green',//设置所有边框颜色
    borderLeftColor: 'green',//设置左边框颜色
    borderLeftWidth: 5,//设置左边框粗细大小
    //borderRadius : 10,//设置正题边框圆角大小
    //borderRightColor
    //borderRightWidth
    borderStyle: 'solid',//设置边框样式'solid', 'dotted', 'dashed'
    //borderTopColor color
    //borderTopLeftRadius ReactPropTypes.number
    //borderTopRightRadius ReactPropTypes.number
    //borderTopWidth ReactPropTypes.number
    //borderWidth ReactPropTypes.number
    overflow: 'visible',//设置内容超过容器显示还是隐藏'visible', 'hidden'
    opacity: 0.5,//设置透明度
  }
});