《正确的发币姿势》
前言:
在之前的《程序员的自我救赎》系列中其实已经讲解过如何用发行区块链代币。
12.2.1 :虚拟币交易平台(区块链) 上 【发行区块链代币】
12.2.2: 虚拟币交易平台(区块链) 中 【开发交易所】
12.2.3: 虚拟币交易平台(区块链) 下 【C#与以太坊通讯】
也有很多人抱怨说基于以太坊发币的流程,虽然比拿比特币源码修改发币要简单,但是由于要同步区块。需要等待很长的时间,有没有不用同步区块的办法?
答案是:当然有啦!
今天,开始一个新的系列-----《搬运工》
============================华丽的分割线 ===============================
第一步:准备一份智能合约
先讲解一下,如果再不需要同步区块的情况下,利用以太坊发币!
其实很简单,首先我们需要一份以太坊发币的智能合约,这个官网就有下载了,我这里直接贴出一份。
官网的智能合约是可以直接用的,但是我们知道照抄也要改个名字嘛!

我再贴一个我改好的合约:


pragma solidity ^0.4.16;

interface tokenRecipient { function receiveApproval(address _from, uint256 _value, address _token, bytes _extraData) external; }

contract AllCoin{
    // Public variables of the token
    string public name;
    string public symbol;
    uint8 public decimals = 8;
    // 18 decimals is the strongly suggested default, avoid changing it
    uint256 public totalSupply;

    // This creates an array with all balances
    mapping (address => uint256) public balanceOf;
    mapping (address => mapping (address => uint256)) public allowance;

    // This generates a public event on the blockchain that will notify clients
    event Transfer(address indexed from, address indexed to, uint256 value);

    // This notifies clients about the amount burnt
    event Burn(address indexed from, uint256 value);

    /**
     * Constructor function
     *
     * Initializes contract with initial supply tokens to the creator of the contract
     */
   constructor(
        uint256 initialSupply,
        string tokenName,
        string tokenSymbol
    ) public {
        totalSupply = initialSupply * 10 ** uint256(decimals);  // Update total supply with the decimal amount
        balanceOf[msg.sender] = totalSupply;                // Give the creator all initial tokens
        name = tokenName;                                   // Set the name for display purposes
        symbol = tokenSymbol;                               // Set the symbol for display purposes
    }

    /**
     * Internal transfer, only can be called by this contract
     */
    function _transfer(address _from, address _to, uint _value) internal {
        // Prevent transfer to 0x0 address. Use burn() instead
        require(_to != 0x0);
        // Check if the sender has enough
        require(balanceOf[_from] >= _value);
        // Check for overflows
        require(balanceOf[_to] + _value >= balanceOf[_to]);
        // Save this for an assertion in the future
        uint previousBalances = balanceOf[_from] + balanceOf[_to];
        // Subtract from the sender
        balanceOf[_from] -= _value;
        // Add the same to the recipient
        balanceOf[_to] += _value;
        emit Transfer(_from, _to, _value);
        // Asserts are used to use static analysis to find bugs in your code. They should never fail
        assert(balanceOf[_from] + balanceOf[_to] == previousBalances);
    }

    /**
     * Transfer tokens
     *
     * Send `_value` tokens to `_to` from your account
     *
     * @param _to The address of the recipient
     * @param _value the amount to send
     */
    function transfer(address _to, uint256 _value) public {
        _transfer(msg.sender, _to, _value);
    }

    /**
     * Transfer tokens from other address
     *
     * Send `_value` tokens to `_to` on behalf of `_from`
     *
     * @param _from The address of the sender
     * @param _to The address of the recipient
     * @param _value the amount to send
     */
    function transferFrom(address _from, address _to, uint256 _value) public returns (bool success) {
        require(_value <= allowance[_from][msg.sender]);     // Check allowance
        allowance[_from][msg.sender] -= _value;
        _transfer(_from, _to, _value);
        return true;
    }

    /**
     * Set allowance for other address
     *
     * Allows `_spender` to spend no more than `_value` tokens on your behalf
     *
     * @param _spender The address authorized to spend
     * @param _value the max amount they can spend
     */
    function approve(address _spender, uint256 _value) public
        returns (bool success) {
        allowance[msg.sender][_spender] = _value;
        return true;
    }

    /**
     * Set allowance for other address and notify
     *
     * Allows `_spender` to spend no more than `_value` tokens on your behalf, and then ping the contract about it
     *
     * @param _spender The address authorized to spend
     * @param _value the max amount they can spend
     * @param _extraData some extra information to send to the approved contract
     */
    function approveAndCall(address _spender, uint256 _value, bytes _extraData)
        public
        returns (bool success) {
        tokenRecipient spender = tokenRecipient(_spender);
        if (approve(_spender, _value)) {
            spender.receiveApproval(msg.sender, _value, this, _extraData);
            return true;
        }
    }

    /**
     * Destroy tokens
     *
     * Remove `_value` tokens from the system irreversibly
     *
     * @param _value the amount of money to burn
     */
    function burn(uint256 _value) public returns (bool success) {
        require(balanceOf[msg.sender] >= _value);   // Check if the sender has enough
        balanceOf[msg.sender] -= _value;            // Subtract from the sender
        totalSupply -= _value;                      // Updates totalSupply
        emit Burn(msg.sender, _value);
        return true;
    }

    /**
     * Destroy tokens from other account
     *
     * Remove `_value` tokens from the system irreversibly on behalf of `_from`.
     *
     * @param _from the address of the sender
     * @param _value the amount of money to burn
     */
    function burnFrom(address _from, uint256 _value) public returns (bool success) {
        require(balanceOf[_from] >= _value);                // Check if the targeted balance is enough
        require(_value <= allowance[_from][msg.sender]);    // Check allowance
        balanceOf[_from] -= _value;                         // Subtract from the targeted balance
        allowance[_from][msg.sender] -= _value;             // Subtract from the sender's allowance
        totalSupply -= _value;                              // Update totalSupply
        emit Burn(_from, _value);
        return true;
    }
}
=======================华丽的分割线==========================
第二步:编译智能合约
好了,这里我们已经准备好了发行自己代币的一份智能合约,下面要介绍一个神器。
以太坊智能合约在线编译器:remix !
我们把刚刚那份智能合约复制--粘贴到remix中,这个是即时编译的!
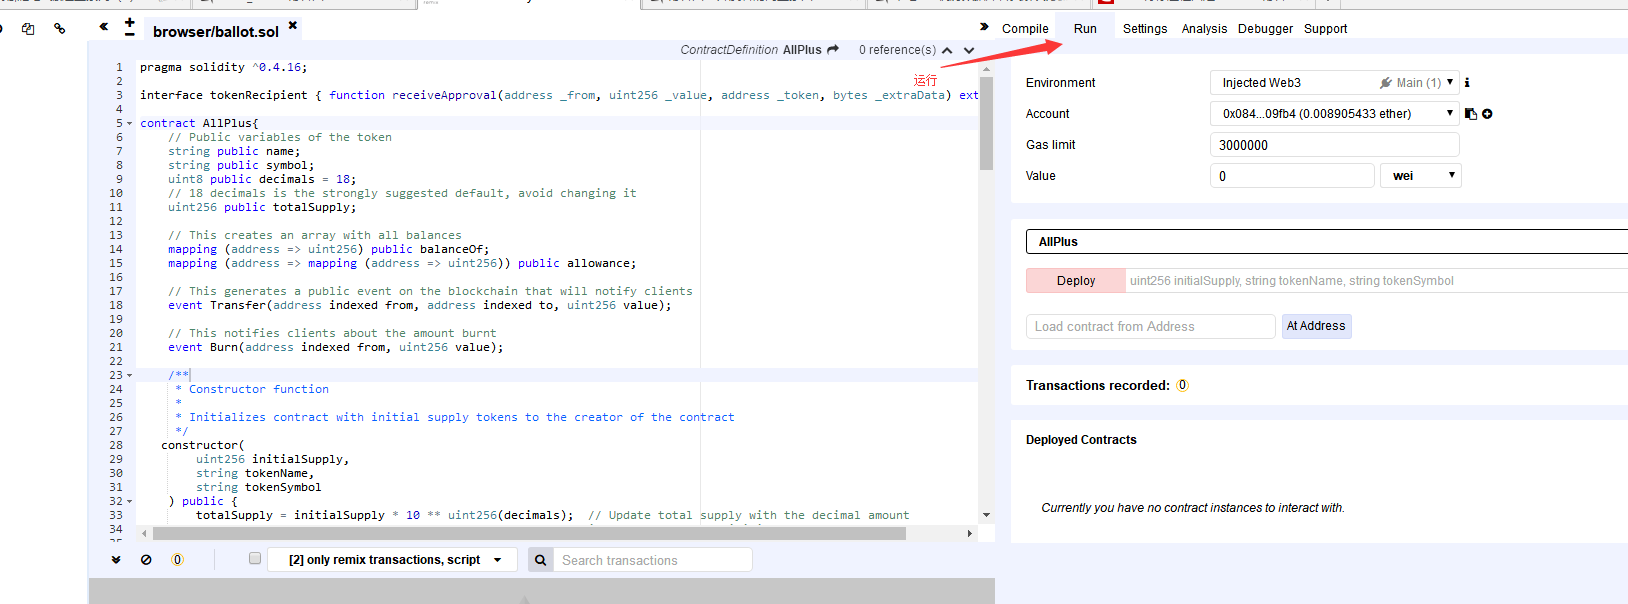
选择Run,运行智能合约。这里系统会分配5个以太坊账号给到我们,每个里面有100个以太币。
不要笑! 是测试环境! (正式环境要有500个以太坊,就发了!)
接着往后面说,这里随便选择一个账号,反正都是测试的。然后我们输入发币的基本参数:
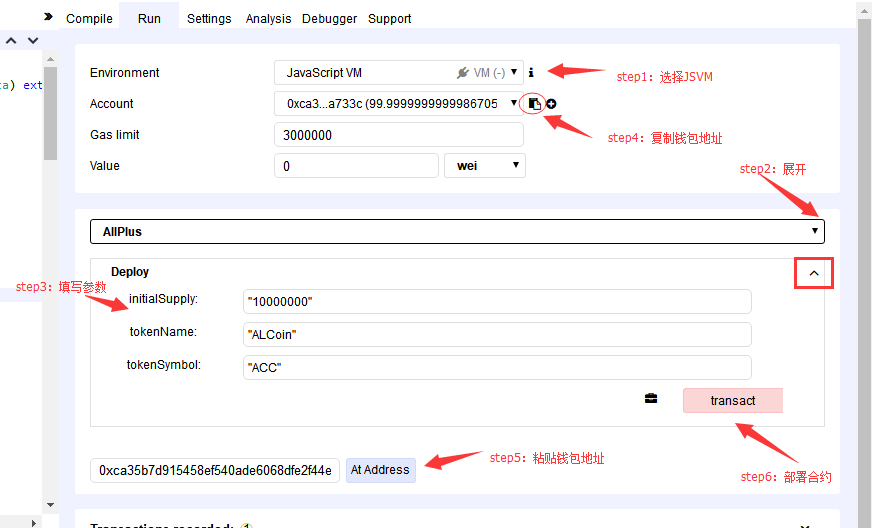
1,选择JavaScript VM,程序员朋友看到VM就太熟悉了!
2,展开要填写的参数,不展开的话也可以一样写完,但是那样看起来不舒服。
3,填写发币所需的参数:
initialSupply:发行总数
tokenName:代币名称,比如比特币是:BitCoin,简写是"BTC"
tokenSymbol: 简写比如 ETH,EOS
4,复制钱包地址到 At Address 那一栏,意思就是将合约部署在哪个账号。
5,粘贴钱包地址,点击At Address。
6,点击Transact,部署智能合约。
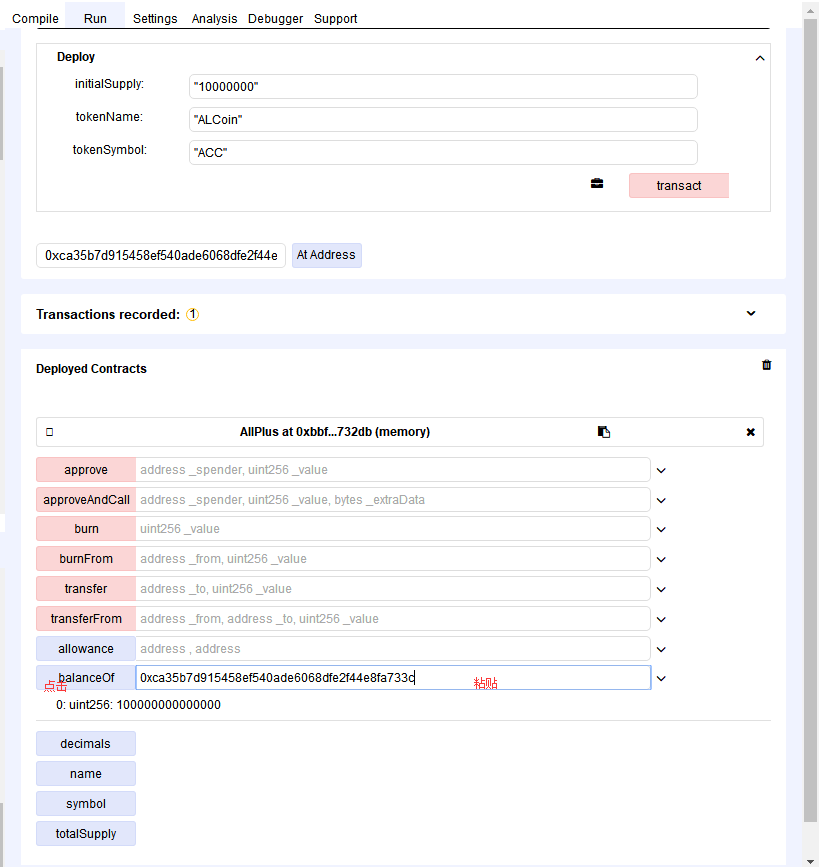
这里我们就已经成功的在测试环境部署了一份代币智能合约,我们测试一下,将钱包地址复制到文本框,然后点击 balance Of。就可以看到
我们在这个钱包下就有币了。(这个后面会多很多“0”,不用在意,可以理解为去掉了小数点,实际位数是对的!)
===================================华丽的分割线============================
第三步:使用matemask
这里我们已经利用remix 顺利的在 “测试环境”下 发币成功,那么如何部署在正式环境?
我们要用到另外一件神器: MateMask
我们可以直接用谷歌浏览器,安装这个插件。(怎么安装? 直接拖进去就可以了!)
如果不能下载的,请使用科学上网,自备梯子!
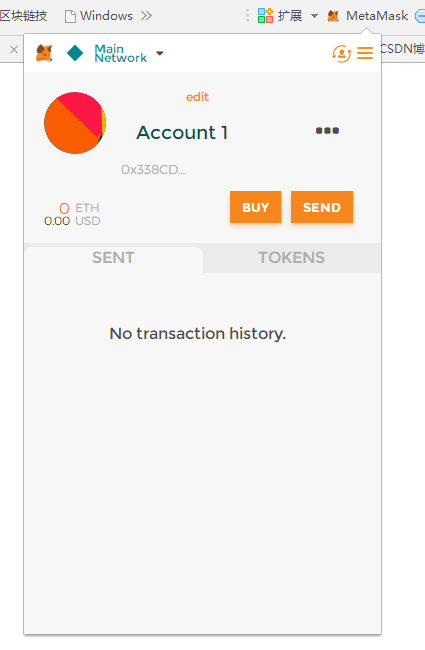
简单介绍一下matemask,它就是一个在线钱包,等于别人在他服务器上同步好了区块,然后以web的方式呈现给你用。
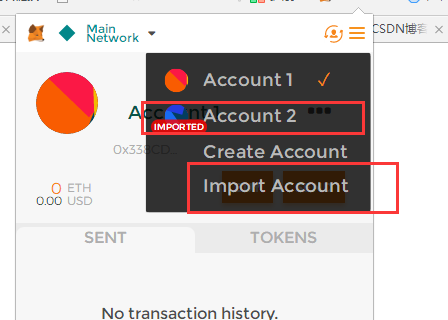
默认的我们会分配一个账户。Account1。
这个Account1里面是没有以太币的,我们都知道发代币是要消耗gas的,也就是以太币。没有币的话有两种方式:
1,去交易所买然后再提币到这个钱包,但是交易所会收提币手续费,这个具体买多少看着办吧!发币的话,其实0.1个以太币就足够了!
2,将自己有币的以太坊钱包,导入到matemask。
我这里使用的第二种方式:
===================================华丽的分割线============================
第四步:正式环境部署!
第四步最简单,我们再次回到remix界面上。
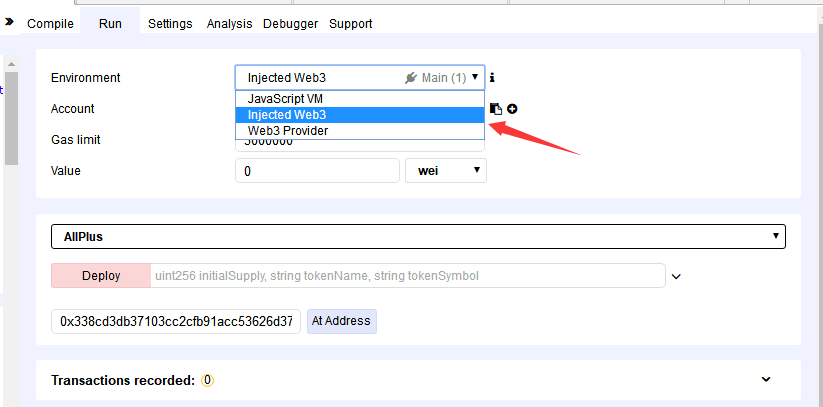
这个时候,我们会发现MateMask,会通过web3.js 自动给我们注入钱包到remix,我们选择injected web3。
这里就可以看到我们自己的钱包地址。然后其他的流程都是一样(重复第二步)
等同于之前是用虚拟环境部署在虚拟账户上,现在是通过matemask部署在正式环境上!
===================================华丽的分割线============================
第五步:收尾
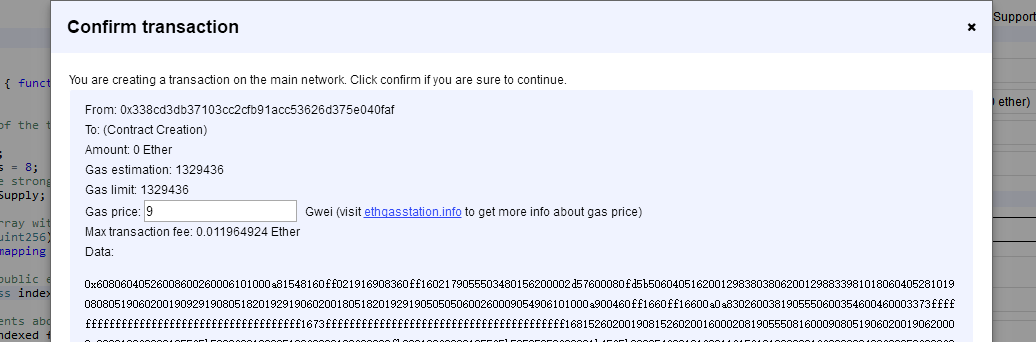
部署的时候,会弹出确认框,这里有说明需要9Gwei 以太币作为gas,这里我建议不要改数字。
我们知道,给的gas越多,打包确认的速度就越快。给的越少,就越慢。 我这次部署需要9Gwei 是remix自动帮我算出来的合理的价格。
我之前就想少给一点,结果发现,等了5个小时没有被确认。(以太坊12个区块确认,才算正式确认)
最后放弃了,好在MateMask,有追加gas的功能。我补了点进去,最后几秒钟就确认成功了!

发币是否成功,以及等待时间,我们可以上 https://etherscan.io/ 去查询!
最后,我们发币成功后,就可以自由的转账了,比如我把钱包导入到Imtoken钱包。
剩下的,至于您要空投,还是要上交易所,那就是运营的事情了!
是不是比同步钱包然后发币,简单多了!