https://castle-engine.io/manual_text.php
Text and fonts
1. Show text using a label UI control (TCastleLabel)
The most comfortable way to show text is to use TCastleLabel. You can customize it's font using CustomFont and FontSize properties.
Many UI controls (see for example unit CastleControls) descend from TUIControlFont, and thus can render text and have their font customized, for example TCastleButton.
You can add and configure UI controls (like TCastleLabel, TCastleButton and many more) by code, or using the CGE editor.
2. Explicitly draw text (TCastleFont)
Instead of using TCastleLabel, you can explicitly draw the text. For this you need an instance of the TCastleFont class. To make it easy, one global instance of this class is already created for you: UIFont (part of CastleControls unit). So you can simply draw text like this:
UIFont.Print(10, 10, Yellow, 'Some text to print');
You should place such drawing code inside a render method, for example inside the OnRender event of TCastleWindowCustom or OnRender event of TCastleControlCustom or inside the overridden TUIControl.Renderimplementation. See the manual about 2D drawing for a general info about 2D rendering.
TCastleFont class has a lot of methods and properties.
- You can simply print the text (Print).
- You can change the font size (Size).
- You can add an outline around it (Outline, OutlineColor).
- You can measure the text (TextWidth, TextHeight, TextSize, RowHeight...).
- You can print a multi-line text, with optional line wrapping (PrintRect, PrintRectMultiline, PrintStrings, PrintBrokenString and other methods).
3. Create a new font
TCastleFont is actually an abstract class representing some font that can be drawn. To create a new font, you create an instance of a non-abstract class, most often the TTextureFont class — it draws font glyphs from a texture, and can be loaded from a font file (TTF, OTF). There are other possible font implementations, for example TSimpleTextureFont allows to use a font drawn on an image (so you can make colorful letters, with fancy custom outline and such).
See castle_game_engine/examples/fonts/font_from_texture.lpr for a simple example of creating fonts. In the basic version, you simply use TTextureFont.Load to load a font from a file (TTF, OTF or any other font format supported by the FreeType2 library). So you construct and load a font like this:
MyNewFont := TTextureFont.Create(Application { any TComponent to act as owner });
MyNewFont.Load(ApplicationData('MyFontFile.ttf'), 20, true);
Remember to install the FreeType2 library for this to work. On Windows, place appropriate FreeType2 DLL alongside the exe, you can get the DLL from castle_game_engine/tools/build-tool/data/external_libraries/directory of the engine.
You can assign the new font as the global UIFont, so it will be by default used by all standard UI controls:
UIFont := MyNewFont;
(Instead of assigning to the UIFont, you can assign to Container.DefaultFont or define a default_font inside the CastleSettings.xml file. This way CGE editor will also use the new font.)
Instead of loading the font data from a file, you can also provide a TTextureFontData instance to the TTextureFont constructor. This allows to create the font data at runtime or to use the font data embedded in a Pascal source code. You can use the texture-font-to-pascal program (compile it from castle_game_engine/tools/texture-font-to-pascal/texture-font-to-pascal.lpr) to convert a font file into a Pascal unit:
texture-font-to-pascal --size 20 MyFontFile.ttf
In response, it will create a unit called CastleTextureFont_MyFontFile_20 with a public function:
function TextureFont_MyFontFile_20: TTextureFontData;
You can use this unit in your program, and create a font instance like this:
MyNewFont := TTextureFont.Create(Application { any TComponent to act as owner });
MyNewFont.Load(TextureFont_MyFontFile_20);
The advantages of embedding a font inside a Pascal unit are:
- You don't need to distribute the FreeType2 library. This is especially useful when developing for Android or iOS or web plugin, when linking with an additional library can be troublesome.
- Font is loaded slightly faster, since it's already processed to a suitable texture data.
The disadvantages are of course that you cannot simply change the font file anymore, you need to rerun the texture-font-to-pascal command and recompile your program to see the new font.
4. International characters
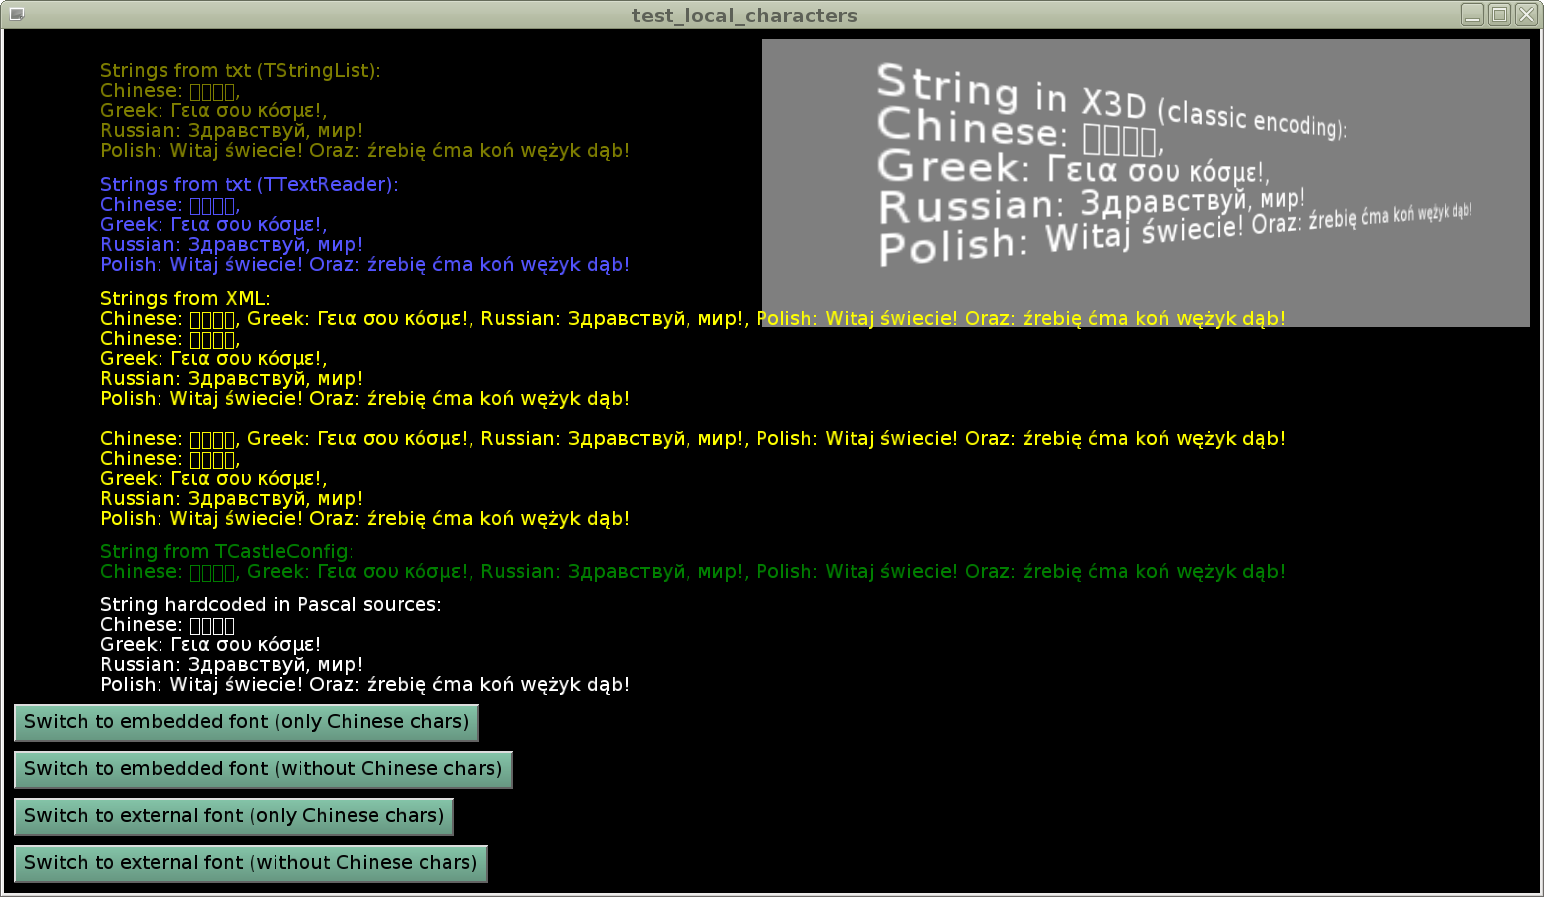 |
(A complete program using the concepts discussed below is in the engine examples, in the examples/fonts/test_local_characters/. The main code is in gameinitialize.pas unit there. Check it out!)
All font routines (printing, measuring) expect the international characters to be encoded using UTF-8. To draw the international characters (anything beyond basic English ASCII set) you also need to create a font with these characters.
When constructing TTextureFont, you need to use the overloaded constructor with parameter ACharacters (TUnicodeCharList). Provide there a list of the characters (including all the possible international characters) that you want to display. Like this:
uses ..., CasteFonts, CastleStringUtils, CastleUnicode;

function CreateMyFont: TCastleFont;
var
  Characters: TUnicodeCharList;
begin
  Characters := TUnicodeCharList.Create;
  try
    Characters.Add(SimpleAsciiCharacters);
    { below is a string containing all my international chars, in UTF-8 }
    Characters.Add('你好世界ΓειασουκόσμεЗдравствуймир');
    Result := TTextureFont.Create(ApplicationData('MyFontFile.ttf'), 20, true, Characters);
  finally FreeAndNil(Characters) end;
end;
Make sure to provide the sample characters encoded in UTF-8. In the example above, they are simply hardcoded in the Pascal source file, so make sure that compiler understands it as UTF-8 data. Make sure your source code is in UTF-8 (edit it using an UTF-8 capable editor, consider adding an UTF-8 BOM, consider using {$CODEPAGE UTF8}, see FPC source codepage option).
If you use the texture-font-to-pascal utility to embed fonts in Pascal sources (see above) then use it's parameter --sample-text to provide the additional (beyond simple ASCII) chars. Like this:
texture-font-to-pascal --size 20 MyFontFile.ttf --sample-text '你好世界ΓειασουκόσμεЗдравствуймир'
And make sure that your command-line, and/or your script interpreter, correcly handles UTF-8 (on Linux, this should be a breeze, since everything works with UTF-8 out of the box; on modern Windows it should also work).
5. Localization (translation) using CastleLocalizationGetText
You can use the CastleLocalizationGetText for a localization approach based on GetText.
You use standard GetText formats for translating (PO, MO) and utilizing GetText tools like PoEdit. You can automatically translate strings in Pascal code, declared as resourcestring (use CastleTranslateResourceStrings). You can automatically translate user interface (use TranslateAllDesigns). You can generate starting file to translate user interface (use GenerateGetTextPo).
A typical workflow for translating an application looks like this:
-
Generate POT (PO Template) files containing everything to translate:
-
Generate POT file to translate the user interface by calling
GenerateGetTextPo('castle-data:/gui/*.castle-user-interface');. Place the resulting contents inuser_interface.pot. -
Generate POT file to translate all resourcestrings using the
rstconvtool from FPC. Place the resulting contents ingame.pot.
-
-
Create and translate the PO files for each language you support.
For each
xxx.pot, create a filexxx.<language-code>.po. For example for Polish translation you would create files likegame.pl.poanduser_interface.pl.po. For Japanese translation you would create filesgame.ja.poanduser_interface.ja.po.Note that
game.xx.poshould contain a map from English text -> localized (Polish, Japanese etc.) text. In contrast,user_interface.xx.poshould contain a map from internal identifier (qualified component names) -> localized (Polish, Japanese etc.) text. Both approaches are possible with GetText.You can create and edit PO files using any GetText PO editor, like PoEdit. The PO is a text file format, so you can use any regular text editor (like Atom or Emacs) as well.
-
Generate MO files from PO using the GetText
msgfmttool. Some editors like PoEdit may also do this automatically.In effect you will get
game.pl.mo,user_interface.pl.mo(Polish translation) andgame.ja.mo,user_interface.ja.mo(Japanese translation).Place these MO files inside the data directory of your application.
-
In game, determine user preferred language, e.g. using CastleSystemLanguage.
Then translate things by loading appropriate MO file.
-
To translate all user interface that will be loaded, call
TranslateAllDesigns('castle-data:/translations/user_interface.ja.mo');(where "ja" stands for Japanese localization, just an example). -
To translate resourcestrings, call
CastleTranslateResourceStrings('castle-data:/translations/game.ja.mo');.
-
For more details and example how to do it all see the README and source code of our example application using CastleLocalizationGetText (examples/localization/gettext/).
You can tweak this workflow to your needs by using various other routines from CastleLocalizationGetText unit and overriding TCastleComponent.TranslateProperties. You can use more POT / PO files for your own needs. You can translate strings explicitly at any moment, using TMOFile.Translate('my_id').
The engine uses resourcestrings for some internally-generated messages, so these can be translated too.
6. Localization (translation) using CastleLocalization (deprecated)
You can use our own localization class from the CastleLocalization unit. It can read from a number of translation formats (XML, JSON, CSV, GetText MO). It can translate user-interface controls, like TCastleLabel. The demo is inside examples/localization/custom/.
For advanced users, the system allows to aid in localizing your custom classes too (see OnUpdateLocalization) and to add your own translation formats (see FileLoader).
As with GetText approach, you can use a cross-platform CastleSystemLanguage unit that tells you the preferred user language. You can also translate strings "explicitly" using the Localization.Items['my_id'] in CastleLocalization.
Thousand thanks go to Benedikt Magnus for developing this approach!
It is deprecated, as it has (for now) less features than the GetText approach (see the CastleLocalization documentation for details).