前言
在vue项目中,组件是vue最强大的功能,对于vue组件,我们知道vue组件的作用域是独立的,每个实例化的组件都只能访问组件内部定义的data,但是在一些情况下,我们需要访问其他组件的数据,就有了组件通信的问题,在vue里组件之间的关系有以下几种:父子,隔代,兄弟。针对不同的关系,实现组件之间的通信,是本文的所要讲述的。
一、父子组件之间的通信
- 父组件可以通过props向子组件传参,而子组件可以通过$emit向父组件传参
例子
child-com.vue
<template>
	<div class="child-com">
		<div >{{userName}}</div>
		<div>{{comment}}</div>
		<div>{{like}}</div>
		<div>{{collect}}</div>
	</div>
</template>

<script>
	export default{
		props:['userName','comment','like','collect']
	}
</script>

<style>
</style>
注意:html中的attribute名是大小写是不敏感的,所以浏览器会把所有的大写字符解释为小写字符,这意味着你使用dom模板的时候,camelCase(驼峰命名法)的props需要用等价的kebab-case(短横线分隔命名)命名
props的类型,在这里我们只是使用字符串数组的形式列出了props,如果你希望每个props都有指定的值的类型,你可以以对象的形式列prop这些属性的名称和值分别是 prop 各自的名称和类型
当我们在子组件中修改props里的值时,控制台会报错,这是因为所有的prop是单向数据流,所有事物prop都使得其父子之间形成一个单向下行绑定:父级的prop更新会向下流动到子组件当中,但是反过来则不行,
父组件向子组件传参(props)
parent-com.vue
<template>
	<child-com class="parent-com" :user-name="childValue.userName" :comment="childValue.comment" :like="childValue.like" :collect="childValue.collect"></child-com>
</template>

<script>
	import childCom from './child-com.vue'
	export default{
		data(){
			return{
				childValue:{
					userName:"dehenliu",
					comment:"a girl of wisdom and beauty",
					like:9999,
					collect:9999
				}
			}
		},
		components:{
			childCom
		}
	}
</script>

<style>
</style>
子组件向父组件传参传值($emit)
child-com.vue
<template>
	<div class="child-com">
		<div >{{userName}}</div>
		<div>{{comment}}</div>
		<div>{{like}}</div>
		<div>{{collect}}</div>
		<input type="text" @change="changeValue" v-model="childTitle" />
	</div>
</template>

<script>
	export default{
		props:['userName','comment','like','collect'],
		data(){
			return{
				childTitle:'我是子组件的值'
			}
		},
		methods:{
			changeValue(e){
				console.log(e)
				this.$emit("changeValue",this.childTitle)
			}
		}
	}
</script>

<style>
</style>
parent-com.vue
<template>
	<child-com class="parent-com" :user-name="childValue.userName" :comment="childValue.comment" :like="childValue.like" :collect="childValue.collect" @changeValue="changeValue" ></child-com>
</template>

<script>
	import childCom from './child-com.vue'
	export default{
		data(){
			return{
				childValue:{
					userName:"dehenliu",
					comment:"a girl of wisdom and beauty",
					like:9999,
					collect:9999
				}
			}
		},
		components:{
			childCom
		},
		methods:{
			changeValue(title){
				console.log(title)
			}
		}
	}
</script>

<style>
</style>
在这个例子中,我们给input绑定了一个change事件,这时候,假设父组件需要子组件的childTitle这个值,我们通过$emit自定义一个事件changeValue,在父组件中通过v-on监听,并接收参数,这样就实现了子组件向父组件通信
- 父子组件间通信之$parent/$children
$paren:指定已创建的实例之父实例,在两者之间建立父子关系。子实例可以用 this.$parent 访问父实例,子实例被推入父实例的 $children 数组中。
节制地使用 $parent 和 $children - 它们的主要目的是作为访问组件的应急方法。更推荐用 props 和 events 实现父子组件通信
$children:当前实例的直接子组件。需要注意 $children 并不保证顺序,也不是响应式的。如果你发现自己正在尝试使用 $children 来进行数据绑定,考虑使用一个数组配合 v-for 来生成子组件,并且使用 Array 作为真正的来源。
先来看个demo
在上面的demo中补充child-com2.vue
<template>
	<div class="child-com2-wrap">
		<div>{{articleList.title}}</div>
		<div>{{articleList.contnet}}</div>
		<img :src="articleList.imgSrc"/>
		<button @click="changeParent">childCom2</button>
	</div>
</template>

<script>
	export default{
		props:{
			articleList:Object
		},
		methods:{
			changeParent(){
				console.log(this.$parent)
				this.$parent.emoj = "hahaha"
			}
		}
	}
</script>

<style>
</style>
修改parent-com.vue
<template>
	<div>
		<div>{{emoj}}</div>
		<child-com class="parent-com" :user-name="childValue.userName" :comment="childValue.comment" :like="childValue.like" :collect="childValue.collect" @changeValue="changeValue" ></child-com>
		<child-com2 :article-list="articleList"></child-com2>
		<button @click="chageChildData">通过$children修改</button>
	</div>
</template>

<script>
	import childCom from './child-com.vue'
	import childCom2 from "./child-com2.vue"
	import img from "@/assets/logo.png"
	export default{
		data(){
			return{
				childValue:{
					userName:"dehenliu",
					comment:"a girl of wisdom and beauty",
					like:9999,
					collect:9999
				},
				articleList:{
					title:"这是一个标题",
					contnet:"可多可少啦啦势力大得看山东矿机角度来看可多可少啦啦势力大得看山东矿机角度来看可多可少啦啦势力大得看山东矿机角度来看可多可少啦啦势力大得看山东矿机角度来看",
					imgSrc:img
				},
				emoj:"smail"
			}
		},
		created(){
			console.log(this.$children)
		},
		components:{
			childCom,
			childCom2
		},
		methods:{
			changeValue(title){
				console.log(title)
			},
			chageChildData(){
				this.$children[0].childTitle = "我是修改厚的childCom"
			}
		}
	}
</script>

<style>
</style>
在上述的demo中,我们点击父组件按钮(通过$children修改)this.$children[0].childTitle='我是修改厚的childCom'来改变子组件中的childTitle值,点击子组件中的按钮(childCom2)通过this.$parent.emoj = 'hahaha'来修改父组件的emoj的值
我们可以通过$parent,$children来访问父组件的子实例(如果子实例没有则为一个空数组),访问子组件的父实例(存在父实例的话),拿到实例,我们就可以对实例的属性和方法,
二、隔代组件之间的通信之$attrs和$listeners
在vue项目中,我们可能会遇到这样的一种情况,祖祖组件,父组件,子组件逐级嵌套,那么在祖祖和孙子之间的通信,我们又该怎么处理呢?我们可以逐级的使用prop去传值,但是这样一级一级的传,也很麻烦,当然我们也可以利用vuex来实现祖孙组件的通信,但是如果传的值只有一个,那又有点小题大做了,因此就有了$attrs和$listener
我们先来看看两个属性的定义
$attrs
-
类型:{ [key: string]: string }
-
只读
-
详细:
包含了父作用域中不作为 prop 被识别 (且获取) 的特性绑定 (class 和 style 除外)。当一个组件没有声明任何 prop 时,这里会包含所有父作用域的绑定 (class 和 style 除外),并且可以通过 v-bind="$attrs" 传入内部组件——在创建高级别的组件时非常有用。
$listeners
-
类型:{ [key: string]: Function | Array
} -
只读
-
详细:
包含了父作用域中的 (不含 .native 修饰器的) v-on 事件监听器。它可以通过 v-on="$listeners" 传入内部组件——在创建更高层次的组件时非常有用。
看了官网上的解释好像并没有明白什么,我们用下面的demo来理解一下吧
假设有三个文件a.vue,b.vue,c.vue,其中a,b,c的关系是a是b的爸爸,b是c的爸爸,a是c的爷爷
a.vue
<template>
	<div class="a-wrap">
		<div>我是a组件</div>
		<div>这是来自c组件的值:{{fromC}}</div>
		<b-com  :articleList="articleList" v-on:chageC="chageC"></b-com>
	</div>
</template>

<script>
	import BCom from './b.vue'
	export default{
		data(){
			return{
				articleList:{
					name:"这是文章标题",
					content:"点击点击五四二季度将foe快递诶看度搜鞥见"
				},
				fromC:null
			}
		},
		components:{
			BCom
		},
		methods:{
			chageC(c){
				console.log(c)
				this.fromC = c
			}
		}
	}
</script>
b.vue
<template>
	<div>
		<div>我是b组件</div>
		<c-com v-bind="$attrs" v-on="$listeners"></c-com>
	</div>
</template>

<script>
	import CCom from './c.vue' // 引入C组件
	export default{
		components:{
			CCom
		}
	}
</script>
c.vue
<template>
	<div class="c-wrap">
		<div>我是c组件</div>
		<div>这是来自a组件的articleList.name:{{$attrs.articleList.name}}</div>
		<div>这是来自a组件的articleList.content:{{$attrs.articleList.content}}</div>
		<button @click="changeData">c-button</button>
	</div>
</template>

<script>
	export default{
		data(){
			return{
				star:4
			}
		},
		methods:{
			changeData(){
				this.star++
				this.$emit("chageC",this.star)
			}
		}
	}
</script>
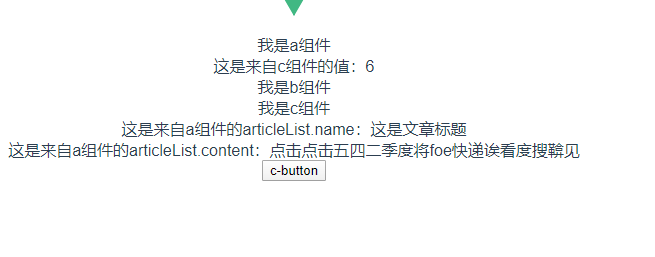
从上面的代码和显示的结果中,我们可以知道,如果我们要给祖父组件给孙子组件传值是可以通过$attrs来实现,孙子组件给祖父组件传值是可以通过$listeners来实现的。
注意,在孙子组件中是不能再props中声明同祖父组件要传入的值,否则就取不到。
- provide/inject
还有另外的方法祖孙组件可以给后代组件数据/方法,那就是provide。然后在任何的后代组件里我们可以使用inject选项来接收指定的我们想要添加在这个实例上的属性
再次之前我们先看看官网对provide和inject的定义
provide/inject:
- provide:
Object | () => Object - inject:
Array<string> | { [key: string]: string | Symbol | Object }
详细
注意:provide和inject主要用于开发高阶插件/组件库的时候使用。并不推荐用于普通应用程序代码中
这对选项需要一起使用,以允许一个祖先组件向其所有子孙后代注入一个依赖。不论组件层次有多深,并且在起上下游关系成立的时间里始终生效。
provide选项应该是一个对象或返回一个对象的函数。该对象包含可注入其子孙的属性。在该对象中你可以使用ES2015 Symbol作为key,但是只在原生支持Symbol和Reflect.ownKeys的环境下可工作
inject选项应该是:
- 一个字符串数组,或
- 一个对象,对象的key是基本的绑定名,value是:
- 在可用的注入内容中搜索用的key(字符串或Symbol)或
- 一个对象,该对象的:
- from属性在可用的注入内容中搜索用的key(字符串或Symbol)
- default属性是降级情况下使用的value
提示:provide和inject绑定并不是可响应的,这不是刻意为之的。然而,如果你传入了一个可监听的对象,那么其对象的属性还是可响应的
demo
provide.vue
<template>
	<div>
		<div>我是provide.vue</div>
		<div>provide content</div>
		<inject-com></inject-com>
		<button @click="changeProvide">改变provide值</button>
	</div>
</template>

<script>
	import injectCom from "./inject.vue"
	export default{
		data(){
			return{
			}
		},
		provide:{
			foo:'bar'
		},
		created(){
			console.log(this)
		},
		components:{
			injectCom
		},
		methods:{
			changeProvide(){
				this._provided.foo = "fooooooooooooooo"
			}
		}
	}
</script>

<style>
</style>
这里打印出来的provide的值如图所示

inject.vue
<template>
	<div>
		<div>我是inject.vue</div>
		<div>inject content</div>
		<child-com :user-name="userName" :comment="comment" :like="like" :collect='collect'></child-com>
	</div>
</template>

<script>
	import childCom from "./child-com.vue"
	export default{
		data(){
			return{
				userName:"dehen",
				comment:"pround girls",
				like:999,
				collect:999
			}
		},
		inject:['foo'],
		created(){
			console.log(this.foo)
		},
		components:{
			childCom
		}
	}
</script>

<style>
</style>
在生命周期created打印注入的inject的foo值,打印出来值为'bar'
child-com.vue
<template>
	<div class="child-com">
		<div >{{userName}}</div>
		<div>{{comment}}</div>
		<div>{{like}}</div>
		<div>{{collect}}</div>
		<input type="text" @change="changeValue" v-model="childTitle" />
	</div>
</template>

<script>
	export default{
		props:['userName','comment','like','collect'],
		inject:['foo'],
		data(){
			return{
				childTitle:'我是子组件的值'
			}
		},
		created(){
			console.log(this.foo)
		},
		methods:{
			changeValue(e){
				console.log(e)
				this.$emit("changeValue",this.childTitle)
			}
		}
	}
</script>

<style>
</style>
在生命周期created打印注入的inject的foo值,打印出来值为'bar'
当点击改变provide值按钮时候,并没有更新组件的foo值
这时,我们给provide传入一个可监听的值,使其变得可响应
改provide.vue的代码
<template>
	<div>
		<div>我是provide.vue</div>
		<div>provide content</div>
		<inject-com></inject-com>
		<button @click="changeProvide">改变provide值</button>
	</div>
</template>

<script>
	import injectCom from "./inject.vue"
	export default{
		data(){
			return{
				changeProvidValue:'ddddd'
			}
		},
		provide()
			return {
				foo:this.changeProvidValue,
				reactiveProvideValue:() => this.changeProvidValue
			}
		},
		created(){
			console.log(this)
		},
		components:{
			injectCom
		},
		methods:{
			changeProvide(){
				console.log(this.changeProvidValue,)
				this.changeProvidValue = "fooooooooooooooo"
			}
		}
	}
</script>

<style>
</style>
改变inject.vue
<template>
	<div>
		<div>我是inject.vue</div>
		<div>inject content{{getReactiveProvideValue}}</div>
		<child-com :user-name="userName" :comment="comment" :like="like" :collect='collect'></child-com>
	</div>
</template>

<script>
	import childCom from "./child-com.vue"
	export default{
		data(){
			return{
				userName:"dehen",
				comment:"pround girls",
				like:999,
				collect:999,
				changeValue:""
			}
		},
		computed:{
	           chilrfoo(){
	                return  this.foo
	           },
	           getReactiveProvideValue(){
	       	        return this.reactiveProvideValue()
	           }
		},
		inject:['foo','reactiveProvideValue'],
		created(){
			console.log(this.foo)
		},
		watch:{
			getReactiveProvideValue(val){
				this.changeValue = val
				console.log('来自Parent组件的changeProvidValue值发生了变化', val)
			}
		},
		components:{
			childCom
		}
	}
</script>

<style>
</style>
上面代码中我们改变了provide.vue中provide选项,返回一个对象的函数,返回的对象里的值有foo,是组件data中的changeProvidValue,还有一个值是reactiveProvideValue,是一个箭头函数,返回的也是data中的changeProvidValue,我们在injec.vue里面在computed里面返回两个inject的值,会发现chilrfoo数据并没有发生改变,而getReactiveProvideValue在点击按钮后数据发生了改变,实现了我们想要的数据响应
三、兄弟组件之间的通信
- eventBus
有以下这样的场景,存在组件parent,兄弟组件brother-one和兄弟组件brother-two,这时兄弟组件brother-one需要brother-two的数据,这里就需要用到vue的eventBus了
什么是eventBus?
eventBus又称事件总线。在vue项目中可以用作两个组件间沟通的桥梁,就像所有组件共用相同事件的中心,可以向该事件中心注册发送事件或者接收事件,所以组件都可以上下平行地通知其他组件
如何使用eventBus?
eventBus.js
import Vue from 'vue'
export const EventBus = new Vue()
我们首先创建事件总线,实际上就是创建一个vue实例,并且将它导出,这样方便其他模块使用
当然还有另外一种方式,直接在入口的js文件中初始化eventBus
Vue.prototype.$EventBus = new Vue()
注意这种方式是一个全局的事件总线
好了现在我们已经创建好了eventBus,接下来,我们在组件里调用它
parent.vue
<template>
	<div class="parent-wrap">
		<h1>brother-one</h1>
		<brother-one></brother-one>
		<h1>brother-two</h1>
		<brother-two></brother-two>
	</div>
</template>

<script>
	import brotherOne from "./brother-one.vue"
	import brotherTwo from "./brother-two.vue"

	export default{
		data(){
			return{

			}
		},
		components:{
			brotherOne,
			brotherTwo
		}
	}
</script>

<style>
</style>
brother-one.vue
<template>
	<div class="brother-one-wrap">
		<h1>这是来自brother-one的数据{{myMsg}}</h1>
	</div>
</template>

<script>
	import {EventBus} from '@/assets/js/eventBus.js'
	export default{
		data(){
			return{
				myMsg:""
			}
		},
		mounted(){
			EventBus.$on('changeMsg',(msg) => {
				this.myMsg = msg
			})
		}
	}
</script>

<style>
</style>
brother-two.vue
<template>
	<div class="brother-two-wrap">
		<h1>{{msg}}</h1>
		<button @click="changeMsg">change msg</button>
	</div>
</template>

<script>
	import {EventBus} from '@/assets/js/eventBus.js'
	export default{
		data(){
			return{
				msg:"this data from brother-two"
			}
		},
		methods:{
			changeMsg(){
				console.log(this.msg)
				EventBus.$emit("changeMsg",this.msg)
			}
		}
	}
</script>

<style>
</style>
点击按钮结果显示
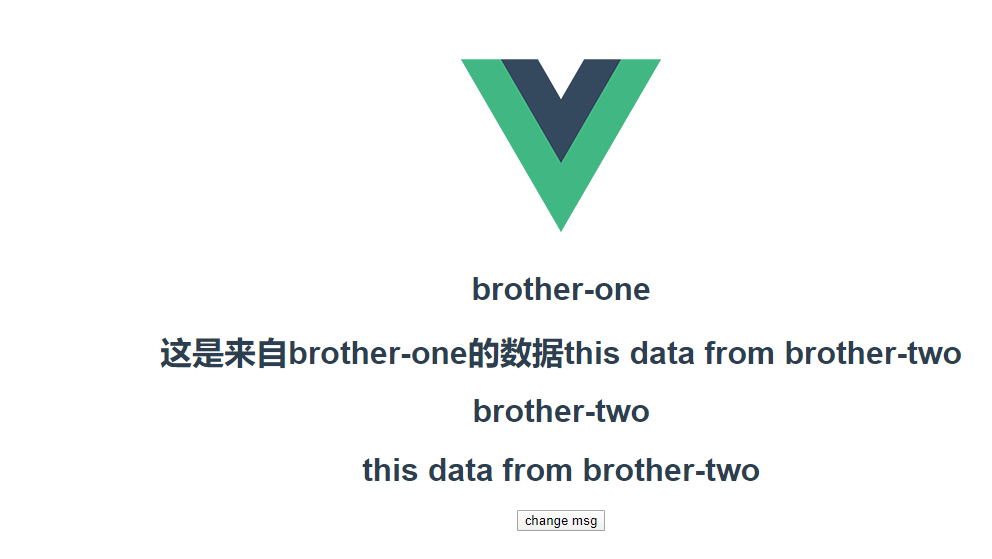
这样我们就实现了兄弟组件之间的通信,虽然eventBus简捷方便,但是如果使用不善,也会在项目中出现很多bug,比如,我们制动vue页面是单页面应用,如果在某个页面刷新页面,那么与之相关的eventBus也会被删除,这样就导致业务走不下去。还有,如果存在反复操作的页面,eventBus监听就会被触发很多次,这样也会带来很大的隐患。通常,我们会在页面销毁的时候,同时移除EventBus事件监听。可以使用eventBus.$off('changeMsg')来移除对应的事件监听,或者调用eventBus.$off()来移除所有事件,不需要传任何参数