4 动画函数封装
4.1 动画原理实现

- 举例
<style>
    div {
        position: absolute;
        left: 0;
         100px;
        height: 100px;
        background-color: pink;
    }
</style>
<body>
    <div></div>
    <script>
        var div = document.querySelector('div');
        var timer = setInterval(function() {
            if (div.offsetLeft >= 400) {
                //停止动画,停止定时器
                clearInterval(timer);
            }
            div.style.left = div.offsetLeft + 1 + 'px'; //offsetLeft只可以读,不可以写
        }, 30)
    </script>
</body>
4.2 动画函数简单封装
- 注意传递两个参数:动画对象和移动到的距离。
<style>
    div {
        position: absolute;
        left: 0;
         100px;
        height: 100px;
        background-color: pink;
    }

    span {
        position: absolute;
        left: 0;
        top: 200px;
        display: block;
         150px;
        height: 150px;
        background-color: purple;
        color: #fff;
    }
</style>
<body>
    <div></div>
    <span>夏雨荷</span>
    <script>
        //简单动画封装   obj目标对象;target目标位置
        function animate(obj, target) {
            var timer = setInterval(function() {
                if (obj.offsetLeft >= target) {
                    //停止动画
                    clearInterval(timer);
                }
                obj.style.left = obj.offsetLeft + 1 + 'px';//达到目标位置清除定时器后,该行代码还是会执行最后一遍
            }, 30)
        }

        var div = document.querySelector('div');
        var span = document.querySelector('span');

        //调用函数
        animate(div, 300);//最终停在301处
        animate(span, 200);//最终停在201处
    </script>
</body>
4.3 动画函数给不同的元素记录不同的定时器

上述做法有一个弊端:每次调用动画的时候都要var一个timer,每次这就要在内存中开辟一个空间。调用动画越多,越占内存。下文的方法避免var timer;还可以为每个对象定制一个自己的定时器。
- 做法:利用对象添加属性的方法
        // var obj = {};
        // obj.name = 'andy';
        var div = document.querySelector('div');
        console.log(typeof div);//object
- 结构
<body>
    <button>点击夏雨荷才走</button>
    <div></div>
    <span>夏雨荷</span>
    <script>
        //简单动画封装   obj目标对象;target目标位置
        function animate(obj, target) {
            clearInterval(obj.timer); //按钮debug解决方案:让每个元素只对应一个定时器,保证当前只有一个定时器
            //给不同的元素指定不同的定时器
            obj.timer = setInterval(function() { //为对象添加属性的方法 避免了var申明变量timer,不用在内存中开辟空间了
                if (obj.offsetLeft >= target) {
                    //停止动画
                    clearInterval(obj.timer); //清除定时器也是这样
                }
                obj.style.left = obj.offsetLeft + 1 + 'px';
            }, 30)
        }

        var div = document.querySelector('div');
        var span = document.querySelector('span');
        var btn = document.querySelector('button');

        //调用函数
        animate(div, 300);
        btn.addEventListener('click', function() {
            animate(span, 200); //debug:当不断地点击按钮,会产生越来越多的定时器,元素的速度会越来越快,解决方案:让每个元素只对应一个定时器
        })
    </script>
</body>
- 样式
<style>
    div {
        position: absolute;
        left: 0;
         100px;
        height: 100px;
        background-color: pink;
    }

    span {
        position: absolute;
        left: 0;
        top: 200px;
        display: block;
         150px;
        height: 150px;
        background-color: purple;
        color: #fff;
    }
</style>
4.4 缓动动画
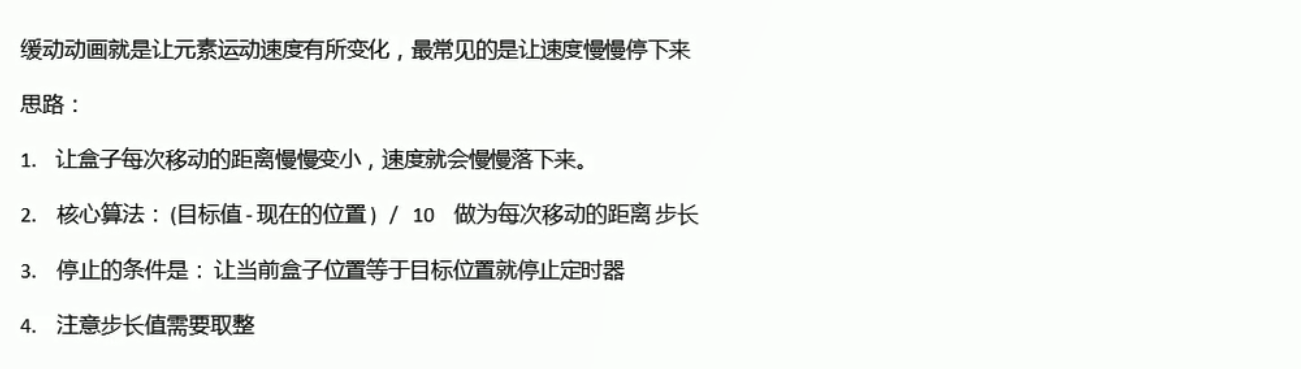
- 匀速动画就是盒子当前的位置+固定的值
- 缓动动画就是盒子当前的位置+变化的值
- 原理
<body>
    <button>点击夏雨荷才走</button>
    <span>夏雨荷</span>
    <script>
        // 缓动动画函数封装obj目标对象 target 目标位置
        // 思路:
        // 1. 让盒子每次移动的距离慢慢变小, 速度就会慢慢落下来。
        // 2. 核心算法:(目标值 - 现在的位置) / 10 做为每次移动的距离 步长
        // 3. 停止的条件是: 让当前盒子位置等于目标位置就停止定时器
        function animate(obj, target) {
            // 先清除以前的定时器,只保留当前的一个定时器执行
            clearInterval(obj.timer);
            obj.timer = setInterval(function() {
                // 步长值写到定时器的里面
                var step = (target - obj.offsetLeft) / 10;
                if (obj.offsetLeft == target) {
                    // 停止动画 本质是停止定时器
                    clearInterval(obj.timer);
                }
                // 把每次加1 这个步长值改为一个慢慢变小的值  步长公式:(目标值 - 现在的位置) / 10
                obj.style.left = obj.offsetLeft + step + 'px';

            }, 15);
        }
        var span = document.querySelector('span');
        var btn = document.querySelector('button');

        btn.addEventListener('click', function() {
                // 调用函数
                animate(span, 500);
            })
    </script>
</body>
- 在多个目标之间移动(让span这个盒子在500处和800处来回切换,可进可退)
<body>
    <button class="btn500">点击夏雨荷到500</button>
    <button class="btn800">点击夏雨荷到800</button>
    <span>夏雨荷</span>
    <script>
        //简单动画封装   obj目标对象;target目标位置
        function animate(obj, target) {
            clearInterval(obj.timer);
            obj.timer = setInterval(function() {
                //步长值写在定时器里面  步长公式:(目标值-现在的位置)/10
                var step = (target - obj.offsetLeft) / 10;
                //为了避免步长出现小数导致最后无法停止规定的位置  所以前进时将步长值向上取整,后退时将步长向下取整
                //前进时:取整之后算到最后几步步长是0.x的时候,步长取整是1,这样就可以确保停止指定位置
                //后退时:取整之后算到最后几步步长是-0.x的时候,步长取整是-1,这样就可以确保停止指定位置
                step = step > 0 ? Math.ceil(step) : Math.floor(step);
                if (obj.offsetLeft == target) { //==号
                    clearInterval(obj.timer); //清除定时器也是这样
                }
                //把每次加1这个步长改为慢慢变小    的值
                obj.style.left = obj.offsetLeft + step + 'px';
            }, 15)
        }

        var span = document.querySelector('span');
        var btn500 = document.querySelector('.btn500');
        var btn800 = document.querySelector('.btn800');

        //调用函数
        //既能前进又能后退
        btn500.addEventListener('click', function() {
            animate(span, 500);
        })
        btn800.addEventListener('click', function() {
            animate(span, 800);
        })
    </script>
</body>
4.6 动画函数添加回调函数

- 到800的位置上,span盒子变成红色。其中的回调函数是等前面动画执行完了才会执行,所以在定时器结束之后执行
<body>
    <button class="btn500">点击夏雨荷到500</button>
    <button class="btn800">点击夏雨荷到800</button>
    <span>夏雨荷</span>
    <script>
        //简单动画封装   obj目标对象;target目标位置
        function animate(obj, target, callback) {
            //将callback参数传进去之后,相当于执行了以下操作
            //callback = function(){}

            clearInterval(obj.timer);
            obj.timer = setInterval(function() {
                var step = (target - obj.offsetLeft) / 10;
                step = step > 0 ? Math.ceil(step) : Math.floor(step);
                if (obj.offsetLeft == target) {
                    clearInterval(obj.timer); //清除定时器也是这样
                    //回调函数写道定时器结束里面
                    if (callback) { //如果有回调函数就运行这个回调函数
                        callback();
                    }
                }
                obj.style.left = obj.offsetLeft + step + 'px';
            }, 15)
        }

        var span = document.querySelector('span');
        var btn500 = document.querySelector('.btn500');
        var btn800 = document.querySelector('.btn800');


        btn500.addEventListener('click', function() {
            animate(span, 500);
        })
        btn800.addEventListener('click', function() {
            animate(span, 800, function() {
                span.style.backgroundColor = 'red';
            });
        })
    </script>
</body>
4.7 将动画函数封装到专门的JS文件里面去
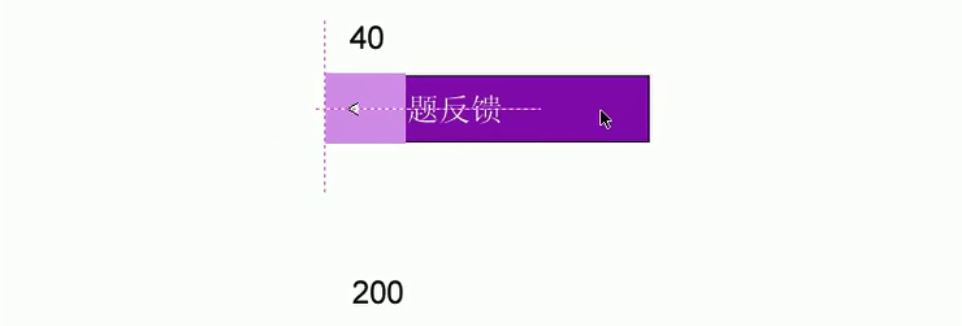
鼠标经过的时候,里面的深紫色盒子往左边滑动
- 将上述动画效果封装到一个animate.js的文件里
function animate(obj, target, callback) {
    //将callback参数传进去之后,相当于执行了以下操作
    //callback = function(){}

    clearInterval(obj.timer);
    obj.timer = setInterval(function() {
        var step = (target - obj.offsetLeft) / 10;
        step = step > 0 ? Math.ceil(step) : Math.floor(step);
        if (obj.offsetLeft == target) {
            clearInterval(obj.timer); //清除定时器也是这样
            //回调函数写道定时器结束里面
            if (callback) { //如果有回调函数就运行这个回调函数
                callback();
            }
        }
        obj.style.left = obj.offsetLeft + step + 'px';
    }, 15)
}
- 在html中引入js文件
<script src="animate.js"></script>
- 主要内容
<body>
    <div class="sliderbar">
        <span>←</span>
        <div class="con">问题反馈</div>
    </div>
    <script>
        //1. 获取元素
        var sliderbar = document.querySelector('.sliderbar');
        var con = document.querySelector('.con');
        //当鼠标经过sliderbar就会让con这个盒子滑动到左侧
        //当鼠标离开sliderbar就会让con这个盒子滑动到右侧
        sliderbar.addEventListener('mouseenter', function() {
            //animate(obj,target,callback);
            animate(con, -160);
            //当我们的动画执行完毕,将⬅改为➡
            sliderbar.children[0].innerHTML = '➡';
        })
        sliderbar.addEventListener('mouseleave', function() {
            animate(con, 0);
            sliderbar.children[0].innerHTML = '←';
        })
    </script>
</body>
5 常见网页特效案例
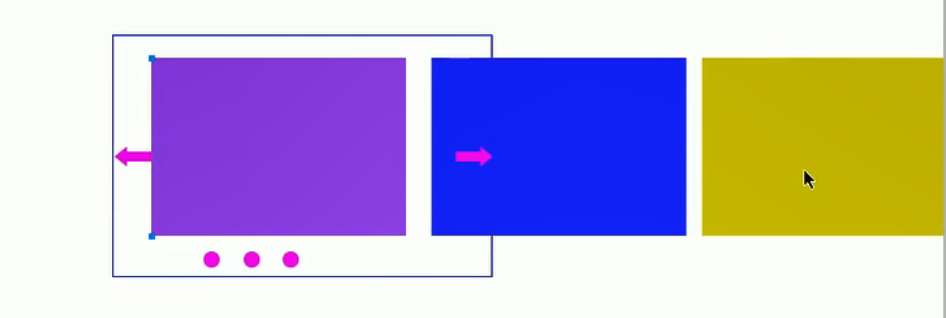
5.1 网页轮播图案例
-
轮播图也称为网页焦点图,在之前品优购首页的案例上进行修改,原理图如下:
-
思路

-
无缝滚动原理
-
部分结构
<div class="focus fl">
<!-- 左侧按钮 -->
<a href="javascript:;" class="arrow-l">
<
</a>
<!-- 右侧按钮 -->
<a href="javascript:;" class="arrow-r"> </a>
<!-- 核心的滚动区域 -->
<ul>
<li>
<a href="#"><img src="upload/focus.jpg" alt=""></a>
</li>
<li>
<a href="#"><img src="upload/focus1.jpg" alt=""></a>
</li>
<li>
<a href="#"><img src="upload/focus2.jpg" alt=""></a>
</li>
<li>
<a href="#"><img src="upload/focus3.jpg" alt=""></a>
</li>
</ul>
<!-- 小圆圈 -->
<ol class="circle">
</ol>
</div>
- 样式
.focus {
    position: relative;
     721px;
    height: 455px;
    background-color: purple;
    overflow: hidden;
}

.focus ul {
    position: absolute;
    top: 0;
    left: 0;
    /*为了让这个装焦点图的盒子可以左右移动以此来显示不同的焦点图 需要让ul可以左右摇摆,所以要为ul添加定位*/
     600%;
    /*将ul手动修改到足够宽依次来容纳若有的焦点图*/
}

.focus ul li {
    float: left;
    /*让所有的焦点图浮动*/
}

.arrow-l,
.arrow-r {
    display: none;
    /*先将两个按钮隐藏起来*/
    position: absolute;
    top: 50%;
    margin-top: -20px;
     24px;
    height: 40px;
    background: rgba(0, 0, 0, .3);
    text-align: center;
    line-height: 40px;
    color: #fff;
    font-family: 'icomoon';
    font-size: 18px;
    z-index: 2;
    /*提高层级*/
}

.arrow-r {
    right: 0;
}

.circle {
    position: absolute;
    bottom: 10px;
    left: 50px;
}

.circle li {
    float: left;
     8px;
    height: 8px;
    /*background-color: #fff;*/
    border: 2px solid rgba(255, 255, 255, 0.5);
    margin: 0 3px;
    border-radius: 50%;
    /*鼠标经过显示小手*/
    cursor: pointer;
}

.current {
    background-color: #fff;
}
- animate.js
function animate(obj, target, callback) {
    // console.log(callback);  callback = function() {}  调用的时候 callback()

    // 先清除以前的定时器,只保留当前的一个定时器执行
    clearInterval(obj.timer);
    obj.timer = setInterval(function() {
        // 步长值写到定时器的里面
        // 把我们步长值改为整数 不要出现小数的问题
        // var step = Math.ceil((target - obj.offsetLeft) / 10);
        var step = (target - obj.offsetLeft) / 10;
        step = step > 0 ? Math.ceil(step) : Math.floor(step);
        if (obj.offsetLeft == target) {
            // 停止动画 本质是停止定时器
            clearInterval(obj.timer);
            // 回调函数写到定时器结束里面
            // if (callback) {
            //     // 调用函数
            //     callback();
            // }
            callback && callback();
        }
        // 把每次加1 这个步长值改为一个慢慢变小的值  步长公式:(目标值 - 现在的位置) / 10
        obj.style.left = obj.offsetLeft + step + 'px';

    }, 15);
}
- index.js
window.addEventListener('load', function() {
    //1. 获取元素
    var arrow_l = document.querySelector('.arrow-l');
    var arrow_r = document.querySelector('.arrow-r');
    var focus = document.querySelector('.focus');

    var focusWidth = focus.offsetWidth; //图片宽度就是focus盒子宽度
    //2. 鼠标经过焦点盒子,就显示左右的按钮
    focus.addEventListener('mouseenter', function() {
        arrow_l.style.display = 'block';
        arrow_r.style.display = 'block';
        clearInterval(timer); //鼠标经过停止定时器
        timer = null; //清除定时器变量
    })

    //鼠标离开焦点盒子,就隐藏左右的按钮
    focus.addEventListener('mouseleave', function() {
        arrow_l.style.display = 'none';
        arrow_r.style.display = 'none';
        timer = setInterval(function() { //鼠标离开,开启定时器
            //手动调用右侧按钮点击事件
            arrow_r.click();

        }, 2000);
    })

    //3. 动态生成小圆圈,有几张图片就生成几个小圆圈
    var ul = focus.querySelector('ul');
    var ol = focus.querySelector('.circle');

    for (var i = 0; i < ul.children.length; i++) { //ul.children.length就是大图的个数
        //创建一个小li
        var li = document.createElement('li');
        //顺便自定义小圆圈的属性index,记录每个小圆圈的索引号
        li.setAttribute('index', i);
        //将小li插入到ol里面
        ol.appendChild(li);
        //4. 小圆圈的排他思想  在生成小圆圈的同时之间绑定点击事件
        li.addEventListener('click', function() {
            //干掉所有人 把所有的小li清除current类名
            for (var i = 0; i < ol.children.length; i++) {
                ol.children[i].className = '';
            }
            //留下我自己 将当前的小li设置为current类名
            this.className = 'current';

            //点击的同时调用以下动画
            //5. 点击小圆圈移动图片  当然移动的是ul不是li
            //animate(obj,target,callback)
            //ul移动的距离d = 小圆圈的索引号x每张图片宽度   注意移动距离是负值
            //当我们点击了某个小li就拿到当前小li的索引号
            var index = this.getAttribute('index');

            //num控制图片下一张的播放,circle控制小圆圈的播放,需要将num和circle都与点击事件建立关系
            //当我们点击了某个小li,就要将li的索引号给num    这样按钮点击(num)才会和小圆圈(li)点击建立关系
            num = index

            //当我们点击了某个小li,就要将li的索引号给circle
            circle = index;

            animate(ul, -index * focusWidth);
        })

    }
    //把ol里面的第一个小li设置类名为current
    ol.children[0].className = 'current';

    //6.克隆第一张大图li,放到ul的最后面
    var first = ul.children[0].cloneNode(true);
    ul.appendChild(first); //不之间在结构中添加li,是为了不让小圆圈数目变多

    //7.点击右侧按钮 图片滚动一张
    var num = 0; //需要将按钮点击num与小圆圈li点击建立关系
    //circle控制小圆圈的播放
    var circle = 0;
    arrow_r.addEventListener('click', function() {
        //无缝滚动
        //如果走到了最后一张复制的图片(5),此时ul要快速复原left改为0
        //滚动顺序12345  2345  2345
        if (num == ul.children.length - 1) {
            ul.style.left = 0;
            num = 0; //从头开始,下面num++后,num==1,然后从第二章开始播放
        }
        num++;
        animate(ul, -num * focusWidth);
        //8. 点击右侧按钮,小圆圈跟随一起变化 可以申明一个变量circle控制小圆圈的播放
        circle++;
        //如果circle == ol.children.length说明走到最后我们克隆的这张图片了
        if (circle == ol.children.length) {
            circle = 0
        }
        circleChange();
    })

    //9. 左侧按钮制作
    arrow_l.addEventListener('click', function() {
        //无缝滚动
        //如果走到了第一张复图片,此时ul要快速将left改为ul.children.length-1已到达最后一张克隆的图片
        //滚动顺序4321 5432 5432
        if (num == 0) {
            num = ul.children.length - 1; //从克隆那一张开始,下面num--后,num==3,然后从第3章开始播放
            ul.style.left = -num * focusWidth + 'px';

        }
        num--;
        animate(ul, -num * focusWidth);
        //10. 点击右侧按钮,小圆圈跟随一起变化 可以申明一个变量circle控制小圆圈的播放
        circle--;
        //如果circle < 0  则小圆圈立刻改为第四个小圆圈
        if (circle < 0) {
            circle = ol.children.length - 1; //3
        }
        circleChange();
    })

    function circleChange() {
        //先清除其余小圆圈的current类名
        for (var i = 0; i < ol.children.length; i++) {
            ol.children[i].className = '';
        }
        //留下当前小圆圈的current类名
        ol.children[circle].className = 'current';
    }
    //11. 自动播放轮播图   自动播放就相当于点击了右侧按钮
    var timer = setInterval(function() {
        //手动调用右侧按钮点击事件
        arrow_r.click();

    }, 2000);

})
- JS文件的引入
 <!-- 这个animate.js 必须写到 index.js的上面引入  先有了这个动画,后面的index.js才可以使用这个动画-->
    <script src="js/animate.js"></script>
    <!-- 引入我们首页的js文件 -->
    <script src="js/index.js"></script>
- 说明
arrow_r.click();//调用右侧按钮点击事件
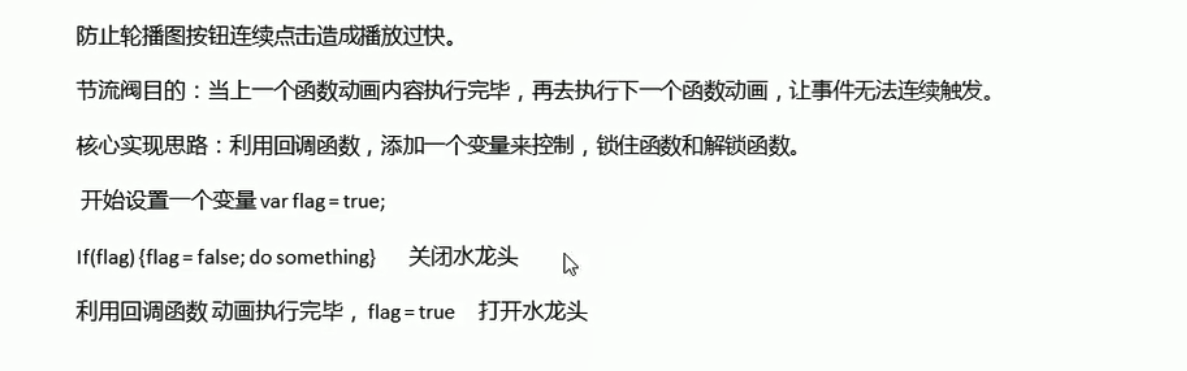
5.2 节流阀
//7.点击右侧按钮 图片滚动一张
var num = 0; //需要将按钮点击num与小圆圈li点击建立关系
//circle控制小圆圈的播放
var circle = 0;
//flag节流阀
flag = true;
arrow_r.addEventListener('click', function() {
    if (flag) {
        //关闭节流阀
        flag = false;
        //无缝滚动
        //如果走到了最后一张复制的图片(5),此时ul要快速复原left改为0
        //滚动顺序12345  2345  2345
        if (num == ul.children.length - 1) {
            ul.style.left = 0;
            num = 0; //从头开始,下面num++后,num==1,然后从第二章开始播放
        }
        num++;
        animate(ul, -num * focusWidth, function() {
            flag = true; //动画执行完毕打开节流阀
        });
        //8. 点击右侧按钮,小圆圈跟随一起变化 可以申明一个变量circle控制小圆圈的播放
        circle++;
        //如果circle == ol.children.length说明走到最后我们克隆的这张图片了
        if (circle == ol.children.length) {
            circle = 0
        }
        circleChange();
    }
})