在登陆一些网站的时候,可以选择登陆方式为第三方登陆,例如微博登陆,以爱奇艺为例,进入首页,点击 ”登陆“,会弹出登录框:

除了本站登陆外,还可以选择其他第三方登陆,比如微博登陆、QQ 登陆、微信登陆等。
选择微博登陆后,爱奇艺会向用户申请授权用于微博登陆(当用户已经登陆了微博时会直接申请授权,当用户没有登陆时会提示用户登陆微博):

此时提示窗口的 url 为:https://api.weibo.com/oauth2/authorize?scope=&redirect_uri=http%3A%2F%2Fpassport.iqiyi.com%2Fapis%2Fthirdparty%2Fncallback.action%3Ffrom%3D2&display=default&client_id=1925825497
当选择连接时,跳转到登录页面,提示用户正在使用新浪微博登陆,并且要求用户使用新浪微博绑定登陆账户:

记录一下在自己的网站上实现使用新浪微博一键登录的实现过程。
① 登陆新浪开发平台:http://open.weibo.com/;
② 选择 “我的应用” -- “管理中心” -- “完善开发者信息”,如图:

③ 完善信息(网站填你的线上网站)-- 提交 -- 验证邮件 -- 验证完毕;
④ 选择 “微连接” -- “网站接入” -- “立即接入”:

添加新网站(你的线上网站):
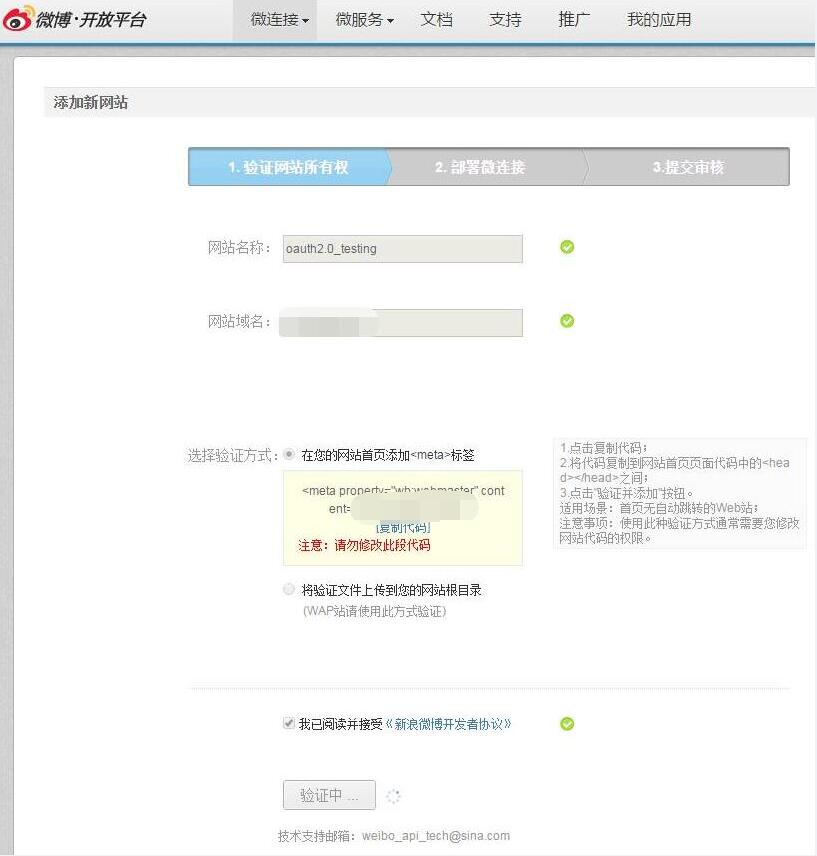
⑤ 根据提示在网站的首页添加 meta 标签,验证并添加:

⑥ 选择 “深度部署” -- “微博登陆”:

⑦ 接下来阅读微博 openAPI 文档:新浪微博授权机制说明
OAuth2.0 的流程如下:

其中Client指第三方应用,Resource Owner指用户,Authorization Server是我们的授权服务器,Resource Server是API服务器。
微博提供了一系列 OAuth2.0 接口:

Web 网站的授权流程:

⑧ 在网站中创建一个测试页面,引导需要授权的用户到地址(获取用户授权,接口文档地址:http://open.weibo.com/wiki/Oauth2/authorize):https://api.weibo.com/oauth2/authorize?client_id=YOUR_CLIENT_ID&response_type=code&redirect_uri=YOUR_REGISTERED_REDIRECT_URI:
<a href="https://api.weibo.com/oauth2/authorize?client_id=4*******&redirect_uri=http://www.ofim.com.cn/index/response/response&response_type=code">登陆</a>

访问该页面(点击 ”登陆“),当我的微博处于登陆状态时,得到:

当微博没有登陆是,点击 ”登陆(<a href="https://api.weibo.com/oauth2/authorize?client_id=4*******&redirect_uri=http://www.****.cn/index/response/response&response_type=code">登陆</a>)“,得到:

选择 ”连接“ 或 登陆后选择 ”连接“,获取授权成功之后就跳转到了授权回调页(redirect_uri):

在 url 中返回了一个 code 参数,返回数据说明:

⑨ 换取 Access Token
新浪的接口地址是:https://api.weibo.com/oauth2/access_token?client_id=YOUR_CLIENT_ID&client_secret=YOUR_CLIENT_SECRET&grant_type=authorization_code&redirect_uri=YOUR_REGISTERED_REDIRECT_URI&code=CODE

上面设置的授权回调地址是:http://www.****.cn/index/response
所以在 index 控制器中添加 response 方法,使用 post 方式请求接口地址:
  public function response(){
          $code = I('code');
          $register_url = 'http://www.ofim.com.cn/index/register';
          $url = 'https://api.weibo.com/oauth2/access_token';
          $data = 'client_id=4******&client_secret=f*******&grant_type=authorization_code&redirect_uri='.$register_url.'&code='.$code;
          $curl= curl_init();
          curl_setopt($curl,CURLOPT_POST,1); //post方式
          curl_setopt($curl,CURLOPT_POSTFIELDS,$data); //设置post的参数
          curl_setopt($curl, CURLOPT_URL, $url);
          curl_setopt($curl, CURLOPT_RETURNTRANSFER, TRUE);//在字符串中返回
          $result = curl_exec($curl);
          curl_close($curl);
          $result = json_decode($result, true);
          $uid = $result['uid'];
//获取用户信息
          $show_url = "https://api.weibo.com/2/users/show.json?uid=".$uid."&access_token=".$result['access_token'];
          $ch = curl_init();
          $timeout = 30;
          curl_setopt($ch, CURLOPT_URL, $show_url);
          curl_setopt($ch, CURLOPT_RETURNTRANSFER, 1);
          curl_setopt($ch, CURLOPT_CONNECTTIMEOUT, $timeout);
          curl_setopt($curl, CURLOPT_USERAGENT, "user-agent:Mozilla/5.0 (Windows NT 5.1; rv:24.0) Gecko/20100101 Firefox/24.0");
          $user_info = curl_exec($ch);
          curl_close($ch);
          dump($user_info);
          $this->display();
  }
重复上一步骤的 "登陆" 步骤,将返回 json 格式的数据到授权回调页:
{
"access_token":"2.00B_E*******",
"remind_in":"151667",
"expires_in":151667,
"uid":"1678084663"
}
Access_token 获取成功。
⑩ 调用 API
阅读微博 API 文档,根据返回的 Access_token 获取需要的数据:

例如获取授权用户的信息(http://open.weibo.com/wiki/2/users/show)调用接口:http://open.weibo.com/wiki/2/users/show
接口测试地址:http://open.weibo.com/tools/console?uri=users/show&httpmethod=GET&key1=uid&value1=1904178193

  public function response(){
          $code = I('code');
          $register_url = 'http://www.ofim.com.cn/index/register';
          $url = 'https://api.weibo.com/oauth2/access_token';
          $data = 'client_id=4******&client_secret=f*******&grant_type=authorization_code&redirect_uri='.$register_url.'&code='.$code;
          $curl= curl_init();
          curl_setopt($curl,CURLOPT_POST,1); //post方式
          curl_setopt($curl,CURLOPT_POSTFIELDS,$data); //设置post的参数
          curl_setopt($curl, CURLOPT_URL, $url);
          curl_setopt($curl, CURLOPT_RETURNTRANSFER, TRUE);//在字符串中返回
          $result = curl_exec($curl);
          curl_close($curl);
          $result = json_decode($result, true);
          $uid = $result['uid'];

          //获取用户信息
          $show_url = "https://api.weibo.com/2/users/show.json?uid=".$uid."&access_token=".$result['access_token'];
          $ch = curl_init();
          $timeout = 30;
          curl_setopt($ch, CURLOPT_URL, $show_url);
          curl_setopt($ch, CURLOPT_RETURNTRANSFER, 1);
          curl_setopt($ch, CURLOPT_CONNECTTIMEOUT, $timeout);
          curl_setopt($curl, CURLOPT_USERAGENT, "user-agent:Mozilla/5.0 (Windows NT 5.1; rv:24.0) Gecko/20100101 Firefox/24.0");
          $user_info = curl_exec($ch);
          curl_close($ch);
          echo '<pre>'; print_r($user_info);
          $this->display();
  }
重复上一步骤的 "登陆" 步骤,将返回 json 格式的数据到授权回调页。格式化后的 Json 数据:
{
    "id": 1848585863,
    "idstr": "1848585863",
    "class": 1,
    "screen_name": "迪斯大王",
    "name": "迪斯大王",
    "province": "11",
    "city": "14",
    "location": "北京 昌平区",
    "description": "力量即正义",
    "url": "",
    "profile_image_url": "http://tp4.sinaimg.cn/1848585863/50/5739067706/1",
    "profile_url": "537681230",
    "domain": "arsenal1886",
    "weihao": "537681230",
    "gender": "m",
    "followers_count": 280,
    "friends_count": 591,
    "pagefriends_count": 4,
    "statuses_count": 1101,
    "favourites_count": 10839,
    "created_at": "Fri Nov 05 18:25:12 +0800 2010",
    "following": false,
    "allow_all_act_msg": true,
    "geo_enabled": false,
    "verified": false,
    "verified_type": -1,
    "remark": "",
    "status": {
        "created_at": "Mon Dec 07 16:33:51 +0800 2015",
        "id": 3917453803378179,
        "mid": "3917453803378179",
        "idstr": "3917453803378179",
        "text": "做分母[挖鼻]",
        "source_allowclick": 0,
        "source_type": 1,
        "source": "微博 weibo.com",
        "favorited": false,
        "truncated": false,
        "in_reply_to_status_id": "",
        "in_reply_to_user_id": "",
        "in_reply_to_screen_name": "",
        "pic_urls": [],
        "geo": null,
        "reposts_count": 0,
        "comments_count": 0,
        "attitudes_count": 0,
        "isLongText": false,
        "mlevel": 0,
        "visible": {
            "type": 0,
            "list_id": 0
        },
        "biz_feature": 0,
        "darwin_tags": [],
        "userType": 0
    },
    "ptype": 0,
    "allow_all_comment": true,
    "avatar_large": "http://tp4.sinaimg.cn/1848585863/180/5739067706/1",
    "avatar_hd": "http://ww3.sinaimg.cn/crop.166.0.432.432.1024/6e2f2e87jw8ewr8egv0r9j20k00c00uk.jpg",
    "verified_reason": "",
    "verified_trade": "",
    "verified_reason_url": "",
    "verified_source": "",
    "verified_source_url": "",
    "follow_me": false,
    "online_status": 0,
    "bi_followers_count": 42,
    "lang": "zh-cn",
    "star": 0,
    "mbtype": 0,
    "mbrank": 0,
    "block_word": 0,
    "block_app": 0,
    "credit_score": 80,
    "user_ability": 0,
    "urank": 26
}
注:如果是未审核的应用,使用上面获取用户信息的接口可能会返回
{"error":"applications over the unaudited use restrictions!","error_code":21321,"request":"/2/users/show.json"}

说明:用到的页面有 登陆引导页、授权回调页。
授权回调页设置地址:

参考: