一、接业务,作分析
1、大致业务要求
1.1 使用 SSM( Spring MVC + Spring + MyBatis )实现图书信息管理系统, MySQL5.5 作为后台数据库,该系统包括查询图书信息功能和增加图书信息功能
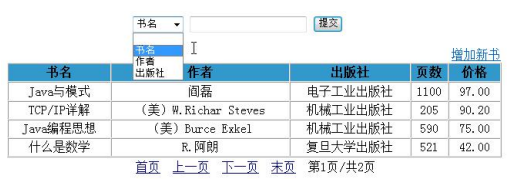
1.2 查询页面效果图

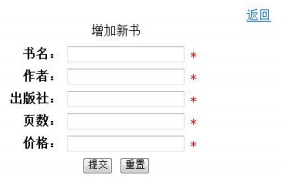
1.3 添加新信息页面效果图

2、查询页面要求
2.1 打开图书信息管理系统首页,分页显示所有图书信息,图书信息按添加时间降序。提供查询表单和“增加新书”超链接
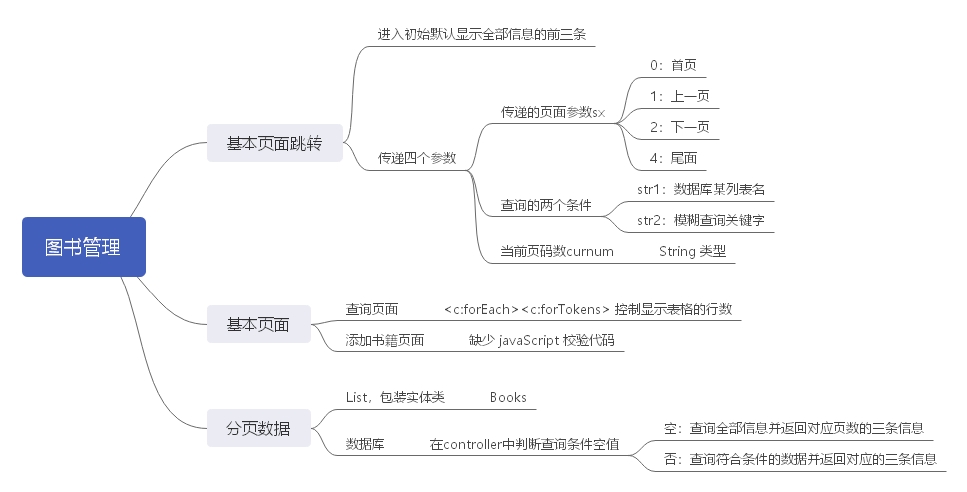
分析:在 controller 的的初始页面里便要给出 List 结果集。分面即是显示从第 N 条至 第 N 每条中的四条数据。降序是 order by 加个 desc
2.2 提供分别按书名、作者、出版社查询图书的动态条件查询的功能,支持模糊查询。查询结果按添加时间降序,分页展示
分析:两个输入框只有二种情况,即是全部查询和模糊查询两种情况。若仅出现单个查询条件,则默认查询全部信息
3、添加新图书页面要求
3.1 点击“增加新书”超链接跳转到增加新书页面。点击“返回”超链接返回图书信息管理系统首页。输入图书信息,使用 JavaScript 验证所有项不能为空,页数必须是整数,价格必须是数字类型
分析:页面的跳转因无特别要求,则使用 <a><a> 标签即可,JavaScript 则要先获取所有输入框中的对象,再取值判断是否合法
3.2 输入增加新书每项信息后点击“提交”。添加日期取系统时间,保存成功或者失败都跳转到图书信息管理系统首页,列表下方显示“保存成功!”或“保存失败!”
分析:添加后直接跳转到主页面,默认显示所有信息,并且给出添加结果的反馈信息
二、架构设计思路

三、数据库设计

四、项目框架搭建
4.1 jsp 页面实现
4.1.1 查询信息的主页面

1 <div align="center"> 2 共 ${pagecount} 页 3 |当前第 ${curnum } 页 4 |<a href="index2?curnum=${curnum }&str1=${str1}&str2=${str2}&sx=0">首页</a> 5 |<a href="index2?curnum=${curnum }&str1=${str1}&str2=${str2}&sx=1">上一页</a> 6 |<a href="index2?curnum=${curnum }&str1=${str1}&str2=${str2}&sx=2">下一页</a> 7 |<a href="index2?curnum=${curnum }&str1=${str1}&str2=${str2}&sx=4">尾页</a> 8 </div>
4.1.2 添加新信息的添加碳

 1 <script type="text/javascript">
 2 function check() {
 3 var name = document.getElementById("bookname").value;
 4 var author = document.getElementById("author").value;
 5 var pubish = document.getElementById("pubish").value;
 6 var pages = document.getElementById("pages").value;
 7 var price = document.getElementById("price").value;
 8
 9 function isInteger(obj) {
10     return typeof obj === 'number' && obj%1 === 0
11 }
12
13 if(name.length < 1){
14     alert("书名不能为空");
15     return false;
16 }else if(author.length<1){
17     alert("作者名不能为空");
18     return false;
19 }else if(pubish.length<1){
20     alert("出版社名不能为空");
21     return false;
22 }else if(!isInteger(pages)) {
23     alert("价格必须是数字类型");
24     return false;
25 }else if(isNaN(price)) {
26     alert("价格必须是数字类型");
27     return false;
28 }
29
30 return true;
31 }
32 </script>
4.1.3 保存 jsp 页面
注:后续将 jsp 页面保存至 webapp WEB-INF jsp 中,此处可先至 H5 中编写 <body></body> 大体代码与 css 样式
4.2 配置文件实现
4.2.1 至 https://maven.apache.org/download.cgi 下载 Maven
4.2.2 配置 Maven 中的 conf settings.xml 中的 <localRepository></localRepositroy> 与 <mirror></mirror>

1 <localRepository>D:\_wenJianeclipse_mavenlocalRepository</localRepository>
2
3 <mirror>
4 <id>alimaven</id>
5 <name>aliyun maven</name>
6 <url>http://maven.aliyun.com/nexus/content/groups/public/</url>
7 <mirrorOf>central</mirrorOf>
8     </mirror>
4.2.3 给 eclipse 配置 Maven
4.3 工程架构实现
4.3.1 创建 Maven project 的 webapp 工程
4.3.2 修复工程 jdk 版本并更新 Maven 工程
4.3.3 配置 pom.xml 文件

<parent>
        <groupId>org.springframework.boot</groupId>
        <artifactId>spring-boot-starter-parent</artifactId>
        <version>2.1.8.RELEASE</version>
    </parent>

    <properties>
        <java.version>1.8</java.version>
    </properties>
  <dependencies>
        <dependency>
            <groupId>org.springframework.boot</groupId>
            <artifactId>spring-boot-starter-web</artifactId>
        </dependency>
        <dependency>
            <groupId>org.mybatis.spring.boot</groupId>
            <artifactId>mybatis-spring-boot-starter</artifactId>
            <version>1.3.2</version>
        </dependency>

        <dependency>
            <groupId>mysql</groupId>
            <artifactId>mysql-connector-java</artifactId>
            <scope>runtime</scope>
        </dependency>
        <!-- 添加servlet依赖模块 -->
        <dependency>
            <groupId>javax.servlet</groupId>
            <artifactId>javax.servlet-api</artifactId>
            <scope>provided</scope>
        </dependency>
        <!-- 添加jstl标签库依赖模块 -->
        <dependency>
            <groupId>javax.servlet</groupId>
            <artifactId>jstl</artifactId>
        </dependency>
        <!--添加tomcat依赖模块.-->
        <dependency>
            <groupId>org.springframework.boot</groupId>
            <artifactId>spring-boot-starter-tomcat</artifactId>
            <scope>provided</scope>
        </dependency>
        <!-- 使用jsp引擎,springboot内置tomcat没有此依赖 -->
        <dependency>
            <groupId>org.apache.tomcat.embed</groupId>
            <artifactId>tomcat-embed-jasper</artifactId>
            <scope>provided</scope>
        </dependency>
  </dependencies>
4.3.4 配置 application.properties 文件

#mysql
spring.datasource.url=jdbc:mysql://localhost:3306/j2ee?serverTimezone=UTC&characterEncoding=utf8
spring.datasource.password=root
spring.datasource.username=root
spring.datasource.driver-class-name=com.mysql.cj.jdbc.Driver

#mybatis
mybatis.mapper-locations=classpath:com/debj/mappers/*.xml

#JSP
spring.mvc.view.prefix=/WEB-INF/jsp/
spring.mvc.view.suffix=.jsp
4.3.5 创建主包,创建 APP.java 文件
4.3.6 创建主包下的子包 controller、dao、pojo、service
4.3.7 在 resources 创建 mqpper.xml 子文件,位于 resources com debj mappers
4.4 具体细节实现
4.4.1 pojo
编写实体类 Books.java 并封装属性
4.4.2 dao
在 BooksDao 接口中,写方法

1 public List<Books> Initialization();
4.4.3 service
使用 @Service 注解,在 BooksService 包中实现 BooksDao 中的方法

1 public List<Books> Initialization(){
2     return booksDao.Initialization();
3 }
4.4.4 resources
创建子文件夹 com **** mappers,创建 BooksMapper.xml 在此文件中编写数据库查询语句
注:建议使用 <resultMap></resultMap> 标签,即防止数据库列名与实体类列名不一致导致错误。其中 column 为数据库列名 property 为实体类属性名

 1 <resultMap type="com.debj.pojo.Books" id="ResultMap">
 2     <result column="bookName" property="bookName" />
 3     <result column="bookAuthor" property="bookAuthor" />
 4     <result column="bookPubish" property="bookPubish" />
 5     <result column="bookPage" property="bookPage" />
 6     <result column="bookPrice" property="bookPrice" />
 7 </resultMap>
 8
 9 <!-- 初始化方法 回到主页面查询全部的前三条记录 -->
10 <select id="Initialization" resultMap="ResultMap">
11     select * from books order by createDate DESC limit 0,3
12 </select>
4.4.5 controller
创建 BooksController.java,使用注释 @Controller 编写 @GetMapping / @PostMapping 等。

 1 //初始化页面
 2 @GetMapping("/index")
 3 public String index(Model model) {
 4     // 总页数
 5     int pagecount = bookService.getPageCount();
 6     pagecount = pagecount%3==0?pagecount/3:pagecount/3+1;
 7     model.addAttribute("pagecount",    pagecount);
 8     // 初始页数
 9     model.addAttribute("curnum","1");
10     // 返回值
11     List = bookService.Initialization();
12     model.addAttribute("list", List);
13
14     return "SelectBooks";
15 }
4.4.6 注:
需要使用实体类 Books 的对象中的类,建议使用 @Autowired 注解

1 @Autowired
2 BooksDao booksDao;
五、项目功能实现
5.1 JavaScript 验证模块
表单中添加 onsubmit="return check()" 属性,在 <head></head> 标签中编写 JavaScript 验证代码。
5.2 添加新信息页面判断页数是否为整数
5.2.1 方法一:根据输入的数据判断其是否为数据类型且为整型

1 var pages = document.getElementById("pages").value;
2
3 function isInteger(obj) {
4     return typeof obj === 'number' && obj%1 === 0
5 }
6 if(!isInteger(pages)) {
7     alert("价格必须是数字类型");
8     return false;
9 }
5.2.1 方法二:input 标签的 type 类型设为 number 即数值类型

1 <input type="number" name="pages" id="pages" value="" />
5.3 模糊查询
注:参考分页具体实现
5.4 分页具体实现
5.4.1 mapper 代码实现查询段

1 <!-- 得到Books分类的返回集 -->
2 <select id="getCSTypeBoksInfo" resultMap="ResultMap">
3 SELECT * From books where ${param1} like '%${param2}%'  order by createDate DESC limit ${param3},3
4 <!--  SELECT * From books where ${param1} like ${param2}  order by createDate DESC  有漏洞-->
5 </select>
5.4.2 controller 中控制查询代码实现

 1 @RequestMapping("/index2")
 2 public String getAllBooksInfoByStr(
 3         @RequestParam("str1") String str1,
 4 @RequestParam("str2") String str2,
 5 @RequestParam("curnum") String curnum,
 6 @RequestParam("sx") String sx,
 7     Model model) {
 8 int pagecount=0;
 9
10 // 保存参数
11 model.addAttribute("str1", str1);
12 model.addAttribute("str2", str2);
13
14 // 返回值
15 if(str1.length()>1) {
16     // 总页数
17 pagecount = bookService.getTypePageCount(str1,str2);
18 pagecount = pagecount%3==0?pagecount/3:pagecount/3+1;
19 model.addAttribute("pagecount",    pagecount);
20 }else {
21     // 总页数
22 pagecount = bookService.getPageCount();
23 pagecount = pagecount%3==0?pagecount/3:pagecount/3+1;
24 model.addAttribute("pagecount",    pagecount);
25 }
26
27 // 初始页数
28 if(sx.equals("1")){
29 // 上一页
30 if(curnum.equals("1")){
31 curnum="1";
32 model.addAttribute("curnum", curnum);
33 }else {
34     curnum = String.valueOf(Integer.valueOf(curnum)-1);
35     model.addAttribute("curnum", curnum);
36     }
37 }else if(sx.equals("2")){
38 // 下一页
39 if(curnum.equals(String.valueOf(pagecount))){
40     model.addAttribute("curnum", curnum);
41 }else {
42     curnum = String.valueOf(Integer.valueOf(curnum)+1);
43     model.addAttribute("curnum", curnum);
44     }
45 }else {
46     curnum= "1";
47 model.addAttribute("curnum", curnum);
48 }
49 // 首尾页
50 if(sx.equals("0")) {
51 curnum="1";
52 model.addAttribute("curnum", curnum);
53 }
54 if(sx.equals("4")) {
55 curnum=String.valueOf(pagecount);
56 model.addAttribute("curnum", curnum);
57 }
58 int curnumm = Integer.parseInt(curnum);
59
60 // 返回值
61 if(str1.length()>2) {
62     List = bookService.getCSTypeBoksInfo(str1,str2,(curnumm-1)*3);
63 }else {
64     List = bookService.getCSInfo((curnumm-1)*3);
65 }
66 model.addAttribute("list", List);
67 return "SelectBooks";
68 }

1 Date time = new Date(System.currentTimeMillis());
2 SimpleDateFormat sdf = new SimpleDateFormat("yyyy-MM-dd HH:mm:ss");
3 String current = sdf.format(time);
