概述
Ambari:基于Web的工具,支持Apache Hadoop集群的创建 、管理和监控。可以从apache官网下载源码,自己定义开发自己需要的样式。这里先设下一个伏笔,有兴趣的可以跟着我的博客。后面会有apache-ambari二次开发。
HDP:包含了hadoop生态系统的所有软件项目,比如HBase,Zookeeper,Hive,Pig等等。
HDP-UTILS:工具类库。
HDP-GPL:LZO压缩库软件包存储在单独的HDP-GPL存储库中。
Ambari的最新版本为2.7.5,HDP的最新版本为3.1.5,通过 https://supportmatrix.hortonworks.com/ 可以查询Ambari和HDP各个版本支持情况。本来想安装最新版,但因为从2.7.5之后,访问Ambari存储库需要身份验证。具体官网截图如下,(浏览器以翻译为中文):

废话不多说,开始搞起。
环境
系统:CentOS Linux release 7.6.1810 (Core)
内存:16G
cpu:1C
磁盘:100G
安装介质:[ ambari-2.7.4.0-centos7.tar.gz | HDP-3.1.4.0-centos7-rpm.tar.gz | HDP-GPL-3.1.4.0-centos7-gpl.tar.gz | HDP-UTILS-1.1.0.22-centos7.tar.gz ]
设置主机名:
方法:之前博客 《TDH(Transwarp Data Hub)社区版安装教程》中 设置主机名
设置root用户登录:
方法:之前博客 《TDH(Transwarp Data Hub)社区版安装教程》中 设置root用户登录
设置集群免密:
方法:之前博客 《TDH(Transwarp Data Hub)社区版安装教程》中 设置集群免密
设置selinux,集群时间同步,防火墙:
方法:之前博客 《TDH(Transwarp Data Hub)社区版安装教程》中 设置selinux,集群时间同步,防火墙
补充:时间同步,这里配置的集群间,所有节点以主节点时间为准,都同步主节点时间
步骤:
注意事项:要注意的是,ntpd 有一个自我保护设置: 如果本机与上源时间相差太大, ntpd 不运行. 所以新设置的时间服务器一定要先 ntpdate 从上源取得时间初值, 然后启动 ntpd服务。ntpd服务 运行后, 先是每64秒与上源服务器同步一次, 根据每次同步时测得的误差值经复杂计算逐步调整自己的时间, 随着误差减小, 逐步增加同步的间隔.每次跳动, 都会重复这个调整的过程。
主节点配置
修改两处:
restrict 10.32.8.0 mask 255.255.255.0 nomodify notrap
server 127.127.1.0 # local clock
fudge 127.127.1.0 stratum 10
修改后具体参数:


[root@nn1 ~]# cat /etc/ntp.conf | grep -v ^# | grep -v ^$
driftfile /var/lib/ntp/drift
restrict default nomodify notrap nopeer noquery
restrict 127.0.0.1
restrict ::1
restrict 10.32.8.0 mask 255.255.255.0 nomodify notrap
server  127.127.1.0     # local clock
fudge   127.127.1.0 stratum 10
includefile /etc/ntp/crypto/pw
keys /etc/ntp/keys
disable monitor
修改配置后需要重启ntpd服务:systemctl restart ntpd
从节点配置
根据上面的注意事项,先同步主节点时间:ntpdate nn1
从节点修改一处:server nn1
修改后具体参数:
[root@dn1 ~]# cat /etc/ntp.conf | grep -v ^# | grep -v ^$
driftfile /var/lib/ntp/drift
restrict default nomodify notrap nopeer noquery
restrict 127.0.0.1
restrict ::1
server nn1
includefile /etc/ntp/crypto/pw
keys /etc/ntp/keys
disable monitor
启动ntpd服务:systemctl start ntpd
除了上面的方法外还有一种,就是在从节点添加定时任务,同步主节点时间。
安装jdk
所有节点安装jdk:
[root@nn1 ~]# tar zxvf jdk-8u251-linux-x64.tar.gz -C /usr/local/

[root@nn1 ~]# mv /usr/local/jdk1.8.0_251/ /usr/local/jdk

环境变量:在/etc/profile 中添加
# for jdk
export JAVA_HOME=/usr/local/jdk
export CLASSPATH=.:$JAVA_HOME/lib/dt.jar:$JAVA_HOME/lib/tools.jar
export PATH=$PATH:$JAVA_HOME/bin

刷新环境变量:source /etc/profile

检查:
[root@nn1 ~]# java -version
java version "1.8.0_251"
Java(TM) SE Runtime Environment (build 1.8.0_251-b08)
Java HotSpot(TM) 64-Bit Server VM (build 25.251-b08, mixed mode)
关闭THP
所有节点在文件/etc/rc.d/rc.local中添加以下内容:
if test -f /sys/kernel/mm/transparent_hugepage/enabled; then
    echo never > /sys/kernel/mm/transparent_hugepage/enabled
fi
if test -f /sys/kernel/mm/transparent_hugepage/defrag; then
    echo never > /sys/kernel/mm/transparent_hugepage/defrag
fi

修改文件打开最大限制
修改文件/etc/security/limits.conf,添加已下内容:
* soft nofile 65536
* hard nofile 65536
* soft nproc 131072
* hard nproc 131072
设置本地源
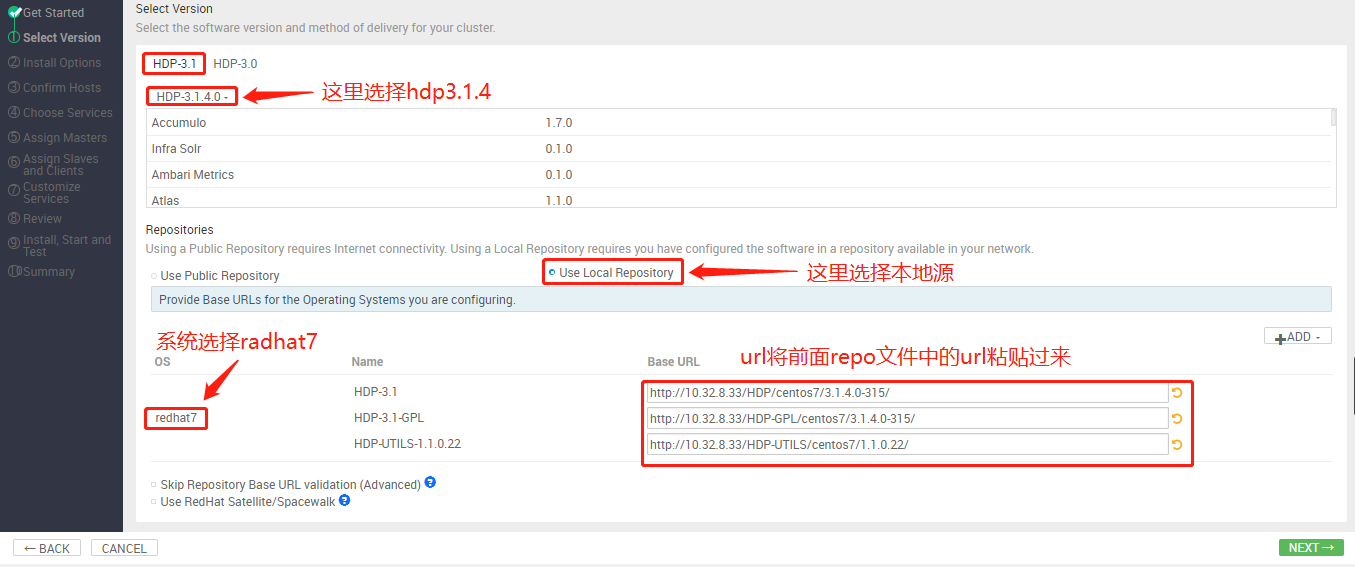
在主节点安装httpd服务,将所有的安装介质解压到httpd的网页根目录:

创建repo文件
位置:
[root@nn1 yum.repos.d]# pwd
/etc/yum.repos.d

内容:
[root@nn1 yum.repos.d]# cat ambari.repo
[ambari]
name=ambari
baseurl=http://10.32.8.33/ambari/centos7/2.7.4.0-118/
gpgcheck=1
enabled=1
gpgkey=http://10.32.8.33/ambari/centos7/2.7.4.0-118/RPM-GPG-KEY/RPM-GPG-KEY-Jenkins

[HDP]
name=HDP
baseurl=http://10.32.8.33//HDP/centos7/3.1.4.0-315
gpgcheck=1
enabled=1
gpgkey=http://10.32.8.33//HDP/centos7/3.1.4.0-315/RPM-GPG-KEY/RPM-GPG-KEY-Jenkins

[HDP-UTILS]
name=HDP-UTILS
baseurl=http://10.32.8.33/HDP-UTILS/centos7/1.1.0.22
gpgcheck=1
enabled=1
gpgkey=http://10.32.8.33/HDP-UTILS/centos7/1.1.0.22/RPM-GPG-KEY/RPM-GPG-KEY-Jenkins

[HDP-GPL]
name=HDP-GPL
baseurl=http://10.32.8.33/HDP-GPL/centos7/3.1.4.0-315
gpgcheck=1
enabled=1
gpgkey=http://10.32.8.33/HDP-GPL/centos7/3.1.4.0-315/RPM-GPG-KEY/RPM-GPG-KEY-Jenkins
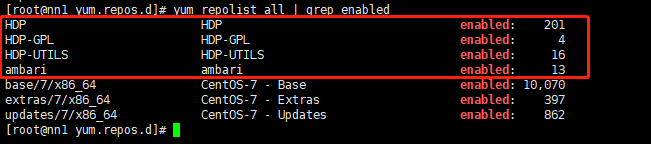
更新yum源查看
[root@nn1 yum.repos.d]# yum clean all
[root@nn1 yum.repos.d]# yum repolist all | grep enabled
分发repo文件到所有节点
[root@nn1 yum.repos.d]# scp /etc/yum.repos.d/ambari.repo dn1:/etc/yum.repos.d/
hdp.local.repo                100%  720   312.7KB/s   00:00
[root@nn1 yum.repos.d]# scp /etc/yum.repos.d/ambari.repo dn2:/etc/yum.repos.d/
hdp.local.repo                100%  720   420.1KB/s   00:00
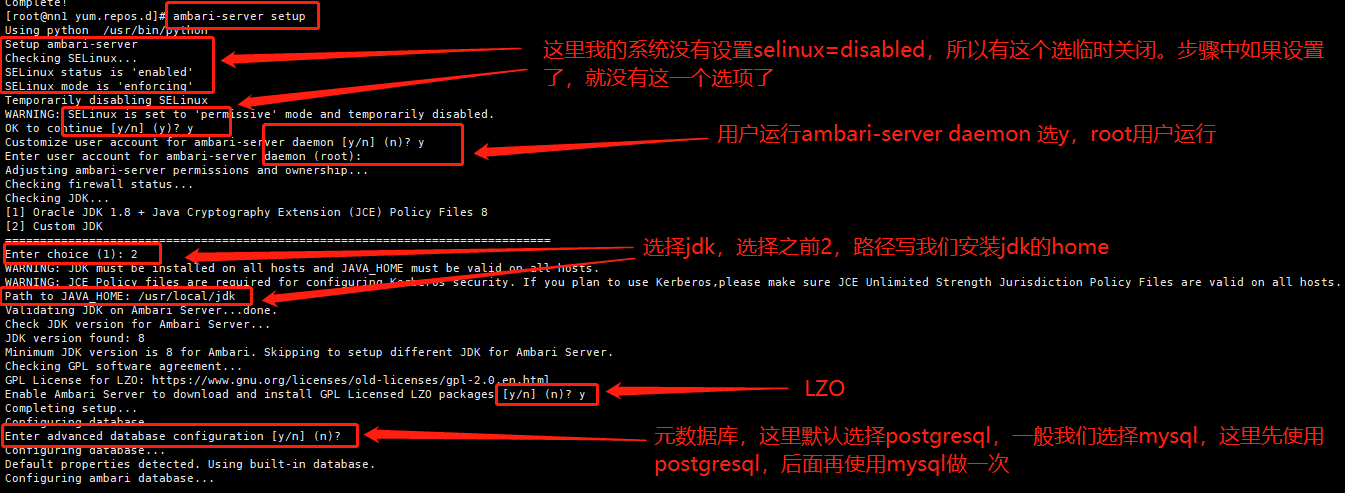
安装ambari-server
[root@nn1 yum.repos.d]# ambari-server setup
Using python  /usr/bin/python
Setup ambari-server
Checking SELinux...
SELinux status is 'enabled'
SELinux mode is 'enforcing'
Temporarily disabling SELinux
WARNING: SELinux is set to 'permissive' mode and temporarily disabled.
OK to continue [y/n] (y)? y
Customize user account for ambari-server daemon [y/n] (n)? y
Enter user account for ambari-server daemon (root):
Adjusting ambari-server permissions and ownership...
Checking firewall status...
Checking JDK...
[1] Oracle JDK 1.8 + Java Cryptography Extension (JCE) Policy Files 8
[2] Custom JDK
==============================================================================
Enter choice (1): 2
WARNING: JDK must be installed on all hosts and JAVA_HOME must be valid on all hosts.
WARNING: JCE Policy files are required for configuring Kerberos security. If you plan to use Kerberos,please make sure JCE Unlimited Strength Jurisdiction Policy Files are valid on all hosts.
Path to JAVA_HOME: /usr/local/jdk
Validating JDK on Ambari Server...done.
Check JDK version for Ambari Server...
JDK version found: 8
Minimum JDK version is 8 for Ambari. Skipping to setup different JDK for Ambari Server.
Checking GPL software agreement...
GPL License for LZO: https://www.gnu.org/licenses/old-licenses/gpl-2.0.en.html
Enable Ambari Server to download and install GPL Licensed LZO packages [y/n] (n)? y
Completing setup...
Configuring database...
Enter advanced database configuration [y/n] (n)?
Configuring database...
Default properties detected. Using built-in database.
Configuring ambari database...
Checking PostgreSQL...
Running initdb: This may take up to a minute.
Initializing database ... OK


About to start PostgreSQL
Configuring local database...
Configuring PostgreSQL...
Restarting PostgreSQL
Creating schema and user...
done.
Creating tables...
done.
Extracting system views...
ambari-admin-2.7.4.0.118.jar
....
Ambari repo file doesn't contain latest json url, skipping repoinfos modification
Adjusting ambari-server permissions and ownership...
Ambari Server 'setup' completed successfully.
启动ambari
[root@nn1 yum.repos.d]# ambari-server start
Using python  /usr/bin/python
Starting ambari-server
Ambari Server running with administrator privileges.
Organizing resource files at /var/lib/ambari-server/resources...
Ambari database consistency check started...
Server PID at: /var/run/ambari-server/ambari-server.pid
Server out at: /var/log/ambari-server/ambari-server.out
Server log at: /var/log/ambari-server/ambari-server.log
Waiting for server start.....................................................................
Server started listening on 8080

DB configs consistency check: no errors and warnings were found.
Ambari Server 'start' completed successfully.
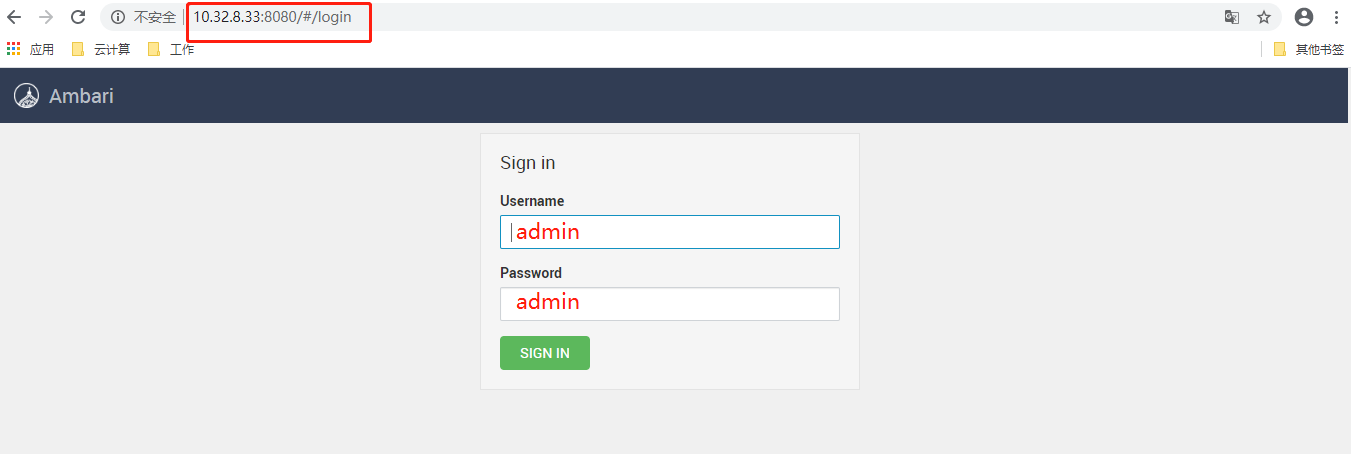
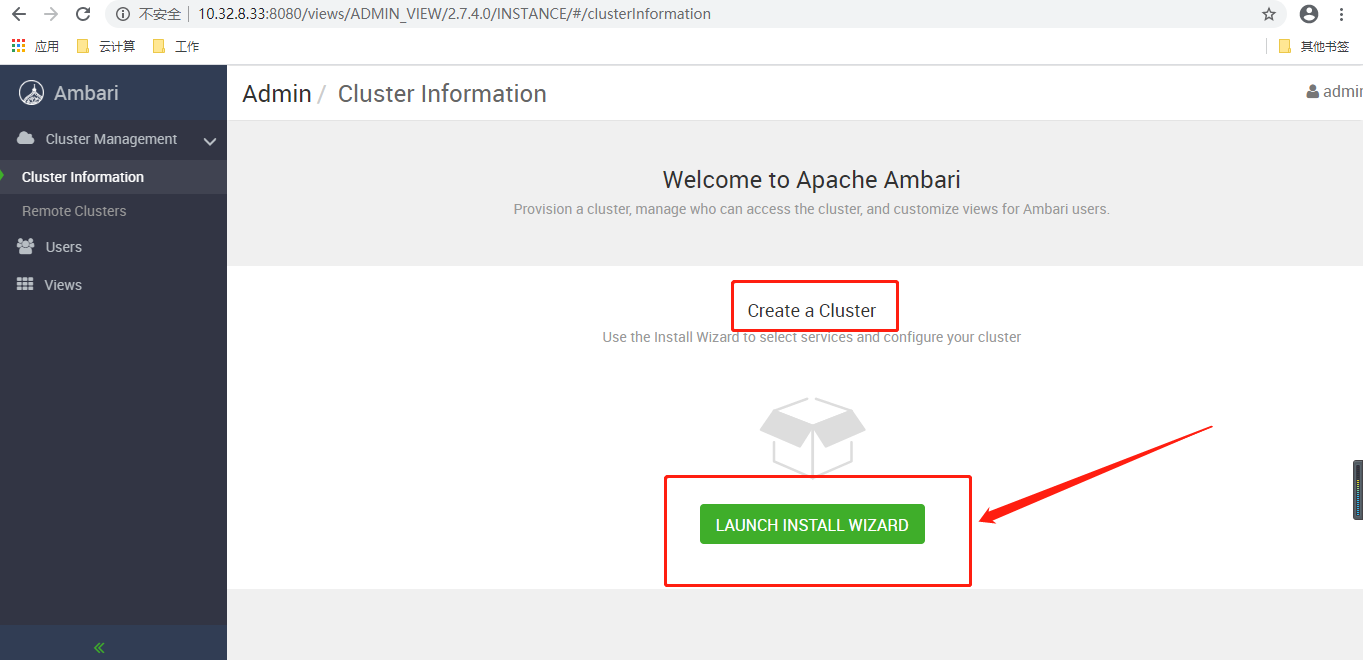
成功启动后在浏览器输入Ambari地址:
http://10.32.8.33:8080 即可进入hdp安装导航,用户/密码(admin/admin):
登录后点击进入导航流程
设置集群名

版本选择
集群列表
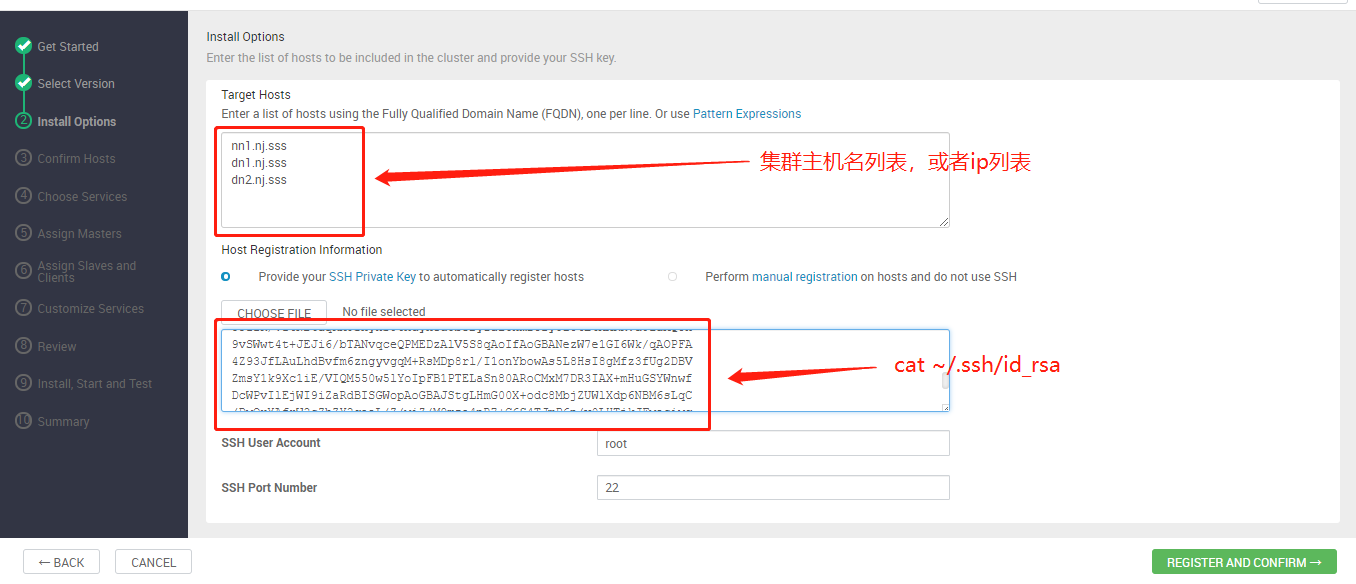
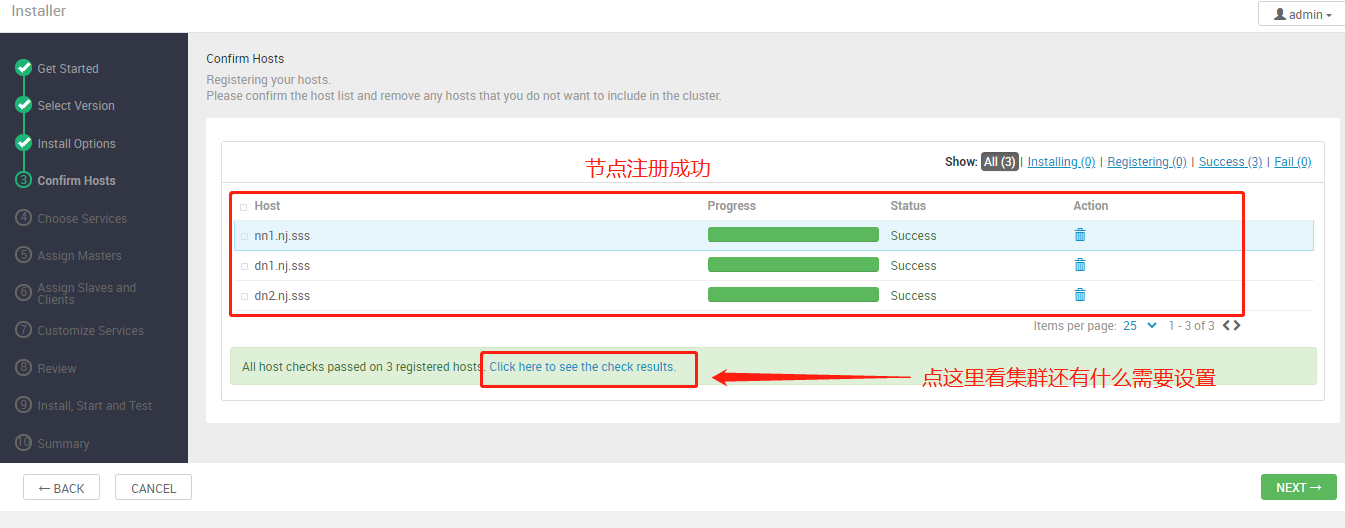
集群节点注册
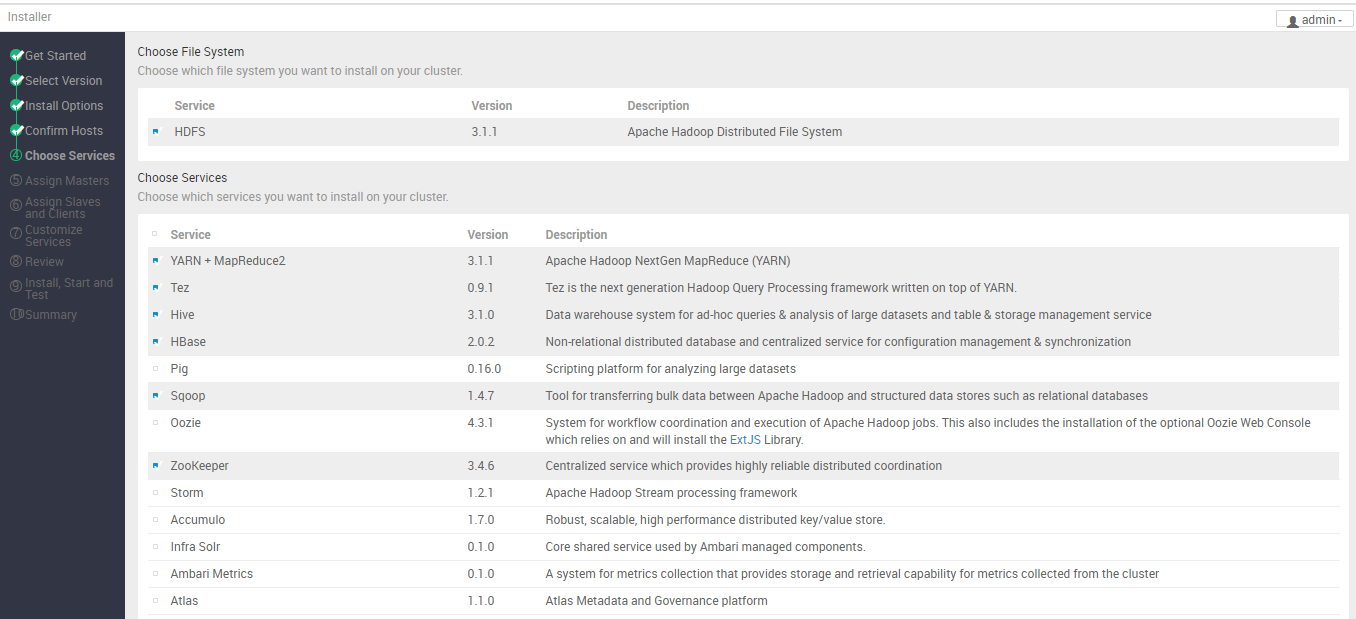
选择安装的服务
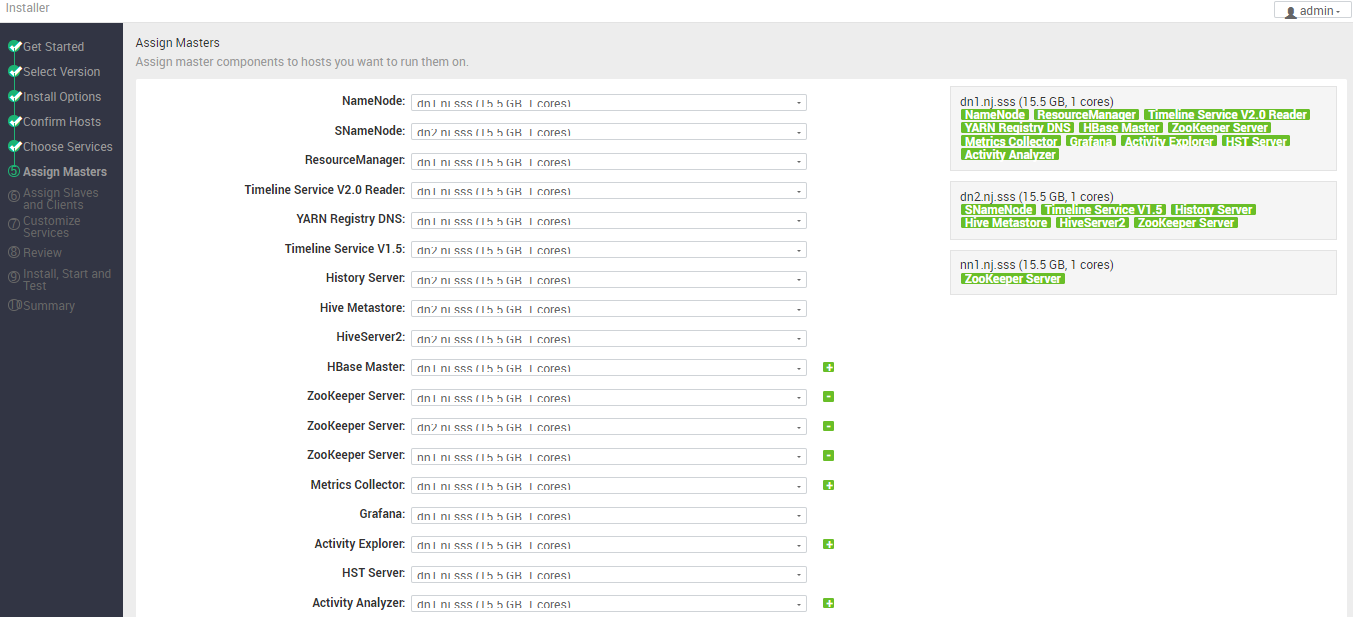
服务主组件分布
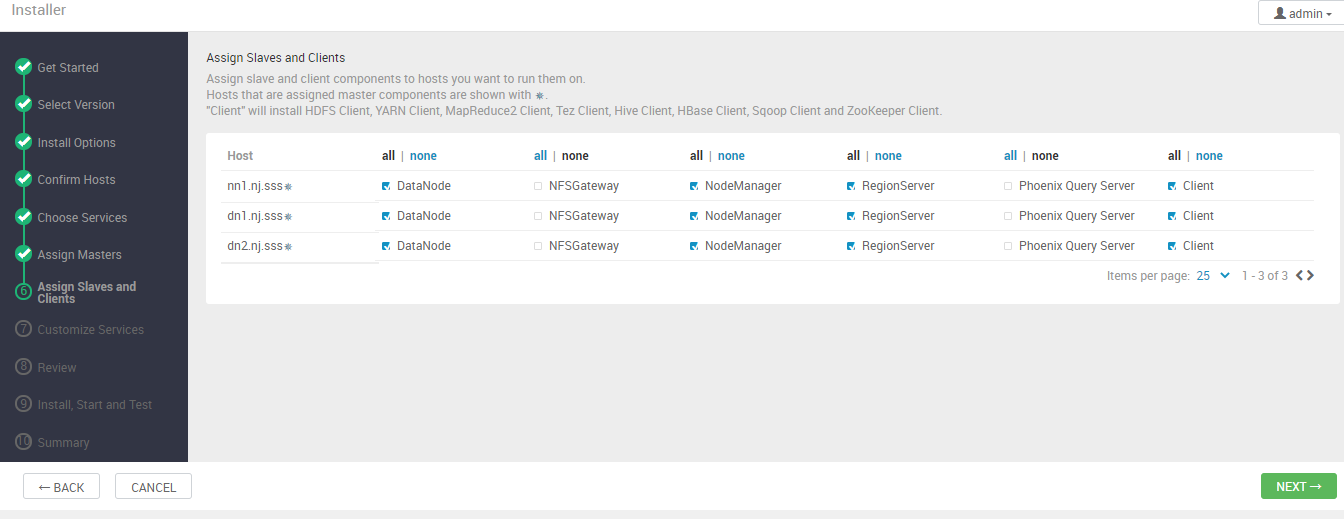
分配 Slaves and Clients
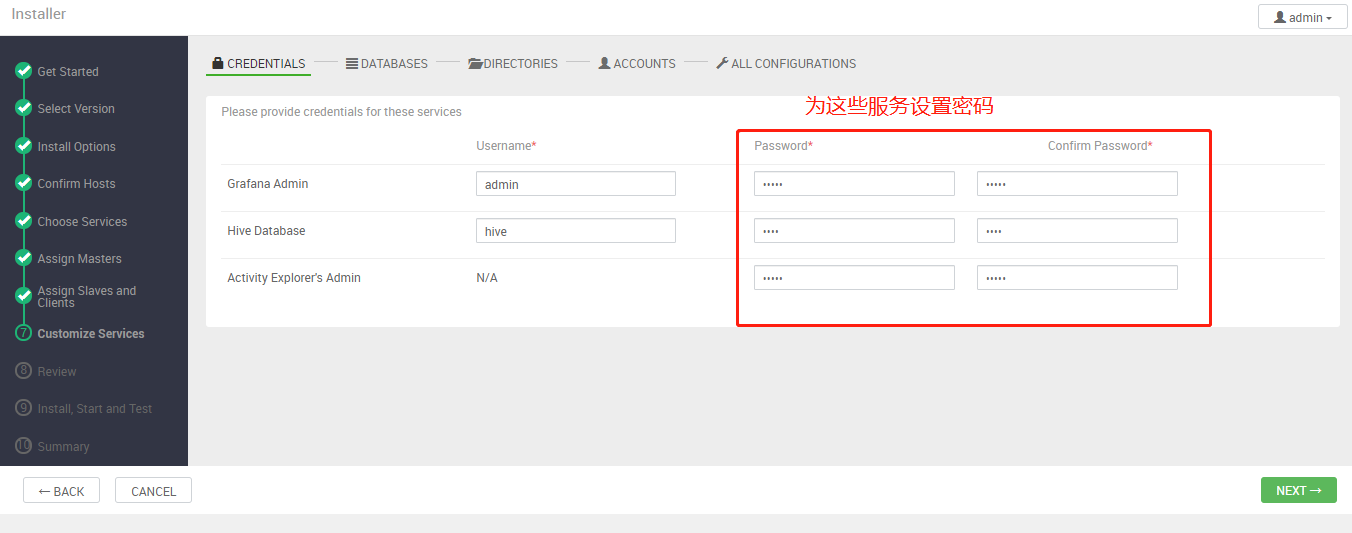
为一些服务设置密码
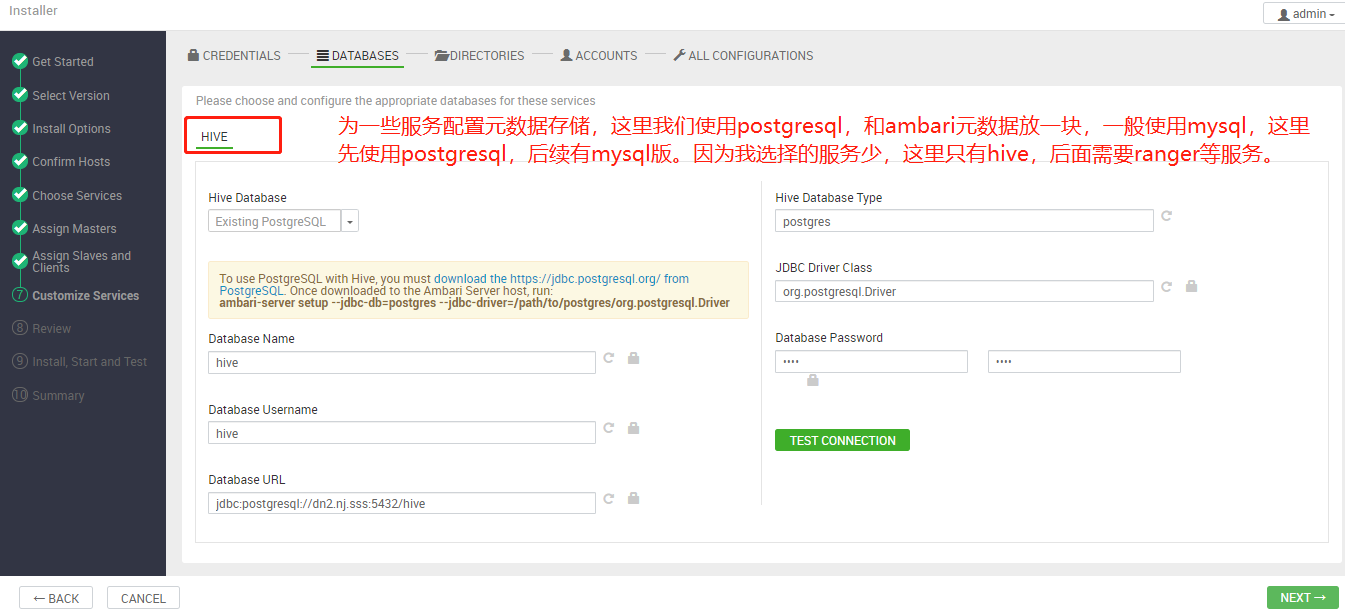
为一些服务设置元数据存储
在配置前需要先配置一下postgresql,如下:
在主节点的postgresql上创建hive数据库,hive用户,并将hive数据库授权给hive用户。
[root@nn1 ~]# su - postgres
Last login: Tue Jun 30 17:14:36 UTC 2020 on pts/2
-bash-4.2$ psql
psql (9.2.24)
Type "help" for help.

postgres=# CREATE DATABASE hive;
CREATE DATABASE
postgres=# CREATE USER hive WITH PASSWORD 'hive';
CREATE ROLE
postgres=# GRANT ALL PRIVILEGES ON DATABASE hive TO hive;
GRANT
postgres=# q

修改/var/lib/pgsql/data/pg_hba.conf文件
将
local  all  ambari,mapred md5
host  all   ambari,mapred 0.0.0.0/0  md5
host  all   ambari,mapred ::/0 md5

改为
local  all  ambari,mapred,hive md5
host  all   ambari,mapred,hive 0.0.0.0/0  md5
host  all   ambari,mapred.hive ::/0 md5

修改后,重新启动postgresql: systemctl restart postgresql.service
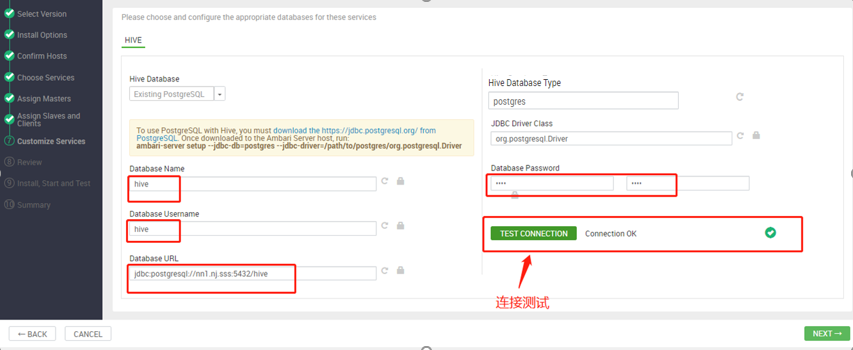
设置完后需要测试一下
后面就一路next就可以了
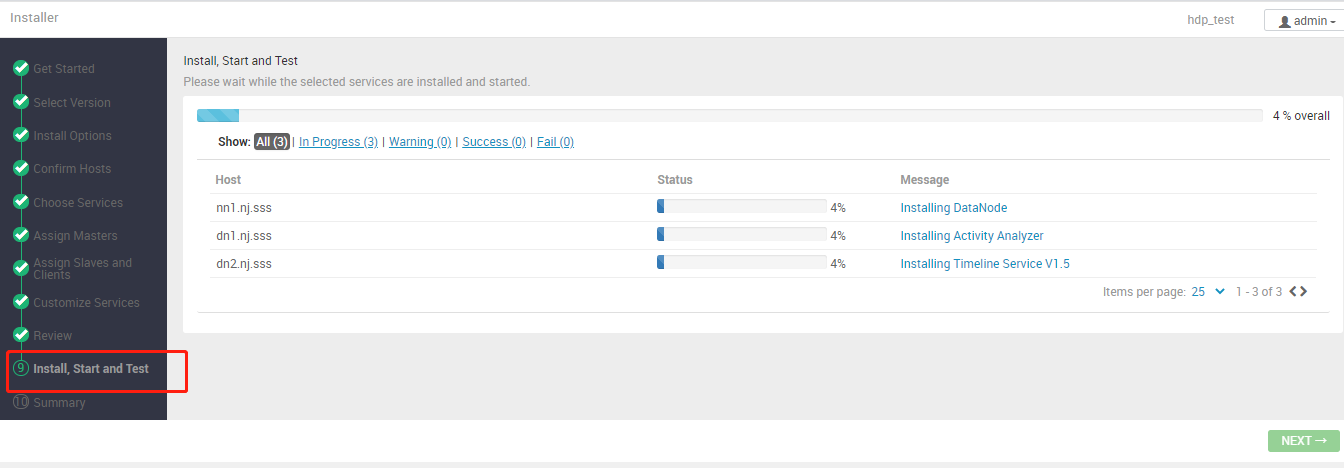
大约半个小时安装完成
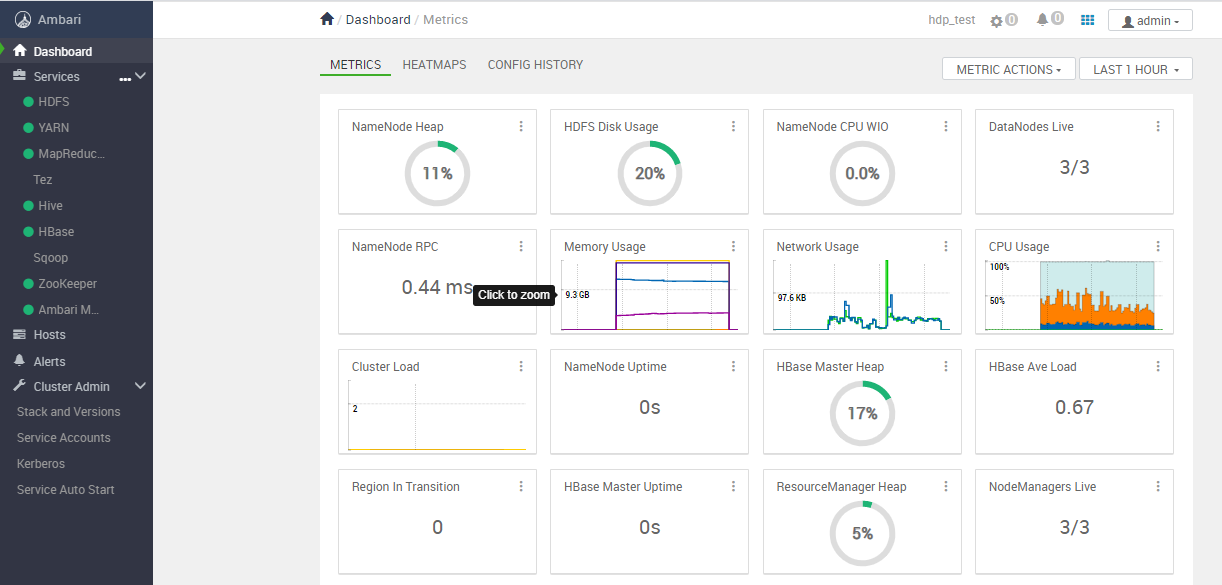
至此结束!!!
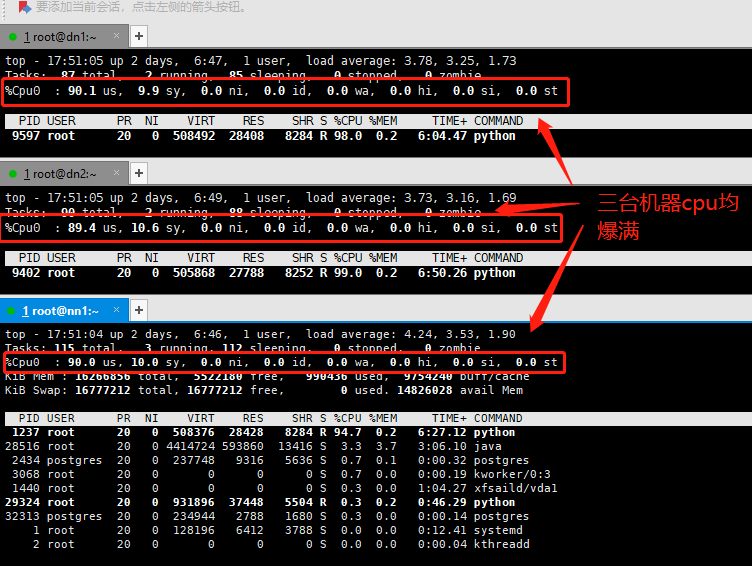
我看了下后台资源使用,三个节点,负载都不低,cpu爆满,建议最小资源:4C+ 16G+ 100G+;