文章目录
本文转自互联网博客,在此感谢博主的总结归纳,本文只提供于巩固复习使用
本章介绍
- 单元测试
- EmbeddedChannel
学会了使用一个或多个ChannelHandler处理接收/发送数据消息,但是如何测试它们呢?Netty提供了2个额外的类使得测试ChannelHandler变得很容易,本章讲解如何测试Netty程序。测试使用JUnit4,如果不会用可以慢慢了解。JUnit4很简单,但是功能很强大。本章将重点讲解测试已实现的ChannelHandler和编解码器。
10.1 General
正如前面所学的,Netty提供了一个简单的方法在ChannelPipeline上“堆叠”不同的ChannelHandler实现。所有的ChannelHandler都会参与处理事件,这个设计允许独立出可重用的小逻辑块,它只处理一个任务。这不仅使代码更清晰,也更容易测试。
测试ChannelHandler可以通过使用“嵌入式”传输很容易的传递事件槽管道以测试你的实现。对于这个嵌入式传输,Netty提供了一个特定的Channel实现:EmbeddedChannel。但是它是如何工作的呢?EmbeddedChannel的工作非常简单,它允许写入入站或出站数据,然后检查ChannelPipeline的结束。这允许你检查消息编码/解码或触发ChannelHandler任何行为。
编写入站和出站的却别是什么?入站数据是通过ChannelInboundHandler处理,代表从远程对等通道读取数据;出站数据是通过ChannelOutboundHandler处理,代表写入数据到远程对等通道。因此测试ChannelHandler就会选择writeInbound(…)或writeOutbound()(或者都选择)。
EmbeddedChannel提供了下面一些方法:
- writeInbound(Object…),写一个消息到入站通道
- writeOutbound(Object…),写消息到出站通道
- readInbound(),从EmbeddedChannel读取入站消息,可能返回null
- readOutbound(),从EmbeddedChannel读取出站消息,可能返回null
- finish(),标示EmbeddedChannel已结束,任何写数据都会失败
为了更清楚的了解其处理过程,看下图:
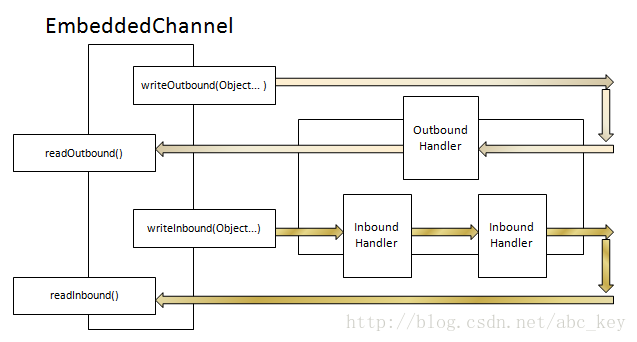
如上图所示,使用writeOutbound(…)写消息到通道,消息在出站方法通过ChannelPipeline,之后就可以使用readOutbound()读取消息。着同样使用与入站,使用writeInbound(…)和readInbound()。处理入站和出站是相似的,它总是遍历整个ChannelPipeline直到ChannelPipeline结束,并将处理过的消息存储在EmbeddedChannel中。下面来看看如何测试你的逻辑。
10.2 测试ChannelHandler
测试ChannelHandler最好的选择是使用EmbeddedChannel。
10.2.1 测试处理入站消息的handler
我们来编写一个简单的ByteToMessageDecoder实现,有足够的数据可以读取时将产生固定大小的包,如果没有足够的数据可以读取,则会等待下一个数据块并再次检查是否可以产生一个完整包。下图显示了重新组装接收的字节:

如上图所示,它可能会占用一个以上的“event”以获取足够的字节产生一个数据包,并将它传递到ChannelPipeline中的下一个ChannelHandler,看下面代码:
package netty.in.action;

import java.util.List;

import io.netty.buffer.ByteBuf;
import io.netty.channel.ChannelHandlerContext;
import io.netty.handler.codec.ByteToMessageDecoder;

public class FixedLengthFrameDecoder extends ByteToMessageDecoder {

	private final int frameLength;

	public FixedLengthFrameDecoder(int frameLength) {
		if (frameLength <= 0) {
			throw new IllegalArgumentException(
					"frameLength must be a positive integer: " + frameLength);
		}
		this.frameLength = frameLength;
	}

	@Override
	protected void decode(ChannelHandlerContext ctx, ByteBuf in,
			List<Object> out) throws Exception {
		while (in.readableBytes() >= frameLength) {
			ByteBuf buf = in.readBytes(frameLength);
			out.add(buf);
		}
	}

}
解码器的实现完成了,写一个单元测试的方法是个好主意。即使代码看起来没啥问题,但是也应该进行单元测试,这样能在部署到生产之前就发现问题。现在让我们来看看如何使用EmbeddedChannel来完成测试,看下面代码:
package netty.in.action;

import io.netty.buffer.ByteBuf;
import io.netty.buffer.Unpooled;
import io.netty.channel.embedded.EmbeddedChannel;

import org.junit.Assert;
import org.junit.Test;

public class FixedLengthFrameDecoderTest {

	@Test
	public void testFramesDecoded() {
		ByteBuf buf = Unpooled.buffer();
		for (int i = 0; i < 9; i++) {
			buf.writeByte(i);
		}
		ByteBuf input = buf.duplicate();
		EmbeddedChannel channel = new EmbeddedChannel(
				new FixedLengthFrameDecoder(3));
		// write bytes
		Assert.assertTrue(channel.writeInbound(input));
		Assert.assertTrue(channel.finish());
		// read message
		Assert.assertEquals(buf.readBytes(3), channel.readInbound());
		Assert.assertEquals(buf.readBytes(3), channel.readInbound());
		Assert.assertEquals(buf.readBytes(3), channel.readInbound());
		Assert.assertNull(channel.readInbound());
	}

	@Test
	public void testFramesDecoded2() {
		ByteBuf buf = Unpooled.buffer();
		for (int i = 0; i < 9; i++) {
			buf.writeByte(i);
		}
		ByteBuf input = buf.duplicate();
		EmbeddedChannel channel = new EmbeddedChannel(
				new FixedLengthFrameDecoder(3));
		Assert.assertFalse(channel.writeInbound(input.readBytes(2)));
		Assert.assertTrue(channel.writeInbound(input.readBytes(7)));
		Assert.assertTrue(channel.finish());
		Assert.assertEquals(buf.readBytes(3), channel.readInbound());
		Assert.assertEquals(buf.readBytes(3), channel.readInbound());
		Assert.assertEquals(buf.readBytes(3), channel.readInbound());
		Assert.assertNull(channel.readInbound());
	}
}
如上面代码,testFramesDecoded()方法想测试一个ByteBuf,这个ByteBuf包含9个可读字节,被解码成包含了3个可读字节的ByteBuf。你可能注意到,它写入9字节到通道是通过调用writeInbound()方法,之后再执行finish()来将EmbeddedChannel标记为已完成,最后调用readInbound()方法来获取EmbeddedChannel中的数据,直到没有可读字节。testFramesDecoded2()方法采取同样的方式,但有一个区别就是入站ByteBuf分两步写的,当调用writeInbound(input.readBytes(2))后返回false时,FixedLengthFrameDecoder值会产生输出,至少有3个字节是可读,testFramesDecoded2()测试的工作相当于testFramesDecoded()。
10.2.2 测试处理出站消息的handler
测试处理出站消息和测试处理入站消息不太一样,例如有一个继承MessageToMessageEncoder的AbsIntegerEncoder类,它所做的事情如下:
- 将已接收的数据flush()后将从ByteBuf读取所有整数并调用Math.abs(…)
- 完成后将字节写入ChannelPipeline中下一个ChannelHandler的ByteBuf中
看下图处理过程:

看下面代码:
package netty.in.action;

import java.util.List;

import io.netty.buffer.ByteBuf;
import io.netty.channel.ChannelHandlerContext;
import io.netty.handler.codec.MessageToMessageEncoder;

public class AbsIntegerEncoder extends MessageToMessageEncoder<ByteBuf> {
	@Override
	protected void encode(ChannelHandlerContext ctx, ByteBuf msg,
			List<Object> out) throws Exception {
		while(msg.readableBytes() >= 4){
			int value = Math.abs(msg.readInt());
			out.add(value);
		}
	}
}
下面代码是测试AbsIntegerEncoder:
package netty.in.action;

import io.netty.buffer.ByteBuf;
import io.netty.buffer.Unpooled;
import io.netty.channel.embedded.EmbeddedChannel;

import org.junit.Assert;
import org.junit.Test;

public class AbsIntegerEncoderTest {

	@Test
	public void testEncoded() {
		//创建一个能容纳10个int的ByteBuf
		ByteBuf buf = Unpooled.buffer();
		for (int i = 1; i < 10; i++) {
			buf.writeInt(i * -1);
		}
		//创建EmbeddedChannel对象
		EmbeddedChannel channel = new EmbeddedChannel(new AbsIntegerEncoder());
		//将buf数据写入出站EmbeddedChannel
		Assert.assertTrue(channel.writeOutbound(buf));
		//标示EmbeddedChannel完成
		Assert.assertTrue(channel.finish());
		//读取出站数据
		ByteBuf output = (ByteBuf) channel.readOutbound();
		for (int i = 1; i < 10; i++) {
			Assert.assertEquals(i, output.readInt());
		}
		Assert.assertFalse(output.isReadable());
		Assert.assertNull(channel.readOutbound());
	}
}
10.3 测试异常处理
有时候传输的入站或出站数据不够,通常这种情况也需要处理,例如抛出一个异常。这可能是你错误的输入或处理大的资源或其他的异常导致。我们来写一个实现,如果输入字节超出限制长度就抛出TooLongFrameException,这样的功能一般用来防止资源耗尽。看下图:

上图显示帧的大小被限制为3字节,若输入的字节超过3字节,则超过的字节被丢弃并抛出TooLongFrameException。在ChannelPipeline中的其他ChannelHandler实现可以处理TooLongFrameException或者忽略异常。处理异常在ChannelHandler.exceptionCaught()方法中完成,ChannelHandler提供了一些具体的实现,看下面代码:
package netty.in.action;

import java.util.List;

import io.netty.buffer.ByteBuf;
import io.netty.channel.ChannelHandlerContext;
import io.netty.handler.codec.ByteToMessageDecoder;
import io.netty.handler.codec.TooLongFrameException;

public class FrameChunkDecoder extends ByteToMessageDecoder {

	// 限制大小
	private final int maxFrameSize;

	public FrameChunkDecoder(int maxFrameSize) {
		this.maxFrameSize = maxFrameSize;
	}

	@Override
	protected void decode(ChannelHandlerContext ctx, ByteBuf in,
			List<Object> out) throws Exception {
		// 获取可读字节数
		int readableBytes = in.readableBytes();
		// 若可读字节数大于限制值,清空字节并抛出异常
		if (readableBytes > maxFrameSize) {
			in.clear();
			throw new TooLongFrameException();
		}
		// 读取ByteBuf并放到List中
		ByteBuf buf = in.readBytes(readableBytes);
		out.add(buf);
	}

}
测试FrameChunkDecoder的代码如下:
package netty.in.action;

import io.netty.buffer.ByteBuf;
import io.netty.buffer.Unpooled;
import io.netty.channel.embedded.EmbeddedChannel;
import io.netty.handler.codec.TooLongFrameException;

import org.junit.Assert;
import org.junit.Test;

public class FrameChunkDecoderTest {

	@Test
	public void testFramesDecoded() {
		//创建ByteBuf并填充9字节数据
		ByteBuf buf = Unpooled.buffer();
		for (int i = 0; i < 9; i++) {
			buf.writeByte(i);
		}
		//复制一个ByteBuf
		ByteBuf input = buf.duplicate();
		//创建EmbeddedChannel
		EmbeddedChannel channel = new EmbeddedChannel(new FrameChunkDecoder(3));
		//读取2个字节写入入站通道
		Assert.assertTrue(channel.writeInbound(input.readBytes(2)));
		try {
			//读取4个字节写入入站通道
			channel.writeInbound(input.readBytes(4));
			Assert.fail();
		} catch (TooLongFrameException e) {

		}
		//读取3个字节写入入站通道
		Assert.assertTrue(channel.writeInbound(input.readBytes(3)));
		//标识完成
		Assert.assertTrue(channel.finish());
		//从EmbeddedChannel入去入站数据
		Assert.assertEquals(buf.readBytes(2), channel.readInbound());
		Assert.assertEquals(buf.skipBytes(4).readBytes(3),
				channel.readInbound());
	}
}
10.4 Summary
In this chapter you learned how you are be able to test your custom ChannelHandler and so make sure it works like you expected. Using the shown techniques you are now be able to make use of JUnit and so ultimately test your code as your are used to. Using the techniques shown in the chapter you will be able to guarantee a high quality of your code and also guard it from misbehavior… In the next chapters we will focus on writing “real” applications on top of Netty and so show you how you can make real use of it. Even if the applications don’t contain any test-code remember it is quite important to do so when you will write your next-gen application.