作者:Daly 出处:http://www.cnblogs.com/daly 欢迎转载,也请保留这段声明。谢谢!
总结记录一下前段时间运用到Web 自动化项目中的实现框架, 以便以后查看。
环境准备:
1. Java:
Install Java jdk:
Version: java 1.8 or above
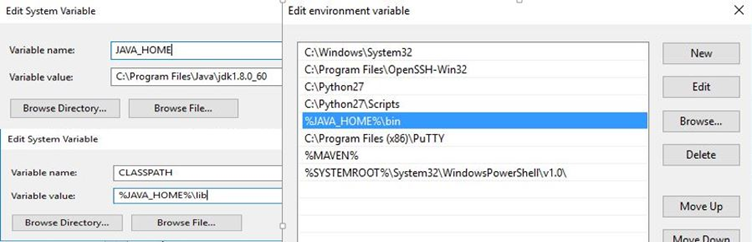
Configure Java Environment Variables:
Add JAVA_HOME
Add CLASSPATH
Add to Path
Verify Java was configured: Input javac in CMD can get output successfully.
2. Eclipse https://www.eclipse.org/
Unzip the eclipse file > Open eclipse.exe to launch Eclipse SDK:
Version: Oxygen.1a (4.7.1a)
Set workspace
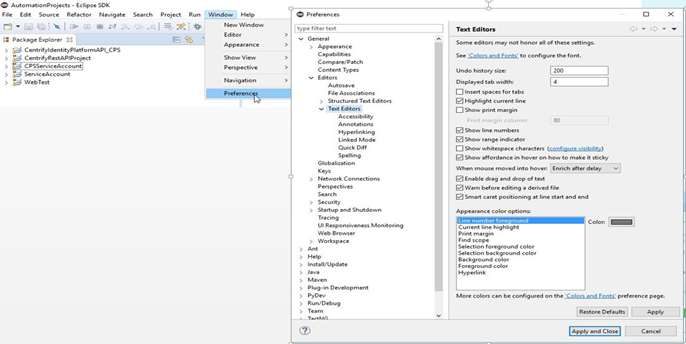
Set Layout and Text Editor
3. TestNG
Install TestNG online in Eclipse:
Click Help -> Install New Software… -> Click Add -> Set Name: TestNG for Eclipse and Location: http://beust.com/eclipse -> Select TestNG to install

4. Maven
Copy Maven package to the machine:
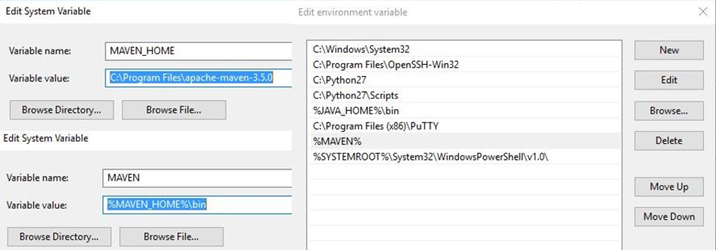
Configure Maven Environment Variables:
Add MAVEN_HOME
Add to Path
Verify Maven was configured: Input mvn –v in CMD can get output successfully.
5. Configure Maven and Eclipse
Click Help -> Install New Software… -> Click Add -> Set Name: maven for Eclipse and Location: http://download.eclipse.org/technology/m2e/releases -> Select Maven Integration for Eclipse to install
Set Maven Repository :
Set localRepository in MAVEN_HOME/conf/settings.xml, such as:
<localRepository>D:/AutomationProjects/Eclipse/repository</localRepository>
Configure Maven in Eclipse:
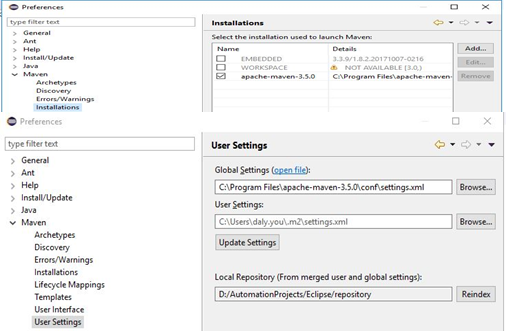
Open Eclipse -> Select Window -> Preferences -> Maven
Click Installations -> Click Add to add the installation used to launch Maven -> Click Apply
Click User Settings -> Click Browse to select the MAVEN_HOME/conf/settings.xml -> Click
创建Maven Project
1. New a Maven Project
Open Eclipse -> Select File -> New -> Project -> Select Maven -> Maven Project -> Click Next -> Click Next -> Click Next -> Input Group Id and Artifact Id, then click Finish.
2. New a TestNG class
Right click in the Maven project > select New -> Other -> select TestNG -> TestNG class -> Click Next -> Input Class Name and click Finish.
Write the test scenarios in the class.
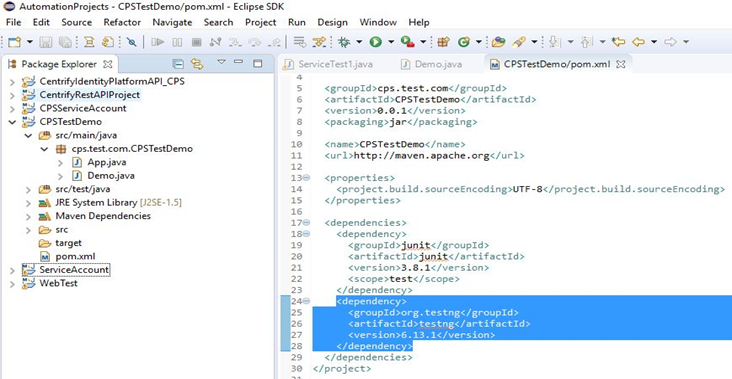
3. Add TestNG dependency in pom.xml
pom.xml: Project Object Model. Maven configuration file.
4. Run the test scripts via TestNG
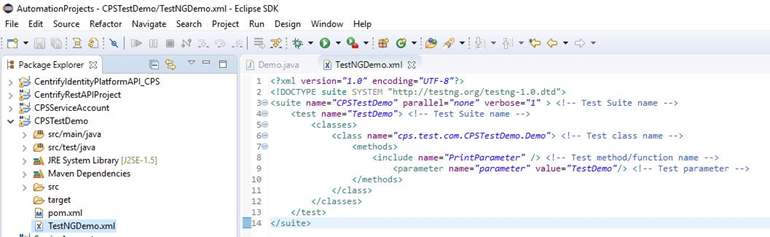
New a TestNG xml:
Right click the Maven project > select New -> Other -> select XML -> XML File -> Click Next -> Input File name and click Finish.
Input the TestNG xml content like:
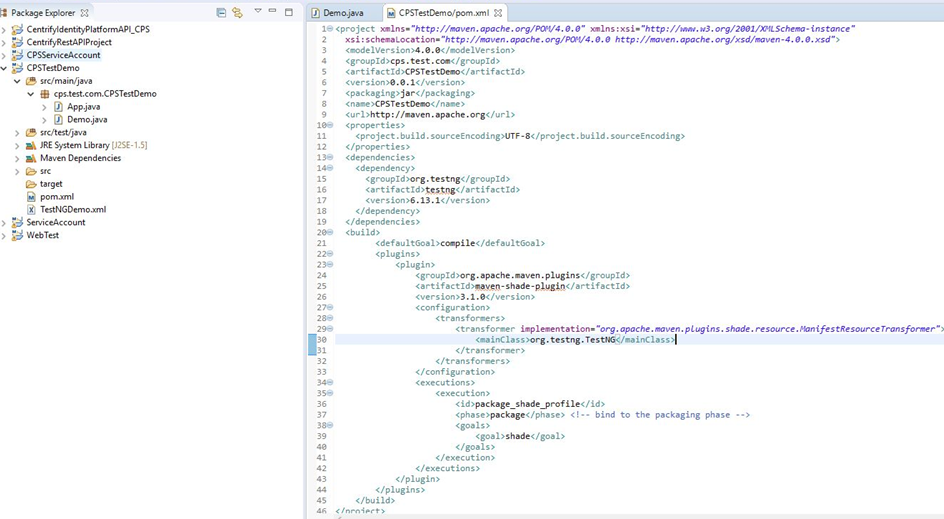
5. Build test project via Maven
Add build project information in pom.xml
Open CMD -> cd to the project folder
Compile the project via command:
>mvn clean compile
Build the project via command:
>mvn clean package
If Build the project success, the .jar file was located in target folder like :
.. argetCPSTestDemo-0.0.1.jar
6. Execute .jar without Eclipse

7. Log
Using log4j2 to log console log output
<?xml version="1.0" encoding="UTF-8"?>
<Configuration status="WARN">
    <Appenders>
        <Console name="Console" target="SYSTEM_OUT">
            <PatternLayout pattern="%d{yyyy-MM-dd HH:mm:ss.SSS} [%-5level] %logger{-3}:%L - %msg%n" />
        </Console>
        <RollingFile name="RollingFile" fileName="log/Console.log"
            filePattern="log/$${date:yyyy-MM-dd}/Console-%d{MM-dd-yyyy}-%i.log.gz">
            <PatternLayout>
                <Pattern>%d [%p] %logger{-3}:%L - %m%n</Pattern>
            </PatternLayout>
            <Policies>
                <OnStartupTriggeringPolicy />
                <TimeBasedTriggeringPolicy />
                <SizeBasedTriggeringPolicy size="20 MB" />
            </Policies>
        </RollingFile>
    </Appenders>
    <Loggers>
        <Root level="debug">
            <AppenderRef ref="Console" />
            <AppenderRef ref="RollingFile" />
        </Root>
    </Loggers>
</Configuration>