LNMP环境配置
1.安装mysql
上传MySQL压缩包并解压 tar zxvf mysql

# mv mysql-5.6.43-linux-glibc2.12-x86_64 /usr/local/mysql //移动mysql包

# useradd -s /sbin/nologin mysql //创建用户

# cd /usr/local/mysql //进入文件

# mkdir -p /data/mysql

# chown -R mysql:mysql /data/mysql

# ./scripts/mysql_install_db --user=mysql --datadir=/data/mysql

# cp support-files/my-default.cnf /etc/my.cnf

# cp support-files/mysql.server /etc/init.d/mysqld

# chmod 755 /etc/init.d/mysqld

# vi /etc/init.d/mysqld //修改配置文件中的datedir=/data/mysql

# chkconfig --add mysqld   //把启动脚本加入系统服务

# chkconfig mysqld on //设置开机自启

# service mysqld start

# ps aux |grep mysqld //查看是否启动
2. 安装php
上传php包并解压
# useradd -s /sbin/nologin php-fpm        //创建用户
# cd php-5.6.30
# ./configure  --prefix=/usr/local/php-fpm  --with-config-file-path=/usr/local/php-fpm/etc --enable-fpm  --with-fpm-user=php-fpm  --with-fpm-group=php-fpm  --with-mysql=/usr/local/mysql  --with-mysql-sock=/tmp/mysql.sock  --with-libxml-dir --with-gd  --with-png-dir  --with-freetype-dir --with-iconv-dir --with-zlib-dir  --with-mcrypt  --enable-soap  --enable-gd-native-ttf  --enable-ftp  --enable-mbstring --enable-exif  --disable-ipv6  -with-pear --with-curl  --with-openssl            //配置编译选项
以上在配置编译过程中会出现错误,安装一下的包
# yum install -y libxml2-devel
# yum install -y gcc
# yum install -y openssl openssl-devel
# yum install -y bzip2 bzip2-devel
# yum install -y libpng libpng-devel
# yum install -y freetype freetype-devel
# yum install -y epel-release
# yum install -y libmcrypt-devel
由于这回和lanp相比多了一个--enable-fpm(如果不加这个参数,php-fpm文件就不会产生,更不能启动php-fpm服务)
#yum install -y libcurl-devel
在编译之前先更改一下配置我呢见防止后面编译时候出错。
#vi Makefile    //在102行。在-lcrypt后面加上“-lpthread”
#make && make install        //如果忘记更改配置文件进行make了,再去更改的配置文件,就make clean一下
修改配置文件
# cd php.ini-production /usr/local/php-fpm/etc/php.ini
# vi /usr/local/php-fpm/etc/php-fpm.conf
[global]
pid = /usr/local/php-fpm/var/run/php-fpm.pid
error_log = /usr/local/php-fpm/var/log/php-fpm.log
[www]
listen = /tmp/php-fcgi.sock
listen.mode = 666
user = php-fpm
group = php-fpm
pm = dynamic
pm.max_children = 50
pm.start_servers = 20
pm.min_spare_servers = 5
pm.max_spare_servers = 35
pm.max_requests = 500
rlimit_files = 1024
检验配置文件是否正确
# /usr/local/php-fpm/sbin/php-fpm -t
显示的是test is successful则配置文件正确否则检查配置文件
启动php
# cp /local/src/php-5.6.30/sapi/fpm/init.d.php-fpm /etc/init.d/php-fpm
# chmod 755 /etc/init.d/php-fpm
# useradd -s /sbin/nologin php-fpm
# service php-fpm start
设置开机自启
# chkconfig php-fpm on
检查启动是否成功
# ps aux |grep php-fpm
2. 安装nginx
上传nginx包并解压
# cd nginx-1.10.3
# ./configure --prefix=/usr/local/nginx        //配置编译选项
# make && make install         //如果这里出现错误就重来吧
编写脚本
# vi /etc/init.d/nginx //脚本如下!!!注意不要错,可能我这里面也会有错误,如果后边出错就查下日志排一下吧,顺便在这评论出来吧
#!/bin/bash
# chkconfig: - 30 21
# description: http service.
# Source Function Library
. /etc/init.d/functions
# Nginx Settings
NGINX_SBIN="/usr/local/nginx/sbin/nginx"
NGINX_CONF="/usr/local/nginx/conf/nginx.conf"
NGINX_PID="/usr/local/nginx/logs/nginx.pid"
RETVAL=0
prog="Nginx"
start()
{
echo -n $"Starting $prog: "
mkdir -p /dev/shm/nginx_temp
daemon $NGINX_SBIN -c $NGINX_CONF
RETVAL=$?
echo
return $RETVAL
}
·
stop()
{
echo -n $"Stopping $prog: "
killproc -p $NGINX_PID $NGINX_SBIN -TERM
rm -rf /dev/shm/nginx_temp
RETVAL=$?
echo
return $RETVAL
}
reload()
{
echo -n $"Reloading $prog: "
killproc -p $NGINX_PID $NGINX_SBIN -HUP
RETVAL=$?
echo
return $RETVAL
}
restart()
{
stop
start
}
configtest()
{
$NGINX_SBIN -c $NGINX_CONF -t
return 0
}
case "$1" in
start)
start
;;
stop)
stop
;;
reload)
reload
;;
restart)
restart
;;
configtest)
configtest
;;
*)
echo $"Usage: $0 {start|stop|reload|restart|configtest}"
RETVAL=1
esac
exit $RETVAL
保存脚本更改权限
# chmod 755 /etc/init.d/nginx
# chkconfig nginx on
# chkconfig --add nginx
更改配置文件,在更改配置文件之前先进行清空。
#  > /usr/local/nginx/conf/nginx.conf        //重定向符单独用可以对文档进行快速清空
# vi /usr/local/nginx/conf/nginx.conf
[root@localhost ~]# vim /usr/local/nginx/conf/nginx.conf
user nobody nobody;
worker_processes 2;
error_log /usr/local/nginx/logs/nginx_error.log crit;
pid /usr/local/nginx/logs/nginx.pid;
worker_rlimit_nofile 51200;

events
{
    use epoll;
    worker_connections 6000;
}

http
{
    include mime.types;
    default_type application/octet-stream;
    server_names_hash_bucket_size 3526;
    server_names_hash_max_size 4096;
    log_format combined_realip '$remote_addr $http_x_forwarded_for [$time_local]'
    ' $host "$request_uri" $status'
    ' "$http_referer" "$http_user_agent"';
    sendfile on;
    tcp_nopush on;
    keepalive_timeout 30;
    client_header_timeout 3m;
    client_body_timeout 3m;
    send_timeout 3m;
    connection_pool_size 256;
    client_header_buffer_size 1k;
    large_client_header_buffers 8 4k;
    request_pool_size 4k;
    output_buffers 4 32k;
    postpone_output 1460;
    client_max_body_size 10m;
    client_body_buffer_size 256k;
    client_body_temp_path /usr/local/nginx/client_body_temp;
    proxy_temp_path /usr/local/nginx/proxy_temp;
    fastcgi_temp_path /usr/local/nginx/fastcgi_temp;
    fastcgi_intercept_errors on;
    tcp_nodelay on;
    gzip on;
    gzip_min_length 1k;
    gzip_buffers 4 8k;
    gzip_comp_level 5;
    gzip_http_version 1.1;
    gzip_types text/plain application/x-javascript text/css text/htm
    application/xml;

    server
    {
        listen 80;
        server_name localhost;
        index index.html index.htm index.php;
        root /usr/local/nginx/html;

        location ~ .php$
        {
            include fastcgi_params;
            fastcgi_pass unix:/tmp/php-fcgi.sock;
            fastcgi_index index.php;
            fastcgi_param SCRIPT_FILENAME /usr/local/nginx/html$fastcgi_script_name;
        }
    }
}
保存文件并检查是否有错误
# /usr/local/nginx/sbin/nginx -t        //显示一个ok一个successful就是正确的
# service nginx start        //启动nginx
# ps aux |grep nginx        //检测nginx是否启动
测试nginx能否解析php
# vi /usr/local/nginx/html/2.php
<?php
    echo "test php scripts.";
?>
# curl localhost/2.php
test php scripts.[root@localhost php-5.6.30]#
****在curl的时候可能会出现拒绝连接的情况那么请检测配置文件是否出错**
NGINX配置
默认虚拟主机
# vi /usr/local/nginx/conf/nginx.conf        //在这个配置文件中最后一个}号里面加include
# vhost/*.conf;
# mkdir /usr/local/nginx/conf/vhost        //创建目录、
# cd /usr/local/nginx/conf/vhost/
# vi default.conf        //修改配置文件
server
{
    listen 80 default_server;   //监听80端口
    server_name aaa.com;  //全部跳转到aaa.com
    index index.html index.htl index.php;
    root /data/nginx/default;
}
#  /usr/local/nginx/sbin/nginx -t        //编辑完成后进行检验
# /usr/local/nginx/sbin/nginx -s reload        //重新加载文件
# mkdir -p /data/nginx/default
# touch /data/nginx/default/index.html        //创建这个目录与文件因为下一步进行的时会用到
# echo "defaule_server" > /data/nginx/default/index.html        //向这个文件输入这段字符下一步会进行读取
# curl -x127.0.0.1:80 aaa.com
defaule_server        //读取成功
用户认证
创建一个新的虚拟主机
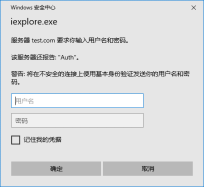
# cd /usr/local/nginx/conf/vhost/
# vi test.com.conf            //创建一个新的虚拟主机
server
{
    listen 80;
    server_name test.com;
    index index.html index.htm index.php;
    root /data/nginx/test.com;

    location  /
    {
        auth_basic    "Auth";            //打开认证
        auth_basic_user_file   /usr/local/nginx/conf/htpasswd;        //指定用户密码文件
    }
}
# yum install -y httpd        //安装httpd也可以使用前边apaceh2.4
# htpasswd -c /usr/local/nginx/conf/htpasswd dai        //设置密码
New password:
Re-type new password:
Adding password for user dai
# /usr/local/nginx/sbin/nginx -t           //检验是否正确
# /usr/local/nginx/sbin/nginx -s reload        //重新加载文件
**reload会重新加载文件服务也不会中断**
# mkdir /data/nginx/test    .com         //创建网页存储位置文件夹
# echo "test.com" > /data/nginx/test.com/index.html            //在网页中输入文件夹
# curl -I -x127.0.0.1:80 test.com            //测试用户认证是否设置成功
HTTP/1.1 401 Unauthorized
Server: nginx/1.12.2
Date: Mon, 07 Dec 2020 12:50:58 GMT
Content-Type: text/html
Content-Length: 195
Connection: keep-alive
WWW-Authenticate: Basic realm="Auth"
状态码为401表示网站想要认证
在去浏览器登陆之前,在自己本地的hosts文件中加入虚拟机ip和地址
浏览器访问
针对某个目录做用户认证
 location  /dai
    {
        auth_basic    "Auth";
        auth_basic_user_file   /usr/local/nginx/conf/htpasswd;
    }
域名重定向
# vi test.com.conf
server
{
    listen 80;
    server_name test.com test1.com test2.com;
    index index.html index.htm index.php;
root /data/nginx/test.com;

    if ($host != 'test.com' ){
            rewrite ^/(.*)$ http://test.com/$1 permanent;
        }
//在nginx中server_name后面可以跟多个域名,permanent就是永久重定向,和lamp中httpd的R=301一样。还有一个常用的redirect相当于httpd的R=302。
测试:
# /usr/local/nginx/sbin/nginx -t
# /usr/local/nginx/sbin/nginx -s reload
# curl -x127.0.0.1:80 test1.com/123.txt -I
HTTP/1.1 301 Moved Permanently
Server: nginx/1.12.2
Date: Mon, 07 Dec 2020 13:38:16 GMT
Content-Type: text/html
Content-Length: 185
Connection: keep-alive
Location: http://test.com/123.txt
nginx访问日志
nginx的日志搁置:
# grep -A2 log_format /usr/local/nginx/conf/nginx.conf
    log_format combined_realip '$remote_addr $http_x_forwarded_for [$time_local]'
    ' $host "$request_uri" $status'
' "$http_referer" "$http_user_agent"';
//combined_realip为日志格式的名字,后面可以调用它;$remote_addr为访问网站的用户的出口IP;
//$http_x_forwarded_for 为代理服务器的IP;$time_local为当前的时间; $host为访问的主机名;
//$request_uri为访问的URL地址; $status为状态码;$http_referer为referer地址;$http_user_agent为user_agent。
指定访问日志路径
# vi test.com.conf
server
{
    listen 80;
    server_name test.com test1.com test2.com;
    index index.html index.htm index.php;
    root /data/nginx/test.com;
    if ($host != 'test.com' ){
            rewrite ^/(.*)$ http://test.com/$1 permanent;
        }
    access_log /tmp/1.log combined_realip;
}
# /usr/local/nginx/sbin/nginx -t
# /usr/local/nginx/sbin/nginx -s reload
# curl -x127.0.0.1:80 test.com/111
<html>
<head><title>401 Authorization Required</title></head>
<body bgcolor="white">
<center><h1>401 Authorization Required</h1></center>
<hr><center>nginx/1.12.2</center>
</body>
</html>
# cat /tmp/1.log
127.0.0.1 - [07/Dec/2020:21:56:23 +0800] test.com "/111" 401 "-" "curl/7.29.0"
切割nginx日志
编写切割脚本:
# vi /usr/local/sbin/nginx_log_rotate.sh
#! /bin.bash
##假设nginx日志存放路径为/data/logs/
d=`date -d ""-1 day" +%Y%m%d`
logdir="/data/logs"
nginx_pid="/usr/local/nginx/logs/nginx.pid"
cd $logdir
for log in `ls *.log`
do
    mv $llog-$d
done
/bin/kill -HUP `cat $nginx_pid`
添加任务计划:
crontab -e
no crontab for root - using an empty one
0 0 * * * /bin/bash /usr/local/sbin/nginx_log_rotate.sh
配置静态文件不记录日志并添加过期时间
# vi test.com.conf
server
{
    listen 80;
    server_name test.com test1.com test2.com;
    index index.html index.htm index.php;
    root /data/nginx/test.com;
    location ~ .*.(gif|jpeg|png|bmp|swf)$
        {
            expires       7d;
            access_log off;
        }
    location ~ .*.(js|css)$
        {
            expires       12h;
            access_log off;
        }
    access_log /tmp/1.log combined_realip;
}
//location~可以指定对应的静态文件,expires配置过期时间,access_log配置为off就可以不记录访问日志了
进行测试:
# /usr/local/nginx/sbin/nginx -t
# echo "dddddddddd" > /data/nginx/test.com/1.js
# echo "aaaaaaaaaa" > /data/nginx/test.com/2.jpg
# touch /data/nginx/test.com/1.jss            //对比文件
# curl -I -udai:a -x127.0.0.1:80 test.com/1.js        //由于前面设置了用户认证这里加上用户名密码才能正常访问
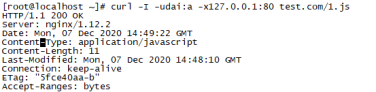
给的回应是200但是没有没有显示过期时间,这里刷新一下配置文件。
# /usr/local/nginx/sbin/nginx -s reload
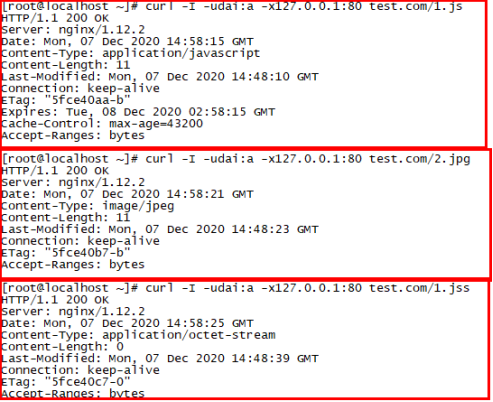

这个jpg是没有限制的
ngixn防盗链
修改配置文件
# vi test.com.conf
location ~ .*.(gif|jpg|png|bmp|swf|flv|rar|zip|doc|pdf|gz|bz2|jpeg|bmp|xls)$
        {
            expires       7d;
            valid_referers none blocked server_names *.test.com;        //有效的地址
            if ($invalid_referer) {        //否则返回值为403
                  return 403;
              }
            access_log off;
}
# /usr/local/nginx/sbin/nginx -t
# /usr/local/nginx/sbin/nginx -s reload
# curl -x127.0.0.1:80 -I -e "http://aaa.com/1.txt" test.com/2.jpg
# curl -x127.0.0.1:80 -I -e "http://test.com/1.txt" test.com/2.jpg
[root@localhost vhost]# curl -x127.0.0.1:80 -I -e "http://aaa.com/1.txt" test.com/2.jpg
HTTP/1.1 403 Forbidden
Server: nginx/1.12.2
Date: Mon, 07 Dec 2020 15:45:36 GMT
Content-Type: text/html
Content-Length: 169
Connection: keep-alive
[root@localhost vhost]# curl -x127.0.0.1:80 -I -e "http://test.com/1.txt" test.com/2.jpg
HTTP/1.1 200 OK
Server: nginx/1.12.2
Date: Mon, 07 Dec 2020 15:46:36 GMT
Content-Type: image/jpeg
Content-Length: 11
Last-Modified: Mon, 07 Dec 2020 14:48:23 GMT
Connection: keep-alive
ETag: "5fce40b7-b"
Expires: Mon, 14 Dec 2020 15:46:36 GMT
Cache-Control: max-age=604800
Accept-Ranges: bytes

访问控制
只允许192.168.29.1和127.0.0.1访问/dai/目录
# vi test.com.conf
    location /dai/                //这里会从上到下逐一进行匹配
        {
            allow 192.168.29.1;        //允许192.168.29.1进行访问
            allow 127.0.0.1;        //允许127.0.0.1访问
            deny all;            //不允许访问
        }
# mkdir /data/nginx/test.com/dai/         //创建被限制的目录
# echo "daiqh" > /data/nginx/test.com/dai/1.html        //创建网页
# /usr/local/nginx/sbin/nginx -s reload            //重新加载配置文件
# /usr/local/nginx/sbin/nginx -s reload
# curl  -x192.168.29.141:80 test.com/dai/1.html
<html>
<head><title>403 Forbidden</title></head>
<body bgcolor="white">
<center><h1>403 Forbidden</h1></center>
<hr><center>nginx/1.12.2</center>
</body>
</html>
# curl -x127.0.0.1:80 test.com/dai/1.html
daiqh

只拒绝几个IP
    location /dai/
        {
            deny 192.168.29.1;
            deny 127.0.0.1;
        }

正则匹配限制
    location ~ .*(abc|image)/.*.php$
        {
            deny all;
        }
//小括号里面的竖线为分隔符,是或者的意思,这样就可以把访问URL中带有abc或者image字符串,并且是PHP的请求拒绝访问,这还能起到禁止解析PHP的作用


针对user_agent做限制
     if ($http_user_agent ~ 'Spider/3.0|YouddaoBot|Tomato')
         {
             return 403;
         }
//~为匹配符号,只要user_agent中含有spider/3.0或者YouddaoBot,Tomato字符串的就会被拒绝,return 403 为,直接返回403状态码。
nginx解析PHP
server
{
    listen 80;
    server_name test.com test1.com test2.com;
    index index.html index.htm index.php;
    root /data/nginx/test.com;
    if ($host != 'test.com' ){
            rewrite ^/(.*)$ http://test.com/$1 permanent;
        }
     location ~ .php$
        {
            include fastcgi_params;
            fastcgi_pass unix:/tmp/phpfcgi.sock;
            fastcgi_index index.php;
            fastcgi_param SCRIPT_FILENAME /data/nginx/test.com$fastcgi_script_name;
        }
    access_log /tmp/1.log combined_realip;
}
/*nginx不像lamp一样,解析php脚本以模块的形式出现,在lnmp中是以服务的形式出现的php-fpm,首先启动php-fpm。然后nginx与php-fpm进行通讯。ngixn=搬运工。
其中fastcgi_pass用来指定php-fpm的地址,如果php-fpm监听的是一个tcp:port的地址(比如 127.0.0.1:9000 ),那么也需要在这里改成fastcgi_pass 127.0.0.l:9000o这个地址一定要和php-fpm服 务监听的地址匹配,否则会报502错误。
还有一个地方也需要注意,factcgi_param SCRIPT_FRENAME后面跟的路径为该站点的根目录,和 前面定义的root那个路径保持一致。如果这里配置不对,访问PHP页面会出现404。
Ngixn代理
nginx代理就是一个用户想要访问服务器将访问请求发送给代理服务器,由代理服务器进行传递这个信息并获取用户所需要的数据再转交给用户。
如果nginx代理服务器后面跟着多台服务器,如果同时代理,还会起到一个负载均衡的作用

nginx代理配置
# cd /usr/local/nginx/conf/vhost/
# vi peoxy.conf
server

{
    listen 80;
    server_name www.baidu.com;
    location /
       {
          proxy_pass       http://220.181.38.150;
          proxy_set_header Host    $host;
          proxy_set_header X-Real-IP    $remote_addr;
          proxy_set_header X-Forwarded-For $proxy_add_x_forwarded_for;
       }
}
**proxy_pass指定要代理的域名所在的服务器的IP(ping来获取),后面三行蒂尼工艺发往后端web服务器的请求头,第二行必须由否则代理不成功,表示后端web服务器的域名和当前配置文件中的server_name是一样的。后面的和日志文件中的相同意思。
# /usr/local/nginx/sbin/nginx -t
# /usr/local/nginx/sbin/nginx -s reload
# curl -x127.0.0.1:80 www.baidu.com -I
HTTP/1.1 200 OK
Server: nginx/1.12.2
Date: Mon, 07 Dec 2020 19:40:24 GMT
Content-Type: text/html
Content-Length: 277
Connection: keep-alive
Accept-Ranges: bytes
Cache-Control: private, no-cache, no-store, proxy-revalidate, no-transform
Etag: "575e1f60-115"
Last-Modified: Mon, 13 Jun 2016 02:50:08 GMT
Pragma: no-cache
# curl www.baidu.com -I
HTTP/1.1 200 OK
Accept-Ranges: bytes
Cache-Control: private, no-cache, no-store, proxy-revalidate, no-transform
Connection: keep-alive
Content-Length: 277
Content-Type: text/html
Date: Tue, 08 Dec 2020 00:46:21 GMT
Etag: "575e1f60-115"
Last-Modified: Mon, 13 Jun 2016 02:50:08 GMT
Pragma: no-cache
Server: bfe/1.0.8.18

负载均衡
先来查看百度域名对应的IP

上面这两个IP都可以访问到百度

两个返回结果一样,因为其使用的就是web server软件为squid,有两个IP就可以走负载均衡了,配置如下:
# vi /usr/local/nginx/conf/vhost/load.conf
    server 39.156.69.79:80;
upstream baidu_com
{
ip_hash;
    server 220.181.38.148:80;
    server 39.156.69.79:80;
}
server
{
    listen 80;
    server_name baidu.com;
    location /
        {
            proxy_pass      http://baidu_com;
            proxy_set_header Host   $host;
            proxy_set_header X-Real-IP    $remote_addr;
            proxy_set_header X-Forwarded-For    $proxy_add_x_forwarded_for;
         }
}
# /usr/local/nginx/sbin/nginx -t
# /usr/local/nginx/sbin/nginx -s reload

Nginx配置SSL
https比http更加安全。
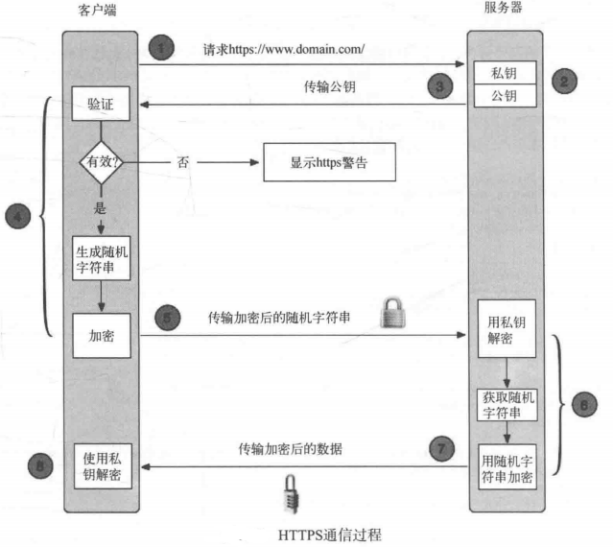
https通信流程:
- 客户端向服务端发送建立https请求。
- 服务器向客户段发送数字证书。
- 客户端验证数字证书,证书验证通过后客户端生成会话密钥(双向验证则此处客户端也会向服务器发送证书)。
- 服务器生成会话密钥(双向验证此处服务端也会对客户端的证书验证)。
- 客户端与服务端开始进行加密会话。
自定义证书:
# cd /usr/local/nginx/conf/
# openssl genrsa -des3 -out tmp.key 2048
Generating RSA private key, 2048 bit long modulus
..............................................+++
.......................+++
e is 65537 (0x10001)
Enter pass phrase for tmp.key:aaaaaaaaaa
Verifying - Enter pass phrase for tmp.key:aaaaaaaaaa
//这里是生成key文件(“私钥”),2048为加密字符的长度,这里输入一个密码,不要太短。
# openssl rsa -in tmp.key -out dailinux.key
Enter pass phrase for tmp.key:aaaaaaaaaa
writing RSA key
//这里是把刚刚生成的tmp.key再转换成dailinux.key。目的就是删除刚刚设置的密码,如果key文件有密码,则必须再nginx加载它的时候输入它的密码,因此很不方便
# rm -rf tmp.key
# openssl req -new -key dailinux.key -out dailinux.csr
Country Name (2 letter code) [XX]:
State or Province Name (full name) []:
Locality Name (eg, city) [Default City]:
Organization Name (eg, company) [Default Company Ltd]:
Organizational Unit Name (eg, section) []:
Common Name (eg, your name or your server's hostname) []:dai.com
Email Address []:

Please enter the following 'extra' attributes
to be sent with your certificate request
A challenge password []:a
string is too short, it needs to be at least 4 bytes long
A challenge password []:aaaa
An optional company name []:
//这里是生成证书请求文件,这个不是公钥,但是必须有,我们要拿的key文件和这个CSR文件一起成最终的公钥文件,其中Common Nnam为后面配置Nginx配置文件中的server_name。
# openssl x509 -req -days 365 -in dailinux.csr -signkey dailinux.key -out dailinux.crt
Signature ok
subject=/C=XX/L=Default City/O=Default Company Ltd/CN=dai.com
Getting Private key
//这里的最终目的是生成dailinux.key和dailinux.crt两个文件。
配置nginx:
# vi /usr/local/nginx/conf/vhost/ssl.conf
server
{
    listen 443;
    server_name dai.com;
    index index.html index.php;
    root /data/nginx/dai.com;

    ssl on;
    ssl_certificate dailinux.crt;
    ssl_cerificate_key dailinux.key;
    ssl_protocols TLSv1 TLSv1.1 TLSv1.2;

    location ~.php$
    {
         include fastcgi_params;
         fastcgi_pass unix:/tmp/php-fcgi.sock;
         fastcgi_index index.php;
         fastcgi_param SCRIPT_FILENAME /data/nginx/dai.com$fastcgi_script_name;
    }
    access_log /tmp/1.log combined_realip;
}
# /usr/local/nginx/sbin/nginx -t            //这里出现错误
nginx: [emerg] unknown directive "ssl" in /usr/local/nginx/conf/vhost/ssl.conf:8
//这个位置显示nginx不支持ssl因为编译时没有设置额外配置支持ssl参数,重新编译一次就好了。
# cd /usr/local/src/nginx-1.12.2
# ./configure --prefix=/usr/local/nginx/ --with-http_ssl_module
# make -j4 && make install
# /usr/local/nginx/sbin/nginx -t
# mkdir /data/nginx/dai.com
# echo "<?php phpinfo(); ?>" > /data/nginx/dai.com/1.php
# /etc/init.d/nginx restart
Restarting nginx (via systemctl):  [  确定  ]
在hosts文件中将IP地址还有域名加入

用网页访问
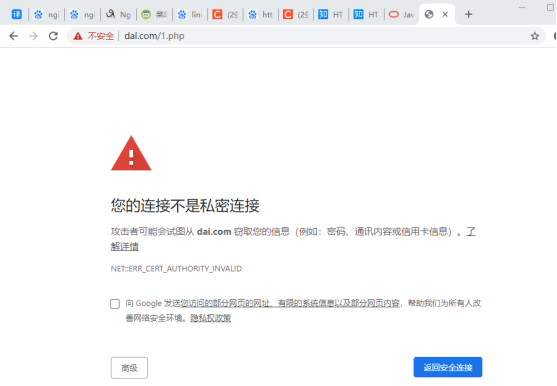
点击高级继续进入也是可以进入的。
php-fpm配置
在nginx中可以配置多台虚拟主机,在LNMP中php-fpm是一个独立的服务,必然有自己的配置文件,/usr/local/php-fpm/etc/php-fpm.conf 它同样支持include语句,类似于nginx。conf里面的include。
php-fpm的pool:
php-fpm可以支持多个pool 每一个pool监听一个端口,也可以监听一个socket。
# vi /usr/local/php-fpm/etc/php-fpm.conf
[global]
pid = /usr/local/php-fpm/var/run/php-fpm.pid
error_log = /usr/local/php-fpm/var/log/php-fpm.log
include = etc/php-fpm.d/*.conf

*/    //这行是因为上面/*conf的/*会将下文显示为注释,所以在这行加和注释结尾,这行忽略,当没有这行
# mkdir /usr/local/php-fpm/etc/php-fpm.d        //创建配置文件存放目录
# cd /usr/local/php-fpm/etc/php-fpm.d
# vi www.conf
[www]
listen = /tmp/www.sock
listen.mode=666
user = php-fpm
group = php-fpm
pm = dynamic
pm.max_children = 50
pm.start_servers = 20
pm.min_spare_servers = 5
pm.max_spare_servers = 35
pm.max_requests = 500
rlimit_files = 1024
# vi dai.conf
[dai]
listen = /tmp/dai.sock
listen.mode=666
user = php-fpm
group = php-fpm
pm = dynamic
pm.max_children = 50
pm.start_servers = 20
pm.min_spare_servers = 5
pm.max_spare_servers = 35
pm.max_requests = 500
rlimit_files = 1024
//这样我们就有两个子配置文件了。也就是两个pool。第一个pool监听/tmp/www.sock。第二个监听 /tmp/dai.sock。这样可以在nginx里不同虚拟主机中调用不同的pool,从而达到相互隔离的目的,
# /usr/local/php-fpm/sbin/php-fpm -t            //检验是否有问题
[08-Dec-2020 09:31:34] NOTICE: configuration file /usr/local/php-fpm/etc/php-fpm.conf test is successful
# /etc/init.d/php-fpm restart
# ls /tmp/*.sock
/tmp/dai.sock  /tmp/mysql.sock  /tmp/php-fcgi.sock
php-fpm慢执行日志
php-fpm慢执行日志的作用就是可以清晰的了解到php的脚本那里执行时间长,可以定位到具体的行。
# vi /usr/local/php-fpm/etc/php-fpm.d/www.conf
request_slowlog_timeout = 1
slowlog = /usr/local/php-fpm/var/log/www-slow.log
//第一行定义的时超时时间,即php-fpm执行超过一秒就纪录日志,第二行第一慢执行路径和名字。
php-fpm进程管理
pm = dynamic
pm.max_children = 50
pm.start_servers = 20
pm.min_spare_servers = 5
pm.max_spare_servers = 35
pm.max_requests = 500
第一行,定义php-fpm的子进程启动模式,dynamic为动态模式;一开始只启动少量的子进程,根据实际需求,动态地增加或者减少子进程,最多不会超过pm.max_children定义的数值。另外一种模式 为static,这种模式下子进程数量由pm.max_children决定,一次性启动这么多,不会减少也不会增加。
pm.start_servers针对dynamic模式,它定义php-fpm服务在启动服务时产生的子进程数量。pm.min_spare_servers针对dynamic模式,它定义在空闲时段子进程数的最少数量,如果达到这个数值时,php-fpm服务会自动派生新的子进程。pm.max_spa:re_se:rvers也是针对dynamic模式的,它定义在空 闲时段子进程数的最大值,如果高于这个数值就开始清理空闲的子进程。 pm.max_requests针对dynamic模式,它定义一个子进程最多处理的请求数,也就是说在一个php-fpm的子进程市最多可以处理这么多请求,当达到这个数值时,它会自动退出。