1、现象概述
这个现象其实大部分都知道,循环依赖也是网上比较流传Spring的一个问题。
比如现在有一个类为Class1,然后其有一个属性为Class2,然后Class2这个类里有一个属性为Class1。当这两个类都是单例的时候,就存在循环依赖的问题了。
那么这种情况在Spring管理Bean的时候是如何解决的呢?
下面来描述
2、代码现象
Class1.java
@Component
public class Class1 {
	@Autowired
	private Class2 class2;
}
Class2.java
@Component
public class Class2 {
	@Autowired
	private Class1 class1;
}
用容器去获取getBean
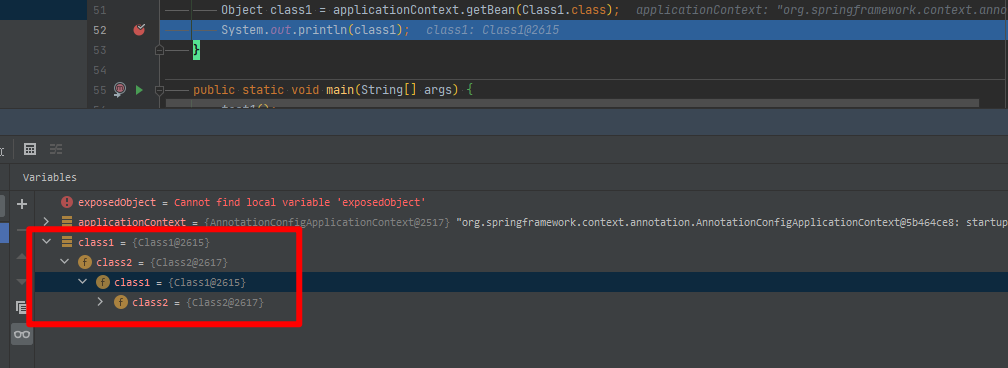
看我们的Class1,它的属性class2有值,其Class2的属性class1也有值,这就是循环依赖,下面我们来解释Spring如何解决这个问题。
3、大概解释
在看源码之前,我们先用白话文对其进行解释。
首先我们Spring先去走Class1的生命周期,首先是用构造器创建Class1的对象,在创建结束以后,对Class1的属性进行注入,在注入Class2的时候,实际上是去调用getBean(Class2),然后Class2在创建结束以后,又回去注入Class2中的class1属性,那么自然就会去调用getBean(Class1),此时去getBean(Class1)是能获取到的,但注意次数获取道德Class1属性并未注入完成,那么这样Class2的class1属性就注入完成,就回到了Class1注入class2的时候,这时Class1去getBean(Class2)就完成,注意此时Class2已经注入完成,那么就将Class2注入到Class1的class2属性中,至此,循环依赖就结束。
你可能有如下疑问:
Class1注入Class2的时候,是如何去getBean的?
Class2注入Class1的时候,为什么getBean能获取到Class1,具体代码在哪里判断的?为什么获取到Class1属性并未注入完成?
下面源码解析中一一解释。
4、源码解析
来到org.springframework.beans.factory.support.AbstractAutowireCapableBeanFactory#doCreateBean中:
在进入这个方法之前,先展示方法栈:
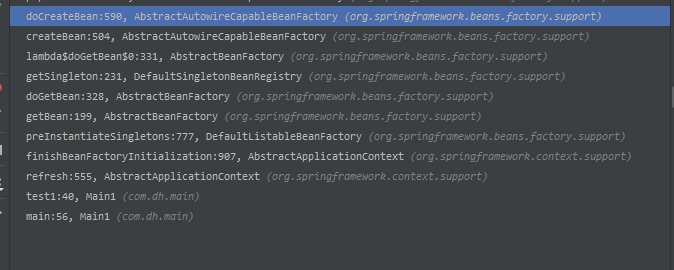
好,现在进入方法代码:
org.springframework.beans.factory.support.AbstractAutowireCapableBeanFactory#doCreateBean
protected Object doCreateBean(String beanName, RootBeanDefinition mbd, @Nullable Object[] args)
			throws BeanCreationException {

		// Instantiate the bean.
		BeanWrapper instanceWrapper = null;
		if (mbd.isSingleton()) {
			instanceWrapper = this.factoryBeanInstanceCache.remove(beanName);
		}
		if (instanceWrapper == null) {
			/**
			 * 这里实际上是去创建Bean了,
			 * 此类中属性并未赋值,比如@Autowried
			 *
			 * */
			instanceWrapper = createBeanInstance(beanName, mbd, args);
		}
		Object bean = instanceWrapper.getWrappedInstance();
		Class<?> beanType = instanceWrapper.getWrappedClass();
		if (beanType != NullBean.class) {
			mbd.resolvedTargetType = beanType;
		}

		// Allow post-processors to modify the merged bean definition.
		synchronized (mbd.postProcessingLock) {
			if (!mbd.postProcessed) {
				try {
					applyMergedBeanDefinitionPostProcessors(mbd, beanType, beanName);
				}
				catch (Throwable ex) {
					throw new BeanCreationException(mbd.getResourceDescription(), beanName,
							"Post-processing of merged bean definition failed", ex);
				}
				mbd.postProcessed = true;
			}
		}

		// Eagerly cache singletons to be able to resolve circular references
		// even when triggered by lifecycle interfaces like BeanFactoryAware.
		boolean earlySingletonExposure = (mbd.isSingleton() && this.allowCircularReferences &&
				isSingletonCurrentlyInCreation(beanName));
		if (earlySingletonExposure) {
			if (logger.isDebugEnabled()) {
				logger.debug("Eagerly caching bean '" + beanName +
						"' to allow for resolving potential circular references");
			}
			/**
			 * 最主要是的将当前创建好的Bean放置到singletonFactories的Map中
			 * */
			addSingletonFactory(beanName, () -> getEarlyBeanReference(beanName, mbd, bean));
		}

		// Initialize the bean instance.
		Object exposedObject = bean;
		try {
			/* 填充Bean,填充其属性的值 */
			populateBean(beanName, mbd, instanceWrapper);
			/**
			 * 去执行
			 * 	BeanPostProcessor的postProcessBeforeInitialization方法
			 * */
			exposedObject = initializeBean(beanName, exposedObject, mbd);
		}
		catch (Throwable ex) {
			if (ex instanceof BeanCreationException && beanName.equals(((BeanCreationException) ex).getBeanName())) {
				throw (BeanCreationException) ex;
			}
			else {
				throw new BeanCreationException(
						mbd.getResourceDescription(), beanName, "Initialization of bean failed", ex);
			}
		}
		.......省略代码
		return exposedObject;
	}
此时我们的beanName为“class1”。
我们分段看:
// Instantiate the bean.
BeanWrapper instanceWrapper = null;
if (mbd.isSingleton()) {
    instanceWrapper = this.factoryBeanInstanceCache.remove(beanName);
}
if (instanceWrapper == null) {
    instanceWrapper = createBeanInstance(beanName, mbd, args);
}
Object bean = instanceWrapper.getWrappedInstance();
Class<?> beanType = instanceWrapper.getWrappedClass();
if (beanType != NullBean.class) {
    mbd.resolvedTargetType = beanType;
}
这里createBeanInstance是去创建类的实例,这个创建的实例当前是啥也没有的,属性并未填充。
// Eagerly cache singletons to be able to resolve circular references
// even when triggered by lifecycle interfaces like BeanFactoryAware.
boolean earlySingletonExposure = (mbd.isSingleton() && this.allowCircularReferences &&
                                  isSingletonCurrentlyInCreation(beanName));
if (earlySingletonExposure) {
    if (logger.isDebugEnabled()) {
        logger.debug("Eagerly caching bean '" + beanName +
                     "' to allow for resolving potential circular references");
    }
    /**
			 * 最主要是的将当前创建好的Bean放置到singletonFactories的Map中
			 * */
    addSingletonFactory(beanName, () -> getEarlyBeanReference(beanName, mbd, bean));
}
addSingletonFactory这个方法最主要的就是将我们刚刚创建的实例加入到singletonFactories这个Map当中去,这个map在循环依赖里面很重要,注意这个Map中的Class1是才创建好的,并没有属性注入。
// Initialize the bean instance.
Object exposedObject = bean;
try {

    populateBean(beanName, mbd, instanceWrapper);

    exposedObject = initializeBean(beanName, exposedObject, mbd);
}
catch (Throwable ex) {
    if (ex instanceof BeanCreationException && beanName.equals(((BeanCreationException) ex).getBeanName())) {
        throw (BeanCreationException) ex;
    }
    else {
        throw new BeanCreationException(
            mbd.getResourceDescription(), beanName, "Initialization of bean failed", ex);
    }
}
这里面populateBean是完成属性注入(换个叫法就是完成Bean填充),initializeBean是执行BeanPostProcessor的回调,我们关心populateBean方法。
进入populateBena方法中。
org.springframework.beans.factory.support.AbstractAutowireCapableBeanFactory#populateBean
protected void populateBean(String beanName, RootBeanDefinition mbd, @Nullable BeanWrapper bw) {
    if (bw == null) {
        if (mbd.hasPropertyValues()) {
            throw new BeanCreationException(
                mbd.getResourceDescription(), beanName, "Cannot apply property values to null instance");
        }
        else {
            // Skip property population phase for null instance.
            return;
        }
    }

    // Give any InstantiationAwareBeanPostProcessors the opportunity to modify the
    // state of the bean before properties are set. This can be used, for example,
    // to support styles of field injection.
    if (!mbd.isSynthetic() && hasInstantiationAwareBeanPostProcessors()) {
        for (BeanPostProcessor bp : getBeanPostProcessors()) {
            if (bp instanceof InstantiationAwareBeanPostProcessor) {
                InstantiationAwareBeanPostProcessor ibp = (InstantiationAwareBeanPostProcessor) bp;
                if (!ibp.postProcessAfterInstantiation(bw.getWrappedInstance(), beanName)) {
                    return;
                }
            }
        }
    }

    PropertyValues pvs = (mbd.hasPropertyValues() ? mbd.getPropertyValues() : null);

    int resolvedAutowireMode = mbd.getResolvedAutowireMode();
    if (resolvedAutowireMode == AUTOWIRE_BY_NAME || resolvedAutowireMode == AUTOWIRE_BY_TYPE) {
        MutablePropertyValues newPvs = new MutablePropertyValues(pvs);
        // Add property values based on autowire by name if applicable.
        if (resolvedAutowireMode == AUTOWIRE_BY_NAME) {
            autowireByName(beanName, mbd, bw, newPvs);
        }
        // Add property values based on autowire by type if applicable.
        if (resolvedAutowireMode == AUTOWIRE_BY_TYPE) {
            autowireByType(beanName, mbd, bw, newPvs);
        }
        pvs = newPvs;
    }
    /**
		 * 要不要处理
		 * */
    boolean hasInstAwareBpps = hasInstantiationAwareBeanPostProcessors();
    /**
		 * 要不要深度检查
		 */
    boolean needsDepCheck = (mbd.getDependencyCheck() != AbstractBeanDefinition.DEPENDENCY_CHECK_NONE);

    if (hasInstAwareBpps || needsDepCheck) {
        if (pvs == null) {
            pvs = mbd.getPropertyValues();
        }
        /**
		* 拿到所有的get/set方法
		* */
        PropertyDescriptor[] filteredPds = filterPropertyDescriptorsForDependencyCheck(bw, mbd.allowCaching);
        if (hasInstAwareBpps) {
            for (BeanPostProcessor bp : getBeanPostProcessors()) {
                if (bp instanceof InstantiationAwareBeanPostProcessor) {
                    /**
						 * 重点看这个PostProcess:org.springframework.beans.factory.annotation.AutowiredAnnotationBeanPostProcessor
						 * 这个是去处理自动注入的.
						 * */
                    InstantiationAwareBeanPostProcessor ibp = (InstantiationAwareBeanPostProcessor) bp;
                    pvs = ibp.postProcessPropertyValues(pvs, filteredPds, bw.getWrappedInstance(), beanName);
                    if (pvs == null) {
                        return;
                    }
                }
            }
        }
        if (needsDepCheck) {
            checkDependencies(beanName, mbd, filteredPds, pvs);
        }
    }

    if (pvs != null) {
        applyPropertyValues(beanName, mbd, bw, pvs);
    }
分段看:
if (bw == null) {
    if (mbd.hasPropertyValues()) {
        throw new BeanCreationException(
            mbd.getResourceDescription(), beanName, "Cannot apply property values to null instance");
    }
    else {
        // Skip property population phase for null instance.
        return;
    }
}
判空处理,这个没什么好解释。
if (!mbd.isSynthetic() && hasInstantiationAwareBeanPostProcessors()) {
    for (BeanPostProcessor bp : getBeanPostProcessors()) {
        if (bp instanceof InstantiationAwareBeanPostProcessor) {
            InstantiationAwareBeanPostProcessor ibp = (InstantiationAwareBeanPostProcessor) bp;
            if (!ibp.postProcessAfterInstantiation(bw.getWrappedInstance(), beanName)) {
                return;
            }
        }
    }
}
InstantiationAwareBeanPostProcessor的方法postProcessAfterInstantiation,该方法的返回值是boolean,如果返回true,则什么都不干,如果返回false,那么此类则不会进行自动装配(属性填充),这里就是可以让我们通过postprocessor的方式控制某些bean不用属性填充。这里很明显如果我们没做特殊处理,这里最里面的if的return是不会被执行到的。
int resolvedAutowireMode = mbd.getResolvedAutowireMode();
if (resolvedAutowireMode == AUTOWIRE_BY_NAME || resolvedAutowireMode == AUTOWIRE_BY_TYPE) {
    MutablePropertyValues newPvs = new MutablePropertyValues(pvs);
    // Add property values based on autowire by name if applicable.
    if (resolvedAutowireMode == AUTOWIRE_BY_NAME) {
        autowireByName(beanName, mbd, bw, newPvs);
    }
    // Add property values based on autowire by type if applicable.
    if (resolvedAutowireMode == AUTOWIRE_BY_TYPE) {
        autowireByType(beanName, mbd, bw, newPvs);
    }
    pvs = newPvs;
}
resolvedAutowireMode:自动注入模型,默认为AUTOWIRE_CONSTRUCTOR,所以这里不会进if,如果该BeanDefinition的注入模型是这两种的,那么则分别的可以尝试byType方式,byName方式。
    /**
		 * 要不要处理
		 * */
    boolean hasInstAwareBpps = hasInstantiationAwareBeanPostProcessors();
    /**
		 * 要不要深度检查
		 */
    boolean needsDepCheck = (mbd.getDependencyCheck() != AbstractBeanDefinition.DEPENDENCY_CHECK_NONE);
这两个属性注释上有,很明显都为true。
for (BeanPostProcessor bp : getBeanPostProcessors()) {
    if (bp instanceof InstantiationAwareBeanPostProcessor) {
        /**
		* 重点看这个PostProcess:org.springframework.beans.factory.annotation.AutowiredAnnotationBeanPostProcessor
		* 这个是去处理自动注入的.
		 * */
        InstantiationAwareBeanPostProcessor ibp = (InstantiationAwareBeanPostProcessor) bp;
        pvs = ibp.postProcessPropertyValues(pvs, filteredPds, bw.getWrappedInstance(), beanName);
        if (pvs == null) {
            return;
        }
    }
}
属性注入是使用BeanPostProcessor来完成的。
这里是使用BeanPostProcessor的子类InstantiationAwareBeanPostProcessor来完成属性注入,这里面很多InstantiationAwareBeanPostProcessor,我们主要关心AutowiredAnnotationBeanPostProcessor的postProcessPropertyValues方法,我们进入AutowiredAnnotationBeanPostProcessor的postProcessPropertyValues方法来看。
org.springframework.beans.factory.annotation.AutowiredAnnotationBeanPostProcessor#postProcessPropertyValues
@Override
public PropertyValues postProcessPropertyValues(
    PropertyValues pvs, PropertyDescriptor[] pds, Object bean, String beanName) throws BeanCreationException {
    /**
	* 拿到需要注入的字段,这个方法不需要去深究
	* */
    InjectionMetadata metadata = findAutowiringMetadata(beanName, bean.getClass(), pvs);
    try {
        metadata.inject(bean, beanName, pvs);
    }
    catch (BeanCreationException ex) {
        throw ex;
    }
    catch (Throwable ex) {
        throw new BeanCreationException(beanName, "Injection of autowired dependencies failed", ex);
    }
    return pvs;
}
分段看:
InjectionMetadata metadata = findAutowiringMetadata(beanName, bean.getClass(), pvs);
这个是去获取到当前类中需要注入的属性,注意此时beanName为前面说到的class1,bean.getClass()为Class1。
我们来断点看看当前的metadata中是否包含了我们Class1中需要注入的class2属性。

那么我们进入metadata.inject方法。
org.springframework.beans.factory.annotation.InjectionMetadata#inject
public void inject(Object target, @Nullable String beanName, @Nullable PropertyValues pvs) throws Throwable {
    Collection<InjectedElement> checkedElements = this.checkedElements;
    Collection<InjectedElement> elementsToIterate =
        (checkedElements != null ? checkedElements : this.injectedElements);
    if (!elementsToIterate.isEmpty()) {
        for (InjectedElement element : elementsToIterate) {
            if (logger.isDebugEnabled()) {
                logger.debug("Processing injected element of bean '" + beanName + "': " + element);
            }
            /**
			* 对属性进行注入操作,当前的element是需要被注入的字段,target是原类的实例对象,beanName是bean的名称,是target的类名称
			* 注意,这个Element为:AutowiredFieldElement
			* */
            element.inject(target, beanName, pvs);
        }
    }
}
将刚才找到的所有需要注入的属性遍历给注入。
我们进入element.inject方法,注意此时的target为Class1,beanName为class1。
org.springframework.beans.factory.annotation.AutowiredAnnotationBeanPostProcessor.AutowiredFieldElement#inject
@Override
protected void inject(Object bean, @Nullable String beanName, @Nullable PropertyValues pvs) throws Throwable {
    Field field = (Field) this.member;

    Object value;
    if (this.cached) {
        value = resolvedCachedArgument(beanName, this.cachedFieldValue);
    }
    else {
        /**
		* 可以理解为字段的描述
		*/
        DependencyDescriptor desc = new DependencyDescriptor(field, this.required);
        desc.setContainingClass(bean.getClass());
        Set<String> autowiredBeanNames = new LinkedHashSet<>(1);
        Assert.state(beanFactory != null, "No BeanFactory available");
        TypeConverter typeConverter = beanFactory.getTypeConverter();
        try {
            value = beanFactory.resolveDependency(desc, beanName, autowiredBeanNames, typeConverter);
        }
        catch (BeansException ex) {
            throw new UnsatisfiedDependencyException(null, beanName, new InjectionPoint(field), ex);
        }
        synchronized (this) {
            if (!this.cached) {
                if (value != null || this.required) {
                    this.cachedFieldValue = desc;
                    registerDependentBeans(beanName, autowiredBeanNames);
                    if (autowiredBeanNames.size() == 1) {
                        String autowiredBeanName = autowiredBeanNames.iterator().next();
                        if (beanFactory.containsBean(autowiredBeanName) &&
                            beanFactory.isTypeMatch(autowiredBeanName, field.getType())) {
                            this.cachedFieldValue = new ShortcutDependencyDescriptor(
                                desc, autowiredBeanName, field.getType());
                        }
                    }
                }
                else {
                    this.cachedFieldValue = null;
                }
                this.cached = true;
            }
        }
    }
    if (value != null) {
        ReflectionUtils.makeAccessible(field);
        field.set(bean, value);
    }
}
分段看:
Object value;
这个value就是用来存放实例化出来以后的Class2对象。
value = beanFactory.resolveDependency(desc, beanName, autowiredBeanNames, typeConverter);
此处就是去getBean(Class2),然后再将拿到的value设置到Class1的class2属性当中去。
  if (value != null) {
      ReflectionUtils.makeAccessible(field);
      field.set(bean, value);
  }
设置到Class1的class2属性中去。
我们现在来看beanFactory.resolveDependency方法。
org.springframework.beans.factory.support.DefaultListableBeanFactory#resolveDependency
@Override
@Nullable
public Object resolveDependency(DependencyDescriptor descriptor, @Nullable String requestingBeanName,
                                @Nullable Set<String> autowiredBeanNames, @Nullable TypeConverter typeConverter) throws BeansException {

    descriptor.initParameterNameDiscovery(getParameterNameDiscoverer());

    if (Optional.class == descriptor.getDependencyType()) {
        return createOptionalDependency(descriptor, requestingBeanName);
    }
    else if (ObjectFactory.class == descriptor.getDependencyType() ||
             ObjectProvider.class == descriptor.getDependencyType()) {
        return new DependencyObjectProvider(descriptor, requestingBeanName);
    }
    else if (javaxInjectProviderClass == descriptor.getDependencyType()) {
        return new Jsr330ProviderFactory().createDependencyProvider(descriptor, requestingBeanName);
    }
    else {
        Object result = getAutowireCandidateResolver().getLazyResolutionProxyIfNecessary(
            descriptor, requestingBeanName);
        if (result == null) {
            /**
				 * 实例化
				 *  */
            result = doResolveDependency(descriptor, requestingBeanName, autowiredBeanNames, typeConverter);
        }
        return result;
    }
}
如果我们的字段类型是这些指定的某个class类型,那么则特殊处理,如果都不是,则else里面进行处理。
我们这里直不是特殊的类型,直接进入doResolveDependency。
org.springframework.beans.factory.support.DefaultListableBeanFactory#doResolveDependency
@Nullable
public Object doResolveDependency(DependencyDescriptor descriptor, @Nullable String beanName,
                                  @Nullable Set<String> autowiredBeanNames, @Nullable TypeConverter typeConverter) throws BeansException {

    .....省略
        if (instanceCandidate instanceof Class) {
            /**
			* 去使用beanFactory.getBean去创建这个属性的Bean
			* */
            instanceCandidate = descriptor.resolveCandidate(autowiredBeanName, type, this);
        }
    .....省略
        return result;
}
finally {
    ConstructorResolver.setCurrentInjectionPoint(previousInjectionPoint);
}
}
上下的代码都根本次的循环依赖没关系,我们重点看这个if里面的。
注意此时的autowiredBeanName为:class2,此时的type为:com.dh.pojo.Class2,此时的this为:BeanFactory。
现在进入descriptor.resolveCandidate方法:
org.springframework.beans.factory.config.DependencyDescriptor#resolveCandidate
public Object resolveCandidate(String beanName, Class<?> requiredType, BeanFactory beanFactory)
			throws BeansException {

    return beanFactory.getBean(beanName);
}
这里可以看到,其实是去beanFactory中调用getBean方法。
到达org.springframework.beans.factory.support.AbstractBeanFactory#doGetBean方法中。
我们这里快速的过去,不去细究这个例如创建的Class2:
到达org.springframework.beans.factory.support.AbstractAutowireCapableBeanFactory#doCreateBean方法中:
protected Object doCreateBean(String beanName, RootBeanDefinition mbd, @Nullable Object[] args)
			throws BeanCreationException {

		。。。。省略
		// Initialize the bean instance.
		Object exposedObject = bean;
		try {
			/* 填充Bean,填充其属性的值 */
			populateBean(beanName, mbd, instanceWrapper);
			/**
			 * 去执行
			 * 	BeanPostProcessor的postProcessBeforeInitialization方法
			 * */
			exposedObject = initializeBean(beanName, exposedObject, mbd);
		}
		catch (Throwable ex) {
			if (ex instanceof BeanCreationException && beanName.equals(((BeanCreationException) ex).getBeanName())) {
				throw (BeanCreationException) ex;
			}
			else {
				throw new BeanCreationException(
						mbd.getResourceDescription(), beanName, "Initialization of bean failed", ex);
			}
		}

		。。。。省略
		return exposedObject;
	}
注意现在这个时候,beanName为class2。
进入populateBean方法后我们再次进入org.springframework.beans.factory.annotation.AutowiredAnnotationBeanPostProcessor#postProcessPropertyValues方法中。
org.springframework.beans.factory.annotation.AutowiredAnnotationBeanPostProcessor#postProcessPropertyValues
public PropertyValues postProcessPropertyValues(
			PropertyValues pvs, PropertyDescriptor[] pds, Object bean, String beanName) throws BeanCreationException {
		/**
		 * 拿到需要注入的字段,这个方法不需要去深究
		 * */
		InjectionMetadata metadata = findAutowiringMetadata(beanName, bean.getClass(), pvs);
		try {
			metadata.inject(bean, beanName, pvs);
		}
		catch (BeanCreationException ex) {
			throw ex;
		}
		catch (Throwable ex) {
			throw new BeanCreationException(beanName, "Injection of autowired dependencies failed", ex);
		}
		return pvs;
	}
再次进入metadata.inject方法,org.springframework.beans.factory.annotation.InjectionMetadata#inject
org.springframework.beans.factory.annotation.InjectionMetadata#inject
public void inject(Object target, @Nullable String beanName, @Nullable PropertyValues pvs) throws Throwable {
		Collection<InjectedElement> checkedElements = this.checkedElements;
		Collection<InjectedElement> elementsToIterate =
				(checkedElements != null ? checkedElements : this.injectedElements);
		if (!elementsToIterate.isEmpty()) {
			for (InjectedElement element : elementsToIterate) {
				if (logger.isDebugEnabled()) {
					logger.debug("Processing injected element of bean '" + beanName + "': " + element);
				}
				/**
				 * 对属性进行注入操作,当前的element是需要被注入的字段,target是原类的实例对象,beanName是bean的名称,是target的类名称
				 * 注意,这个Element为:AutowiredFieldElement
				 * */
				element.inject(target, beanName, pvs);
			}
		}
	}
注意此时的target为Class2,beanName为class2,此时是需要去注入Class2中的class1属性的。
那么此时我们跳跃一下代码,中间的都不是关键,到达org.springframework.beans.factory.support.AbstractBeanFactory#doGetBean中来。
protected <T> T doGetBean(
			String name, @Nullable Class<T> requiredType, @Nullable Object[] args, boolean typeCheckOnly)
			throws BeansException {
		/* 此处需要处理FactoryBean的情况,如果是FactoryBean的话,此处的BeanName为&xxxx,此处需要将&去掉 */
		String beanName = transformedBeanName(name);
		Object bean;

		/*
		* 去当前容器中获取实例化好的Bean,如果bean不为空,则直接返回了,如果为空,则需要去实例化,进入else
		*  */
		// Eagerly check singleton cache for manually registered singletons.
		Object sharedInstance = getSingleton(beanName);
		if (sharedInstance != null && args == null) {
			if (logger.isDebugEnabled()) {
				if (isSingletonCurrentlyInCreation(beanName)) {
					logger.debug("Returning eagerly cached instance of singleton bean '" + beanName +
							"' that is not fully initialized yet - a consequence of a circular reference");
				}
				else {
					logger.debug("Returning cached instance of singleton bean '" + beanName + "'");
				}
			}
			bean = getObjectForBeanInstance(sharedInstance, name, beanName, null);
		}

		....else省略
		return (T) bean;
	}
注意此时的beanName为“class1”,然后注意Object sharedInstance = getSingleton(beanName);中得到的sharedInstance不为空,这里很重要,是解决循环依赖最重要的位置。你如果细心可以发现,在第一次Class1进入doGetBean的时候,这里的getSingleton结果为空,第二次Class2进入doGetBean的时候,这里的getSingleton结果也是空,第三次Class1进入doGetBean的时候,getSingleton结果不是空了。
那么这里可以看到如果sharedInstance不为空的话,就不会进入else,else里面是进行创建bean的代码,if里面的话,就会在后面直接return这个bean。
那么这里我们大概就知道了,来理一下,
1、第一次Class1创建的时候,getSingleton为空那么创建对象。
2、Class1注入Class2,那么Class2这里getSingleton为空,那么则创建对象。
3、Class2注入Class1的时候,这里Class1的getSingleton不为空,那么Class2就成功的注入得到了Class1。
4、当Class2注入完成Class1以后,就回到了Class1注入Class2的位置,这个时候Class1已经成功拿到了Class2,那么就将其注入到Class1自己的属性里面去。
至此循环依赖就解决了。
但是需要注意,当3步的时候,Class1的getSingleton得到的对象中,其属性并未注入完成。

那么就代表这个时候拿到的Class1就是一个未填充完成的对象。
但是这种方式是可以解决循环依赖的问题的。
那么这里我们有一些问题还没有解决:
1、getSingleton为什么能拿到Class1
2、有人可能听说过,是缓存,说白了这个缓存就是一个Map,存放临时的Class1,那么这个Map是哪个呢,临时的Class1是何时存入Map中的呢?
首先我们来看getSingleton方法怎么获取到Class1的:
org.springframework.beans.factory.support.DefaultSingletonBeanRegistry#getSingleton(java.lang.String)
	@Override
	@Nullable
	public Object getSingleton(String beanName) {
		return getSingleton(beanName, true);
	}
再次进入getSingleton方法。
org.springframework.beans.factory.support.DefaultSingletonBeanRegistry#getSingleton(java.lang.String, boolean)
protected Object getSingleton(String beanName, boolean allowEarlyReference) {
    Object singletonObject = this.singletonObjects.get(beanName);
    if (singletonObject == null && isSingletonCurrentlyInCreation(beanName)) {
        synchronized (this.singletonObjects) {
            singletonObject = this.earlySingletonObjects.get(beanName);
            if (singletonObject == null && allowEarlyReference) {
                ObjectFactory<?> singletonFactory = this.singletonFactories.get(beanName);
                if (singletonFactory != null) {
                    singletonObject = singletonFactory.getObject();
                    this.earlySingletonObjects.put(beanName, singletonObject);
                    this.singletonFactories.remove(beanName);
                }
            }
        }
    }
    return singletonObject;
}
首先this.singletonObjects.get(beanName)结果肯定为空,因为这个singletonObjects集合中存放的是已经走过完整生命周期的Bean,很明显我们这里的Class1并没有。
那么下面的这个if会进入,singletonObjects为空这个true我们知道,我们来看看isSingletonCurrentlyInCreation(beanName),注意此时的beanName为class1。
public boolean isSingletonCurrentlyInCreation(String beanName) {
    return this.singletonsCurrentlyInCreation.contains(beanName);
}
注意此时的singletonsCurrentlyInCreation里面的元素为:

这个集合代表着,当前正在创建的对象,此时我们的Class1和Class2在这里面。
那么自然这个if就能进去了。
然后注意看if里面singletonObject = this.earlySingletonObjects.get(beanName);
这个时候获取的仍然是空的。但是下一行中this.singletonFactories.get(beanName)里面就不是空了

这里可以看得到,成功的拿出了Class1这个对象,且里面的class2属性为空的。
那么我们这里就看明白整体了。我这里再描述一遍。
1、创建Class1对象,并将其beanName放置到singletonsCurrentlyInCreation集合中、singletonFactories集合中。
2、注入Class1中的class2,这时需要去创建Class2,并将其Class2的beanName放置到singletonsCurrentlyInCreation集合中、singletonFactories集合中。
3、再对Class2进行注入class1属性,这时getSingleton方法中就能拿到Class1这个对象,那么getSingleton中首先判断当前Class1是否在singletonsCurrentlyInCreation集合中,如果在,那么就从singletonFactories集合中将其取出。
那么我们最后再来看一个东西,看Spring在何时将beanName存放至singletonsCurrentlyInCreation集合中,何时将创建好的对象存放至singletonFactories中。
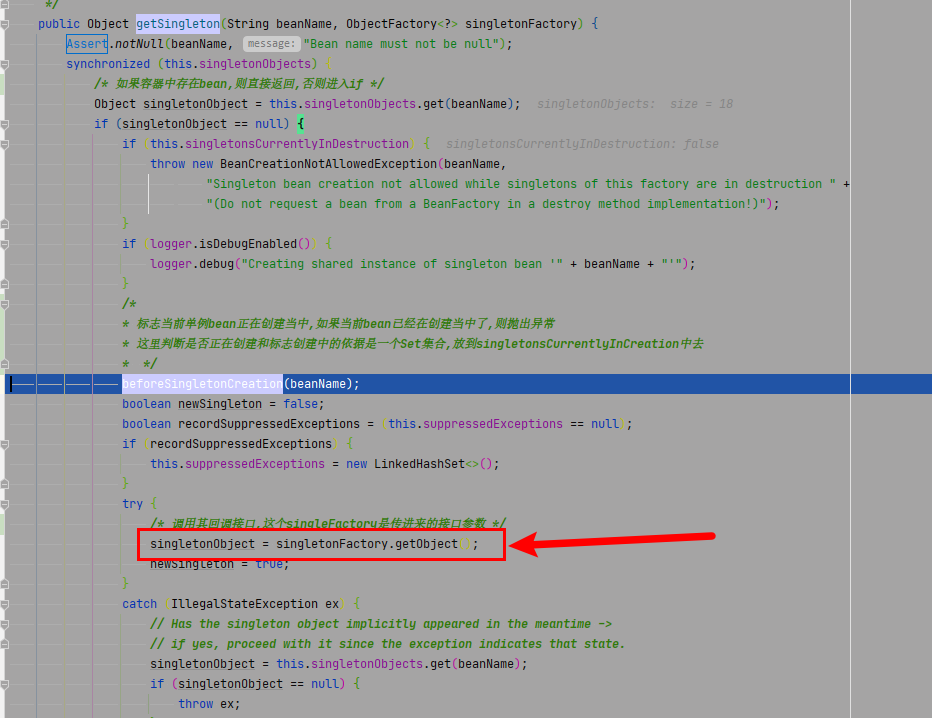
进入到:org.springframework.beans.factory.support.DefaultSingletonBeanRegistry#getSingleton(java.lang.String, org.springframework.beans.factory.ObjectFactory<?>)
org.springframework.beans.factory.support.DefaultSingletonBeanRegistry#getSingleton(java.lang.String, org.springframework.beans.factory.ObjectFactory<?>)

注意看这个方法,beforeSingletonCreation,进入这个方法。
org.springframework.beans.factory.support.DefaultSingletonBeanRegistry#beforeSingletonCreation
protected void beforeSingletonCreation(String beanName) {
    if (!this.inCreationCheckExclusions.contains(beanName) && !this.singletonsCurrentlyInCreation.add(beanName)) {
        throw new BeanCurrentlyInCreationException(beanName);
    }
}
注意看这里将当前的beanName存放至singletonsCurrentlyInCreation集合当中去,这里我们找到了在哪里存放到singletonsCurrentlyInCreation集合中去的。
注意这个getSingleton方法中会去调用doCreateBean方法。

然后我们再来找何时存放至singletonFactories集合中的,注意这个Map的value是一个对象,那么代表是在我们Bean创建完以后才存放至这个集合中的。
进入到org.springframework.beans.factory.support.AbstractAutowireCapableBeanFactory#doCreateBean方法中
org.springframework.beans.factory.support.AbstractAutowireCapableBeanFactory#doCreateBean

protected void addSingletonFactory(String beanName, ObjectFactory<?> singletonFactory) {
    Assert.notNull(singletonFactory, "Singleton factory must not be null");
    synchronized (this.singletonObjects) {
        if (!this.singletonObjects.containsKey(beanName)) {
            this.singletonFactories.put(beanName, singletonFactory);
            this.earlySingletonObjects.remove(beanName);
            this.registeredSingletons.add(beanName);
        }
    }
}
这里的!this.singletonObjects.containsKey(beanName)其实就是当前Bean如果没有走完生命周期的话,就会进入这个IF,因为singletonObjects集合中是存放已经走完生命周期的。
然后下面就是将当前的Bean加入到singletonFactories集合中。
至此,我们循环依赖已经结束,如有不明白的地方,可翻阅随笔中内容,如有其他疑问可留言或评论。