41.1 Nginx部署
| 源码编译 | 官方仓库 | epel仓库 | |
|---|---|---|---|
| 优点 | 规范 | 安装简单 | 安装简单 |
| 便于管理 | 配置易读 | ||
| 缺点 | 安装复杂 | 配置不易读 | |
| 升级繁琐 | |||
| 版本状态 | 版本随意 | 版本较新 | 版本较低 |
| 是否推荐使用 | 企业实际应用多,推荐 | 效率高,优先推荐 | 不推荐 |
1)方式1——官方仓库
步骤1、安装Nginx依赖
yum install -y gcc gcc-c++ autoconf pcre pcre-devel openssl-devel make automake
步骤2、配置官方yum源
[root@web01 ~]# vim /etc/yum.repos.d/nginx.repo
[nginx]
name=nginx repo
baseurl=http://nginx.org/packages/centos/7/$basearch/
gpgcheck=0
enabled=1
步骤3、安装Nginx服务
[root@web01 ~]# yum install nginx -y
步骤4、启动并设置开机自启
[root@web01 ~]# systemctl start nginx
[root@web01 ~]# systemctl enable nginx
Created symlink from /etc/systemd/system/multi-user.target.wants/nginx.service to /usr/lib/systemd/system/nginx.service.
PS:启动报错:

需要输入 journalctl -xe 或者 systemctl status nginx.service,此处输入journalctl -xe。
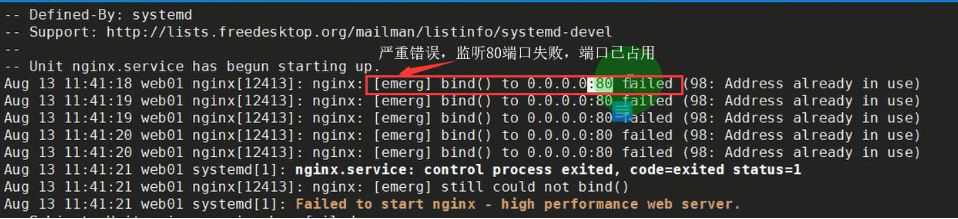
问题根源:80端口被占用,一台服务器上不能端口冲突,端口是唯一的。
解决方法:谁占用的,干掉谁。停止占用80端口的服务————systemctl stop httpd,然后再开启nginx服务————systemctl start nginxs
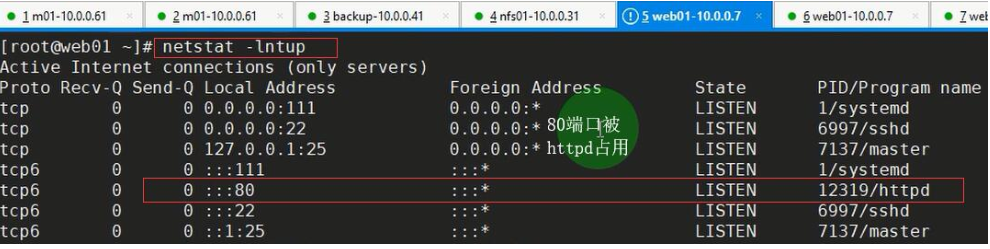
使用命令netstat -lntup————查看端口状况
[root@web01 ~]# netstat -lntup
Active Internet connections (only servers)
Proto Recv-Q Send-Q Local Address Foreign Address State PID/Program name
tcp 0 0 0.0.0.0:80 0.0.0.0:* LISTEN 8092/nginx: master
tcp 0 0 0.0.0.0:22 0.0.0.0:* LISTEN 6722/sshd
tcp 0 0 127.0.0.1:25 0.0.0.0:* LISTEN 6804/master
步骤5、检测nginx是否启动成功
1)方法一:监测进程
[root@web01 ~]# ps -ef|grep [n]ginx
root 12457 1 0 11:44 ? 00:00:00 nginx: master process /usr/sbin/nginx -c /etc/nginx/nginx.conf
nginx 12458 12457 0 11:44 ? 00:00:00 nginx: worker process
2)方法二:如果遇到僵尸进程,可以使用此方法————监测端口
[root@web01 ~]# netstat -lntup|grep 80
tcp 0 0 0.0.0.0:80 0.0.0.0:* LISTEN 12457/nginx: master
3)方法三:systemd
[root@web01 ~]# systemctl status nginx
● nginx.service - nginx - high performance web server
Loaded: loaded (/usr/lib/systemd/system/nginx.service; enabled; vendor preset: disabled)
Active: active (running) since Tue 2019-08-13 11:44:03 CST; 8min ago
Docs: http://nginx.org/en/docs/
Process: 12456 ExecStart=/usr/sbin/nginx -c /etc/nginx/nginx.conf (code=exited, status=0/SUCCESS)
Main PID: 12457 (nginx)
CGroup: /system.slice/nginx.service
├─12457 nginx: master process /usr/sbin/nginx -c /etc/nginx/nginx.conf
└─12458 nginx: worker process
4)方法四:curl命令
[root@web01 ~]# curl 10.0.0.7
[root@web01 ~]# curl www.driverzeng.com
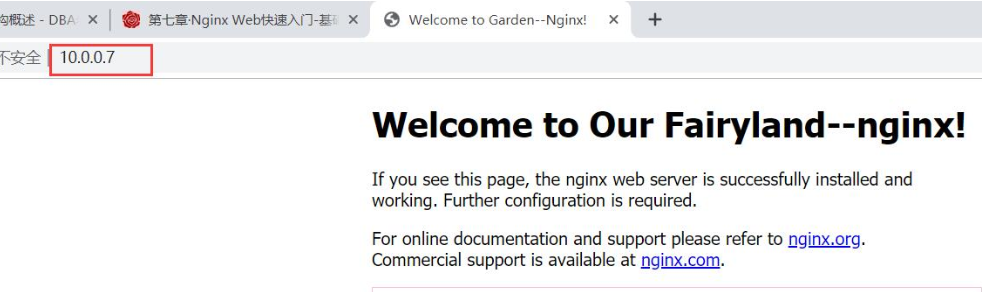
5)方法五:打开浏览器访问,输入10.0.0.7
2)方式2——源码编译
#此处V为大写字母V
[root@web01 ~]# nginx -V
步骤一、基础环境准备
[root@web02 ~]# yum install -y gcc make wget
步骤二、下载源码包
[root@web02 ~]# wget http://nginx.org/download/nginx-1.16.0.tar.gz
步骤三、解压源码包,并进入相应目录
[root@web02 ~]# tar xf nginx-1.16.0.tar.gz
[root@web02 ~]# ll
total 1020
-rw-------. 1 root root 1445 Jul 24 09:43 anaconda-ks.cfg
-rw-r--r--. 1 root root 473 Jul 24 10:52 host_ip.sh
drwxr-xr-x 8 1001 1001 158 Apr 23 21:13 nginx-1.16.0
-rw-r--r-- 1 root root 1032345 Apr 23 21:58 nginx-1.16.0.tar.gz
[root@web02 ~]# cd nginx-1.16.0
步骤四、配置相关的选项,并生成Makefile,按系统提示补安装相应的依赖
[root@web02 nginx-1.16.0]# ./configure --prefix=/etc/nginx --sbin-path=/usr/sbin/nginx --modules-path=/usr/lib64/nginx/modules --conf-path=/etc/nginx/nginx.conf --error-log-path=/var/log/nginx/error.log --http-log-path=/var/log/nginx/access.log --pid-path=/var/run/nginx.pid --lock-path=/var/run/nginx.lock --http-client-body-temp-path=/var/cache/nginx/client_temp --http-proxy-temp-path=/var/cache/nginx/proxy_temp --http-fastcgi-temp-path=/var/cache/nginx/fastcgi_temp --http-uwsgi-temp-path=/var/cache/nginx/uwsgi_temp --http-scgi-temp-path=/var/cache/nginx/scgi_temp --user=nginx --group=nginx --with-compat --with-file-aio --with-threads --with-http_addition_module --with-http_auth_request_module --with-http_dav_module --with-http_flv_module --with-http_gunzip_module --with-http_gzip_static_module --with-http_mp4_module --with-http_random_index_module --with-http_realip_module --with-http_secure_link_module --with-http_slice_module --with-http_ssl_module --with-http_stub_status_module --with-http_sub_module --with-http_v2_module --with-mail --with-mail_ssl_module --with-stream --with-stream_realip_module --with-stream_ssl_module --with-stream_ssl_preread_module --with-cc-opt='-O2 -g -pipe -Wall -Wp,-D_FORTIFY_SOURCE=2 -fexceptions -fstack-protector-strong --param=ssp-buffer-size=4 -grecord-gcc-switches -m64 -mtune=generic -fPIC' --with-ld-opt='-Wl,-z,relro -Wl,-z,now -pie'
#提示要安装依赖之一——PCRE
./configure: error: the HTTP rewrite module requires the PCRE library.
#安装pcre
[root@web02 nginx-1.16.0]# yum install -y pcre-devel
重复执行
[root@web02 nginx-1.16.0]# ./configure --prefix=/etc/nginx --sbin-path=/usr/sbin/nginx --modules-path=/usr/lib64/nginx/modules --conf-path=/etc/nginx/nginx.conf --error-log-path=/var/log/nginx/error.log --http-log-path=/var/log/nginx/access.log --pid-path=/var/run/nginx.pid --lock-path=/var/run/nginx.lock --http-client-body-temp-path=/var/cache/nginx/client_temp --http-proxy-temp-path=/var/cache/nginx/proxy_temp --http-fastcgi-temp-path=/var/cache/nginx/fastcgi_temp --http-uwsgi-temp-path=/var/cache/nginx/uwsgi_temp --http-scgi-temp-path=/var/cache/nginx/scgi_temp --user=nginx --group=nginx --with-compat --with-file-aio --with-threads --with-http_addition_module --with-http_auth_request_module --with-http_dav_module --with-http_flv_module --with-http_gunzip_module --with-http_gzip_static_module --with-http_mp4_module --with-http_random_index_module --with-http_realip_module --with-http_secure_link_module --with-http_slice_module --with-http_ssl_module --with-http_stub_status_module --with-http_sub_module --with-http_v2_module --with-mail --with-mail_ssl_module --with-stream --with-stream_realip_module --with-stream_ssl_module --with-stream_ssl_preread_module --with-cc-opt='-O2 -g -pipe -Wall -Wp,-D_FORTIFY_SOURCE=2 -fexceptions -fstack-protector-strong --param=ssp-buffer-size=4 -grecord-gcc-switches -m64 -mtune=generic -fPIC' --with-ld-opt='-Wl,-z,relro -Wl,-z,now -pie'
#提示要安装依赖之一——OpenSSL
./configure: error: SSL modules require the OpenSSL library.
#安装openssl
[root@web02 nginx-1.16.0]# yum install -y openssl-devel
重复执行
[root@web02 nginx-1.16.0]# ./configure --prefix=/etc/nginx --sbin-path=/usr/sbin/nginx --modules-path=/usr/lib64/nginx/modules --conf-path=/etc/nginx/nginx.conf --error-log-path=/var/log/nginx/error.log --http-log-path=/var/log/nginx/access.log --pid-path=/var/run/nginx.pid --lock-path=/var/run/nginx.lock --http-client-body-temp-path=/var/cache/nginx/client_temp --http-proxy-temp-path=/var/cache/nginx/proxy_temp --http-fastcgi-temp-path=/var/cache/nginx/fastcgi_temp --http-uwsgi-temp-path=/var/cache/nginx/uwsgi_temp --http-scgi-temp-path=/var/cache/nginx/scgi_temp --user=nginx --group=nginx --with-compat --with-file-aio --with-threads --with-http_addition_module --with-http_auth_request_module --with-http_dav_module --with-http_flv_module --with-http_gunzip_module --with-http_gzip_static_module --with-http_mp4_module --with-http_random_index_module --with-http_realip_module --with-http_secure_link_module --with-http_slice_module --with-http_ssl_module --with-http_stub_status_module --with-http_sub_module --with-http_v2_module --with-mail --with-mail_ssl_module --with-stream --with-stream_realip_module --with-stream_ssl_module --with-stream_ssl_preread_module --with-cc-opt='-O2 -g -pipe -Wall -Wp,-D_FORTIFY_SOURCE=2 -fexceptions -fstack-protector-strong --param=ssp-buffer-size=4 -grecord-gcc-switches -m64 -mtune=generic -fPIC' --with-ld-opt='-Wl,-z,relro -Wl,-z,now -pie'
#验证命令是否成功,非0都不算成功
[root@web02 nginx-1.16.0]# echo $?
0
步骤五、编译并安装
[root@web02 nginx-1.16.0]# make
[root@web02 nginx-1.16.0]# make install
#验证命令是否成功,非0都不算成功
[root@web02 nginx-1.16.0]# echo $?
0
#Nginx编译的时候指定了用户组和用户,但是系统中并没有这个用户导致的问题
[root@web02 nginx-1.16.0]# /usr/sbin/nginx
nginx: [emerg] getpwnam("nginx") failed
#创建用户nginx
[root@web02 nginx-1.16.0]# id nginx
id: nginx: no such user
[root@web02 nginx-1.16.0]# useradd nginx
#创建目录/var/cache/nginx/client_temp
[root@web02 nginx-1.16.0]# /usr/sbin/nginx
nginx: [emerg] mkdir() "/var/cache/nginx/client_temp" failed (2: No such file or directory)
[root@web02 nginx-1.16.0]# mkdir -p /var/cache/nginx/client_temp
[root@web02 nginx-1.16.0]# /usr/sbin/nginx
#检测nginx源码安装是否成功
[root@web02 nginx-1.16.0]# netstat -lntup |grep 80
tcp 0 0 0.0.0.0:80 0.0.0.0:* LISTEN 14385/nginx: master
[root@web02 nginx-1.16.0]# ps -ef |grep nginx
root 14385 1 0 17:23 ? 00:00:00 nginx: master process /usr/sbin/nginx
nginx 14386 14385 0 17:23 ? 00:00:00 nginx: worker process
root 14390 7922 0 17:24 pts/0 00:00:00 grep --color=auto nginx
41.1.2 查看Nginx的版本
[root@web01 ~]# nginx -v
nginx version: nginx/1.16.0
41.3 在Nginx首页添加滚动效果代码块
步骤1、查询到index.html路径
[root@web01 ~]# rpm -ql nginx
步骤2、vim 编辑index.html文件,进入index.html文件
[root@web01 ~]# vim /usr/share/nginx/html/index.html
#处理乱码问题
<meta http-equiv="Content-Type" content="text/html"; charset="utf-8">
#滚动效果的代码
<html>
<head>
<body>
<meta http-equiv="Content-Type" content="text/html"; charset="utf-8">
<div style="">
<marquee border="0" class="float-content-title-left-up" onmouseout="this.start();" onmouseover="this.stop();" direction="up" scrolldelay="50" style="border:1px solid pink; height: 500px;">
<center><h1><font color='black'>讲师自我介绍</font></h1></center>
<b><p>
<font color='red'>
曾老湿, 江湖人称曾老大。
</font>
<br>
<br><font color='orange'>
联系方式QQ:133411023、253097001
</font>
<br>
<br><font color='yellow'>
交流群:198571640
</font>
<br>
<br><font color='green'>
微信:z133411023
</font>
<br>
<br><font color='red'>
多年互联网运维工作经验,曾负责过大规模集群架构自动化运维管理工作。
</font>
<br>
<br><font color='orange'>
擅长Web集群架构与自动化运维,曾负责国内某大型金融公司运维工作。
</font>
<br>
<br><font color='yellow'>---------------------------------------------------------------------------</font>
<br>
<br><font color='green'>
devops项目经理兼DBA。
开发过一套自动化运维平台(功能如下)
</font>
<br>
<br><font color='red'>
1)整合了各个公有云API,自主创建云主机
</font>
<br>
<br><font color='orange'>
2)ELK自动化收集日志功能。
</font>
<br>
<br><font color='yellow'>
3)Saltstack自动化运维统一配置管理工具。
</font>
<br>
<br><font color='green'>
4)Git、Jenkins自动化代码上线及自动化测试平台。
</font>
<br>
<br><font color='red'>
5)堡垒机,连接Linux、Windows平台及日志审计。
</font>
<br>
<br><font color='orange'>
6)SQL执行及审批流程。
</font>
<br>
<br><font color='yellow'>
7)慢查询日志分析web界面。
</font>
<br>
</p></b>
</marquee>
</div>
<script>
var titleCtx = document.querySelector('.float-content-title-left-up');
document.onscroll = function() {
// t是上滚距离
var t = document.documentElement.scrollTop || document.body.scrollTop;
window.console.log(t)
// 开始变化的节点
if (t > 500) {
titleCtx.style.marginTop = t - 500 + 'px'
} else {
titleCtx.style.marginTop = '0px'
}
}
</script>
</body>
</head>
</html>
41.4 状态码
状态码(status-code)是响应报文状态行中包含的一个3位数字,指明特定的请求是否被满足,如果没有满足,原因是什么。状态码分为以下五类:
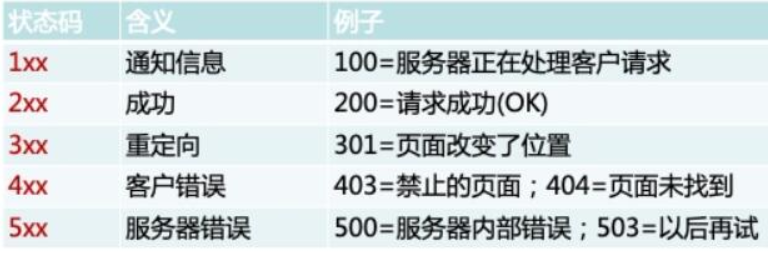
状态码非常重要,需要牢记所有的状态码,状态码200、304、403、404等等。
/var/log/httpd/access_log
1)状态码200————成功

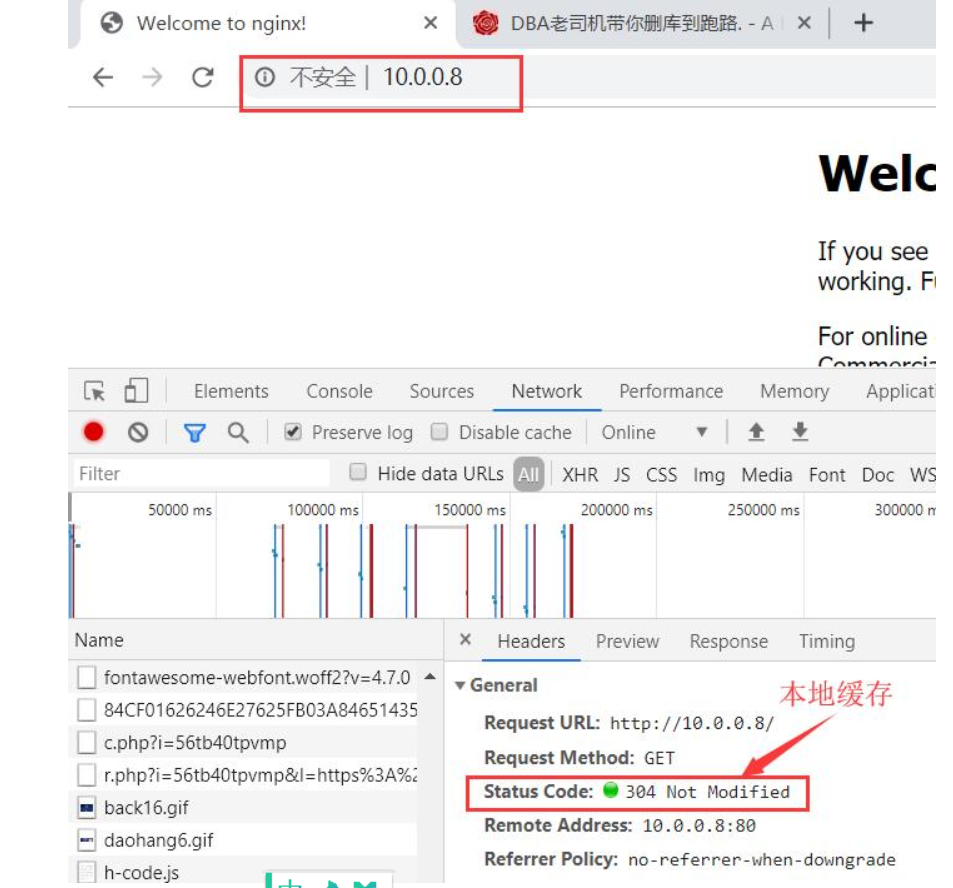
2)状态码304————本地缓存
多刷几遍,刷新页面,可以看到
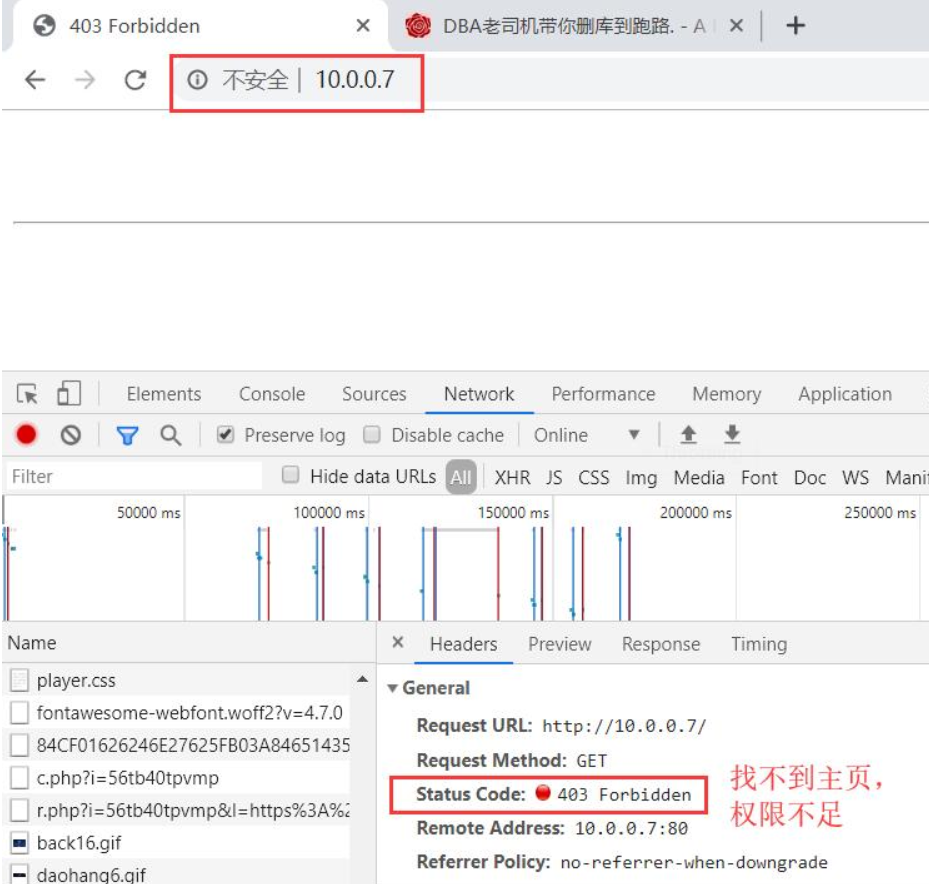
3)状态码403————找不到主页,权限不足
[root@web01 ~]# cd /usr/share/nginx/html
[root@web01 html]# ll
total 8
-rw-r--r-- 1 root root 494 Apr 23 22:36 50x.html
-rw-r--r-- 1 root root 2778 Aug 13 16:36 index.html
#备份index.html
[root@web01 html]# cp index.html index.html.bak
[root@web01 html]# ll
total 12
-rw-r--r-- 1 root root 494 Apr 23 22:36 50x.html
-rw-r--r-- 1 root root 2778 Aug 13 16:36 index.html
-rw-r--r-- 1 root root 2778 Aug 13 18:05 index.html.bak
#将index.html改成inde.html
[root@web01 html]# mv index.html inde.html
[root@web01 html]# ll
total 12
-rw-r--r-- 1 root root 494 Apr 23 22:36 50x.html
-rw-r--r-- 1 root root 2778 Aug 13 16:36 inde.html
-rw-r--r-- 1 root root 2778 Aug 13 18:05 index.html.bak
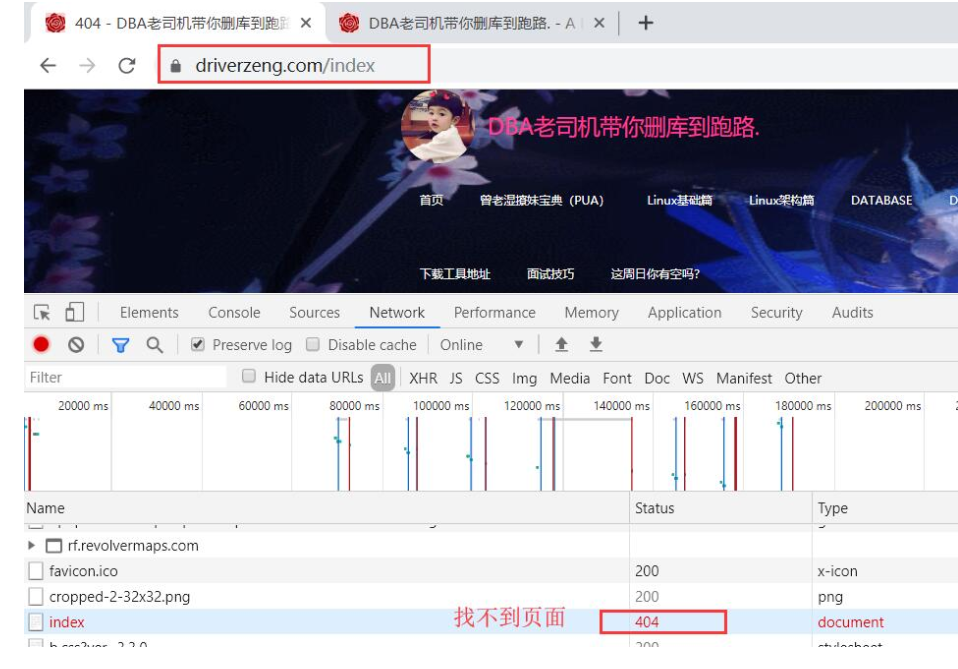
4)状态码404————找不到页面
10.0.0.8/index
| 状态码 | 含义 |
|---|---|
| 200 | 成功 |
| 301 | 永久重定向(跳转) |
| 302 | 临时重定向(跳转) |
| 304 | 本地缓存 |
| 307 | 内部重定向(跳转) |
| 400 | 客户端错误 |
| 401 | 认证失败 |
| 403 | 找不到主页,权限不足 |
| 404 | 找不到页面 |
| 500 | 内部错误 |
| 502 | 找不到后端主机 |
| 503 | 服务器过载 |
| 504 | 后端主机超时 |