前言
Makefile对于从来没有接触过的人来说是相当别扭的(比如我),但它确实又是非常重要的,它描述了一个Image是如何形成的,理解它也许并不能帮我解决实际问题,而且编写Makefile的工作也许根本不需要我们来做,但是,学习它能给我们一个更广阔的视角,说不定就能为某些难题、bug提供解决思路。这篇文章也只是对Makefile的初探,待到对Makefile有更深刻的理解之后,我会对这篇文章进行更新~
Tips
- 在查看Makefile源码之前最好熟悉gas常用的命令参数
as A B
A
-ac:忽略失败条件;
-ad:忽略调试指令;
-ah:包括高级源;
-al:包括装配;
-am:包括宏扩展;
-an:忽略形式处理;
-as:包括符号;
=file:设置列出文件的名字;
--alternate:以交互宏模式开始;
-f:跳过空白和注释预处理;
-g:产生调试信息;
-J:对于有符号溢出不显示警告信息;
-L:在符号表中保留本地符号;
-o:指定要生成的目标文件;
--statistics:打印汇编所用的最大空间和总时间。
B
指定要汇编的源文件。
- 在查看Makefile源码之前最好熟悉gcc常用的命令参数
-ansi	只支持 ANSI 标准的 C 语法。这一选项将禁止 GNU C 的某些特色, 例如 asm 或 typeof 关键词。
-c 	只编译并生成目标文件。
-DMACRO	以字符串"1"定义 MACRO 宏。
-DMACRO=DEFN	以字符串"DEFN"定义 MACRO 宏。
-E 	只运行 C 预编译器。
-g 	生成调试信息。GNU 调试器可利用该信息。
-IDIRECTORY 	指定额外的头文件搜索路径DIRECTORY。
-LDIRECTORY	指定额外的函数库搜索路径DIRECTORY。
-lLIBRARY 	连接时搜索指定的函数库LIBRARY。
-m486 	针对 486 进行代码优化。
-o FILE 	生成指定的输出文件。用在生成可执行文件时。
-O0 	不进行优化处理。
-O 或 -O1 	优化生成代码。
-O2 	进一步优化。
-O3 	比 -O2 更进一步优化,包括 inline 函数。
-shared 	生成共享目标文件。通常用在建立共享库时。
-static 	禁止使用共享连接。
-UMACRO	取消对 MACRO 宏的定义。
-w 	不生成任何警告信息。
-Wall 	生成所有警告信息。
-
在查看Makefile之前最好熟悉gld连接器常用命令参数。(不列出)
-
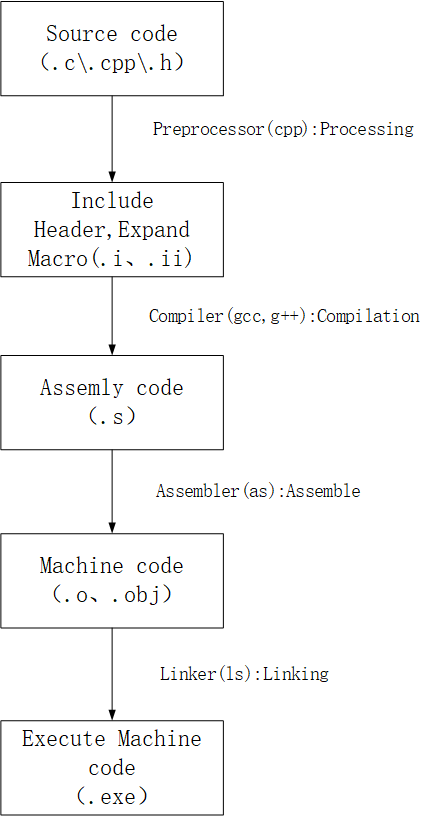
你需要知道简单的编译和链接知识,比如:
-
Makefile关于文件树描述的基本格式是这样的:
A:B
	xxx
#A代表目标
#B代表该A依赖的其他目标
#xxx代表产生A的命令
Makefile源码走读
该源码为中国大学MOOC(慕课)下的操作系统课程(哈尔滨工业大学,李治军主讲)中的实验所给的Linux0.11源码中的Makefile(该课程非常好,建议大家可以学习一下)。该源码和《Linux内核完全注释》(赵炯,非常好的书,可作为备查手册)中所示的Linux0.11的Makefile有些许不同,这里以MOOC的Makefile源码进行注释。
#
# if you want the ram-disk device, define this to be the
# size in blocks.
#
#如果你要使用RAM盘设备,就定义块的大小
RAMDISK = #-DRAMDISK=512
#定义了1个标识符,as86是16位汇编命令,-0 生成8086目标程序,-a 生成与gas和gld部分兼容的代码。
#AS86是一个能汇编16位8086汇编代码的命令,因为IBM PC(Linux0.11的宿主)一上电时会首先执行在16位模式(实模式)下,在setup模块执行完以后才会切换到32位模式(保护模式),因此bootsect.s和setup.s这两个程序都必须用16位的汇编来编写,所以需要用AS86来汇编,LD86来链接。
AS86 =as86 -0 -a
#-0 表示链接8086目标程序
LD86 =ld86 -0
#gas(as)即GNU AS汇编器,32位,其属于AT&T风格,我们常用的GNU的产品还有GCC/G++
#nasm是linux平台下常用的汇编器,是intel风格的汇编器
#masm是windows平台下的汇编器,也使用intel风格,我们学的8086汇编时使用的就是masm汇编器
AS =as
#gld(ld)是GNU的连接器
LD =ld
#LDFLAGS是gld运行时用到的选项。
#-m elf_i386 表示模拟器是elf_i386
#-Ttext 0 表示把0作为 输出文件 的段起始地址
#-e startup_32 表示把startup_32作为程序执行的开始端
LDFLAGS =-m elf_i386 -Ttext 0 -e startup_32
#gcc是GNU C程序编译器
#-march xxx表示机器位数,i386是Intel 80386,是32位处理器。对UNIX类的脚本语言而言,在引用定义的标识符时,格式为$(xxx)
CC =gcc-3.4 -march=i386 $(RAMDISK)
#CFLAGS表示C编译器的选项
#-32 表示生成32位机器的汇编代码
#-g 表示在可执行程序中包含标准调试信息
#-Wall 表示打印所有警告信息
#-O2 表示控制优化代码的生成,2代表一个级别,相比于O1有额外调整工作,如处理器指令调度
#-fomit-frame-pointer不晓得= =
CFLAGS =-m32 -g -Wall -O2 -fomit-frame-pointer
#cpp是gcc的预处理程序
#-nostdinc -Iinclude 表示不要搜索标准目录中的头文件,而是使用-I选项指定目录或在当前目录中搜索头文件
CPP =cpp -nostdinc -Iinclude
#
# ROOT_DEV specifies the default root-device when making the image.
# This can be either FLOPPY, /dev/xxxx or empty, in which case the
# default of /dev/hd6 is used by 'build'.
#
#ROOT_DEV指定在创建内核映像image文件时默认根文件系统所在的设备,这可以是软盘(FLOPPY)、/dev/xxx或空着。
#空着时使用build程序的默认值/dev/hd6
ROOT_DEV= #FLOPPY
#kernel、mm和fs目录所产生的目标代码文件,为方便引用,用ARCHIVES标识符表示。
#分别表示操作系统中的进程管理、内存管理和文件系统的目标文件。
ARCHIVES =kernel/kernel.o mm/mm.o fs/fs.o
#同理,DRIVERS表示块和字符设备库文件,.a表示该文件是个归档文件,即包含很多可执行二进制代码子程序的集合的库文件,通常由ar程序生成。ar是GNU的二进制文件处理程序,用于创建、修改以及从归档文件中抽取文件。
DRIVERS =kernel/blk_drv/blk_drv.a kernel/chr_drv/chr_drv.a
#数学运算库文件
MATH =kernel/math/math.a
#由lib/目录中的文件所编译生成的通用库文件
LIBS =lib/lib.a
#make老式的隐式后缀规则,表示 make利用下面命令将所有的.c文件编译成.s汇编程序。
.c.s:
#表示gcc采用CFLAGS、nostdinc、Iinclude等规则
#-S 表示只产生汇编文件就停止
#$*.s(或$@)是自动目标变量,$<代表第一个先决条件,这里是符合条件*.c的文件
$(CC) $(CFLAGS)
-nostdinc -Iinclude -S -o $*.s $<
#表示 将所有.s文件编译成.o目标文件
.s.o:
	$(AS)  -o $*.o $<
#.c -> .o
.c.o:
$(CC) $(CFLAGS)
-nostdinc -Iinclude -c -o $*.o $<
#all由Image产生,这里显而易见all是文件树的最顶层
all: Image
#Image由bootsect、setup、system、build4个文件产生
Image: boot/bootsect boot/setup tools/system tools/build
#用system覆盖system.tmp而且不给出提示
cp -f tools/system system.tmp
#去掉system.tmp中的空格
strip system.tmp
#把system.tmp按照指定方式拷贝到kernel中
#-O xxx 表示指定输出文件的BFD名
#-R xxx 表示从文件中去除掉由xxx指定的section
objcopy -O binary -R .note -R .comment system.tmp tools/kernel
#使用build,将bootsect、setup、kernel以ROOT_DEV为根文件系统设备组成Image
tools/build boot/bootsect boot/setup tools/kernel $(ROOT_DEV) > Image
#删除
rm system.tmp
#-f 表示不提示用户
rm tools/kernel -f
sync
#disk由Image产生
disk: Image
#dd 表示根据选项复制一个文件
#bs=8192 表示1次8192字节
#if=Image 表示源文件为Image
#of=/dev/fd0 表示目标文件/dev/fd0(指第1个软盘驱动器)
dd bs=8192 if=Image of=/dev/fd0
#BootImage由bootsect、setup、build产生
BootImage: boot/bootsect boot/setup tools/build
#使用build,将bootsect、setup以ROOT_DEV为根文件系统设备组成Image
tools/build boot/bootsect boot/setup none $(ROOT_DEV) > Image
sync
#执行程序build由build.c产生
tools/build: tools/build.c
#通过build.c生成build,具体后面再说。
gcc $(CFLAGS)
-o tools/build tools/build.c
#head.o由head.s产生
boot/head.o: boot/head.s
#使用gcc-3.4
#-32 表示生成32位机器的汇编代码
#-g 表示生成调试信息
#-l./include 表示连接时搜索指定的函数库./include
#-traditional 表示
#-c 表示只编译生成目标文件boot/head.s
gcc-3.4 -m32 -g -I./include -traditional -c boot/head.s
#如果没有写生成途径,就用上面的隐式规则,这里生成boot/head.o的隐式规则为
#.s.o,即 $(AS) -o $*.o $<,即gas -o boot/head.o boot/head.s
#即用GNU汇编命令gas完成对head.s的汇编,所以head.s是一个GNU 32位汇编程序,因为运行head的时候机器已经进入保护模式了
#把head.o移动到boot/
mv head.o boot/
#system由head.o、main.o、$(ARCHIVES)、$(DRIVERS)、$(MATH)、$(LIBS)生成
tools/system: boot/head.o init/main.o
$(ARCHIVES) $(DRIVERS) $(MATH) $(LIBS)
#$(LD)把$(LDFLAGS)作为参数,用head.o、main.o、$(ARCHIVES)、$(DRIVERS)、$(MATH)、$(LIBS)生成system
$(LD) $(LDFLAGS) boot/head.o init/main.o
$(ARCHIVES)
$(DRIVERS)
$(MATH)
$(LIBS)
-o tools/system
#nm 表示列出.o文件、可执行文件、静态库和动态库的函数名
#grep -v 表示只打印没有匹配后面通配符的
#| 表示通过管道操作传递给sort
#sort 表示将要打印的函数名排序,默认按照ASCII码
#> System.map 表示gld需要将连接映像重定向保存在System.map文件中
nm tools/system | grep -v '(compiled)|(.o$$)|( [aU] )|(..ng$$)|(LASH[RL]DI)'| sort > System.map
#FORCE 表示math.a每次要重新生成,而生成的方式为(cd kernel/math; make),即kernel/目录下还有Makefile指导编译
kernel/math/math.a: FORCE
(cd kernel/math; make)
#同上
kernel/blk_drv/blk_drv.a: FORCE
(cd kernel/blk_drv; make)
#同上
kernel/chr_drv/chr_drv.a: FORCE
(cd kernel/chr_drv; make)
#同上
kernel/kernel.o: FORCE
(cd kernel; make)
#同上
mm/mm.o: FORCE
(cd mm; make)
#同上
fs/fs.o: FORCE
(cd fs; make)
#同上
lib/lib.a: FORCE
(cd lib; make)
#setup由setup.s生成
boot/setup: boot/setup.s
	#用$(AS86)编译setup.s为setup.o,-o 表示生成的目标文件
	$(AS86) -o boot/setup.o boot/setup.s
	#用(LD86)链接setup.o为setup
	$(LD86) -s -o boot/setup boot/setup.o
#bootsect由bootsect.s生成
boot/bootsect: boot/bootsect.s
$(AS86) -o boot/bootsect.o boot/bootsect.s
$(LD86) -s -o boot/bootsect boot/bootsect.o
#tmp.s由bootsect.s、system生成
tmp.s: boot/bootsect.s tools/system
#大意是利用ls对system文件进行长列表显示,用grep取得列表行上文件字节数字段信息,并定向保存在tmp.s
(echo -n "SYSSIZE = (";ls -l tools/system | grep system
| cut -c25-31 | tr '�12' ' '; echo "+ 15 ) / 16") > tmp.s
#将bootsect.s输出到tmp.s
cat boot/bootsect.s >> tmp.s
#make clean时执行的动作
clean:
#-f 表示忽略不存在的文件,并且不显示删除信息
rm -f Image System.map tmp_make core boot/bootsect boot/setup
rm -f init/*.o tools/system tools/build boot/*.o
#进入不同目录make clean
(cd mm;make clean)
(cd fs;make clean)
(cd kernel;make clean)
(cd lib;make clean)
#执行backup先执行上面的clean
backup: clean
#退到上一级,对linux/目录执行tar归档,最后压缩成backup.Z
(cd .. ; tar cf - linux | compress16 - > backup.Z)
sync
dep:
#使用字符串编辑程序sed对Makefile文件进行处理,输出为删除Makefile文件中'### Dependencies'行后面的所有行,并生成tmp_make临时文件
sed '/### Dependencies/q' < Makefile > tmp_make
#对init/目录下的每一个C文件执行gcc预处理操作,对于每一个源文件,预处理程序输出一个make规则
#最后把预处理结果都添加到临时文件tmp_make中
(for i in init/*.c;do echo -n "init/";$(CPP) -M $$i;done) >> tmp_make
#并将该临时文件复制成新的Makefile
cp tmp_make Makefile
(cd fs; make dep)
(cd kernel; make dep)
(cd mm; make dep)
# Force make run into subdirectories even no changes on source
FORCE:
### Dependencies:
init/main.o: init/main.c include/unistd.h include/sys/stat.h
include/sys/types.h include/sys/times.h include/sys/utsname.h
include/utime.h include/time.h include/linux/tty.h include/termios.h
include/linux/sched.h include/linux/head.h include/linux/fs.h
include/linux/mm.h include/signal.h include/asm/system.h
include/asm/io.h include/stddef.h include/stdarg.h include/fcntl.h
纵观整个MakeFile文件,它的结构主要由以下几部分组成:
- 标识符。
定义了一些常用的指令、指令参数、文件路径。和C语言里面的宏类似。
AS86 =as86 -0 -a
- 文件生成隐式规则
定义了文件生成的隐式规则,在没有显式规则的情况下使用该规则。
.s.o:
$(AS) -o $*.o $<
- 文件生成显式规则
定义了文件生成的显式规则。
boot/setup: boot/setup.s
#用$(AS86)编译setup.s为setup.o,-o 表示生成的目标文件
$(AS86) -o boot/setup.o boot/setup.s
#用(LD86)链接setup.o为setup
$(LD86) -s -o boot/setup boot/setup.o
build.c
由上面的分析我们可以知道Image形成的关键语句为
Image: boot/bootsect boot/setup tools/system tools/build
	tools/build boot/bootsect boot/setup tools/kernel $(ROOT_DEV) > Image
即Image依赖build将三个文件组织到一起。tools/build形成的语句是
tools/build: tools/build.c
	gcc $(CFLAGS)
	-o tools/build tools/build.c
tools/build可执行文件由tools/build.c通过gcc编译、".s.o"汇编而来。通过查阅资料和源码,我们知道build.c的主要功能是将对应文件读入并按照适当的方式拼接在仪器输出到屏幕上,加上重定向将输出到屏幕上的内容再全部写到了文件Image中。那么我们来看一下build.c的源码(依然是MOOC上的实验课的源码,有些许改动)。
/*
* linux/tools/build.c
*
* (C) 1991 Linus Torvalds
*/
// 1991年- - 666
/*
* This file builds a disk-image from three different files:
*
* - bootsect: max 510 bytes of 8086 machine code, loads the rest
* - setup: max 4 sectors of 8086 machine code, sets up system parm
* - system: 80386 code for actual system
*
* It does some checking that all files are of the correct type, and
* just writes the result to stdout, removing headers and padding to
* the right amount. It also writes some system data to stderr.
*/
//该程序从三个不同的程序中创建磁盘映像文件
//- bootsect:最长为510字节的8086机器码,用于加载其他程序。
//- setup:最大为4个扇区的8086机器码,用于设置系统参数
//- system:实际系统的8086机器码。
//该程序检查所有文件的类型是否正确,将检查结果在标准输出上显示,删除头部并扩充到正确长度。也会写一些系统数据到stderr
/*
* Changes by tytso to allow root device specification
*/
//使用其中的fprintf()
#include <stdio.h> /* fprintf */
//字符串操作
#include <string.h>
//含有exit()
#include <stdlib.h> /* contains exit */
//unistd.h需要使用
#include <sys/types.h> /* unistd.h needs this */
//文件状态信息结构
#include <sys/stat.h>
//文件系统
#include <linux/fs.h>
//含有read()/write()
#include <unistd.h> /* contains read/write */
//文件操作模式符号参数
#include <fcntl.h>
/*
* Changes by falcon<zhangjinw@gmail.com> to define MAJOR and MINOR for they
* are not defined in current linux header file linux/fs.h,I copy it from
* include/linux/fs.h directly.
*/
//falcon<zhangjinw@gmail.com>所做的修改
//找到高8位
#ifndef MAJOR
#define MAJOR(a) (((unsigned)(a))>>8)
#endif
//低8位
#ifndef MINOR
#define MINOR(a) ((a)&0xff)
#endif
//MINIX二进制模块头部长度为32B
#define MINIX_HEADER 32
//GCC头部信息长度为1024B
#define GCC_HEADER 1024
//system文件最长字节数,被falcon<zhangjinw@gmail.com>修改
#define SYS_SIZE 0x3000
/*
* Changes by falcon<zhangjinw@gmail.com> to let this kernel Image file boot
* with a root image file on the first hardware device /dev/hd1, hence, you
* should prepare a root image file, and configure the bochs with
* the following lines(please set the ... as suitable info):
* ...
* floppya: 1_44="Image", status=inserted
* ata0-master: type=disk, path="/path/to/rootimage.img", mode=flat ...
* ...
*/
//默认根设备主设备号 - 3(硬盘)
#define DEFAULT_MAJOR_ROOT 3
//默认根设备次设备号 - 1
#define DEFAULT_MINOR_ROOT 1
//下面指定setup模块占的最大扇区数:不要改变该值,除非也改变bootsect等相应文件
/* max nr of sectors of setup: don't change unless you also change
* bootsect etc */
//setup最大长度为4个扇区(4 * 512B)
#define SETUP_SECTS 4
//用于出错时显示语句中表示扇区数
#define STRINGIFY(x) #x
//显示出错信息,并终止程序
void die(char * str)
{
fprintf(stderr,"%s
",str);
exit(1);
}
//显示程序使用方法,并退出
void usage(void)
{
die("Usage: build bootsect setup system [rootdev] [> image]");
}
int main(int argc, char ** argv)
{
int i,c,id;
char buf[1024];
char major_root, minor_root;
struct stat sb;
//若命令行参数不是4个或5个,则显示用法并退出
if ((argc != 4) && (argc != 5))
usage();
//如果参数是5个,则说明带有根设备名
if (argc == 5) {
//如果根设备名是软盘("FLOPPY")
if (strcmp(argv[4], "FLOPPY")) {
//获取该设备文件的状态信息
if (stat(argv[4], &sb)) {
//如果未成功获取,把错误消息输出到标准错误stderr
perror(argv[4]);
//退出程序
die("Couldn't stat root device.");
}
//如果成功获取,取出主设备名号和次设备名号
major_root = MAJOR(sb.st_rdev);
minor_root = MINOR(sb.st_rdev);
} else {//如果根设备名不是软盘("FLOPPY")
major_root = 0;
minor_root = 0;
}
} else {//如果参数只有4个,让主设备号和次设备号等于系统默认的根设备。
major_root = DEFAULT_MAJOR_ROOT;
minor_root = DEFAULT_MINOR_ROOT;
}
//在标准错误中断上显示所选择的根设备主、次设备号
fprintf(stderr, "Root device is (%d, %d)
", major_root, minor_root);
//如果主设备号不等于2(软盘)、3(硬盘)、0(系统默认根设备)
if ((major_root != 2) && (major_root != 3) &&
(major_root != 0)) {
//显示错误
fprintf(stderr, "Illegal root device (major = %d)
",
major_root);
//退出
die("Bad root device --- major #");
}
//buf缓冲区全部置0
for (i=0;i<sizeof buf; i++) buf[i]=0;
//以只读的方式打开参数1(bootsect),若出错则显示出错信息,退出
if ((id=open(argv[1],O_RDONLY,0))<0)
die("Unable to open 'boot'");
//读取文件中的MINIX执行头部信息,如果读出字节数不等于MINIX_HEADER(32)
if (read(id,buf,MINIX_HEADER) != MINIX_HEADER)
die("Unable to read header of 'boot'");
//判断执行头部信息(buf[0])结构
//0x0301:MINIX头部a_magic魔数;
//0x10:a_flag,可执行;
//0x04:a_cpu,Intel 8086机器码。
if (((long *) buf)[0]!=0x04100301)
die("Non-Minix header of 'boot'");
//判断头部长度字段(buf[1])的a_hdrlen(byte)是否是MINIX_HEADER(32),(long的后3字节为0)
if (((long *) buf)[1]!=MINIX_HEADER)
die("Non-Minix header of 'boot'");
//判断数据段长(buf[3])a_data字段(long)是否为0
if (((long *) buf)[3]!=0)
die("Illegal data segment in 'boot'");
//判断堆a_bss字段(buf[4])(long)是否为0
if (((long *) buf)[4]!=0)
die("Illegal bss in 'boot'");
//判断执行点a_entry字段(buf[5])(long)是否为0
if (((long *) buf)[5] != 0)
die("Non-Minix header of 'boot'");
//判断符号表长字段a_sym(buf[7])是否为0
if (((long *) buf)[7] != 0)
die("Illegal symbol table in 'boot'");
//读取数据,应该返回读取字节数为512字节
i=read(id,buf,sizeof buf);
//打印出字节数
fprintf(stderr,"Boot sector %d bytes.
",i);
//如果不是512字节,退出
if (i != 512)
die("Boot block must be exactly 512 bytes");
//判断boot的0x510处是否是0xAA55
if ((*(unsigned short *)(buf+510)) != 0xAA55)
die("Boot block hasn't got boot flag (0xAA55)");
//508,509处存放根设备号
buf[508] = (char) minor_root;
buf[509] = (char) major_root;
//将boot的512字节写到标准输出stdout
i=write(1,buf,512);
if (i!=512)
die("Write call failed");
//关闭文件
close (id);
//以只读方式打开setup
if ((id=open(argv[2],O_RDONLY,0))<0)
die("Unable to open 'setup'");
//读取该文件中的MINIX执行头部信息(32字节)
if (read(id,buf,MINIX_HEADER) != MINIX_HEADER)
die("Unable to read header of 'setup'");
//同上,检查一些数据
if (((long *) buf)[0]!=0x04100301)
die("Non-Minix header of 'setup'");
if (((long *) buf)[1]!=MINIX_HEADER)
die("Non-Minix header of 'setup'");
if (((long *) buf)[3]!=0)
die("Illegal data segment in 'setup'");
if (((long *) buf)[4]!=0)
die("Illegal bss in 'setup'");
if (((long *) buf)[5] != 0)
die("Non-Minix header of 'setup'");
if (((long *) buf)[7] != 0)
die("Illegal symbol table in 'setup'");
//读取setup到buf并输出到stdout
for (i=0 ; (c=read(id,buf,sizeof buf))>0 ; i+=c )
if (write(1,buf,c)!=c)
die("Write call failed");
close (id);
//如果setup模块长度大于4个扇区
if (i > SETUP_SECTS*512)
die("Setup exceeds " STRINGIFY(SETUP_SECTS)
" sectors - rewrite build/boot/setup");
//打印出setup长度
fprintf(stderr,"Setup is %d bytes.
",i);
//缓冲区清零
for (c=0 ; c<sizeof(buf) ; c++)
buf[c] = '�';
//如果setup长度小于4 * 512字节,则用�将setup填至4 * 512字节
while (i<SETUP_SECTS*512) {
c = SETUP_SECTS*512-i;
if (c > sizeof(buf))
c = sizeof(buf);
if (write(1,buf,c) != c)
die("Write call failed");
i += c;
}
//以只读的方式打开system
if ((id=open(argv[3],O_RDONLY,0))<0)
die("Unable to open 'system'");
//这两句注释掉了,因为后面的试验会修改这里
// if (read(id,buf,GCC_HEADER) != GCC_HEADER)
// die("Unable to read header of 'system'");
// if (((long *) buf)[5] != 0)
// die("Non-GCC header of 'system'");
//读取数据并输出到stdout
for (i=0 ; (c=read(id,buf,sizeof buf))>0 ; i+=c )
if (write(1,buf,c)!=c)
die("Write call failed");
//关闭system
close(id);
//打印system字节数
fprintf(stderr,"System is %d bytes.
",i);
//如果system长度超过SYS_SIZE(128K)
if (i > SYS_SIZE*16)
die("System is too big");
return(0);
}
整个build.c是标准的c文件,在阅读的时候我们一定要牢记build.c的思路:将对应文件读入并按照适当的方式拼接在仪器输出到屏幕上,加上重定向将输出到屏幕上的内容再全部写到了文件Image中。我们假设boot,setup,system三个模块格式完全正确,那么可以看到输出到屏幕上,即image的全部内容:
- 主、次设备号(似乎只输出到屏幕,不确定)
- bootsect长度(似乎只输出到屏幕,不确定)
- 512字节的bootsect
- setup
- setup长度(似乎只输出到屏幕,不确定)
- system
- system长度(似乎只输出到屏幕,不确定)
小结
Makefile指导了整个Image的产生,包括所有分支使用的原料、手段、参数等。最终的Image由build.c指导合成,build.c是标准的c文件,对boot,setup,system三个已经产生的模块文件进行了检查和重定向写入。至此,一个Image就根据Makefile产生了。