一、Ansible简介
Ansible是新出现的自动化运维工具,基于python开发,集合了众多运维工具(puppet(ruby)、cfengine、chef、func、fabric、)的优点,实现了批量系统配置、批量程序部署、批量运行命令等功能。
特性:
1. no agent:不需要在被管控主机上安装任何软件
2. no server: 无服务器端,使用时直接运行命令即可
3. modules in any languages: 基于模块工作,可使用任意语言开发模块。
4. Yaml,not code:使用yaml语言定制脚本playbook。
5. Ssh by default: 基于ssh工作。
优点:
1. 轻量级,无需在客户端安装agent,更新时,只需在操作机上进行一次更新即可。
2. 批量任务执行可以写成脚本,而且不用分发到远程就可以执行。
3. 使用python编写,维护简单,ruby语法过于复杂。
4. 支持sudo
二、Ansible的基础架构图
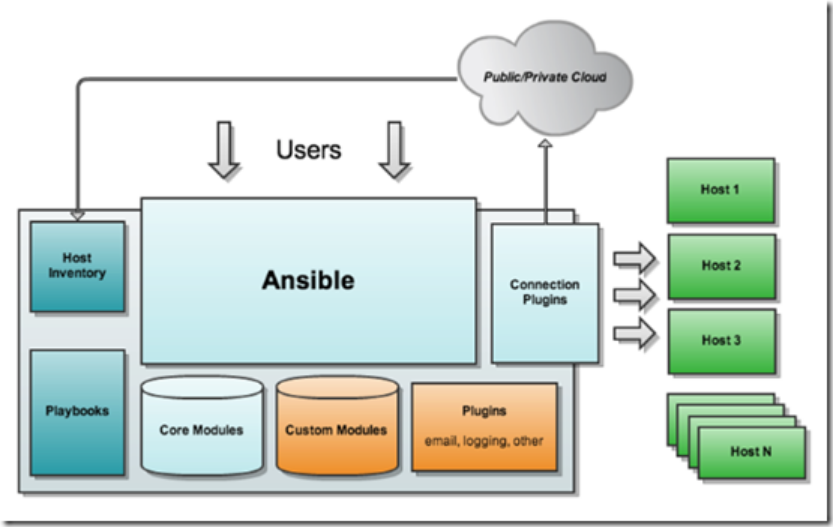
ansible core : ansible 自身核心模块
host inventory: 主机库,定义可管控的主机列表
connection plugins: 连接插件,一般默认基于 ssh 协议连接
modules:core modules ( 自带模块 ) 、 custom modules ( 自定义模块 )
playbooks :剧本,按照所设定编排的顺序执行完成安排任务
三、安装Ansible
3.1 Ansible需要epel源来安装
# uname -r
 3.10.0-327.el7.x86_64
# cat /etc/redhat-release
 CentOS Linux release 7.2.1511 (Core)

# yum install https://dl.fedoraproject.org/pub/epel/epel-release-latest-7.noarch.rpm -y
# yum install ansible -y
3.2 创建密钥,并分发公钥到所有的主机
# ssh-keygen -t rsa -P '' -f ~/.ssh/id_dsa >/dev/null 2>&1
# ssh-copy-id -i .ssh/id_dsa.pub root@192.168.5.71
# ssh-copy-id -i .ssh/id_dsa.pub root@192.168.5.72
# ssh-copy-id -i .ssh/id_dsa.pub root@192.168.5.73
3.3 配置Ansible主机组清单
# vim /etc/ansible/hosts
[test]
192.168.5.71
192.168.5.72
192.168.5.73

主机清单可以包含主机清单,例:
[web]
192.168.5.71
192.168.5.72
[mysql]
192.168.5.73

[online:children]
web
mysql

也可以使用帐号密码的方式:
[test]
192.168.5.71 ansible_ssh_user=root ansible_ssh_pass=mypawd ansible_ssh_port=22
3.4 查看主机清单
# ansible test --list-hosts
  hosts (8):
    192.168.5.71
    192.168.5.72
    192.168.5.73
四、Ansible ping模块
ansible 主组组 使用模块 ping模块
# ansible test -m ping
192.168.5.73 | SUCCESS => {
    "ansible_facts": {
        "discovered_interpreter_python": "/usr/bin/python"
    },
    "changed": false,
    "ping": "pong"
}
192.168.5.72 | SUCCESS => {
    "ansible_facts": {
        "discovered_interpreter_python": "/usr/bin/python"
    },
    "changed": false,
    "ping": "pong"
}
192.168.5.71 | SUCCESS => {
    "ansible_facts": {
        "discovered_interpreter_python": "/usr/bin/python"
    },
    "changed": false,
    "ping": "pong"
}
五、Ansible yum模块
基于yum机制,对远程主机管理程序包
name --- 必须参数,用于指定需要管理的软件包,比如 nginx。
state --- 用于指定软件包的状态有installed、latest、absent、removed,其中 installed 与present 等效,latest 表示安装 yum 中最新的版本,absent 和 removed 等效,表示删除对应的软件包。
disable_gpg_check --- 用于禁用对 rpm 包的公钥 gpg 验证。默认值为 no,表示不禁用验证,设置为 yes 表示禁用验证,即不验证包,直接安装。在对应的 yum 源没有开启 gpg 验证的情况下,需要将此参数的值设置为 yes,否则会报错而无法进行安装。
enablerepo --- 用于指定安装软件包时临时启用的 yum 源。假如你想要从A源中安装软件,但是你不确定A源是否启用了,你可以在安装软件包时将此参数的值设置为 yes,即使A源的设置是未启用,也可以在安装软件包时临时启用A源。
disablerepo --- 用于指定安装软件包时临时禁用的 yum 源。某些场景下需要此参数,比如,当多个 yum 源中同时存在要安装的软件包时,你可以使用此参数临时禁用某个源,这样设置后,在安装软件包时则不会从对应的源中选择安装包。
enablerepo 参数和 disablerepo 参数可以同时使用。
# ansible test -m yum -a 'name=net-tools state=installed'
六、Ansible service模块
用来管理远程主机上的服务的模块
name --- 被管理的服务名称(/etc/init.d)
state --- startd | stopped | restarted | reloaded 表示启动、停止、重启、重新加载。
enabled --- yes|no 表示要不要设定该服务开机自启。
runleve --- 如果设定了enabled开机自动启动,则要定义在哪些运行级别下自动启动。
# ansible test -m service -a 'name=nginx state=started enabled=yes'
七、Ansible command模块
执行命令模块,不支持管道
# ansible test -m command -a 'w'
192.168.5.73 | CHANGED | rc=0 >>
 16:13:01 up  2:35,  2 users,  load average: 0.00, 0.01, 0.05
USER     TTY      FROM             LOGIN@   IDLE   JCPU   PCPU WHAT
root     tty1                      13:37    2:34m  0.08s  0.08s -bash
root     pts/0    192.168.5.55     16:13    0.00s  0.11s  0.01s w

192.168.5.72 | CHANGED | rc=0 >>
 16:13:01 up  2:36,  1 user,  load average: 0.08, 0.06, 0.05
USER     TTY      FROM             LOGIN@   IDLE   JCPU   PCPU WHAT
root     pts/0    192.168.5.55     16:13    0.00s  0.11s  0.01s w

192.168.5.71 | CHANGED | rc=0 >>
 16:13:01 up  2:38,  2 users,  load average: 0.04, 0.08, 0.08
USER     TTY      FROM             LOGIN@   IDLE   JCPU   PCPU WHAT
root     tty1                      13:34    2:21m  0.73s  0.73s -bash
root     pts/0    192.168.5.55     16:13    0.00s  0.08s  0.00s w

# 默认使用command模板,可以不加 -m command参数
# ansible test -a 'cat /etc/hosts'
八、Ansible shell模块
被管理端执行命令支持重定向,管道
# ansible test -m shell -a 'rpm -qa | grep nginx'
# ansible test -m shell -a 'echo password1! | passwd --stdin root'
九、Ansible copy模块
拷贝ansible管理端的文件到远程主机的指定位置
src --- 推送数据的源文件信息
dest --- 推送数据的目标路径
backup --- 对推送传输过去的文件,进行备份
content --- 直接批量在被管理端文件中添加内容
group --- 将本地文件推送到远端,指定文件属组信息
owner --- 将本地文件推送到远端,指定文件属主信息
mode --- 将本地文件推送到远端,指定文件权限信息
remote_src ---如果是no它将在ansible主机中搜索src,如果是yes,src将是远程/目标主机的src目录
# ansible test -m copy -a 'src=/etc/resolv.conf dest=/etc/resolv.conf'
# ansible test -m copy -a 'content="hehe" dest=/tmp/abc.txt owner=root group=root mode=644 backup=yes'
十、Ansible Scripts模块
在本地运行模块,等同于在远程执行,不需要将脚本文件进行推送目标主机执行
# mkdir scripts
# vim scripts/yum.sh
# ansible test -m script -a '/root/scripts/yum.sh'
十一、Ansible File模块
一般用于创建目录和创建文件
path --- 指定远程主机目录或文件信息
recurse --- 递归授权
state ---
directory --- 在远端创建目录
touch --- 在远端创建文件
link --- link或hard表示创建链接文件
absent --- 表示删除文件或目录
mode --- 设置文件或目录权限
owner --- 设置文件或目录属主信息
group --- 设置文件或目录属组信息
# 在远端创建/backup目录
# ansible test -m file -a 'path=/backup state=directory'
192.168.5.72 | CHANGED => {
    "ansible_facts": {
        "discovered_interpreter_python": "/usr/bin/python"
    },
    "changed": true,
    "gid": 0,
    "group": "root",
    "mode": "0755",
    "owner": "root",
    "path": "/backup",
    "size": 6,
    "state": "directory",
    "uid": 0
}
......

# ansible test -a 'ls -ld /backup'

192.168.5.72 | CHANGED | rc=0 >>
drwxr-xr-x 2 root root 6 Jul 11 09:52 /backup

# 创建文件,默认touch的权限就是root和644,但是如果文件夹存在则不会创建,然后权限不会变成你想要的。
# ansible test -m file -a 'path=/tmp/connie state=touch mode=644 owner=root group=root'
192.168.5.73 | CHANGED => {
    "ansible_facts": {
        "discovered_interpreter_python": "/usr/bin/python"
    },
    "changed": true,
    "dest": "/tmp/connie",
    "gid": 0,
    "group": "root",
    "mode": "0644",
    "owner": "root",
    "size": 0,
    "state": "file",
    "uid": 0
}

# 递归修改权限,将子目录及文件一并修改
# ansible test -m file -a 'path=/backup state=directory owner=root group=root recurse=yes'

# 创建软链接
# ansible test -m file -a 'src=/usr/local/mysql-5.6.32 path=/usr/local/mysql state=link'
十二、Ansible Group模块
用来创建用户组
name --- 指定创建的组名
gid --- 指定组的gid
state
absent --- 移除远端主机的组
present --- 创建远端主机的组(默认)
# 创建组指定GID
# ansible test -m group -a 'name=connie gid=1981'
十三、Ansible User模块
创建指定的用户
uid --- 指定用户的uid
group --- 指定用户组名称,默认为空
groups --- 指定附加组名称
password --- 给用户添加密码
shell --- 指定用户登录shell
create_home --- 是否创建家目录
# 创建connie用户并加入用户组connie 设置UID为1981,禁止登录,不创建家目录
# ansible test -m user -a 'name=connie group=connie uid=1981 shell=/sbin/nologin create_home=no'
192.168.5.72 | CHANGED => {
    "ansible_facts": {
        "discovered_interpreter_python": "/usr/bin/python"
    },
    "changed": true,
    "comment": "",
    "create_home": false,
    "group": 1981,
    "home": "/home/connie",
    "name": "connie",
    "shell": "/sbin/nologin",
    "state": "present",
    "system": false,
    "uid": 1981
}
......

# 创建加密的登录用户,password参数必须要是经过加密的字符串。-1是MD5加密
# echo 'linzfn' | openssl passwd -1 -stdin
$1$FNGUGf3H$5rfXpwXqlkL9HDC88uWRA1
# ansible test -m user -a 'name=leon password="$1$FNGUGf3H$5rfXpwXqlkL9HDC88uWRA1"'
192.168.5.72 | CHANGED => {
    "ansible_facts": {
        "discovered_interpreter_python": "/usr/bin/python"
    },
    "changed": true,
    "comment": "",
    "create_home": true,
    "group": 1982,
    "home": "/home/leon",
    "name": "leon",
    "password": "NOT_LOGGING_PASSWORD",
    "shell": "/bin/bash",
    "state": "present",
    "system": false,
    "uid": 1982
}
十四、Ansible Cron模块
使用cront服务,如果填写的时候不写分时日月周,则默认都是'*'
# 设置定时任务注释信息,防止重复,name设定
# ansible test -m cron -a 'name="ntpdate" minute=*/5 hour=* month=* weekday=* job="/usr/sbin/ntpdate time1.aliyun.com"'
192.168.5.72 | CHANGED => {
    "ansible_facts": {
        "discovered_interpreter_python": "/usr/bin/python"
    },
    "changed": true,
    "envs": [],
    "jobs": [
        "ntpdate"
    ]
}

# 登录192.168.5.72查看定时任务
# crontab -l
#Ansible: ntpdate
*/5 * * * * /usr/sbin/ntpdate time1.aliyun.com

# 按名称删除定时任务
# ansible test -m cron -a 'name="ntpdate" state=absent'

# 注释相应定时任务,使定时任务失效
# ansible test -m cron -a 'name="ntpdate" minute=*/5 hour=* month=* weekday=* job="/usr/sbin/ntpdate time1.aliyun.com" disabled=yes'
十五、Ansible Mount模块
present --- 开机挂载,仅将挂载配置写入/etc/fstab
mounted --- 挂载设备,并将配置写入/etc/fstab
unmounted --- 卸载设备,不会清除/etc/fstab写入的配置
absent --- 卸载设备,会清理/etc/fstab写入的配置
# 挂载192.168.5.80:/data目录到test组中的主机
# ansible test -m mount -a "src=192.168.5.80:/data path=/data fstype=nfs opts=defaults state=mounted"

# 卸载,会直接删除/data目录,挂载的时候也不需要创建目标的/data目录
# ansible test -m mount -a "src=192.168.5.80:/data path=/data fstype=nfs opts=defaults state=absent"