接着系列二,继续开始我们face_recognition项目.
face_recognition项目.为什么能识别人脸,是因为人脸有面部关键点。
案例:提取鞠婧祎面部关键点
在knowe_people文件夹中创建find_facial_features_in_picture.py文件并写入以下代码:

from PIL import Image, ImageDraw
import face_recognition

# Load the jpg file into a numpy array
image = face_recognition.load_image_file("鞠婧祎.jpg")

# Find all facial features in all the faces in the image
face_landmarks_list = face_recognition.face_landmarks(image)

print("I found {} face(s) in this photograph.".format(len(face_landmarks_list)))

# Create a PIL imagedraw object so we can draw on the picture
pil_image = Image.fromarray(image)
d = ImageDraw.Draw(pil_image)

for face_landmarks in face_landmarks_list:

    # Print the location of each facial feature in this image
    for facial_feature in face_landmarks.keys():
        print("The {} in this face has the following points: {}".format(facial_feature, face_landmarks[facial_feature]))

    # Let's trace out each facial feature in the image with a line!
    for facial_feature in face_landmarks.keys():
        d.line(face_landmarks[facial_feature], width=5)

# Show the picture
pil_image.show()
然后终端切换到knowe_people目录下,输入以下命令,弹出窗口如下:
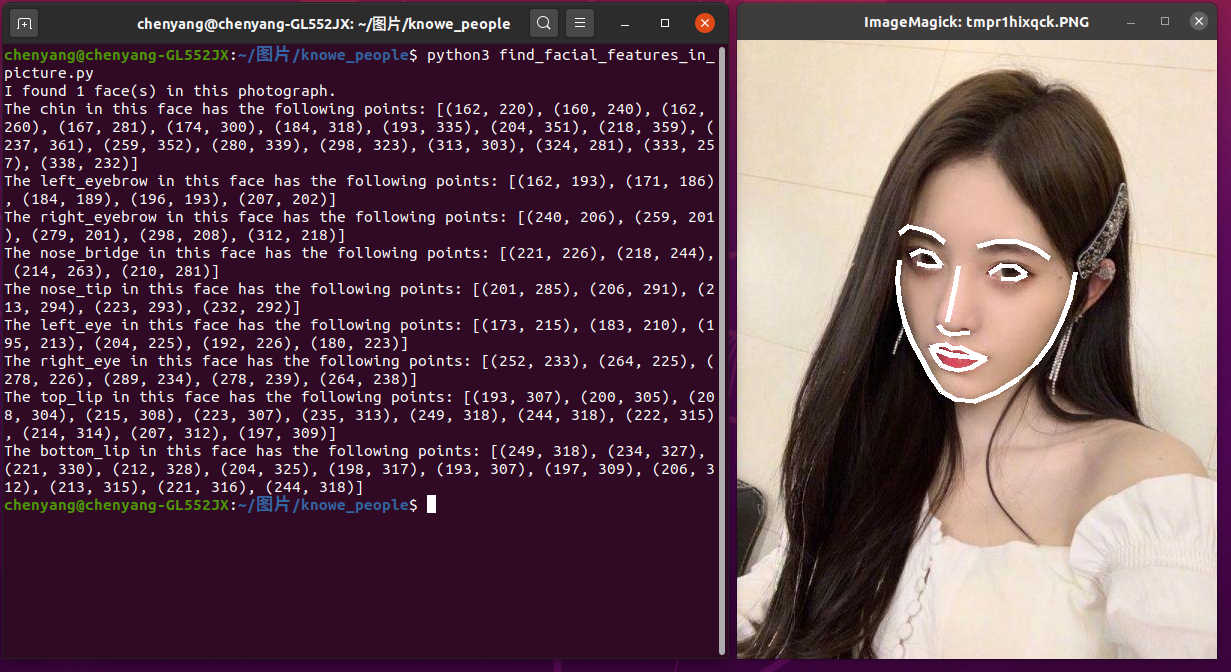
从终端可以看到:之所以能识别人脸,是因为脸部有像素关键点:
在这张脸上有以下几点:[(162 220)、(160 240)、(162 260)、(167 281)、(174 300)、(184 318)、(193 335)、(204 351)、(218 359)、(237 361)、(289 352)、(289 339)、(298 323)、(313 303)、(324 281)、(333 257)、(338 232)]
这张脸的左眉毛有以下几个点:[(162,193),(171,186),(184,189),(196,193),(207,202)]
这张脸右边的眉毛有以下几个点:[(240,206),(259,201),(279,201),(298,208),(312,218)]
这张脸的鼻梁有以下几个点:[(221,226),(218,244),(214,263),(210,281)]
这张脸的鼻尖有以下几个点:[(201,285),(206,291),(213,294),(223,293),(232,292)]
左边的眼睛有以下几个点:[(173,215),(183,210),(195213),(204,225),(192,226),(180,223)]
这张脸右边的眼睛有以下几个点:[(252 233),(264 225),(278226),(289234),(278239),(264 238)]
(193,307)、(200,305)、(208,304)、(215,308)、(232,307)、(233,313)、(243,318)、(222,315)、(214,314)、(197,309)
这张脸的下嘴唇有以下几个点:[(249,318)、(234,327)、(221,330)、(22,328)、(204,325)、(1983,317)、(193,309)、(206,312)、(22,315)、(244,318)]
此处附上原始图片:(还希望鞠婧祎小姐姐不要喷我,拿她的照片来做实验)

案例二:给鞠婧祎涂美妆
在knowe_people文件夹中创建digital_makeup.py文件并写入以下代码:

from PIL import Image, ImageDraw
import face_recognition

# Load the jpg file into a numpy array
image = face_recognition.load_image_file("鞠婧祎.jpg")

# Find all facial features in all the faces in the image
face_landmarks_list = face_recognition.face_landmarks(image)

pil_image = Image.fromarray(image)
for face_landmarks in face_landmarks_list:
    d = ImageDraw.Draw(pil_image, 'RGBA')

    # Make the eyebrows into a nightmare
    d.polygon(face_landmarks['left_eyebrow'], fill=(68, 54, 39, 128))
    d.polygon(face_landmarks['right_eyebrow'], fill=(68, 54, 39, 128))
    d.line(face_landmarks['left_eyebrow'], fill=(68, 54, 39, 150), width=5)
    d.line(face_landmarks['right_eyebrow'], fill=(68, 54, 39, 150), width=5)

    # Gloss the lips
    d.polygon(face_landmarks['top_lip'], fill=(150, 0, 0, 128))
    d.polygon(face_landmarks['bottom_lip'], fill=(150, 0, 0, 128))
    d.line(face_landmarks['top_lip'], fill=(150, 0, 0, 64), width=8)
    d.line(face_landmarks['bottom_lip'], fill=(150, 0, 0, 64), width=8)

    # Sparkle the eyes
    d.polygon(face_landmarks['left_eye'], fill=(255, 255, 255, 30))
    d.polygon(face_landmarks['right_eye'], fill=(255, 255, 255, 30))

    # Apply some eyeliner
    d.line(face_landmarks['left_eye'] + [face_landmarks['left_eye'][0]], fill=(0, 0, 0, 110), width=6)
    d.line(face_landmarks['right_eye'] + [face_landmarks['right_eye'][0]], fill=(0, 0, 0, 110), width=6)

    pil_image.show()
然后终端切换到knowe_people目录下,输入以下命令,弹出窗口如下:

今天就这样,主要实现两个功能更多内容见其他系列。
案例一:提取鞠婧祎面部关键点
案例二:给鞠婧祎涂美妆
- 系列一:https://www.cnblogs.com/cy0628/p/13879603.html
-
系列二:https://www.cnblogs.com/cy0628/p/13883511.html
系列三:https://www.cnblogs.com/cy0628/p/13884073.html
系列四:https://www.cnblogs.com/cy0628/p/13884460.html