8. 生产者消费者案例-虚假唤醒
参考下面生产者消费者案例:

/*
* 生产者和消费者案例
*/
public class TestProductorAndConsumer {
public static void main(String[] args) {
Clerk clerk = new Clerk();
Productor pro = new Productor(clerk);
Consumer cus = new Consumer(clerk);
new Thread(pro, "生产者 A").start();
new Thread(cus, "消费者 B").start();
new Thread(pro, "生产者 C").start();
new Thread(cus, "消费者 D").start();
}
}
//店员
class Clerk{
private int product = 0;
//进货
public synchronized void get(){//循环次数:0
if(product >= 1){
System.out.println("产品已满!");
try {
this.wait();
} catch (InterruptedException e) {
}
}
System.out.println(Thread.currentThread().getName() + " : " + ++product);
//为避免线程不能正常关闭(一直处在wait状态未唤醒),notifyAll()方法不要放在if...else...中
this.notifyAll();
}
//卖货
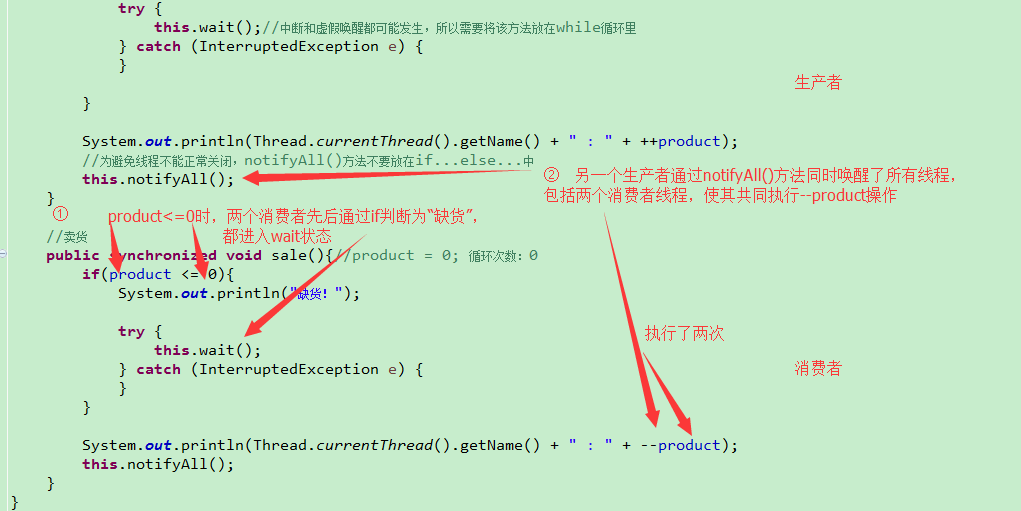
public synchronized void sale(){//product = 0; 循环次数:0
if(product <= 0){
System.out.println("缺货!");
try {
this.wait();
} catch (InterruptedException e) {
}
}
System.out.println(Thread.currentThread().getName() + " : " + --product);
this.notifyAll();
}
}
//生产者
class Productor implements Runnable{
private Clerk clerk;
public Productor(Clerk clerk) {
this.clerk = clerk;
}
@Override
public void run() {
for (int i = 0; i < 20; i++) {
try {
Thread.sleep(200);
} catch (InterruptedException e) {
}
clerk.get();
}
}
}
//消费者
class Consumer implements Runnable{
private Clerk clerk;
public Consumer(Clerk clerk) {
this.clerk = clerk;
}
@Override
public void run() {
for (int i = 0; i < 20; i++) {
clerk.sale();
}
}
}
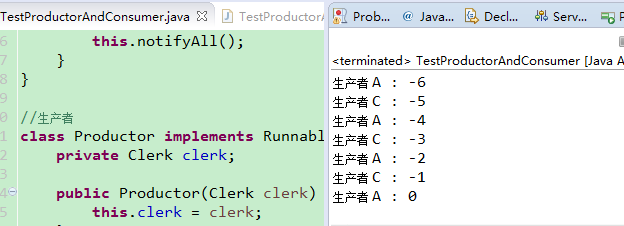
当多个生产者、消费者同时响应资源时,程序输出如下(商品数出现负数):
原因如下,即产生了虚假唤醒:
解决方法在jdk的wait()方法里已经声明,即需要把wait()方法放在循环里(生产者方法也同下)
//卖货
    public synchronized void sale(){//product = 0; 循环次数:0
        while(product <= 0){//为了避免虚假唤醒问题,应该总是使用在循环中
            System.out.println("缺货!");

            try {
                this.wait();//中断和虚假唤醒都可能发生,所以需要将该方法放在while循环里
            } catch (InterruptedException e) {
            }
        }

        System.out.println(Thread.currentThread().getName() + " : " + --product);
        this.notifyAll();
    }
9. Condition 线程通信
Condition 接口描述了可能会与锁有关联的条件变量。这些变量在用法上与使用 Object.wait 访问的隐式监视器类似,但提供了更强大的功能。需要特别指出的是,单个 Lock 可能与多个 Condition 对象关联。为了避免兼容性问题,Condition 方法的名称与对应的 Object 版本中的不同。
在 Condition 对象中,与 wait、notify 和 notifyAll 方法对应的分别是await、signal 和 signalAll。
Condition 实例实质上被绑定到一个锁上。要为特定 Lock 实例获得Condition 实例,请使用其 newCondition() 方法。
使用lock和Condition对生产者消费者案例进行改造
class Clerk {
    private int product = 0;

    private Lock lock = new ReentrantLock();
    //使用其 newCondition() 方法,为特定 Lock 实例获得Condition 实例
    private Condition condition = lock.newCondition();

    // 进货
    public void get() {
        //开启lock
        lock.lock();

        try {
            while (product >= 1) { // 为了避免虚假唤醒,应该总是使用在循环中。
                System.out.println("产品已满!");

                try {
                    //this.wait();
                    condition.await();
                } catch (InterruptedException e) {
                }
            }
            System.out.println(Thread.currentThread().getName() + " : "
                    + ++product);
            //this.notifyAll();
            condition.signalAll();
        } finally {//执行关lock
            lock.unlock();
        }
    }

    // 卖货
    public void sale() {
        lock.lock();

        try {
            while (product <= 0) {
                System.out.println("缺货!");

                try {
                    condition.await();
                } catch (InterruptedException e) {
                }
            }
            System.out.println(Thread.currentThread().getName() + " : "
                    + --product);
            condition.signalAll();
        } finally {
            lock.unlock();
        }
    }
}
10. 线程按序交替
/*
 * 编写一个程序,开启 3 个线程,这三个线程的 ID 分别为 A、B、C,每个线程将自己的 ID 在屏幕上打印 n 遍,要求输出的结果必须按顺序显示。
 *    如:ABBCCCABBCCCABBCCC…… 依次递归
 * 这里按照ABBCCC...的顺序打印20次
 */
public class TestABCAlternate {

    public static void main(String[] args) {
        AlternateDemo ad = new AlternateDemo();

        new Thread(new Runnable() {
            @Override
            public void run() {

                for (int i = 1; i <= 20; i++) {
                    ad.loopA(i);
                }
            }
        }, "A").start();

        new Thread(new Runnable() {
            @Override
            public void run() {

                for (int i = 1; i <= 20; i++) {
                    ad.loopB(i);
                }
            }
        }, "B").start();

        new Thread(new Runnable() {
            @Override
            public void run() {

                for (int i = 1; i <= 20; i++) {
                    ad.loopC(i);

                    System.out.println("-----------------------------------");
                }
            }
        }, "C").start();
    }
}

class AlternateDemo{

    private int number = 1; //当前正在执行线程的标记

    private Lock lock = new ReentrantLock();
    private Condition condition1 = lock.newCondition();
    private Condition condition2 = lock.newCondition();
    private Condition condition3 = lock.newCondition();

    /**
     * @param totalLoop : 循环第几轮
     */
    public void loopA(int totalLoop){
        lock.lock();

        try {
            //1. 判断
            if(number != 1){
                condition1.await();
            }
            //2. 打印
            for (int i = 1; i <= 1; i++) {
                System.out.println(Thread.currentThread().getName() + "	" + i + "	" + totalLoop);
            }
            //3. 唤醒
            number = 2;
            condition2.signal();
        } catch (Exception e) {
            e.printStackTrace();
        } finally {
            lock.unlock();
        }
    }

    public void loopB(int totalLoop){
        lock.lock();

        try {
            //1. 判断
            if(number != 2){
                condition2.await();
            }
            //2. 打印
            for (int i = 1; i <= 2; i++) {
                System.out.println(Thread.currentThread().getName() + "	" + i + "	" + totalLoop);
            }
            //3. 唤醒
            number = 3;
            condition3.signal();
        } catch (Exception e) {
            e.printStackTrace();
        } finally {
            lock.unlock();
        }
    }

    public void loopC(int totalLoop){
        lock.lock();

        try {
            //1. 判断
            if(number != 3){
                condition3.await();
            }
            //2. 打印
            for (int i = 1; i <= 3; i++) {
                System.out.println(Thread.currentThread().getName() + "	" + i + "	" + totalLoop);
            }
            //3. 唤醒
            number = 1;
            condition1.signal();
        } catch (Exception e) {
            e.printStackTrace();
        } finally {
            lock.unlock();
        }
    }
}
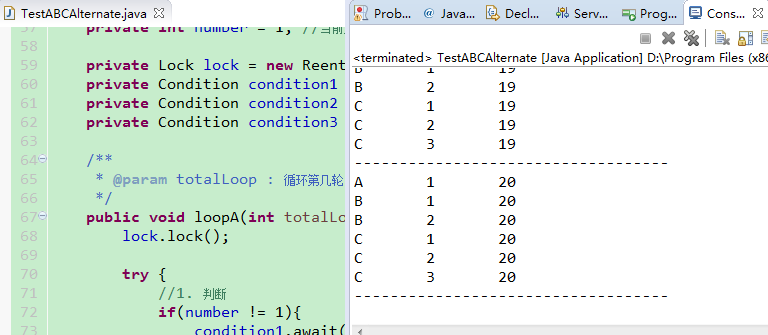
实现如下:
11. ReadWriteLock 读写锁
ReadWriteLock 维护了一对相关的锁,一个用于只读操作,另一个用于写入操作。只要没有 writer,读取锁可以由多个 reader 线程同时保持。写入锁是独占的。
ReadWriteLock 读取操作通常不会改变共享资源,但执行写入操作时,必须独占方式来获取锁。对于读取操作占多数的数据结构。 ReadWriteLock 能提供比独占锁更高的并发性。而对于只读的数据结构,其中包含的不变性可以完全不需要考虑加锁操作。
/*
 * ReadWriteLock : 读写锁
 *
 * 写写/读写 需要“互斥”
 * 读读 不需要互斥
 *
 */
public class TestReadWriteLock {

    public static void main(String[] args) {
        ReadWriteLockDemo rw = new ReadWriteLockDemo();
        //1个线程对数据进行写操作
        new Thread(new Runnable() {

            @Override
            public void run() {
                rw.set((int)(Math.random() * 101));
            }
        }, "Write:").start();

        //100个线程对数据进行读操作
        for (int i = 0; i < 100; i++) {
            new Thread(new Runnable() {

                @Override
                public void run() {
                    rw.get();
                }
            }).start();
        }
    }
}

class ReadWriteLockDemo{

    private int number = 0;
    //创建ReadWriteLock读写锁对象
    private ReadWriteLock lock = new ReentrantReadWriteLock();

    //读
    public void get(){
        lock.readLock().lock(); //上锁
        try{
            System.out.println(Thread.currentThread().getName() + " : " + number);
        }finally{
            lock.readLock().unlock(); //释放锁
        }
    }

    //写
    public void set(int number){
        lock.writeLock().lock();
        try{
            System.out.println(Thread.currentThread().getName());
            this.number = number;
        }finally{
            lock.writeLock().unlock();
        }
    }
}
12. 线程八锁
/*
 * 题目:判断打印的 "one" or "two" ?
 *
 * 1. 两个普通同步方法,两个线程,标准打印, 打印? //one  two
 * 2. 新增 Thread.sleep() 给 getOne() ,打印? //one  two
 * 3. 新增普通方法 getThree() , 打印? //three  one   two
 * 4. 两个普通同步方法,两个 Number 对象,打印?  //two  one
 * 5. 修改 getOne() 为静态同步方法,打印?  //two   one
 * 6. 修改两个方法均为静态同步方法,一个 Number 对象?  //one   two
 * 7. 一个静态同步方法,一个非静态同步方法,两个 Number 对象?  //two  one
 * 8. 两个静态同步方法,两个 Number 对象?   //one  two
 *
 * 线程八锁的关键:
 * ①非静态方法的锁默认为  this,  静态方法的锁为 对应的 Class 实例
 * ②某一个时刻内,只能有一个线程持有锁,无论几个方法。
 */
public class TestThread8Monitor {

    public static void main(String[] args) {
        Number number = new Number();
        Number number2 = new Number();

        new Thread(new Runnable() {
            @Override
            public void run() {
                number.getOne();
            }
        }).start();

        new Thread(new Runnable() {
            @Override
            public void run() {
//                number.getTwo();
                number2.getTwo();
            }
        }).start();

        /*new Thread(new Runnable() {
            @Override
            public void run() {
                number.getThree();
            }
        }).start();*/

    }
}

class Number{

    public static synchronized void getOne(){//Number.class
        try {
            Thread.sleep(3000);
        } catch (InterruptedException e) {
        }

        System.out.println("one");
    }

    public synchronized void getTwo(){//this
        System.out.println("two");
    }

    public void getThree(){
        System.out.println("three");
    }

}
总结:
①一个对象里面如果有多个synchronized方法,某一个时刻内,只要一个线程去调用其中的一个synchronized方法了,其他的线程都只能等待,换句话说,某一时刻内,只能有唯一一个线程去访问这些synchronized方法。
②锁的是当前对象this,被锁定后,其他线程都不能进入到当前对象的其他的synchronized方法。
③加个普通方法后发现和同步锁无关。
④换成静态同步方法后,情况又变化
⑤所有的非静态同步方法用的都是同一把锁 -- 实例对象本身,也就是说如果一个实例对象的非静态同步方法获取锁后,该实例对象的其他非静态同步方法必须等待获取锁的方法释放锁后才能获取锁,可是别的实例对象的非静态同步方法因为跟该实例对象的非静态同步方法用的是不同的锁,所以毋须等待该实例对象已经取锁的非静态同步方法释放锁就可以获取他们自己的锁。
⑥所有的静态同步方法用的也是同一把锁 -- 类对象本身,这两把锁是两个不同的对象,所以静态同步方法与非静态同步方法之间不会有竞争条件。但是一旦一个静态同步方法获取锁后,其他的静态同步方法都必须等待该方法释放锁后才能获取锁,而不管是同一个实例对象的静态同步方法之间,还是不同的实例对象的静态同步方法之间,只要它们是同一个实例对象。