通过案例我们发现“获得连接”和“释放资源”两次代码将在之后的增删改查所有功能中都存在,开发中遇到此种情况,将采用工具类的方法进行抽取,从而达到代码的重复利用。
1、使用properties配置文件
开发中获得连接的4个参数(驱动、URL、用户名、密码)通常都存在配置文件中,方便后期维护,程序如果需要更换数据库,只需要修改配置文件即可。
文件要求如下:
1)文件位置:任意,建议在src下
2)文件名称:任意,扩展名为properties
3)文件内容:一行一组数据,格式是“key=value”.
a)key命名自定义,如果是多个单词,习惯使用点分隔。例如:jdbc.driver
b)value值不支持中文,如果需要使用非英文字符,将进行Unicode转换
2、创建配置文件
右击src->new->file命名...
1 driver=com.mysql.jdbc.Driver
2 url=jdbc:mysql://localhost:3306/web08?useUnicode=true&characterEncoding=utf8
3 username=root
4 password=12345
3.1、加载配置文件:ResourceBundle对象(JDBCUtils_V2.java文件)
 1 package cn.itheima.jdbc;
 2
 3 import java.sql.Connection;
 4 import java.sql.DriverManager;
 5 import java.sql.PreparedStatement;
 6 import java.sql.ResultSet;
 7 import java.sql.SQLException;
 8 import java.util.ResourceBundle;
 9
10 /**
11  * 提供获取连接和释放资源的方法
12  * @author Administrator
13  *
14  */
15 public class JDBCUtils_V2 {
16         private static String driver;        //驱动
17         private static String url;           //路径
18         private static String username;      //用户名
19         private static String password;      //密码
20
21         /*
22          * 静态代码块加载配置文件信息
23          */
24         static{
25             //1.使用JDK提供的工具类加载properties文件,getBundle()方法只需要填写文件,不加后缀!!!
26             ResourceBundle bundle=ResourceBundle.getBundle("db");
27             //2.通过key获得需要的值
28             driver=bundle.getString("driver");
29             url=bundle.getString("url");
30             username=bundle.getString("username");
31             password=bundle.getString("password");
32         }
33
34         /*
35          * 获取连接方法
36          */
37         public static Connection getConnection(){
38             Connection conn=null;
39             try {
40                 //1.注册驱动
41                 Class.forName(driver);
42                 //2.获得连接
43                 conn=DriverManager.getConnection(url,username,password);
44             } catch (Exception e) {
45                 e.printStackTrace();
46             }
47             return conn;
48         }
49         /*
50          * 释放资源方法
51          */
52         public static void release(Connection conn,PreparedStatement pstmt,ResultSet rs){
53             if(rs!=null){
54                 try {
55                     rs.close();
56                 } catch (SQLException e) {
57                     e.printStackTrace();
58                 }
59             }
60             if(pstmt!=null){
61                 try {
62                     pstmt.close();
63                 } catch (SQLException e) {
64                     e.printStackTrace();
65                 }
66             }
67             if(conn!=null){
68                 try {
69                     conn.close();
70                 } catch (SQLException e) {
71                     e.printStackTrace();
72                 }
73             }
74         }
75 }
3.2、加载配置文件:Properties对象((JDBCUtils_V3.java文件)可选)
 1 package cn.itheima.jdbc;
 2
 3 import java.io.IOException;
 4 import java.io.InputStream;
 5 import java.io.InputStreamReader;
 6 import java.sql.Connection;
 7 import java.sql.DriverManager;
 8 import java.sql.PreparedStatement;
 9 import java.sql.ResultSet;
10 import java.sql.SQLException;
11 import java.util.Properties;
12 import java.util.ResourceBundle;
13
14 /**
15  * 提供获取连接和释放资源的方法
16  * @author Administrator
17  *
18  */
19 public class JDBCUtils_V3 {
20         private static String driver;         //驱动
21         private static String url;            //路径
22         private static String username;       //用户名
23         private static String password;       //密码
24
25         /*
26          * 静态代码块加载配置文件信息
27          */
28         static{
29             try {
30                 //1.通过当前类获得类加载器
31                 ClassLoader classLoader=JDBCUtils_V3.class.getClassLoader();
32                 //2.通过类加载器的方法获得一个输入流
33                 InputStream is=classLoader.getResourceAsStream("db.properties");
34                 //3.创建一个properties对象
35                 Properties props=new Properties();
36                 //4.加载输入流
37                 props.load(is);
38                 //5.获取相关参数的值
39                 driver=props.getProperty("driver");
40                 url=props.getProperty("url");
41                 username=props.getProperty("username");
42                 password=props.getProperty("password");
43             } catch (IOException e) {
44                 e.printStackTrace();
45             }
46         }
47         /*
48          * 获取连接方法
49          */
50         public static Connection getConnection(){
51             Connection conn=null;
52             try {
53                 //1.注册驱动
54                 Class.forName(driver);
55                 //2.获得连接
56                 conn=DriverManager.getConnection(url,username,password);
57             } catch (Exception e) {
58                 e.printStackTrace();
59             }
60             return conn;
61         }
62         /*
63          * 释放资源
64          */
65         public static void release(Connection conn,PreparedStatement pstmt,ResultSet rs){
66             if(rs!=null){
67                 try {
68                     rs.close();
69                 } catch (SQLException e) {
70                     e.printStackTrace();
71                 }
72             }
73             if(pstmt!=null){
74                 try {
75                     pstmt.close();
76                 } catch (SQLException e) {
77                     e.printStackTrace();
78                 }
79             }
80             if(conn!=null){
81                 try {
82                     conn.close();
83                 } catch (SQLException e) {
84                     e.printStackTrace();
85                 }
86             }
87         }
88 }
4、实现CRUD操作(查询和添加使用的JDBCUtils_V2.java、删除和修改使用的是JDBCUtils_V3.java文件)
  1 package cn.itheima.jdbc.test;
  2
  3 import java.sql.Connection;
  4 import java.sql.PreparedStatement;
  5 import java.sql.ResultSet;
  6 import java.sql.SQLException;
  7
  8 import org.junit.Test;
  9
 10 import cn.itheima.jdbc.JDBCUtils_V2;
 11 import cn.itheima.jdbc.JDBCUtils_V3;
 12
 13 /*
 14  * 测试工具类
 15  */
 16 public class TestUtils {
 17     /*
 18      * 根据id查询用户信息
 19      */
 20     @Test
 21     public void testFindUserById() {
 22         Connection conn = null;
 23         PreparedStatement pstmt = null;
 24         ResultSet rs = null;
 25         try {
 26             // 1.获取连接
 27             conn = JDBCUtils_V2.getConnection();
 28             // 2.编写sql语句
 29             String sql = "select * from tbl_user where uid=?";
 30             // 3.获取执行sql语句对象
 31             pstmt = conn.prepareStatement(sql);
 32             // 4.设置参数
 33             pstmt.setInt(1, 2);
 34             // 5.执行查询操作
 35             rs = pstmt.executeQuery();
 36             // 6.处理结果集
 37             while (rs.next()) {
 38                 System.out.println(rs.getString(2) + "----" + rs.getString("upassword"));
 39             }
 40             // 释放资源放在此处不行滴!
 41         } catch (SQLException e) {
 42             e.printStackTrace();
 43         } finally {
 44             // 7.释放资源
 45             JDBCUtils_V2.release(conn, pstmt, rs);
 46         }
 47     }
 48
 49     /*
 50      * 添加用户信息方法
 51      */
 52     @Test
 53     public void testAdd(){
 54         Connection conn=null;
 55         PreparedStatement pstmt=null;
 56         try{
 57             //1.获取连接
 58             conn=JDBCUtils_V2.getConnection();
 59             //2.编写sql语句
 60             String sql="insert into tbl_user values(null,?,?)";
 61             //3.获取执行sql语句对象
 62             pstmt=conn.prepareStatement(sql);
 63             //4.设置参数
 64             pstmt.setString(1, "hehe");
 65             pstmt.setString(2,"789");
 66             //5.执行插入操作
 67             int row=pstmt.executeUpdate();
 68             if(row>0){
 69                 System.out.print("添加成功!");
 70             }else{
 71                 System.out.print("添加失败 ");
 72             }
 73         }catch(Exception e){
 74             e.printStackTrace();
 75         }finally{
 76             //6.释放资源
 77             JDBCUtils_V2.release(conn, pstmt, null);
 78         }
 79     }
 80
 81     /*
 82      * 根据id删除用户信息
 83      */
 84     @Test
 85     public void testDeleteById(){
 86         Connection conn = null;
 87         PreparedStatement pstmt = null;
 88         ResultSet rs = null;
 89         try {
 90             // 1.获取连接
 91             conn = JDBCUtils_V3.getConnection();
 92             // 2.编写sql语句
 93             String sql = "delete from tbl_user where uid=?";
 94             // 3.获取执行sql语句对象
 95             pstmt = conn.prepareStatement(sql);
 96             // 4.设置参数
 97             pstmt.setInt(1, 4);
 98             // 5.执行删除操作
 99             int row=pstmt.executeUpdate();
100             if(row>0){
101                 System.out.print("删除成功!");
102             }else{
103                 System.out.print("删除失败 ");
104             }
105         }catch(Exception e){
106             e.printStackTrace();
107         }finally{
108             //6.释放资源
109             JDBCUtils_V3.release(conn, pstmt, null);
110         }
111     }
112
113     /*
114      * 根据id更新用户信息
115      */
116     @Test
117     public void testUpdateById(){
118         Connection conn = null;
119         PreparedStatement pstmt = null;
120         ResultSet rs = null;
121         try {
122             // 1.获取连接
123             conn = JDBCUtils_V3.getConnection();
124             // 2.编写sql语句
125             String sql = "update tbl_user set upassword=? where uid=?";
126             // 3.获取执行sql语句对象
127             pstmt = conn.prepareStatement(sql);
128             // 4.设置参数
129             pstmt.setString(1, "233");
130             pstmt.setInt(2, 5);
131             // 5.执行更新操作
132             int row=pstmt.executeUpdate();
133             if(row>0){
134                 System.out.print("更新成功!");
135             }else{
136                 System.out.print("更新失败 ");
137             }
138         }catch(Exception e){
139             e.printStackTrace();
140         }finally{
141             //6.释放资源
142             JDBCUtils_V3.release(conn, pstmt, null);
143         }
144     }
145 }
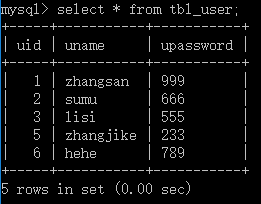
查询uid=2的效果如下:

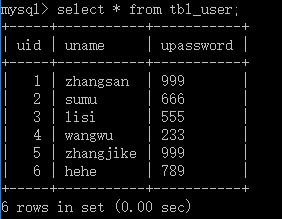
添加成功的效果如下:
删除uid=4的效果如下:
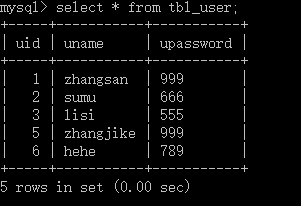
更新uid=5的密码为233的效果如下: