针对我们要做到软件杯赛题—视频全量目标分析和建模,首先是了解Tensorflow object detection API
这个API是基于tensorflow构造的开源框架,易于构建、训练和部署目标检测模型
第一步:
下载tensorflow object detection API模型
第二步:
下载Protoc: 点击下载Protoc
protoc的作用是将Tensorflow object detection API模型文件中的.pro
解压后将bin文件夹的路径添加到环境变量
第三步:
将下载的tensorflow object detection文件解压, 文件名可改为model:打开models esearchobject_detectionprotos,会看到里面有很多的.proto文件,利用Protoc将这些.proto文件编译成py文件
第四步:
需要添加两个环境变量:
-> models esearch
-> models esearchslim
第五步:
在research/object_detection文件夹下新建一个python文件,命名为object_detection_tutorial,代码如下
import numpy as np
import os
import six.moves.urllib as urllib
import sys
import tarfile
import tensorflow as tf
import zipfile

from collections import defaultdict
from io import StringIO
from matplotlib import pyplot as plt
from PIL import Image


# # This is needed to display the images.
# %matplotlib inline

# This is needed since the notebook is stored in the object_detection folder.
sys.path.append("..")

# from utils import label_map_util
# from utils import visualization_utils as vis_util
from research.object_detection.utils import label_map_util
from research.object_detection.utils import visualization_utils as vis_util

# What model to download.
MODEL_NAME = 'ssd_mobilenet_v1_coco_11_06_2017'
MODEL_FILE = MODEL_NAME + '.tar.gz'
DOWNLOAD_BASE = 'http://download.tensorflow.org/models/object_detection/'

# Path to frozen detection graph. This is the actual model that is used for the object detection.
PATH_TO_CKPT = MODEL_NAME + '/frozen_inference_graph.pb'

# List of the strings that is used to add correct label for each box.
PATH_TO_LABELS = os.path.join('data', 'mscoco_label_map.pbtxt')

NUM_CLASSES = 90

# download model
opener = urllib.request.URLopener()
# 下载模型,如果已经下载好了下面这句代码可以注释掉
opener.retrieve(DOWNLOAD_BASE + MODEL_FILE, MODEL_FILE)
tar_file = tarfile.open(MODEL_FILE)
for file in tar_file.getmembers():
    file_name = os.path.basename(file.name)
    if 'frozen_inference_graph.pb' in file_name:
        tar_file.extract(file, os.getcwd())

# Load a (frozen) Tensorflow model into memory.
detection_graph = tf.Graph()
with detection_graph.as_default():
    od_graph_def = tf.GraphDef()
    with tf.gfile.GFile(PATH_TO_CKPT, 'rb') as fid:
        serialized_graph = fid.read()
        od_graph_def.ParseFromString(serialized_graph)
        tf.import_graph_def(od_graph_def, name='')
# Loading label map
label_map = label_map_util.load_labelmap(PATH_TO_LABELS)
categories = label_map_util.convert_label_map_to_categories(label_map, max_num_classes=NUM_CLASSES,
                                                            use_display_name=True)
category_index = label_map_util.create_category_index(categories)


# Helper code
def load_image_into_numpy_array(image):
    (im_width, im_height) = image.size
    return np.array(image.getdata()).reshape(
        (im_height, im_width, 3)).astype(np.uint8)


# For the sake of simplicity we will use only 2 images:
# image1.jpg
# image2.jpg
# If you want to test the code with your images, just add path to the images to the TEST_IMAGE_PATHS.
PATH_TO_TEST_IMAGES_DIR = 'test_images'
TEST_IMAGE_PATHS = [os.path.join(PATH_TO_TEST_IMAGES_DIR, 'image{}.jpg'.format(i)) for i in range(1, 3)]

# Size, in inches, of the output images.
IMAGE_SIZE = (12, 8)

with detection_graph.as_default():
    with tf.Session(graph=detection_graph) as sess:
        # Definite input and output Tensors for detection_graph
        image_tensor = detection_graph.get_tensor_by_name('image_tensor:0')
        # Each box represents a part of the image where a particular object was detected.
        detection_boxes = detection_graph.get_tensor_by_name('detection_boxes:0')
        # Each score represent how level of confidence for each of the objects.
        # Score is shown on the result image, together with the class label.
        detection_scores = detection_graph.get_tensor_by_name('detection_scores:0')
        detection_classes = detection_graph.get_tensor_by_name('detection_classes:0')
        num_detections = detection_graph.get_tensor_by_name('num_detections:0')
        for image_path in TEST_IMAGE_PATHS:
            image = Image.open(image_path)
            # the array based representation of the image will be used later in order to prepare the
            # result image with boxes and labels on it.
            image_np = load_image_into_numpy_array(image)
            # Expand dimensions since the model expects images to have shape: [1, None, None, 3]
            image_np_expanded = np.expand_dims(image_np, axis=0)
            image_tensor = detection_graph.get_tensor_by_name('image_tensor:0')
            # Each box represents a part of the image where a particular object was detected.
            boxes = detection_graph.get_tensor_by_name('detection_boxes:0')
            # Each score represent how level of confidence for each of the objects.
            # Score is shown on the result image, together with the class label.
            scores = detection_graph.get_tensor_by_name('detection_scores:0')
            classes = detection_graph.get_tensor_by_name('detection_classes:0')
            num_detections = detection_graph.get_tensor_by_name('num_detections:0')
            # Actual detection.
            (boxes, scores, classes, num_detections) = sess.run(
                [boxes, scores, classes, num_detections],
                feed_dict={image_tensor: image_np_expanded})
            # Visualization of the results of a detection.
            vis_util.visualize_boxes_and_labels_on_image_array(
                image_np,
                np.squeeze(boxes),
                np.squeeze(classes).astype(np.int32),
                np.squeeze(scores),
                category_index,
                use_normalized_coordinates=True,
                line_thickness=8)
            plt.figure(figsize=IMAGE_SIZE)
            plt.imshow(image_np)
            plt.show()
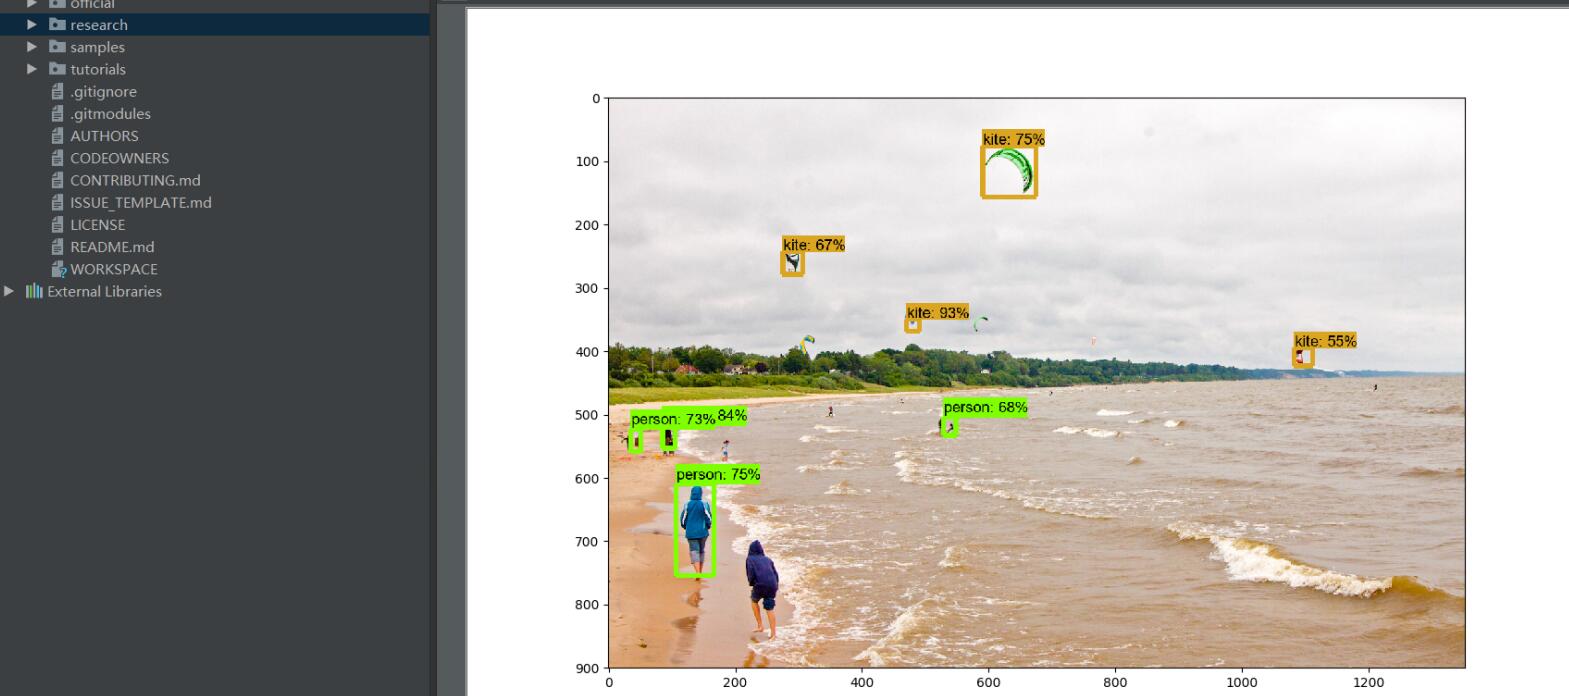
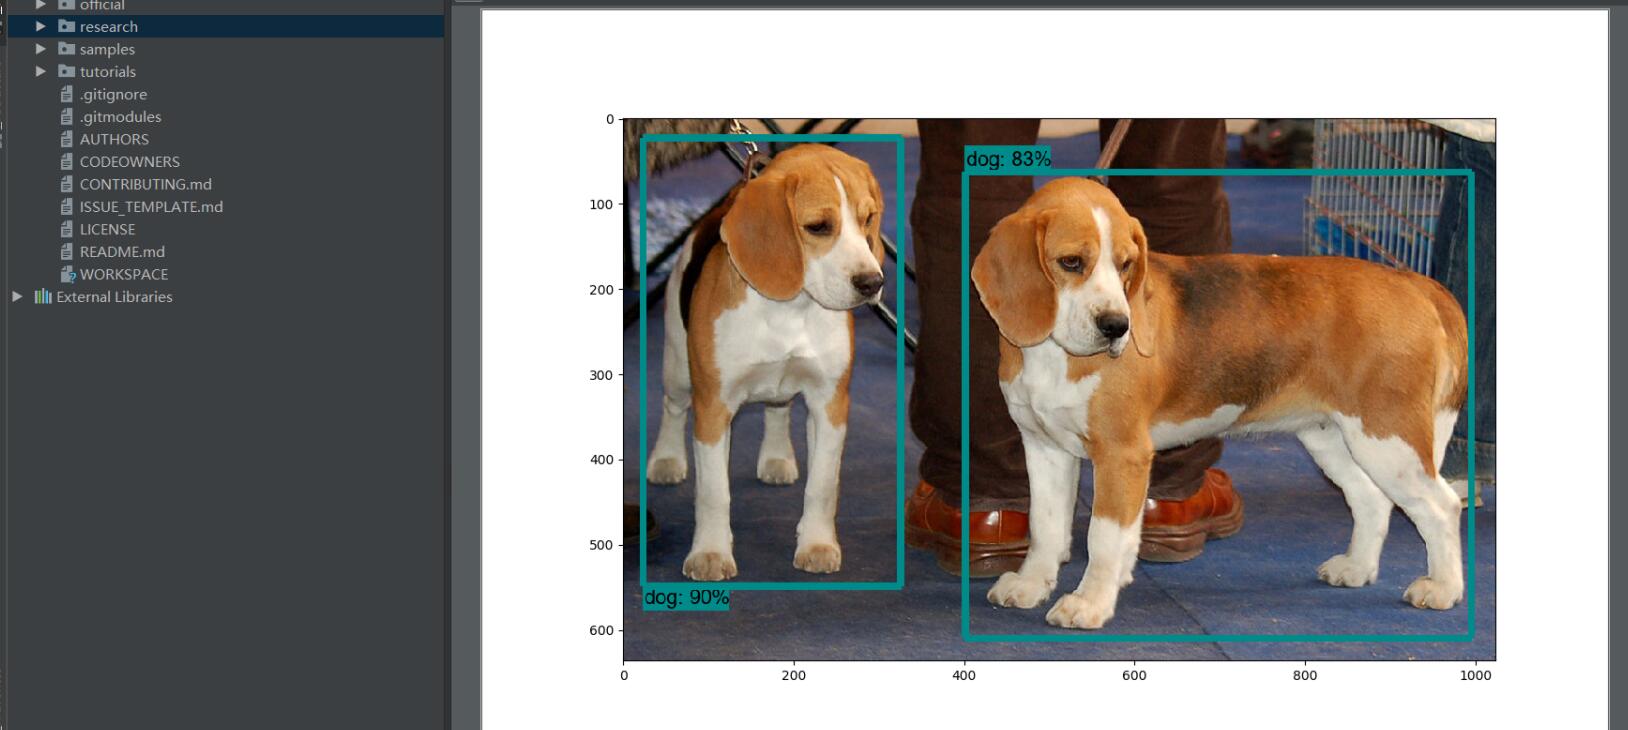
第六步:直接运行刚才创建的object_detection_tutorial.py文件了
运行截图: