首先看一下搭建完成的SSM项目结构,如下图所示:

下面开始搭建SSM框架。
1、 在MyEclipse中新建web project ,整个文档结构上图 所示,将需要的jar包导入到WebRoot/WEB-INF/lib包下。
jar包下载链接: https://pan.baidu.com/s/1pLRopkB 密码: 4ky7
2、 新建模型类 User.java,里面添加username age属性。并增加对应的get set方法和构造函数。
3、 创建接口文件UserMapper.java,里面添加接口方法 findAllUser() 用于查询所有用户。同时创建对应的userMapper.xml。里面配置我们用来从数据库查询所有用户的SQL语句
package com.mapper;

import java.util.List;
import com.model.User;

public interface UserMapper {
    List<User> findAllUser();
}
<?xml version="1.0" encoding="UTF-8"?>
<!DOCTYPE mapper PUBLIC "-//mybatis.org//DTD Mapper 3.0//EN"
"http://mybatis.org/dtd/mybatis-3-mapper.dtd">
<mapper namespace="com.mapper.UserMapper">
    <!-- 解决表名与字段不匹配 -->
    <!-- type 类的全限定名, 或者一个类型别名
         id 当前命名空间中的一个唯一标识,用于标识一个result map
         result 注入到字段或 JavaBean 属性的普通结果
     -->
    <resultMap type="User" id="userResultMap">
        <!--  <id property="id" column="user_id"/>-->
        <!-- property 映射到列结果的字段或属性。
             column 从数据库中得到的列名,或者是列名的重命名标签。
         -->
        <result property="username" column="name"/>
        <result property="age" column="age"/>
    </resultMap>

    <!-- id 在命名空间中唯一的标识符,可以被用来引用这条语句
         resultMap 外部 resultMap 的命名引用
         resultType 从这条语句中返回的期望类型的类的完全限定名或别名。
     -->
    <select id="findAllUser" resultMap="userResultMap" resultType="User">
        select * from myuser
    </select>
</mapper>
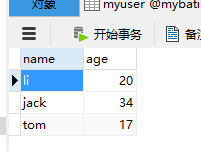
在mapper.xml文件中我们使用了一条查询语句,select * from myuser 。这要求我们有这个表。
我们可以在mysql中创建myuser表,里面添加username userage字段,并添加一些信息。下图是我添加的信息。
4、 创建UserService接口,里面添加接口方法 findAllUser()。同时在service.impl包下创建该接口的实现类UserServiceImpl,里面返回之间创建的mapper接口的接口方法。
package com.service;

import java.util.List;
import com.model.User;

public interface UserService {
    List<User> findAllUser();
}
package com.service.impl;

import java.util.List;
import javax.annotation.Resource;
import org.springframework.stereotype.Service;
import org.springframework.transaction.annotation.Transactional;
import com.mapper.UserMapper;
import com.model.User;
import com.service.UserService;

@Service
@Transactional
public class UserServiceImpl implements UserService{

    @Resource
    public UserMapper userMapper;

    @Override
    public List<User> findAllUser() {
        // TODO Auto-generated method stub
        return userMapper.findAllUser();
    }
}
5、 创建controller类,里面UserService接口的findAllUser()方法,并且将结果加到request。
package com.controller;

import java.io.File;
import java.util.List;

import javax.servlet.http.HttpServletRequest;

import org.apache.log4j.Logger;
import org.springframework.beans.factory.annotation.Autowired;
import org.springframework.stereotype.Controller;
import org.springframework.web.bind.annotation.RequestMapping;

import com.model.User;
import com.service.UserService;

@Controller
@RequestMapping("/user")
public class UserController {

    @Autowired
    private UserService userService;
    protected Logger log = Logger.getLogger(UserController.class);
    @RequestMapping("/findAllUser")
    public String findAllUser(HttpServletRequest request){
        List<User> listUser = userService.findAllUser();
        request.setAttribute("listUser",listUser);
        log.debug("服务器启动了,log4j开始工作了");
        log.error("服务器启动了,log4j开始工作了");
        return "/allUser";
    }
}
其中的log代码是为了测试log4j的,你可以不添加。
6、 在config包下创建mybatis-config.xml,配置mybatis.
<?xml version="1.0" encoding="UTF-8"?>
<!DOCTYPE configuration PUBLIC "-//mybatis.org//DTD Config 3.0//EN"
"http://mybatis.org/dtd/mybatis-3-config.dtd">
<configuration>
    <!-- typeAliases 类型别名是为 Java 类型设置一个短的名字。它只和 XML 配置有关,存在的意义仅在于用来减少类完全限定名的冗余。 -->
    <typeAliases>
        <typeAlias alias="User" type="com.model.User"/>
    </typeAliases>
    <!-- mappers 告诉 MyBatis 到哪里去找映射文件 -->
    <mappers>
        <mapper resource="com/mapper/userMapper.xml" />
    </mappers>
</configuration>
7、 在config包下创建jdbc的配置文件jdbc.properties,配置jdbc的信息
#jdbc config
jdbc.driver = com.mysql.jdbc.Driver
#jdbc.url = jdbc:mysql://localhost:3306/mybatis
jdbc.url = jdbc:mysql://localhost:3306/mybatis?useUnicode=true&characterEncoding=gbk
jdbc.username = root
jdbc.password = 123456
8、 在config包下创建spring-common.xml文件,里面引入jdbc mybatis的配置文件,并且设置mybatis自动扫描加载的sql映射文件
<?xml version="1.0" encoding="UTF-8"?>
<beans xmlns="http://www.springframework.org/schema/beans"
    xmlns:xsi="http://www.w3.org/2001/XMLSchema-instance" xmlns:p="http://www.springframework.org/schema/p"
    xmlns:context="http://www.springframework.org/schema/context" xmlns:tx="http://www.springframework.org/schema/tx"
    xsi:schemaLocation="
        http://www.springframework.org/schema/beans
        http://www.springframework.org/schema/beans/spring-beans-4.0.xsd
        http://www.springframework.org/schema/context
        http://www.springframework.org/schema/context/spring-context-4.0.xsd
        http://www.springframework.org/schema/tx
        http://www.springframework.org/schema/tx/spring-tx-4.0.xsd">

  <!-- 引入配置文件 -->
  <bean id="propertyConfigurer"
    class="org.springframework.beans.factory.config.PropertyPlaceholderConfigurer">
    <property name="location" value="classpath:config/jdbc.properties"/>
  </bean>

    <!-- 1. 数据源 : DriverManagerDataSource -->
    <bean id="dataSource"
        class="org.springframework.jdbc.datasource.DriverManagerDataSource">
        <property name="driverClassName" value="${jdbc.driver}" />
        <property name="url" value="${jdbc.url}" />
        <property name="username" value="${jdbc.username}" />
        <property name="password" value="${jdbc.password}" />
    </bean>

    <!--2. mybatis的SqlSession的工厂: SqlSessionFactoryBean dataSource:
        引用数据源MyBatis定义数据源,同意加载配置-->
    <bean id="sqlSessionFactory" class="org.mybatis.spring.SqlSessionFactoryBean">
        <property name="dataSource" ref="dataSource"></property>
        <property name="configLocation" value="classpath:config/mybatis-config.xml" />
    </bean>

    <!--3. mybatis自动扫描加载Sql映射文件/接口 : MapperScannerConfigurer sqlSessionFactory
        basePackage:指定sql映射文件/接口所在的包(自动扫描)    -->
    <bean class="org.mybatis.spring.mapper.MapperScannerConfigurer">
        <property name="basePackage" value="com.mapper"></property>
        <!-- <property name="sqlSessionFactory" ref="sqlSessionFactory"></property> -->  <!-- 会引起无法加载配置文件 -->
        <property name="sqlSessionFactoryBeanName" value="sqlSessionFactory"></property>
    </bean>

    <!--4. 事务管理 : DataSourceTransactionManager dataSource:引用上面定义的数据源    -->
    <bean id="txManager"
        class="org.springframework.jdbc.datasource.DataSourceTransactionManager">
        <property name="dataSource" ref="dataSource"></property>
    </bean>

    <!-- 5. 使用声明式事务: transaction-manager:引用上面定义的事务管理器 -->
    <tx:annotation-driven transaction-manager="txManager" />

</beans>
9、在config包下创建spring-mvc.xml文件,配置spring mvc
<?xml version="1.0" encoding="UTF-8"?>
<beans xmlns="http://www.springframework.org/schema/beans"
    xmlns:xsi="http://www.w3.org/2001/XMLSchema-instance" xmlns:context="http://www.springframework.org/schema/context"
    xmlns:mvc="http://www.springframework.org/schema/mvc"
    xsi:schemaLocation="http://www.springframework.org/schema/beans
    http://www.springframework.org/schema/beans/spring-beans-4.0.xsd
    http://www.springframework.org/schema/context
    http://www.springframework.org/schema/context/spring-context-4.0.xsd
    http://www.springframework.org/schema/mvc
    http://www.springframework.org/schema/mvc/spring-mvc-4.0.xsd">

    <!-- 注解扫描包 -->
    <context:component-scan base-package="com" />

    <!-- 开启注解 -->
    <mvc:annotation-driven />

    <!--  配置静态资源,直接映射到对应的文件夹,不被DispatcherServlet处理 -->
    <mvc:resources mapping="/img/**" location="/img/" />
    <mvc:resources mapping="/js/**" location="/js/" />
    <mvc:resources mapping="/css/**" location="/css/" />
    <mvc:resources mapping="/html/**" location="/html/" />

    <!-- 定义跳转的文件的前后缀 ,视图模式配置-->
    <bean id="viewResolver"
        class="org.springframework.web.servlet.view.InternalResourceViewResolver">
        <!-- 这里的配置我的理解是自动给后面action的方法return的字符串加上前缀和后缀,变成一个 可用的url地址 -->
        <property name="prefix" value="/WEB-INF/jsp/" />
        <property name="suffix" value=".jsp" />
    </bean>

</beans>
10、在WEB-INF下创建web.xml文件,里面加载Spring容器配置,设置Spring容器加载所有的配置文件的路径,
配置SpringMVC核心控制器,为DispatcherServlet建立映射
<?xml version="1.0" encoding="UTF-8"?>
<web-app xmlns:xsi="http://www.w3.org/2001/XMLSchema-instance"
    xmlns="http://java.sun.com/xml/ns/javaee"
    xsi:schemaLocation="http://java.sun.com/xml/ns/javaee http://java.sun.com/xml/ns/javaee/web-app_3_0.xsd" id="WebApp_ID" version="3.0">

     <!-- 加载Spring容器配置 -->
    <listener>
        <listener-class>org.springframework.web.context.ContextLoaderListener</listener-class>
    </listener>

    <!-- 设置Spring容器加载所有的配置文件的路径 -->
    <context-param>
        <param-name>contextConfigLocation</param-name>
        <param-value>classpath*:config/spring-*.xml</param-value>
    </context-param>

    <context-param>
        <param-name>webAppRootKey</param-name>
        <param-value>webapp.root</param-value>
    </context-param>
    <!-- 设置log4j配置文件的路径 -->
      <context-param>
        <param-name>log4jConfigLocation</param-name>
        <!--  <param-value>classpath*:config/log4j.properties</param-value>  -->
        <param-value>classpath:config/log4j.properties</param-value>
        <!--  <param-value>WEB-INF/log4j.properties</param-value> -->
    </context-param>
    <!-- 3000表示 开一条watchdog线程每60秒扫描一下配置文件的变化;这样便于日志存放位置的改变 -->
    <context-param>
        <param-name>log4jRefreshInterval</param-name>
        <param-value>3000</param-value>
    </context-param>
    <listener>
           <listener-class>org.springframework.web.util.Log4jConfigListener</listener-class>
    </listener>

    <!-- 配置SpringMVC核心控制器 -->
    <servlet>
        <servlet-name>springMVC</servlet-name>
        <servlet-class>org.springframework.web.servlet.DispatcherServlet</servlet-class>
        <init-param>
            <param-name>contextConfigLocation</param-name>
            <param-value>classpath*:config/spring-mvc.xml</param-value>
        </init-param>
        <!-- 启动加载 -->
        <load-on-startup>1</load-on-startup>
     </servlet>

    <!--为DispatcherServlet建立映射 -->
    <servlet-mapping>
        <servlet-name>springMVC</servlet-name>
        <!-- 此处可以可以配置成*.do -->
        <url-pattern>/</url-pattern>
    </servlet-mapping>

    <!-- 防止Spring内存溢出监听器 -->
    <listener>
         <listener-class>org.springframework.web.util.IntrospectorCleanupListener</listener-class>
    </listener>

   <!-- 解决工程编码过滤器 -->
   <filter>
        <filter-name>encodingFilter</filter-name>
        <filter-class>org.springframework.web.filter.CharacterEncodingFilter</filter-class>
        <init-param>
            <param-name>encoding</param-name>
            <param-value>UTF-8</param-value>
        </init-param>
        <init-param>
            <param-name>forceEncoding</param-name>
            <param-value>true</param-value>
        </init-param>
    </filter>

    <filter-mapping>
        <filter-name>encodingFilter</filter-name>
        <url-pattern>/*</url-pattern>
    </filter-mapping>

    <welcome-file-list>
        <welcome-file>index.jsp</welcome-file>
    </welcome-file-list>
</web-app>
11、最后在WEB-INF下创建一个jsp文件夹,里面创建一个返回页面文件allUser.jsp,用于显示用数据库查询到的用户信息。
<%@ page language="java" import="java.util.*" pageEncoding="utf-8"%>
<%
String path = request.getContextPath();
String basePath = request.getScheme()+"://"+request.getServerName()+":"+request.getServerPort()+path+"/";
%>
<%@taglib uri="http://java.sun.com/jsp/jstl/core" prefix="c"%>

<!DOCTYPE HTML PUBLIC "-//W3C//DTD HTML 4.01 Transitional//EN">
<html>
  <head>
    <base href="<%=basePath%>">
    <title>ssm</title>
    <meta http-equiv="pragma" content="no-cache">
    <meta http-equiv="cache-control" content="no-cache">
    <meta http-equiv="expires" content="0">
    <meta http-equiv="keywords" content="keyword1,keyword2,keyword3">
    <meta http-equiv="description" content="This is my page">
  </head>

  <body>
   <table border="1">
       <tbody>
           <tr>
               <th>姓名</th>
               <th>年龄</th>
           </tr>
           <c:if test="${!empty listUser }">
               <c:forEach items="${listUser }" var="list">
                   <tr>
                       <td>${list.username }</td>
                    <td>${list.age }</td>
                   </tr>
               </c:forEach>
           </c:if>
       </tbody>
   </table>
  </body>
</html>
12、在MyEclipse中使用Tomcat运行该工程,最后结果如下:
