自定义事件
通过prop属性,父组件可以向子组件传递数据,而子组件的自定义事件就是用来将内部的数据报告给父组件的。
<div id="app3">
    <my-component2 v-on:myclick="onClick"></my-component2>
</div>
<script>
  Vue.component('my-component2', {
    template: `<div>
    <button type="button" @click="childClick">点击我触发自定义事件</button>
    </div>`,
    methods: {
      childClick () {
        this.$emit('myclick', '这是我暴露出去的数据', '这是我暴露出去的数据2')
      }
    }
  })
  new Vue({
    el: '#app3',
    methods: {
      onClick () {
        console.log(arguments)
      }
    }
  })
</script>
如上所示,共分为以下步骤:
1.子组件在自己的方法中将自定义事件以及需要发出的数据通过以下代码发送出去
this.$emit('myclick', '这是我暴露出去的数据', '这是我暴露出去的数据2')
-
第一个参数是自定义事件的名字
-
后面的参数是依次想要发送出去的数据
2.父组件利用v-on为事件绑定处理器
<my-component2 v-on:myclick="onClick"></my-component2>
这样,在Vue实例的methods方法中就可以调用传进来的参数了
注意: 在使用v-on绑定事件处理方法时,不应该传进任何参数,而是直接写v-on:myclick="onClick",不然,子组件暴露出来的数据就无法获取到了
举例:
Vue.component('button-counter', {
  template: '<button v-on:click="increment">{{counter}}</button>',
  data: function () {
    return {
      counter: 0
    }
  },

  methods: {
    increment: function () {
      this.counter += 1
      this.$emit('increment-event')
    }
  }
})

new Vue({
  el: '#app',
  data: {
    totalCounter: 0
  },

  methods: {
    total_increment: function () {
      this.totalCounter += 1
    }
  }
})
<div id='app'>
      <button>{{ totalCounter }}</button>
      </br>
      <button-counter v-on:increment-event='total_increment'></button-counter>
      <button-counter v-on:increment-event='total_increment'></button-counter>
</div>
下面两个按钮是两个相同的子组件,并和上面那个按钮共同组成了父组件。
当点击任意一个子组件的按钮,使其加1,都会使得父组件+1,最终:父组件的数值 = 子组件的数值之和
点击下方左边button

点击下方右边button


自定义事件的原理
通过$emit(event)触发一个自定义事件
然后通过$on(event,callback) 去执行对应的callback(回调函数)
(两个event是字符串,且必须名称相同)
但$on不能在父组件中监听子组件抛出的事件,所以我们要做到这一点,可以在父组件的模板中使用到子组件的时候,直接用v-on绑定 (和$on作用效果一致) 就像上面那样:
<button-counter v-on:increment-event='total_increment'></button-counter>
这样一来,自定义事件的雏形就变得和原生事件一样了
即使这样,上面的代码可能还是有些难理解,我认为比较重要的是这一段:
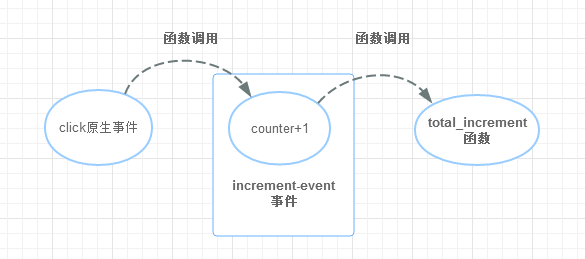
increment: function () {
      this.counter += 1
      this.$emit('increment-event')
  }
因为我们对于事件的运用主要是:利用事件和函数绑定,从而在事件触发的时候能执行相印的函数
所以! 对于自定义事件,我们要解决的问题就是,“这个事件在什么时候被触发” 在上面的代码中,触发事件的时间(执行 this.$emit('increment-event')的时间)
就恰恰是执行this.counter += 1 的时候
绑定原生事件
如果想在某个组件的根元素上监听一个原生事件。可以使用 .native 修饰 v-on
<my-component v-on:click.native="doTheThing"></my-component>
探究v-model
v-model可以对表单控件实现数据的双向绑定,它的原理就是利用了绑定属性和事件来实现的。比如input控件。不使用v-model,可以这样实现数据的双向绑定:
<div id="app4">
    <input type="text" v-bind:value="text" v-on:input="changeValue($event.target.value)">
    {{text}}
  </div>
  <script>
      new Vue({
        el: '#app4',
        data: {
          text: '444'
        },
        methods: {
          changeValue (value) {
            this.text = value
          }
        }
      })
  </script>
面的代码同样实现了数据的双向绑定。其本质就是:
-
把
input的value特性绑定到Vue实例的属性text上,text改变,input中的内容也会改变 -
然后把表单的
input事件处理函数设置为Vue实例的一个方法,这个方法会根据输入参数改变Vue中text`的值 -
相应的,在
input中输入内容时,触发了input事件,把event.target.value传给这个方法,最后就实现了改变绑定的数据的效果。
而v-model就是上面这种方式的语法糖,也就是把上面的写法封装了一下,方便我们使用。
使用自定义事件创建自定义的表单输入组件
理解了v-model的内幕,也就可以把这个效果用在自定义表单组件上了。
来实现一个简单的只能输入hello的表单输入组件。
<div id="app5">
    <my-component3 v-model="hello"></my-component3>
    <div>{{hello}}</div>
</div>
<script>
  Vue.component('my-component3', {
    template: `<input ref="input" type="text" :value="value" @input="checkInput($event.target.value)">`,
    props: ['value'],
    methods: {
      checkInput (value) {
        var hello = 'hello'
        if (!hello.includes(value)) {
          this.$emit('input', hello)
          this.$refs.input.value = hello
        } else {
          this.$emit('input', value)
        }
      }
    }
  })
  new Vue({
    el: '#app5',
    data: {
      hello: ''
    }
  })
</script>
定制组件的v-model
默认情况下,一个组件的 v-model 会使用 value 属性和 input 事件,但是诸如单选框、复选框之类的输入类型可能把 value 属性用作了别的目的。model 选项可以回避这样的冲突:
Vue.component('my-checkbox', {
  model: {
    prop: 'checked',   // 将输入的特性改为checked
    event: 'change'        // 触发的自定义事件类型为change
  },
  props: {
    checked: Boolean,
    // this allows using the `value` prop for a different purpose
    value: String
  }
})
这样设置的话,
<my-checkbox v-model="foo" value="some value"></my-checkbox>
上面的代码就等同于
<my-checkbox :checked="foo" @change="val => { foo = val }" value="some value"></my-checkbox>
实际使用时,与之前不同的地方是:
-
把子组件中接收外部数据的
prop属性改为checked -
向父组件发出事件时,事件类型应改为
change
Vue.component('my-component3', {
    template: `<input ref="input" type="text" :value="checked" @input="checkInput($event.target.value)">`,
    props: ['checked'],        // 属性名改变
    model: {
      prop: 'checked',
      event: 'change'
    },
    methods: {
      checkInput (value) {
        var hello = 'hello'
        if (!hello.includes(value)) {
          this.$emit('change', hello)   // 事件类型改变
          this.$refs.input.value = hello
        } else {
          this.$emit('change', value)  // 事件类型改变
        }
      }
    }
  })
、