七、J.U.C - AQS
java.util.concurrent(J.U.C)大大提高了并发性能,AQS 被认为是 J.U.C 的核心。
1.1 CountdownLatch
用来控制一个线程等待多个线程。
维护了一个计数器 cnt,每次调用 countDown() 方法会让计数器的值减 1,减到 0 的时候,那些因为调用 await() 方法而在等待的线程就会被唤醒。

public class CountdownLatchExample {
public static void main(String[] args) throws InterruptedException {
final int totalThread = 10;
CountDownLatch countDownLatch = new CountDownLatch(totalThread);
ExecutorService executorService = Executors.newCachedThreadPool();
for (int i = 0; i < totalThread; i++) {
executorService.execute(() -> {
System.out.print("run..");
countDownLatch.countDown();
});
}
countDownLatch.await();
System.out.println("end");
executorService.shutdown();
}
}
run..run..run..run..run..run..run..run..run..run..end
1.2 CyclicBarrier
用来控制多个线程互相等待,只有当多个线程都到达时,这些线程才会继续执行。
和 CountdownLatch 相似,都是通过维护计数器来实现的。线程执行 await() 方法之后计数器会减 1,并进行等待,直到计数器为 0,所有调用 awati() 方法而在等待的线程才能继续执行。
CyclicBarrier 和 CountdownLatch 的一个区别是,CyclicBarrier 的计数器通过调用 reset() 方法可以循环使用,所以它才叫做循环屏障。
CyclicBarrier 有两个构造函数,其中 parties 指示计数器的初始值,barrierAction 在所有线程都到达屏障的时候会执行一次。
public CyclicBarrier(int parties, Runnable barrierAction) {
if (parties <= 0) throw new IllegalArgumentException();
this.parties = parties;
this.count = parties;
this.barrierCommand = barrierAction;
}
public CyclicBarrier(int parties) {
this(parties, null);
}

public class CyclicBarrierExample {
public static void main(String[] args) {
final int totalThread = 10;
CyclicBarrier cyclicBarrier = new CyclicBarrier(totalThread);
ExecutorService executorService = Executors.newCachedThreadPool();
for (int i = 0; i < totalThread; i++) {
executorService.execute(() -> {
System.out.print("before..");
try {
cyclicBarrier.await();
} catch (InterruptedException | BrokenBarrierException e) {
e.printStackTrace();
}
System.out.print("after..");
});
}
executorService.shutdown();
}
}
before..before..before..before..before..before..before..before..before..before..after..after..after..after..after..after..after..after..after..after..
1.3 Semaphore
Semaphore 类似于操作系统中的信号量,可以控制对互斥资源的访问线程数。

以下代码模拟了对某个服务的并发请求,每次只能有 3 个客户端同时访问,请求总数为 10。
public class SemaphoreExample {
public static void main(String[] args) {
final int clientCount = 3;
final int totalRequestCount = 10;
Semaphore semaphore = new Semaphore(clientCount);
ExecutorService executorService = Executors.newCachedThreadPool();
for (int i = 0; i < totalRequestCount; i++) {
executorService.execute(()->{
try {
semaphore.acquire();
System.out.print(semaphore.availablePermits() + " ");
} catch (InterruptedException e) {
e.printStackTrace();
} finally {
semaphore.release();
}
});
}
executorService.shutdown();
}
2 1 2 2 2 2 2 1 2 2
八、J.U.C - 其它组件
1.4 FutureTask
在介绍 Callable 时我们知道它可以有返回值,返回值通过 Future 进行封装。FutureTask 实现了 RunnableFuture 接口,该接口继承自 Runnable 和 Future 接口,这使得 FutureTask 既可以当做一个任务执行,也可以有返回值。
public class FutureTask<V> implements RunnableFuture<V>
public interface RunnableFuture<V> extends Runnable, Future<V>
FutureTask 可用于异步获取执行结果或取消执行任务的场景。当一个计算任务需要执行很长时间,那么就可以用 FutureTask 来封装这个任务,主线程在完成自己的任务之后再去获取结果。
public class FutureTaskExample {
public static void main(String[] args) throws ExecutionException, InterruptedException {
FutureTask<Integer> futureTask = new FutureTask<Integer>(new Callable<Integer>() {
@Override[陈文文1]
public Integer call() throws Exception {
int result = 0;
for (int i = 0; i < 100; i++) {
Thread.sleep(10);
result += i;
}
return result;
}
});
Thread computeThread = new Thread(futureTask);
computeThread.start();
Thread otherThread = new Thread(() -> {
System.out.println("other task is running...");
try {
Thread.sleep(1000);
} catch (InterruptedException e) {
e.printStackTrace();
}
});
otherThread.start();
System.out.println(futureTask.get());
}
}
other task is running...
4950
1.5 BlockingQueue
java.util.concurrent.BlockingQueue 接口有以下阻塞队列的实现:
- FIFO 队列 :LinkedBlockingQueue、ArrayBlockingQueue(固定长度)
- 优先级队列 :PriorityBlockingQueue
提供了阻塞的 take() 和 put() 方法:如果队列为空 take() 将阻塞,直到队列中有内容;如果队列为满 put() 将阻塞,直到队列有空闲位置。
使用 BlockingQueue 实现生产者消费者问题
public class ProducerConsumer {
private static BlockingQueue<String> queue = new ArrayBlockingQueue<>(5);
private static class Producer extends Thread {
@Override
public void run() {
try {
queue.put("product");
} catch (InterruptedException e) {
e.printStackTrace();
}
System.out.print("produce..");
}
}
private static class Consumer extends Thread {
@Override
public void run() {
try {
String product = queue.take();
} catch (InterruptedException e) {
e.printStackTrace();
}
System.out.print("consume..");
}
}
}
public static void main(String[] args) {
for (int i = 0; i < 2; i++) {
Producer producer = new Producer();
producer.start();
}
for (int i = 0; i < 5; i++) {
Consumer consumer = new Consumer();
consumer.start();
}
for (int i = 0; i < 3; i++) {
Producer producer = new Producer();
producer.start();
}
}
produce..produce..consume..consume..produce..consume..produce..consume..produce..consume..
produce..produce..consume..consume..produce..produce..produce..consume..consume..consume..
1.6 ForkJoin
主要用于并行计算中,和 MapReduce 原理类似,都是把大的计算任务拆分成多个小任务并行计算。
public class ForkJoinExample extends RecursiveTask<Integer> {
private final int threshold = 5;
private int first;
private int last;
public ForkJoinExample(int first, int last) {
this.first = first;
this.last = last;
}
@Override
protected Integer compute() {
int result = 0;
if (last - first <= threshold) {
// 任务足够小则直接计算
for (int i = first; i <= last; i++) {
result += i;
}
} else {
// 拆分成小任务
int middle = first + (last - first) / 2;
ForkJoinExample leftTask = new ForkJoinExample(first, middle);
ForkJoinExample rightTask = new ForkJoinExample(middle + 1, last);
leftTask.fork();
rightTask.fork();
result = leftTask.join() + rightTask.join();
}
return result;
}
}
public static void main(String[] args) throws ExecutionException, InterruptedException {
ForkJoinExample example = new ForkJoinExample(1, 10000);
ForkJoinPool forkJoinPool = new ForkJoinPool();
Future result = forkJoinPool.submit(example);
System.out.println(result.get());
}
ForkJoin 使用 ForkJoinPool 来启动,它是一个特殊的线程池,线程数量取决于 CPU 核数。
public class ForkJoinPool extends AbstractExecutorService
ForkJoinPool [陈文文2] 实现了工作窃取算法来提高 CPU 的利用率。每个线程都维护了一个双端队列,用来存储需要执行的任务。工作窃取算法允许空闲的线程从其它线程的双端队列中窃取一个任务来执行。窃取的任务必须是最晚的任务,避免和队列所属线程发生竞争。例如下图中,Thread2 从 Thread1 的队列中拿出最晚的 Task1 任务,Thread1 会拿出 Task2 来执行,这样就避免发生竞争。但是如果队列中只有一个任务时还是会发生竞争。

九、线程不安全示例
如果多个线程对同一个共享数据进行访问而不采取同步操作的话,那么操作的结果是不一致的。
以下代码演示了 1000 个线程同时对 cnt 执行自增操作,操作结束之后它的值有可能小于 1000。
public class ThreadUnsafeExample {
private int cnt = 0;
public void add() {
cnt++;
}
public int get() {
return cnt;
}
}
public static void main(String[] args) throws InterruptedException {
final int threadSize = 1000;
ThreadUnsafeExample example = new ThreadUnsafeExample();[陈文文3]
final CountDownLatch countDownLatch = new CountDownLatch(threadSize[陈文文4] );
ExecutorService executorService [陈文文5] = Executors.newCachedThreadPool();
for (int i = 0; i < threadSize; i++) {
executorService.execute(() -> {
example.add();
countDownLatch.countDown();[陈文文6]
});
}
countDownLatch.await();[陈文文7]
executorService.shutdown();[陈文文8]
System.out.println(example.get());
}
997
十、Java 内存模型
Java 内存模型试图屏蔽各种硬件和操作系统的内存访问差异,以实现让 Java 程序在各种平台下都能达到一致的内存访问效果。
1.7 主内存与工作内存
处理器上的寄存器的读写的速度比内存快几个数量级,为了解决这种速度矛盾,在它们之间加入了高速缓存。
加入高速缓存带来了一个新的问题:缓存一致性。如果多个缓存共享同一块主内存区域,那么多个缓存的数据可能会不一致,需要一些协议来解决这个问题。

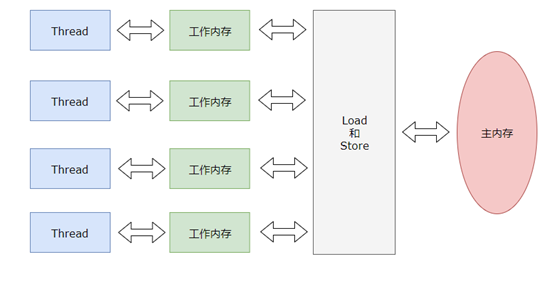
所有的变量都存储在主内存中,每个线程还有自己的工作内存,工作内存存储在高速缓存或者寄存器中,保存了该线程使用的变量的主内存副本拷贝。
线程只能直接操作工作内存中的变量,不同线程之间的变量值传递需要通过主内存来完成。
1.8 内存间交互操作
Java 内存模型定义了 8 个操作来完成主内存和工作内存的交互操作。

- read:把一个变量的值从主内存传输到工作内存中
- load:在 read 之后执行,把 read 得到的值放入工作内存的变量副本中
- use:把工作内存中一个变量的值传递给执行引擎
- assign:把一个从执行引擎接收到的值赋给工作内存的变量
- store:把工作内存的一个变量的值传送到主内存中
- write:在 store 之后执行,把 store 得到的值放入主内存的变量中
- lock:作用于主内存的变量
- unlock
1.9 内存模型三大特性
1. 原子性
Java 内存模型保证了 read、load、use、assign、store、write、lock 和 unlock 操作具有原子性,例如对一个 int 类型的变量执行 assign 赋值操作,这个操作就是原子性的。但是 Java 内存模型允许虚拟机将没有被 volatile 修饰的 64 位数据(long,double)的读写操作划分为两次 32 位的操作来进行,即 load、store、read 和 write 操作可以不具备原子性。
有一个错误认识就是,int 等原子性的类型在多线程环境中不会出现线程安全问题。前面的线程不安全示例代码中,cnt 属于 int 类型变量,1000 个线程对它进行自增操作之后,得到的值为 997 而不是 1000。
为了方便讨论,将内存间的交互操作简化为 3 个:load、assign、store。
下图演示了两个线程同时对 cnt 进行操作,load、assign、store 这一系列操作整体上看不具备原子性,那么在 T1 修改 cnt 并且还没有将修改后的值写入主内存,T2 依然可以读入旧值。可以看出,这两个线程虽然执行了两次自增运算,但是主内存中 cnt 的值最后为 1 而不是 2。因此对 int 类型读写操作满足原子性只是说明 load、assign、store 这些单个操作具备原子性。

AtomicInteger 能保证多个线程修改的原子性。

使用 AtomicInteger 重写之前线程不安全的代码之后得到以下线程安全实现:
public class AtomicExample {
private AtomicInteger [陈文文9] cnt = new AtomicInteger();
public void add() {
cnt.incrementAndGet();
}
public int get() {
return cnt.get();
}
}
public static void main(String[] args) throws InterruptedException {
final int threadSize = 1000;
AtomicExample example = new AtomicExample(); // 只修改这条语句
final CountDownLatch countDownLatch = new CountDownLatch(threadSize);
ExecutorService executorService = Executors.newCachedThreadPool();
for (int i = 0; i < threadSize; i++) {
executorService.execute(() -> {
example.add();
countDownLatch.countDown();
});
}
countDownLatch.await();
executorService.shutdown();
System.out.println(example.get());
}
1000
除了使用原子类之外,也可以使用 synchronized 互斥锁来保证操作的原子性。它对应的内存间交互操作为:lock 和 unlock,在虚拟机实现上对应的字节码指令为 monitorenter 和 monitorexit。
public class AtomicSynchronizedExample {
private int cnt = 0;
public synchronized [陈文文10] void add() {
cnt++;
}
public synchronized int get() {
return cnt;
}
}
public static void main(String[] args) throws InterruptedException {
final int threadSize = 1000;
AtomicSynchronizedExample example = new AtomicSynchronizedExample();
final CountDownLatch countDownLatch = new CountDownLatch(threadSize);
ExecutorService executorService = Executors.newCachedThreadPool();
for (int i = 0; i < threadSize; i++) {
executorService.execute(() -> {
example.add();
countDownLatch.countDown();
});
}
countDownLatch.await();
executorService.shutdown();
System.out.println(example.get());
}
2. 可见性
可见性指当一个线程修改了共享变量的值,其它线程能够立即得知这个修改。Java 内存模型是通过在变量修改后将新值同步回主内存,在变量读取前从主内存刷新变量值来实现可见性的。
主要有三种实现可见性的方式:
- volatile
- synchronized,对一个变量执行 unlock 操作之前,必须把变量值同步回主内存。
- final,被 final 关键字修饰的字段在构造器中一旦初始化完成,并且没有发生 this 逃逸(其它线程通过 this 引用访问到初始化了一半的对象),那么其它线程就能看见 final 字段的值。
对前面的线程不安全示例中的 cnt 变量使用 volatile 修饰,不能解决线程不安全问题,因为 volatile 并不能保证操作的原子性。
3. 有序性
有序性是指:在本线程内观察,所有操作都是有序的。在一个线程观察另一个线程,所有操作都是无序的,无序是因为发生了指令重排序。在 Java 内存模型中,允许编译器和处理器对指令进行重排序,重排序过程不会影响到单线程程序的执行,却会影响到多线程并发执行的正确性。
volatile 关键字通过添加内存屏障的方式来禁止指令重排,即重排序时不能把后面的指令放到内存屏障之前。
也可以通过 synchronized 来保证有序性,它保证每个时刻只有一个线程执行同步代码,相当于是让线程顺序执行同步代码。
1.10 先行发生原则
上面提到了可以用 volatile 和 synchronized 来保证有序性。除此之外,JVM 还规定了先行发生原则,让一个操作无需控制就能先于另一个操作完成。
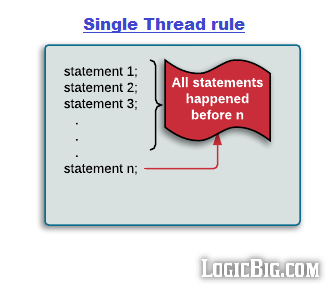
1. 单一线程原则
Single Thread rule
在一个线程内,在程序前面的操作先行发生于后面的操作。
2. 管程锁定规则
Monitor Lock Rule
一个 unlock 操作先行发生于后面对同一个锁的 lock 操作。

3. volatile 变量规则
Volatile Variable Rule
对一个 volatile 变量的写操作先行发生于后面对这个变量的读操作。

4. 线程启动规则
Thread Start Rule
Thread 对象的 start() 方法调用先行发生于此线程的每一个动作。

5. 线程加入规则
Thread Join Rule
Thread 对象的结束先行发生于 join() 方法返回。

6. 线程中断规则
Thread Interruption Rule
对线程 interrupt() 方法的调用先行发生于被中断线程的代码检测到中断事件的发生,可以通过 interrupted() 方法检测到是否有中断发生。
7. 对象终结规则
Finalizer Rule
一个对象的初始化完成(构造函数执行结束)先行发生于它的 finalize() 方法的开始。
8. 传递性
Transitivity
如果操作 A 先行发生于操作 B,操作 B 先行发生于操作 C,那么操作 A 先行发生于操作 C。