1、router-link和router-view组件
router-link组件实际上是封装了一个a标签(链接标签),里面有一个重要属性:“to”,它的值是一个路径,其路径对应的渲染组件,要在路由列表(router->router.js)里定义,该路由列表为一个数组形式存放不同的路由对象,一个基本的路由对象,必须包含两个属性:path、component;path为对应的路径(在url输入的路径),component为对应path路径要渲染的组件
router-view组件是一个视图渲染组件,通过router-link实现跳转的组件,其加载动作都需要通过router-view来渲染
2、路由配置
- 动态路由
通过路由url中传递不同的参数给同一组件,达到呈现不同内容的目的:
- 路由列表中添加一个动态路由定义:
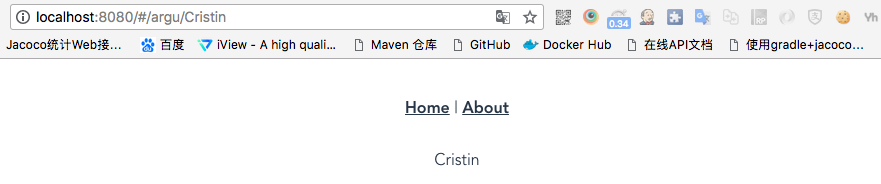
{ path: '/argu/:name', component: () => import('@/views/argu.vue') } - Views中增加对应的argu.vue组件:
<template>
  <div>
    {{ $route.params.name }}
  </div>
</template>

<script>
export default {

}
</script>
<style lang="less" scoped>

</style>
备注:
{{ $route.params.name }}可以直接获取到路由列表中定义的:name值,$route表示获取当前路由对象
- 路由列表中添加一个动态路由定义:
Run后执行的效果为:
- 嵌套路由
顾名思义组件套组件呈现,实现思路为:路由列表定义一个父组件:parent,然后在父组件下定义子组件:child,强调:在parent.vue中必须要增加视图渲染组件(router-view)才能使子组件渲染出来,具体实现步骤:
- 路由列表增加嵌套关系的组件:
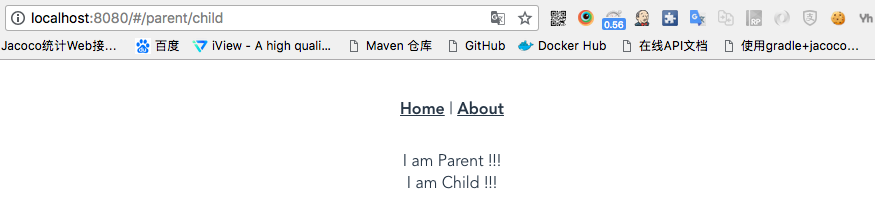
{ path: '/parent', component: () => import('@/views/parent.vue'), children: [ { path: 'child', component: () => import('@/views/child.vue') } ] } - Views中增加对应的parent.vue、child.vue组件:
-
parent.vue:
<template> <div> I am Parent !!! <router-view/> </div> </template> - child.vue:
<template>
  <div>
    I am Child !!!
  </div>
</template>
-
- 路由列表增加嵌套关系的组件:
Run后执行的效果为:
- 命名路由
通过给路由对象增加name属性,其他组件通过name来读取该对象的方法,比如 home和about路由对象增加name属性:
{
    path: '/',
    name: 'home',
    component: Home
  },
  {
    path: '/about',
    name: 'about',
    // route level code-splitting
    // this generates a separate chunk (about.[hash].js) for this route
    // which is lazy-loaded when the route is visited.
    component: () => import(/* webpackChunkName: "about" */ '@/views/About.vue')
  }
然后App.vue中通过修改router-link组件的to方法,由原有的路径访问更改为对象的name属性访问:
<template>
  <div id="app">
    <div id="nav">
      <router-link :to="{ name: 'home' }">Home</router-link>
      <router-link :to="{ name: 'about' }">About</router-link>
    </div>
    <router-view/>
  </div>
</template>
备注::to是v-bind:to的缩写两个等同
- 命名视图
如果想在同一个页面上显示多个视图,而且让每一个视图显示指定的位置,实现思路:
- 在App.vue中增加命名视图:
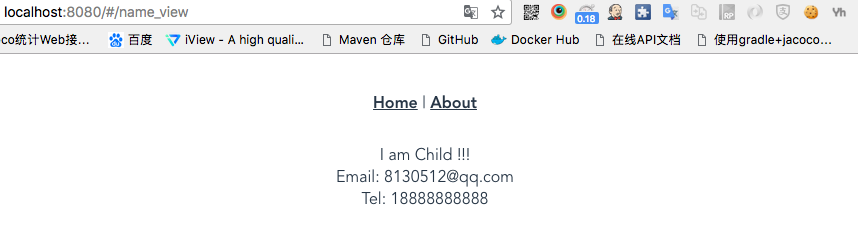
<template> <div id="app"> <div id="nav"> <router-link :to="{ name: 'home' }">Home</router-link> | <router-link :to="{ name: 'about' }">About</router-link> </div> <router-view/> <router-view name="email"/> <router-view name="tel"/> </div> </template> - 路由列表中增加命名路由定义【只是由传统的路由对象的component调整为复式的components】,如果1步骤没有命名,则在2步骤中默认的路由对象为default:
{ path: '/name_view', components: { default: () => import('@/views/child.vue'), email: () => import('@/views/email.vue'), tel: () => import('@/views/tel.vue') } } - Views中增加对应的组件
- email.vue:
<template>
  <div>
    Email: 8130512@qq.com
  </div>
</template>
- tel.vue:
<template>
  <div>
    Tel: 18888888888
  </div>
</template>
- email.vue:
- 在App.vue中增加命名视图:
Run后的结果呈现:
3、重定向和别名
- 重定向:把当前要访问的url 重定向到另一个url上,实现思路:在路由列表中增加组件对象:
{
    path: '/main',
    redirect: '/'
  }
备注:实现的内容就是当访问main这个url的时候,自动重定向到/(首页),也可以通过命名路由的方式来访问
{
    path: '/main',
    redirect: {
      name: 'home'
    }
  }
也可以通过方法的方式来实现:
{
    path: '/main',
    redirect: to => {
      return {
        name: 'home'
      }
    }
  }
2. 别名:我们在访问一个路径的时候,可以给它定义一个其他的名字,效果一样都是访问同一个页面,别名的关键字用的是:alias 用法跟name一样, 注意别名前面要有反斜杠:
{
    path: '/',
    name: 'home',
    alias: '/home_page',
    component: Home
  }
4、history模式
路由实例中初始化的时候默认是有一个mode方法的,该方法值是hash,就是我们看到的在url中存在的#号字符地址,如果我们想在url中将这种默认的方法剔除掉,可以重新对方法赋值:history,路由实例调整为:
import Vue from 'vue'
import Router from 'vue-router'
import routes from './router'

Vue.use(Router)

export default new Router({
  mode: 'history',
  routes
})
然后在路由列表中,增加方法来实现检索不到的地址,则所有非定义的url都跳转到指定组件中去,这里有一个知识点就是路由列表是由上到下来读取的,路由对象间存在读取顺序关系
5、编程式的导航【重点】,通过js来控制页面的跳转、返回等动作
- 返回上一页:思路:通过事件定义,来获取当前路由实例,通过实例调用实例的指定方法:go、back 等
<template>
  <div class="home">
    <img alt="Vue logo" src="../assets/img/logo.png">
    <HelloWorld msg="Welcome to Your Vue.js App"/>
    <button @click="handleClick">返回上一页</button>
  </div>
</template>

<script>
// @ is an alias to /src
import HelloWorld from '@/components/HelloWorld.vue'

export default {
  name: 'home',
  components: {
    HelloWorld
  },
  methods: {
    handleClick () {
      this.$router.go(-1)
    }
  }
}
</script>
<template>
  <div class="home">
    <img alt="Vue logo" src="../assets/img/logo.png">
    <HelloWorld msg="Welcome to Your Vue.js App"/>
    <button @click="handleClick">返回上一页</button>
  </div>
</template>

<script>
// @ is an alias to /src
import HelloWorld from '@/components/HelloWorld.vue'

export default {
  name: 'home',
  components: {
    HelloWorld
  },
  methods: {
    handleClick () {
      this.$router.back()
    }
  }
}
</script>
也可以通过参数来实现处理,使得逻辑更加缜密:
<template>
  <div class="home">
    <img alt="Vue logo" src="../assets/img/logo.png">
    <HelloWorld msg="Welcome to Your Vue.js App"/>
    <button @click="handleClick('back')">返回上一页</button>
  </div>
</template>

<script>
// @ is an alias to /src
import HelloWorld from '@/components/HelloWorld.vue'

export default {
  name: 'home',
  components: {
    HelloWorld
  },
  methods: {
    handleClick (type) {
      if (type === 'back') this.$router.back()
    }
  }
}
</script>
- 通过js来实行指定页面的跳转,思路:通过逻辑判断来使得页面跳转到指定路径,这里要用到的是当前路由实例的push方法,该方法是检索历史路由,然后通过地址直接跳转到指定的路由地址上:
<template>
  <div class="home">
    <img alt="Vue logo" src="../assets/img/logo.png">
    <HelloWorld msg="Welcome to Your Vue.js App"/>
    <button @click="handleClick('back')">返回上一页</button>
    <button @click="handleClick('push')">跳转到Parent页面</button>
  </div>
</template>

<script>
// @ is an alias to /src
import HelloWorld from '@/components/HelloWorld.vue'

export default {
  name: 'home',
  components: {
    HelloWorld
  },
  methods: {
    handleClick (type) {
      if (type === 'back') this.$router.back()
      else if (type === 'push') this.$router.push('/parent')
    }
  }
}
</script>
还可以使用命名的方式跳转到parent上:
<template>
  <div class="home">
    <img alt="Vue logo" src="../assets/img/logo.png">
    <HelloWorld msg="Welcome to Your Vue.js App"/>
    <button @click="handleClick('back')">返回上一页</button>
    <button @click="handleClick('push')">跳转到Parent页面</button>
  </div>
</template>

<script>
// @ is an alias to /src
import HelloWorld from '@/components/HelloWorld.vue'

export default {
  name: 'home',
  components: {
    HelloWorld
  },
  methods: {
    handleClick (type) {
      if (type === 'back') this.$router.back()
      else if (type === 'push') {
        this.$router.push({
          name: 'parent'
        })
      }
    }
  }
}
</script>
- 替换到指定页面,比如替换到parent页面,思路:调用当前路由实例的replace方法来替换当前页面
<template>
  <div class="home">
    <img alt="Vue logo" src="../assets/img/logo.png">
    <HelloWorld msg="Welcome to Your Vue.js App"/>
    <button @click="handleClick('back')">返回上一页</button>
    <button @click="handleClick('push')">跳转到Parent页面</button>
    <button @click="handleClick('replace')">替换到Parent页面</button>
  </div>
</template>

<script>
// @ is an alias to /src
import HelloWorld from '@/components/HelloWorld.vue'

export default {
  name: 'home',
  components: {
    HelloWorld
  },
  methods: {
    handleClick (type) {
      if (type === 'back') this.$router.back()
      else if (type === 'push') {
        this.$router.push({
          name: 'parent'
        })
      } else if (type === 'replace') {
        this.$router.replace({
          name: 'parent'
        })
      }
    }
  }
}
</script>
push和replace的区别:push是在浏览历史里加入一个记录,replace是将当前的浏览历史替换为想要替换的页面,之后再做回退,会回退到parent
6、路由组件传参:如果在一个页面中,需要根据路由去获得参数,去对页面进行一些逻辑处理,首先可以通过this.$router来获取路由实例的参数,这样页面组件和路由就进行了耦合,为了进行分离,更大程度复用,我们推出了路由组件传参的实现方案:
- 第一种传参方式为:布尔模式,它适用于有动态路由传参的路由配置中,实现思路为:将路由的参数作为属性来传入到组件中
<template>
  <div>
    {{ name }}
  </div>
</template>

<script>
export default {
  props: {
    name: {
      type: String,
      default: 'apple'
    }
  }
}
</script>
<style lang="less" scoped>

</style>
{ path: '/argu/:name', component: () => import('@/views/argu.vue'), props: true }这样随着不同的url里的参数录入,组件都会展示对应的参数数据
- 第二种传参方式为:对象模式,这种模式适用于普通传统的路由类型,没有参数,实现思路为,直接在组件里定义一个属性,然后路由列表中定义一个路由对象的属性值,默认情况下取的是组件里的默认值,存在各个路由对象下则取对应路由对象的属性值:
<template>
  <div class="about">
    <h1>This is an about page</h1>
    <d>
      {{ food }}
    </d>
  </div>
</template>
<script>
export default {
  props: {
    food: {
      type: String,
      default: 'apple'
    }
  }
}
</script>
{
    path: '/about',
    name: 'about',
    // route level code-splitting
    // this generates a separate chunk (about.[hash].js) for this route
    // which is lazy-loaded when the route is visited.
    component: () => import(/* webpackChunkName: "about" */ '@/views/About.vue'),
    props: {
      food: 'banana'
    }
  }
- 第三种传参方式为:函数模式,适合于在传入的属性中,能够根据当前的路由,来做一些处理逻辑,从而设置传入组件的属性值,就是如果URL+参数,实现传递不同的内容给组件,实现逻辑:路由列表中以函数方式同等属性名(food)来获取当前路由实例的指定属性的值:route.query.food,然后组件中定义同名属性以承接路由列表传递的属性值,然后供业务逻辑处理呈现
{
    path: '/',
    name: 'home',
    alias: '/home_page',
    component: Home,
    props: route => ({
      food: route.query.food
    })
  }
  props: {
    food: {
      type: String,
      default: 'apple'
    }
  }