Angular 项目创建时,就会问你是否需要创建项目 routing,你可以选择是。如果你创建时没有选择,也可以手动添加一个app-routing.module.ts 文件如下:

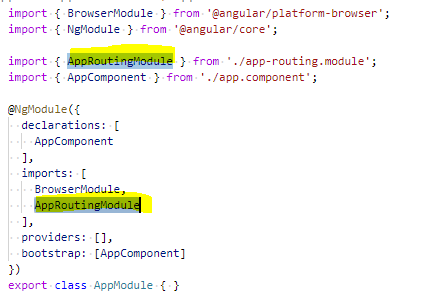
在 app.module.ts 中引入并指明 routing 模块
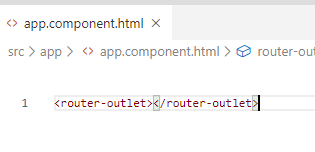
Angular 通过在 html 中加入 <router-outlet></router-outlet> 来实现 view 的占位符,上面路由文件中设置的路由,必须配合 view 的占位符一起使用。
在 app.component.html 中加入占位符
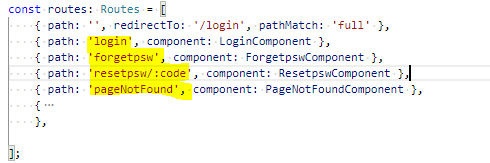
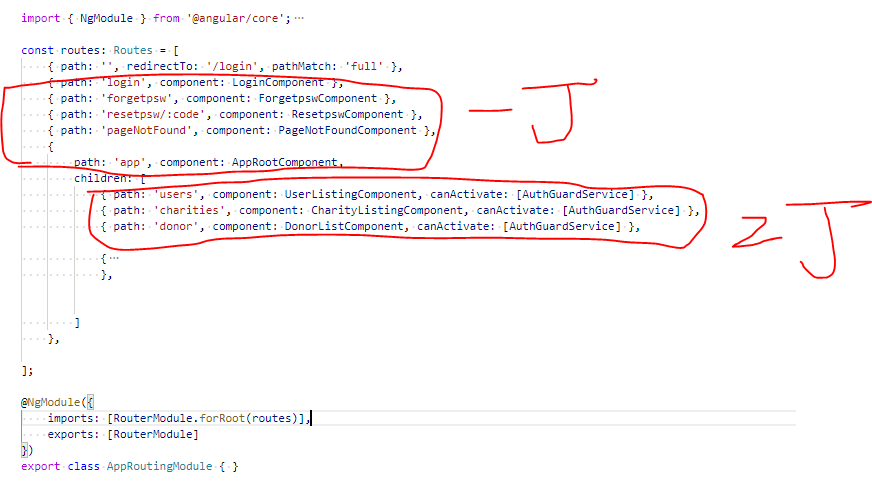
在 app-routing.module.ts 中添加路由。下面的 LoginComponent, ForgetpswComponent,都是我们通过 ng g c [componentname] 方式来创建的各种 component.
那么在browser 中输入: http://localhost:4200/login, 就会看到我们在 LoginComponent 中定义的界面。
根据业务要求,我们有时需要在路由中内嵌路由。
例如:
第一级路由包括:登录页面,密码找回页面,重置密码页面,登录后的主页面
在‘登录后的主页面中’,导航栏和工具栏是不变的,而导航栏之外的各个内容的变换又需要用到子级路由去显示:用户信息列表,产品信息列表,组织列表等。
我们的思路是:
- 在App.component.html 中放置 <router-outlet></router-outlet> 作为一级路由
- 创建一个组件(appRootComponent)用来显示登陆后的内容,包含,工具栏,导航栏,和子级路由占位符
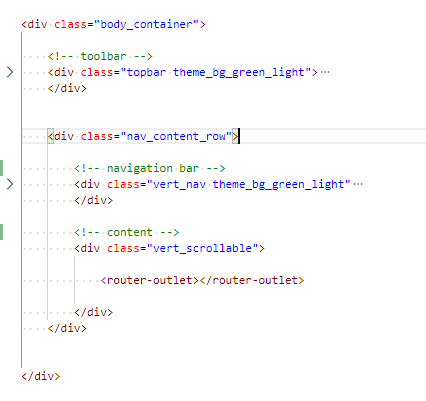
App.component.html 一级路由
App-root.component.html 登陆后主页面,二级路由
路由配置:
- html 中跳转
绝对路径:
<a routerLink="/app"> </a> //不带参数
<a routerLink="/app/123"> </a> //带参数
<a [routerLink]="['/forgetpsw']">forget your password?</a> //不带参数
<a [routerLink]="['/forgetpsw/123']">forget your password?</a> //带参数
相对路径:
相对于当前router 所在路径
<a routerLink="users"> </a>
<a [routerLink]="['charities']"></a>
2.Js 中跳转
导入router
import { Router } from '@angular/router'; //路由
import { ActivatedRoute } from '@angular/router'; //当前路由
constructor(
private route: ActivatedRoute,
public router: Router
) { }
绝对路径:
this.router.navigate(["login"]); //不带参数
this.router.navigate(["app/charityAllInOne/" + this.CharityId + "/charityTemplate/1"]); //带参数,
this.all.router.navigate(["campaignInAll", element.Id]); //带参数
相对路径:
this.router.navigate(["PageConfig"], { relativeTo: this.route }); //如果当前路径是 http://localhost:4200/app/campaign, 路径跳转目的地将会是 http://localhost:4200/app/campaign/PageConfig
his.router.navigate(["PageConfig"], { relativeTo: this.route.parent}); //如果当前路径是 http://localhost:4200/app/campaign, 路径跳转目的地将会是 http://localhost:4200/app/PageConfig
获得路由参数,需要引入当前路由组件
import { ActivatedRoute } from '@angular/router'; //当前路由
constructor(
private route: ActivatedRoute,
) { }
可以在页面初始化或者刷新方法中获得路由参数
this.Id = this.route.snapshot.params['id']; //获得当前路由中参数名为id的参数
this.Id = this.route.snapshot.parent.params['id']; //获得父级路由中参数名为id的参数。
注意,路由是否有父级是根据实际路由定义决定的(app-routing.module.ts)。如果存在多个层级,可以写成
this.Id = this.route.snapshot.parent.parent.parent.params['id'];