一、关于ListView的一些问题以及解决方法
1、实现ListView自动滚到指定项,可以使用listView.setSelection()设置,滚动指定到listView可现实区域的最上面
2、listView.stackFromBottom属性,这只该属性之后你做好的列表就会显示你列表的最下面,值为true和false android:stackFromBottom="true"
3、transciptMode属性,需要用ListView或者其它显示大量Items的控件实时跟踪或者查看信息,并且希望最新的条目可以自动滚动到可视范围内。
通过设置的控件transcriptMode属性可以将Android平台的控件(支持ScrollBar)自动滑动到最底部。 android:transcriptMode="alwaysScroll"
4、cacheColorHint属性,很多人希望能够改变一下它的背景,使他能够符合整体的UI设计,改变背景背很简单只需要准备一张图片然后指定属性 android:background="@drawable/bg",
不过不要高兴地太早,当你这么做以后,发现背景是变了,但是当你拖动,或者点击list空白位置的时候发现ListItem都变成黑色的了,破坏了整体效果。
如果你只是换背景的颜色的话,可以直接指定android:cacheColorHint为你所要的颜色,如果你是用图片做背景的话,那也只要将android:cacheColorHint指定为透明(#00000000)就可以了
5、divider属性,该属性作用是每一项之间需要设置一个图片做为间隔,或是去掉item之间的分割线 android:divider="@drawable/list_driver" 其中 @drawable/list_driver 是一个图片资源,
如果不想显示分割线则只要设置为android:divider="@drawable/@null" 就可以了 第五fadingEdge属性,上边和下边有黑色的阴影 android:fadingEdge="none" 设置后没有阴影了~
6、scrollbars属性,作用是隐藏listView的滚动条, android:scrollbars="none"与setVerticalScrollBarEnabled(true);的效果是一样的,不活动的时候隐藏,活动的时候也隐藏
7、fadeScrollbars属性,android:fadeScrollbars="true" 配置ListView布局的时候,设置这个属性为true就可以实现滚动条的自动隐藏和显示。
8、如何让你的ListView实现自动滚动呢? Android其实已经考虑到ListView控件的智能滚动操作。直接在Layout中写即可,注意下面的stackFromBottom以及transcriptMode这两个属性。涉及代码如下:
Xml代码
<ListView android:id="listCWJ"
android:layout_width="fill_parent"
android:layout_height="fill_parent"
android:stackFromBottom="true"
android:transcriptMode="alwaysScroll"
/>
【1】Android中如何通过单击Button按钮来实现 BACK(返回)功能:
网上有很多人都说通过调用:
- onKeyDown(KeyEvent.KEYCODE_BACK, null);
来实现该功能。但会出现报错!!
其实可以通过调用如下系统的方法来实现该功能:
- onBackPressed();
【2】Android中如何通过单击Button按钮(或者其它方式)实现 MENU(菜单) 功能:
- openOptionsMenu();
【3】android.view.WindowManager$BadTokenException: Unable to add window -- token null is not for an application 异常解决方法:
原由:定义了一个Context的变量,如 private Context mContext; 同时在 onCreate(Bundle savedInstanceState); 方法中采用 mContext = getApplicationContext(); 实例化。同时在该Activity中添加一个AlertDialog的提示对话框,采用如下方式实例化:
- AlertDialog.Builder builder = new AlertDialog.Builder(mContext);
这样就会出现异常!致报这个错是在于new AlertDialog.Builder(mcontext),虽然这里的参数是AlertDialog.Builder(Context context)但我们不能使用getApplicationContext()获得的Context,而必须使用Activity,因为只有一个Activity才能添加一个窗体。
解决方法:将new AlertDialog.Builder(Context context)中的参数用Activity.this(Activity是你的Activity的名称)来填充就可以正确的创建一个Dialog了。
【4】android中动态实现全屏和动态退出全屏方法:
- /**
- * 动态设置全屏
- */
- private void setFullScreen(){
- getWindow().setFlags(WindowManager.LayoutParams.FLAG_FULLSCREEN,WindowManager.LayoutParams.FLAG_FULLSCREEN);
- }
- /**
- * 动态取消全屏
- */
- private void quitFullScreen(){
- final WindowManager.LayoutParams attrs = getWindow().getAttributes();
- attrs.flags &= (~WindowManager.LayoutParams.FLAG_FULLSCREEN);
- getWindow().setAttributes(attrs);
- getWindow().clearFlags(WindowManager.LayoutParams.FLAG_LAYOUT_NO_LIMITS);
- }
【5】Android中如何获取SDCard的目录路径:
- /**
- * 获取SDCard的目录路径功能
- * @return
- */
- private String getSDCardPath(){
- File sdcardDir = null;
- //判断SDCard是否存在
- boolean sdcardExist =Environment.getExternalStorageState().equals(android.os.Environment.MEDIA_MOUNTED);
- if(sdcardExist){
- sdcardDir = Environment.getExternalStorageDirectory();
- }
- return sdcardDir.toString();
- }
-
android preferenceActivity的用法
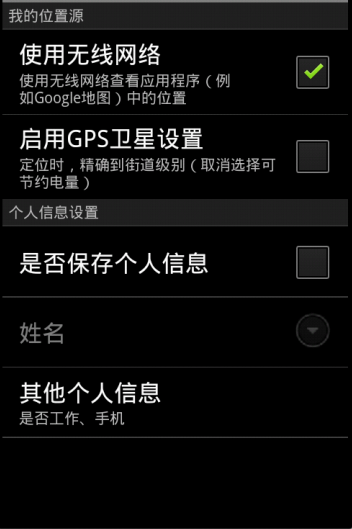
首先让大家看图 看到这张图是 不是很熟悉 我想大家应该会好奇他是怎么实现 咋一看是不是觉得实现起来有点困难 因为各个按钮之间会绑定牵连在一起 原来android内部提供更容易的实现他的方法 也就是preferenceActivity该类封装了sharedpreferences所以他的所有子类都具有保存key-value对的能力
比较常用的设置项 有三类:
1、checkboxpreferences
2、edittextpreferences
3、listviewpreferences
好了 直接看列子吧
分2步:
1、在res目录下建一个xml目录 并在该目录下新建一个preferences_setting.xml
<?xml version="1.0" encoding="utf-8"?>
<PreferenceScreen xmlns:android="http://schemas.android.com/apk/res/android" >

    <PreferenceCategory android:title="我的位置源" >
        <CheckBoxPreference
            android:key="wireless_network"
            android:summary="使用无线网络查看应用程序(例如Google地图)中的位置"
            android:title="使用无线网络" />
        <CheckBoxPreference
            android:key="gps_satellite_setting"
            android:summary="定位时,精确到街道级别(取消选择可节约电量)"
            android:title="启用GPS卫星设置" />
    </PreferenceCategory>
    <PreferenceCategory android:title="个人信息设置" >
        <CheckBoxPreference
            android:key="yesno_save_individual_info"
            android:title="是否保存个人信息" />

        <EditTextPreference
            android:key="individual_name"
            android:summary="请输入真实姓名"
            android:title="姓名" />

        <PreferenceScreen
            android:key="other_individual_msg"
            android:summary="是否工作、手机"
            android:title="其他个人信息" >
            <CheckBoxPreference
                android:key="is_an_employee"
                android:title="是否工作" />

            <EditTextPreference
                android:key="mobile"
                android:summary="请输入真实的手机号"
                android:title="手机" />
        </PreferenceScreen>
    </PreferenceCategory>

</PreferenceScreen>
2 、java文件:
package net.blogjava.mobile;

import android.content.SharedPreferences;
import android.os.Bundle;
import android.preference.Preference;
import android.preference.PreferenceActivity;
import android.preference.PreferenceScreen;
import android.preference.Preference.OnPreferenceChangeListener;

public class Main extends PreferenceActivity implements
                OnPreferenceChangeListener
{
        /** Called when the activity is first created. */

        @Override
        public void onCreate(Bundle savedInstanceState)
        {
                super.onCreate(savedInstanceState);
                getPreferenceManager().setSharedPreferencesName("setting");
                addPreferencesFromResource(R.xml.preference_setting);
                Preference individualNamePreference = findPreference("individual_name");
                SharedPreferences sharedPreferences= individualNamePreference.getSharedPreferences();
                individualNamePreference.setSummary(sharedPreferences.getString("individual_name", ""));
                if (sharedPreferences.getBoolean("yesno_save_individual_info", false))
                         individualNamePreference.setEnabled(true);
                else
                         individualNamePreference.setEnabled(false);
                individualNamePreference.setOnPreferenceChangeListener(this);


        }

        public boolean onPreferenceChange(Preference preference, Object newValue)
        {
                preference.setSummary(String.valueOf(newValue));
                return true;
        }

        @Override
        public boolean onPreferenceTreeClick(PreferenceScreen preferenceScreen,
                        Preference preference)
        {

                if ("yesno_save_individual_info".equals(preference.getKey()))
                {
                        findPreference("individual_name").setEnabled(
                                        !findPreference("individual_name").isEnabled());
                }
                return super.onPreferenceTreeClick(preferenceScreen, preference);
        }
}
前言
这里积累了一些不常见确又很实用的代码,每收集7条更新一次,希望能对大家有用。
声明
欢迎转载,但请保留文章原始出处:) 博客园:http://www.cnblogs.com
农民伯伯: http://over140.cnblogs.com
正文
1、精确获取屏幕尺寸(例如:3.5、4.0、5.0寸屏幕)
public static double getScreenPhysicalSize(Activity ctx) { DisplayMetrics dm = new DisplayMetrics(); ctx.getWindowManager().getDefaultDisplay().getMetrics(dm); double diagonalPixels = Math.sqrt(Math.pow(dm.widthPixels, 2) + Math.pow(dm.heightPixels, 2)); return diagonalPixels / (160 * dm.density); }一般是7寸以上是平板
2、判断是否是平板(官方用法)
public static boolean isTablet(Context context) { return (context.getResources().getConfiguration().screenLayout & Configuration.SCREENLAYOUT_SIZE_MASK) >= Configuration.SCREENLAYOUT_SIZE_LARGE; }3、文字根据状态更改颜色 android:textColor
<selector xmlns:android="http://schemas.android.com/apk/res/android"> <item android:color="#53c1bd" android:state_selected="true"/> <item android:color="#53c1bd" android:state_focused="true"/> <item android:color="#53c1bd" android:state_pressed="true"/> <item android:color="#777777"/> </selector>放在res/color/目录下
4、背景色根据状态更改颜色 android:backgroup
<selector xmlns:android="http://schemas.android.com/apk/res/android">
<item android:state_selected="true"><shape><gradient android:angle="0" android:centerColor="#00a59f" android:endColor="#00a59f" android:startColor="#00a59f"/> </shape></item> <item android:state_focused="true"><shape> <gradient android:angle="0" android:centerColor="#00a59f" android:endColor="#00a59f" android:startColor="#00a59f"/> </shape></item> <item android:state_pressed="true"><shape> <gradient android:angle="0" android:centerColor="#00a59f" android:endColor="#00a59f" android:startColor="#00a59f"/> </shape></item> <item><shape> <gradient android:angle="0" android:centerColor="#00ff00" android:endColor="00ff00" android:startColor="00ff00"/> </shape></item>
</selector>如果直接给背景色color会报错。
5、启动APK的默认Activity
public static void startApkActivity(final Context ctx, String packageName) { PackageManager pm = ctx.getPackageManager(); PackageInfo pi; try { pi = pm.getPackageInfo(packageName, 0); Intent intent = new Intent(Intent.ACTION_MAIN, null); intent.addCategory(Intent.CATEGORY_LAUNCHER); intent.setPackage(pi.packageName);
List<ResolveInfo> apps = pm.queryIntentActivities(intent, 0);
ResolveInfo ri = apps.iterator().next(); if (ri != null) { String className = ri.activityInfo.name; intent.setComponent(new ComponentName(packageName, className)); ctx.startActivity(intent); } } catch (NameNotFoundException e) { Log.e("startActivity", e); } }7、计算字宽
public static float GetTextWidth(String text, float Size) { TextPaint FontPaint = new TextPaint(); FontPaint.setTextSize(Size); return FontPaint.measureText(text); }注意如果设置了textStyle,还需要进一步设置TextPaint。
ImageView的属性android:scaleType作用
查了好多资料,大致都雷同,大家都是互相抄袭的,看着很费劲,自己总结一下,留着需要看的话来查找。
例子:
<ImageView
            android:id="@+id/iv_bit_1"
            android:layout_width="@dimen/passcode_width"
            android:layout_height="@dimen/passcode_height"
            android:scaleType="fitXY" />

        <ImageView
            android:id="@+id/iv_bit_2"
            android:layout_width="@dimen/passcode_width"
            android:layout_height="@dimen/passcode_height"
            android:scaleType="fitXY" />

        <ImageView
            android:id="@+id/iv_bit_3"
            android:layout_width="@dimen/passcode_width"
            android:layout_height="@dimen/passcode_height"
            android:scaleType="fitXY" />

        <ImageView
            android:id="@+id/iv_bit_4"
            android:layout_width="@dimen/passcode_width"
            android:layout_height="@dimen/passcode_height"
            android:scaleType="fitXY" />

        <ImageView
            android:id="@+id/iv_bit_5"
            android:layout_width="@dimen/passcode_width"
            android:layout_height="@dimen/passcode_height"
            android:scaleType="fitXY" />

        <ImageView
            android:id="@+id/iv_bit_6"
            android:layout_width="@dimen/passcode_width"
            android:layout_height="@dimen/passcode_height"
            android:scaleType="fitXY" />
这其中的ImageView的属性android:scaleType到底是做什么的呢?
网上有人说 ImageView.setScaleType(ImageView.ScaleType)。
android:scaleType是控制图片如何放大或者缩放来匹对ImageView的size。
ImageView.ScaleType / android:scaleType值的意义区别:
CENTER /center 按图片的原来size居中显示,当图片长/宽超过View的长/宽,则截取图片的居中部分显示 CENTER_CROP / centerCrop 按比例扩大图片的size居中显示,使得图片长(宽)等于或大于View的长(宽) CENTER_INSIDE / centerInside 将图片的内容完整居中显示,通过按比例缩小或原来的size使得图片长/宽等于或小于View的长/宽 FIT_CENTER / fitCenter 把图片按比例扩大/缩小到View的宽度,居中显示 FIT_END / fitEnd 把图片按比例扩大/缩小到View的宽度,显示在View的下部分位置 FIT_START / fitStart 把图片按比例扩大/缩小到View的宽度,显示在View的上部分位置 FIT_XY / fitXY 把图片 不按比例
Android---常用方法(转)
1、获取资源: Resources res = getBaseContext().getResources(); Drawable draw=res.getDrawable(R.drawable.icon); 2、获得数组: String[] ary = getResources().getStringArray(R.array.ary); 3、自动提示框:
String[] arrays=new String[]{"a","ab","abc","bc","bcde","ee"}; actalert=(AutoCompleteTextView)findViewById(R.id.actalert); ArrayAdapter<String> adapter=new ArrayAdapter<String>( this, android.R.layout.simple_dropdown_item_1line, arrays); actalert.setAdapter(adapter); mactalert=(MultiAutoCompleteTextView)findViewById(R.id.mactvalert); mactalert.setAdapter(adapter); // 设置多个值之间的分隔符,此处为逗号 mactalert.setTokenizer(new MultiAutoCompleteTextView.CommaTokenizer());
4、spinner设置数据源
spncolor.setPrompt("请选择"); ArrayAdapter<CharSequence> adapter = ArrayAdapter.createFromResource( this, R.array.attr, android.R.layout.simple_spinner_item); adapter.setDropDownViewResource(android.R.layout.simple_spinner_dropdown_item); spncolor.setAdapter(adapter);
5、显示当前时间:
SimpleDateFormat sdf = new SimpleDateFormat("HH:mm:ss"); // 将当前时间显示在TextView组件中 tvTime.setText("当前时间:" + sdf.format(new Date()));
6、代码添加布局文件
AbsListView.LayoutParams lp = new AbsListView.LayoutParams( ViewGroup.LayoutParams.FILL_PARENT, 64); TextView text = new TextView(activity); text.setLayoutParams(lp); text.setTextSize(20); text.setGravity(Gravity.CENTER_VERTICAL | Gravity.LEFT); text.setPadding(36, 0, 0, 0); text.setText(s);
7、自定义窗口标题栏代码 requestWindowFeature(Window.FEATURE_CUSTOM_TITLE);//自定义标题栏 setContentView(R.layout.main); //为标题栏设置一个xml布局 getWindow().setFeatureInt(Window.FEATURE_CUSTOM_TITLE, R.layout.title_custom);
custom_title.xml <?xml version="1.0" encoding="utf-8"?> <RelativeLayout xmlns:android="http://schemas.android.com/apk/res/android" android:layout_width="wrap_content" android:layout_height="wrap_content"> <TextView android:id="@+id/tvtitle" android:layout_width="wrap_content" android:layout_height="wrap_content" android:layout_alignParentLeft="true"></TextView> <LinearLayout android:layout_width="wrap_content" android:layout_height="wrap_content" android:layout_toRightOf="@+id/tvtile" android:orientation="horizontal" android:layout_alignParentRight="true" android:gravity="center"> <Button android:text="@string/answer" android:id="@+id/btnanswer" android:layout_width="wrap_content" android:layout_height="wrap_content" android:background="@color/btn_inter" android:layout_marginRight="8dp" android:gravity="center" android:paddingTop="2dp"></Button> <Button android:text="@string/submit" android:id="@+id/btnsubmit" android:layout_width="wrap_content" android:layout_height="wrap_content" android:background="@color/btn_inter" android:layout_marginRight="8dp" android:gravity="center" android:paddingTop="2dp"></Button> </LinearLayout>
</RelativeLayout>
8、Activity仿Dialog Theme(加图标和标题其实就是Activity的icon和titile)(1)、自定义样式 <style name="Theme.CustomDialog" parent="android:style/Theme.Dialog"> <item name="android:windowBackground">@drawable/filled_box</item> </style>
@drawable/filled_box:资源文件中新建drawable文件夹,新建filled_box样式xml <shape xmlns:android="http://schemas.android.com/apk/res/android"> <solid android:color="#f0600000"/> <stroke android:width="3dp" color="#ffff8080"/> <corners android:radius="3dp" /> <padding android:left="10dp" android:top="10dp" android:right="10dp" android:bottom="10dp" /> </shape>
(2)Manifest.xml中配置Acitivity样式 <activity android:name=".Main" android:label="@string/app_name" android:theme="@android:style/Theme.Dialog"> <intent-filter> <action android:name="android.intent.action.MAIN" /> <category android:name="android.intent.category.LAUNCHER" /> </intent-filter> </activity>
(3)为Activity设置图标 //设定窗口模式(仿Dialog中的icon,带有一个左图标) requestWindowFeature(Window.FEATURE_LEFT_ICON); setContentView(R.layout.main); //设置图片资源 getWindow().setFeatureDrawableResource(Window.FEATURE_LEFT_ICON , R.drawable.icon);
9、从一个Activity1到另一个Activity2,当在第二个Activity2按返回键不出现Activity1的做法是在打开Activity2的同时关闭Activity1 Intent intent = new Intent(Main.this, fowardwidget.class); startActivity(intent); finish();
10、允许TextView的文本值拼接 (1)允许在TextView的文本值后添加buffer text tv.setText(tv.getText(),TextView.BufferType.EDITABLE);
(2)使用Editable对象添加buffer text Editable text=(Editable)tv.getText();
text.append("editable");
text.append("\n"):
11、如果历史栈中包含Activity,打开此Activity从栈中放到栈顶层而不是从新打开Activity Intent intent = new Intent(ReorderFour.this, ReorderTwo.class); intent.addFlags(Intent.FLAG_ACTIVITY_REORDER_TO_FRONT); startActivity(intent);
12、避免输入法面板遮挡,在manifest.xml中activity中设置android:windowSoftInputMode android:windowSoftInputMode="stateVisible|adjustResize"
13、获取当前手机壁纸和设置手机壁纸(wallpaper)(1)获取当前壁纸 WallpaperManager wm=WallpaperManager.getInstance(this); Drawable wallpaper=wpm.getDrawable();
(2)设置当前壁纸,同时要添加壁纸设置权限 imapaper.setDrawingCacheEnabled(true); Drawable drawale=this.getResources().getDrawable(R.drawable.bg); imapaper.setImageDrawable(drawale); wpm.setBitmap(imapaper.getDrawingCache());
<uses-permission android:name="android.permission.SET_WALLPAPER"></uses-permission>
14、常见通过系统服务得到的实例化对象 NotificationManager nm=(NotificationManager)getSystemService(NOTIFICATION_SERVICE);
15、检查网络是否连接 //检查网络是否连接 public boolean checkIntent(){ ConnectivityManager mannager=(ConnectivityManager) this.getSystemService(CONNECTIVITY_SERVICE); NetworkInfo info=mannager.getActiveNetworkInfo(); if(info==null || !info.isConnected()){ return false; } if(info.isRoaming()){ return true; } return true; }
<uses-permission android:name="android.permission.ACCESS_NETWORK_STATE"></uses-permission>
16、从资源文件中(asset)读取文本文档 //获得输入流 InputStream in=getAssets().open("read_asset.txt"); int size=in.available(); //将输入流读到字节数组中(内存) byte[] buffer=new byte[size]; in.read(buffer); in.close(); String text=new String(buffer);
17、TextView、Button等设置文本滚动(跑马灯效果),控件必须获得焦点才能有滚动效果,并且文字长度大于控件长度 android:singleLine="true" android:ellipsize="marquee" android:focusable="true" android:marqueeRepeatLimit="marquee_forever" //marquee_forever:一直滚动下去,n(整数):滚动n次
18、TextView文本添加下划线 TextView textView = (TextView)findViewById(R.id.testView); textView.setText(Html.fromHtml("<u>"+"hahaha"+"</u>"));
19、TextView添加图片 String src=""+R.drawable.qq; Html.ImageGetter imageGetter =new ImageGetter() { Drawable draw=null; @Override public Drawable getDrawable(String source) { // TODO Auto-generated method stub int id=Integer.parseInt(source.trim()); draw=getResources().getDrawable(id); draw.setBounds(0, 0, draw.getIntrinsicWidth(), draw.getIntrinsicHeight()); return draw; } }; tvquestion.append(Html.fromHtml("<img src="+src+"", imageGetter, null));
20、秒转成00:00:00 int hour=time/60/60%60; int minute = time/60%60; int second = time%60; String strhour=hour<10 ? "0" + hour : "" + hour; String strminutes=minute<10 ? "0" + minute : "" + minute; String strseconds=second < 10 ? "0" + second : "" + second; tvtimer.setText(strhour+":"+strminutes+":"+strseconds);
21、TextView添加滚动条 <ScrollView android:id="@+id/sv_e8_question" android:layout_width="fill_parent" android:layout_height="180dp" android:scrollbarStyle="outsideOverlay"> <TextView android:text="@string/question" android:id="@+id/tv_e8_question" android:layout_width="fill_parent" android:layout_height="wrap_content" android:paddingTop="5dp" android:paddingLeft="5dp"></TextView> </ScrollView>
22、Activity自动销毁时调用onSaveInstanceState()方法保存配置信息:可多Activity共享 @Override public void onSaveInstanceState(Bundle outState){ SharedPreferences.Editor editor=getSharedPreferences("sp_timer", 0).edit(); editor.putInt(arg0, arg1); super.onSaveInstanceState(outState); }
单个Activity保存 @Override public void onSaveInstanceState(Bundle outState){ SharedPreferences.Editor editor=this.getPreferences(0).edit(); editor.putInt(arg0, arg1); super.onSaveInstanceState(outState); }
