RabbitMQ Linwei Note
转载说明:
https://blog.csdn.net/qq_35387940/article/details/100514134
https://www.cnblogs.com/xifengxiaoma/p/11121355.html
一、RabbitMQ 介绍
1. RabbitMQ的安装
目前主要先了解其使用,因此安装在此先略过
2. 理论及名词介绍
2.1 整体介绍
RabbitMQ是一个开源的AMQP实现,服务器端用 Erlang 语言编写,支持多种客户端,如:Java、Python、Ruby、.NET、JMS、C、PHP、ActionScript、XMPP、STOMP等,支持AJAX。用于在分布式系统中存储转发消息,具有很高的易用性和可用性。
在安装完rabbitMq后,输入http://ip:15672/ ,是可以看到一个简单后台管理界面的。
在控制台里可以手动创建虚拟host,创建用户,分配权限,创建交换机,创建队列等等,还有查看队列消息,消费效率,推送效率等等。
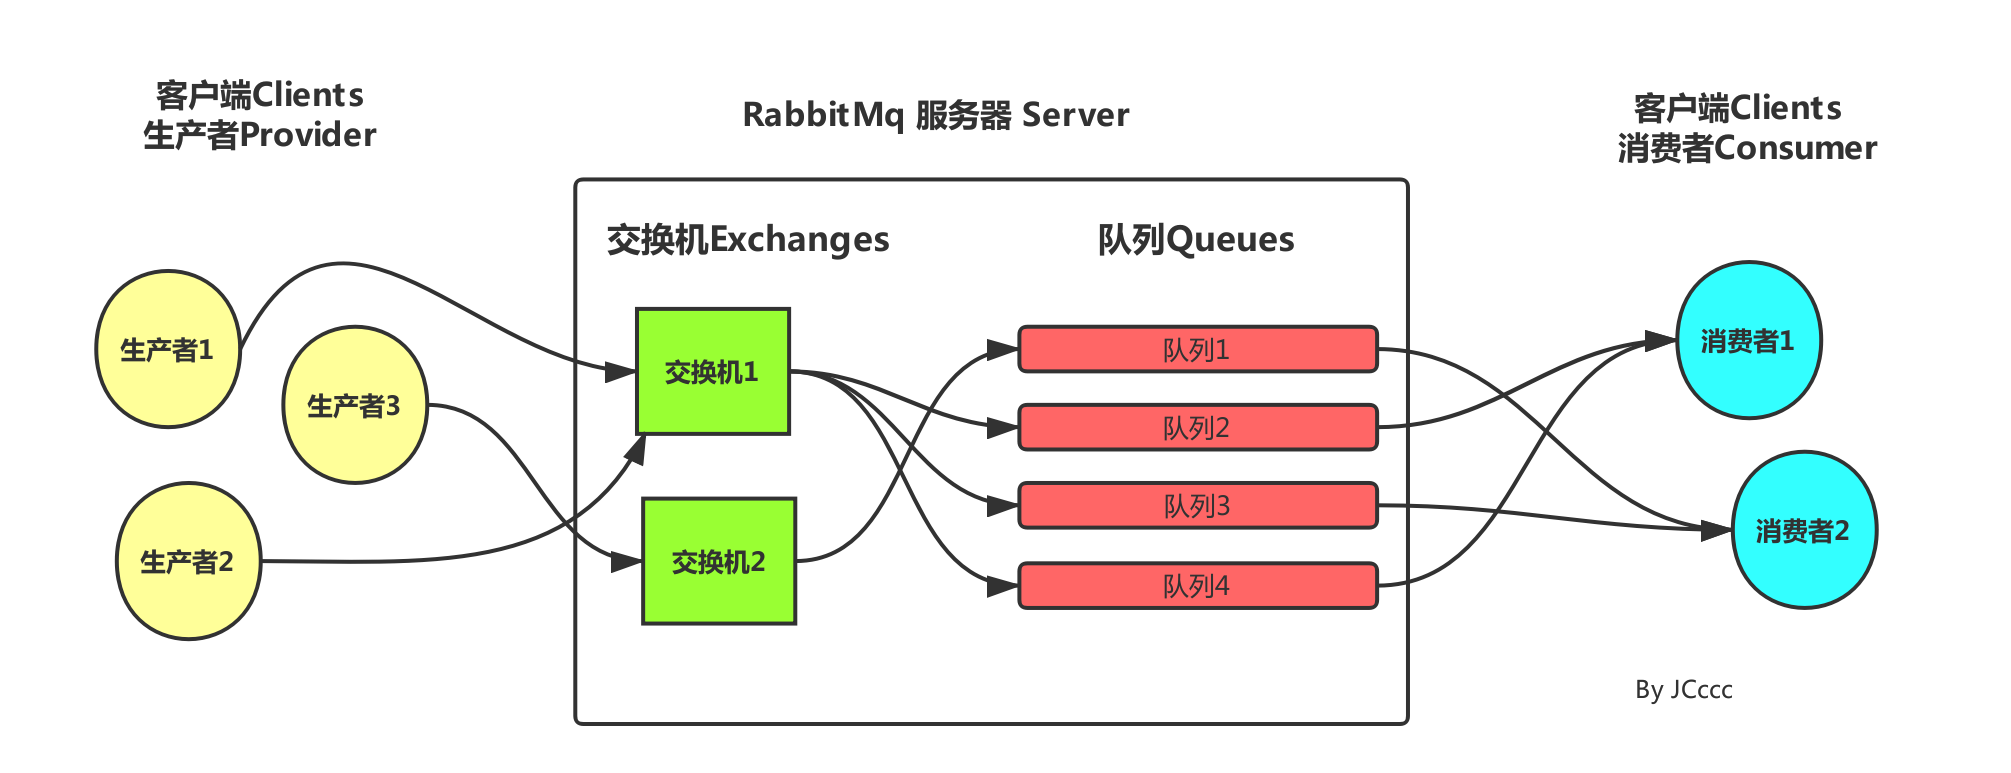
黄色的圈圈就是我们的消息推送服务,将消息推送到 中间方框里面也就是 rabbitMq的服务器,然后经过服务器里面的交换机、队列等各种关系(后面会详细讲)将数据处理入列后,最终右边的蓝色圈圈消费者获取对应监听的消息。
Exchange Type交换机的类别
-
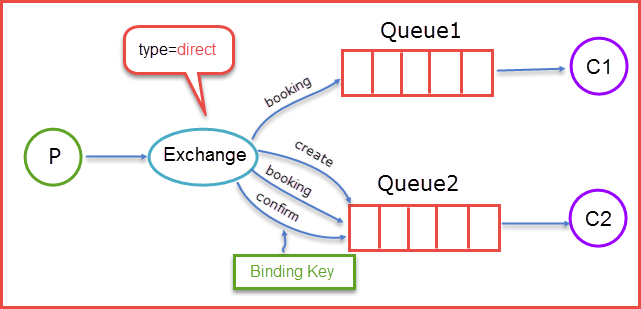
Direct Exchange 直连交换机
direct类型的Exchange路由规则也很简单,它会把消息路由到那些binding key与routing key完全匹配的Queue中。
当生产者(P)发送消息时Rotuing key=booking时,这时候将消息传送给Exchange,Exchange获取到生产者发送过来消息后,会根据自身的规则进行与匹配相应的Queue,这时发现Queue1和Queue2都符合,就会将消息传送给这两个队列,如果我们以Rotuing key=create和Rotuing key=confirm发送消息时,这时消息只会被推送到Queue2队列中,其他Routing Key的消息将会被丢弃。
-
Fanout Exchange 扇型交换机
这个交换机没有路由键概念,就算你绑了路由键也是无视的。 这个交换机在接收到消息后,会直接转发到绑定到它上面的所有队列中。
-
Topic Exchange 主题交换机
前面提到的direct规则是严格意义上的匹配,换言之Routing Key必须与Binding Key相匹配的时候才将消息传送给Queue,那么topic这个规则就是模糊匹配,可以通过通配符满足一部分规则就可以传送。
通过通配符 *,# 来绑定键; * 星号表示一个占位符,# 表示0个或多个占位符,例如:
队列Q1 绑定键为 .TT. 队列Q2绑定键为 TT.#
如果一条消息携带的路由键为 A.TT.B,那么队列Q1将会收到;
如果一条消息携带的路由键为TT.AA.BB,那么队列Q2将会收到;当一个队列的绑定键为 "#"(井号) 的时候,这个队列将会无视消息的路由键,接收所有的消息。
当 * (星号) 和 # (井号) 这两个特殊字符都未在绑定键中出现的时候,此时主题交换机就拥有的直连交换机的行为。
所以主题交换机也就实现了扇形交换机的功能,和直连交换机的功能。
2.2 名词介绍
-
ConnectionFactory、Connection、Channel
ConnectionFactory、Connection、Channel都是RabbitMQ对外提供的API中最基本的对象。Connection是RabbitMQ的socket链接,它封装了socket协议相关部分逻辑。ConnectionFactory为Connection的制造工厂。 Channel是我们与RabbitMQ打交道的最重要的一个接口,我们大部分的业务操作是在Channel这个接口中完成的,包括定义Queue、定义Exchange、绑定Queue与Exchange、发布消息等。
-
Queue
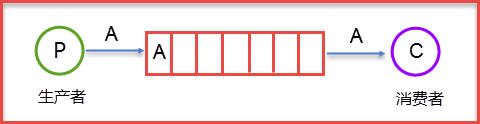
Queue(队列)是RabbitMQ的内部对象,用于存储消息。
RabbitMQ中的消息都只能存储在Queue中,生产者(下图中的P)生产消息并最终投递到Queue中,消费者(下图中的C)可以从Queue中获取消息并消费。
-
Message acknowledgment
在实际应用中,可能会发生消费者收到Queue中的消息,但没有处理完成就宕机(或出现其他意外)的情况,这种情况下就可能会导致消息丢失。为了避免这种情况发生,我们可以要求消费者在消费完消息后发送一个回执给RabbitMQ,RabbitMQ收到消息回执(Message acknowledgment)后才将该消息从Queue中移除;如果RabbitMQ没有收到回执并检测到消费者的RabbitMQ连接断开,则RabbitMQ会将该消息发送给其他消费者(如果存在多个消费者)进行处理。这里不存在timeout概念,一个消费者处理消息时间再长也不会导致该消息被发送给其他消费者,除非它的RabbitMQ连接断开。 这里会产生另外一个问题,如果我们的开发人员在处理完业务逻辑后,忘记发送回执给RabbitMQ,这将会导致严重的bug——Queue中堆积的消息会越来越多;消费者重启后会重复消费这些消息并重复执行业务逻辑。
-
Message durability
如果我们希望即使在RabbitMQ服务重启的情况下,也不会丢失消息,我们可以将Queue与Message都设置为可持久化的(durable),这样可以保证绝大部分情况下我们的RabbitMQ消息不会丢失。但依然解决不了小概率丢失事件的发生(比如RabbitMQ服务器已经接收到生产者的消息,但还没来得及持久化该消息时RabbitMQ服务器就断电了),如果我们需要对这种小概率事件也要管理起来,那么我们要用到事务。由于这里仅为RabbitMQ的简单介绍,所以这里将不讲解RabbitMQ相关的事务。
-
Exchange
生产者产生的消息并不是直接发送给消息队列Queue的,而是要经过Exchange(交换器),由Exchange再将消息路由到一个或多个Queue,当然这里还会对不符合路由规则的消息进行丢弃掉,这里指的是后续要谈到的Exchange Type。那么Exchange是怎样将消息准确的推送到对应的Queue的呢?那么这里的功劳最大的当属Binding,RabbitMQ是通过Binding将Exchange和Queue链接在一起,这样Exchange就知道如何将消息准确的推送到Queue中去。
二、RabbitMQ的使用
1. 以Topic交换机为例(实例)
1.1 加依赖
新建springboot项目,修改pom添加rabbit依赖
<!--rabbitmq-->
        <dependency>
            <groupId>org.springframework.boot</groupId>
            <artifactId>spring-boot-starter-amqp</artifactId>
        </dependency>
1.2 加配置
配置rabbit服务器连接信息
server:
  port: 8080

spring:
  application:
    name: rabbitmq-demo

#  rabbit服务器配置
  rabbitmq:
    host: 127.0.0.1
    port: 5672
    username: test
    password: test123
1.3 添加配置类-定义Queue和Exchange
定义的Queue和Exchange,如果在RabbitMQ控制台中没有,会自动创建;
package com.linwei.rabbitmq.demo.config;

import org.springframework.amqp.core.Binding;
import org.springframework.amqp.core.BindingBuilder;
import org.springframework.amqp.core.Queue;
import org.springframework.amqp.core.TopicExchange;
import org.springframework.context.annotation.Bean;
import org.springframework.context.annotation.Configuration;


@Configuration
public class TopicRabbitConfig {

    public static final String QUEUE_NAME = "topic.queue.test01";
    public static final String EXCHANGE_NAME = "topicExchange";

    /**
     * 定义队列:队列名 topic.queue.test01
     * durable持久化设置为false,默认为true;
     * @return
     */
    @Bean
    public Queue taskQueue(){
        return new Queue(QUEUE_NAME,false);
    }

    /**
     * 定义交换机, 参数是交换机的名字
     * @return
     */
    @Bean
    public TopicExchange exchange(){
        return new TopicExchange(EXCHANGE_NAME);
    }

    /**
     * 将队列与交换机绑定, 并指定Routing Key
     * @return
     */
    @Bean
    Binding bindingExchange(){
        return BindingBuilder.bind(taskQueue()).to(exchange()).with(QUEUE_NAME);
    }
}
1.4 新建controller用来发送消息(生产者)
package com.linwei.rabbitmq.demo.controller;

import lombok.extern.slf4j.Slf4j;
import org.springframework.amqp.rabbit.core.RabbitTemplate;
import org.springframework.beans.factory.annotation.Autowired;
import org.springframework.web.bind.annotation.RequestMapping;
import org.springframework.web.bind.annotation.RestController;

import java.time.LocalDateTime;
import java.time.format.DateTimeFormatter;

@Slf4j
@RestController
public class RabbitTestController {

    //使用RabbitTemplate,这提供了接收/发送等等方法
    @Autowired
    RabbitTemplate rabbitTemplate ;

    @RequestMapping("/sendmessage")
    public String sendTopicMessage(){
        String message = "This is test message by Springboot demo ."
                + LocalDateTime.now().format(DateTimeFormatter.ofPattern("yyyy-MM-dd HH:mm:ss"));

        log.info("--->send message: {}",message);
        // 发送消息(交换机, routingKey, 消息)
        rabbitTemplate.convertAndSend("topicExchange","topic.queue.test01",message);
        return "ok";
    }

}
1.5 定义消费者Consumer
@RabbitListener 指定监听的队列;
@RabbitHandler 接收消息后的处理方法;
package com.linwei.rabbitmq.demo.consumer;

import org.springframework.amqp.rabbit.annotation.RabbitHandler;
import org.springframework.amqp.rabbit.annotation.RabbitListener;
import org.springframework.stereotype.Component;

@Component
@RabbitListener(queues = "topic.queue.test01")
public class TopicConsumerTest {

    /**
     * 消息消费
     * @RabbitHandler 代表此方法为接受到消息后的处理方法
     */
    @RabbitHandler
    public void received(String msg){
        System.out.println("--->Consumer消费消息: "+ msg);
    }
}
1.6 测试发送消息
发送get请求http://localhost:8080/sendmessage 进行消息发送;
--->send message: This is test message by Springboot demo .2021-08-24 16:37:03.195
--->send message: This is test message by Springboot demo .2021-08-24 16:37:05.672
--->send message: This is test message by Springboot demo .2021-08-24 16:37:05.871
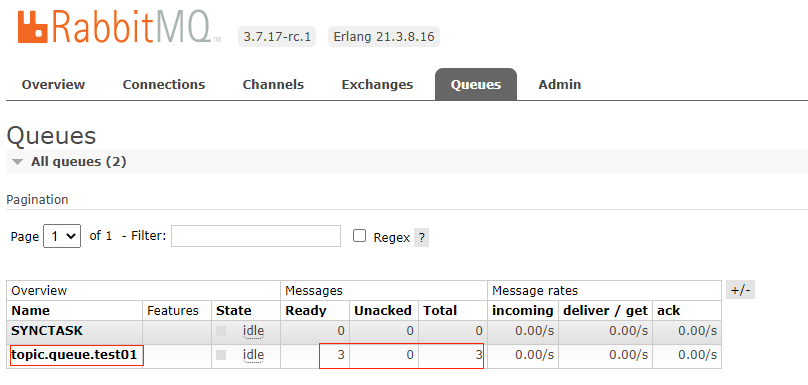
登录Rabbit控制台,可以看到队列topic.queue.test01里有三条待处理的消息;
下面打印的是消费者接收并处理的信息:(消息被消费后,上面控制台里的数量会被置0,所以上面total显示的是待处理的消息总数,而不是历史消息总数)
--->Consumer消费消息: This is test message by Springboot demo .2021-08-24 16:37:03.195
--->Consumer消费消息: This is test message by Springboot demo .2021-08-24 16:37:05.672
--->Consumer消费消息: This is test message by Springboot demo .2021-08-24 16:37:05.871
1.7 补充测试
上面已经定义了一个消费者TopicConsumerTest , 如果我再定义一个监听相同queue的消费者会怎么样呢?
@Component
@RabbitListener(queues = "topic.queue.test01")
public class TopicConsumerTest2 {

    /**
     * 消息消费
     * @RabbitHandler 代表此方法为接受到消息后的处理方法
     */
    @RabbitHandler
    public void received(String msg){
        System.out.println("--->Consumer02消费消息: "+ msg);
    }
}
实验效果:
如果队列里有消息,每次只会被一个消费者消费,如果拼命刷新页面,即模拟生产者往队列里发送消息,通过控制台打印可以发现,消费者02可能会被触发;所以,如果有多个消费者监听同一个队列,多个消费者相当于多实例,一个消息只会被一个消费者进行消费,不会存在重复消费的情况。
有意思的是,两个消费者是轮流消费的,这里面应该是采用了轮询的方式进行负载了。
--->Consumer02消费消息: This is test message by Springboot demo .2021-08-25 15:58:25.785
--->Consumer消费消息: This is test message by Springboot demo .2021-08-25 15:58:25.944
--->Consumer02消费消息: This is test message by Springboot demo .2021-08-25 15:58:26.088
--->Consumer消费消息: This is test message by Springboot demo .2021-08-25 15:58:26.257
--->Consumer02消费消息: This is test message by Springboot demo .2021-08-25 15:58:26.443
在RabbitMQ控制台里也能够看到队列的消费者的个数:

2. direct 直连交换机(网例)
direct类型的Exchange路由规则很简单,它会把消息路由到那些binding key与routing key完全匹配的Queue中。
2.1 新建一个RabbitMQ配置类,并添加一个demoQueue队列
package com.louis.springboot.demo.config;
import org.springframework.amqp.core.Queue;
import org.springframework.context.annotation.Bean;
import org.springframework.context.annotation.Configuration;

@Configuration
public class RabbitConfig {

    /**
     * 定义demoQueue队列
     * @return
     */
    @Bean
    public Queue demoString() {
        return new Queue("demoQueue");
    }

}
2.2 编写生产者发送消息
编写一个消息发布者,并编写一个发送方法,通过AmqpTemplate往"demoQueue"发送消息。
RabbitProducer.java
package com.louis.springboot.demo.mq;
import java.text.SimpleDateFormat;
import java.util.Date;

import org.springframework.amqp.core.AmqpTemplate;
import org.springframework.beans.factory.annotation.Autowired;
import org.springframework.stereotype.Component;

@Component
public class RabbitProducer {

    @Autowired
    private AmqpTemplate rabbitTemplate;

    public void sendDemoQueue() {
        Date date = new Date();
        String dateString = new SimpleDateFormat("YYYY-mm-DD hh:MM:ss").format(date);
        System.out.println("[demoQueue] send msg: " + dateString);
        // 第一个参数为刚刚定义的队列名称
        this.rabbitTemplate.convertAndSend("demoQueue", dateString);
    }
}
2.3 编写一个消息消费者
编写一个消息消费者,通过@RabbitListener(queues = "demoQueue")注解监听"demoQueue"队列,并用@RabbitHandler注解相关方法,这样在在队列收到消息之后,交给@RabbitHandler注解的方法进行处理。
package com.louis.springboot.demo.mq;
import org.springframework.amqp.rabbit.annotation.RabbitHandler;
import org.springframework.amqp.rabbit.annotation.RabbitListener;
import org.springframework.stereotype.Component;


@Component
@RabbitListener(queues = "demoQueue")
public class DemoQueueConsumer {

    /**
     * 消息消费
     * @RabbitHandler 代表此方法为接受到消息后的处理方法
     */
    @RabbitHandler
    public void recieved(String msg) {
        System.out.println("[demoQueue] recieved message: " + msg);
    }

}
2.4 编写测试controller
编写一个控制器,注入RabbitProducer调用相关消息发送方法,方便通过接口触发消息发送。
package com.louis.springboot.demo.controller;

import org.springframework.beans.factory.annotation.Autowired;
import org.springframework.web.bind.annotation.GetMapping;
import org.springframework.web.bind.annotation.RestController;
import com.louis.springboot.demo.mq.RabbitProducer;

@RestController
public class RabbitMqController {

    @Autowired
    private RabbitProducer rabbitProducer;

    @GetMapping("/sendDemoQueue")
    public Object sendDemoQueue() {
        rabbitProducer.sendDemoQueue();
        return "success";
    }
}
2.5 观察输出
调用两次sendDemoQueue接口,在控制台可以看到我们输出的信息,说明消息已经成功发送并被消费。
[demoQueue] send msg: 2019-58-183 04:07:38
[demoQueue] recieved message: 2019-58-183 04:07:38
[demoQueue] send msg: 2019-01-183 05:07:05
[demoQueue] recieved message: 2019-01-183 05:07:05
3. fanout 扇形交换机
fanout类型的Exchange路由规则也非常简单,它会把所有发送到该Exchange的消息路由到所有与它绑定的Queue中。
Fanout其实就是广播模式,只要跟它绑定的队列都会通知并且接受到消息。
3.1 修改配置类
RabbitConfig.java
	@Bean
    public Queue fanoutA() {
        return new Queue("fanout.a");
    }

    @Bean
    public Queue fanoutB() {
        return new Queue("fanout.b");
    }

    @Bean
    public Queue fanoutC() {
        return new Queue("fanout.c");
    }

    /**
     * 定义个fanout交换器
     * @return
     */
    @Bean
    FanoutExchange fanoutExchange() {
        // 定义一个名为fanoutExchange的fanout交换器
        return new FanoutExchange("fanoutExchange");
    }

    /**
     * 将定义的fanoutA队列与fanoutExchange交换机绑定
     * @return
     */
    @Bean
    public Binding bindingExchangeWithA() {
        return BindingBuilder.bind(fanoutA()).to(fanoutExchange());
    }

    /**
     * 将定义的fanoutB队列与fanoutExchange交换机绑定
     * @return
     */
    @Bean
    public Binding bindingExchangeWithB() {
        return BindingBuilder.bind(fanoutB()).to(fanoutExchange());
    }

    /**
     * 将定义的fanoutC队列与fanoutExchange交换机绑定
     * @return
     */
    @Bean
    public Binding bindingExchangeWithC() {
        return BindingBuilder.bind(fanoutC()).to(fanoutExchange());
    }
3.2 修改生产者
然后我们在RabbitProducer中添加一个sendFanout方法,用来向fanout队列发送消息。
RabbitProducer.java
public void sendFanout() {
    Date date = new Date();
    String dateString = new SimpleDateFormat("YYYY-mm-DD hh:MM:ss").format(date);
    System.out.println("[fanout] send msg:" + dateString);
    // 注意 第一个参数是我们交换机的名称 ,第二个参数是routerKey 我们不用管空着就可以,第三个是你要发送的消息
    this.rabbitTemplate.convertAndSend("fanoutExchange", "", dateString);
}
3.2 新增的消费者
接着针对三个广播队列分别编写一个消息消费者,指定队列和处理函数。
FanoutAConsumer.java
package com.louis.springboot.demo.mq;

import org.springframework.amqp.rabbit.annotation.RabbitHandler;
import org.springframework.amqp.rabbit.annotation.RabbitListener;
import org.springframework.stereotype.Component;

@Component
@RabbitListener(queues = "fanout.a")
public class FanoutAConsumer {

    /**
     * 消息消费
     * @RabbitHandler 代表此方法为接受到消息后的处理方法
     */
    @RabbitHandler
    public void recieved(String msg) {
        System.out.println("[fanout.a] recieved message: " + msg);
    }
}
FanoutBConsumer.java
package com.louis.springboot.demo.mq;

import org.springframework.amqp.rabbit.annotation.RabbitHandler;
import org.springframework.amqp.rabbit.annotation.RabbitListener;
import org.springframework.stereotype.Component;

@Component
@RabbitListener(queues = "fanout.b")
public class FanoutBConsumer {

    /**
     * 消息消费
     * @RabbitHandler 代表此方法为接受到消息后的处理方法
     */
    @RabbitHandler
    public void recieved(String msg) {
        System.out.println("[fanout.b] recieved message: " + msg);
    }
}
FanoutCConsumer.java
package com.louis.springboot.demo.mq;

import org.springframework.amqp.rabbit.annotation.RabbitHandler;
import org.springframework.amqp.rabbit.annotation.RabbitListener;
import org.springframework.stereotype.Component;

@Component
@RabbitListener(queues = "fanout.c")
public class FanoutCConsumer {

    /**
     * 消息消费
     * @RabbitHandler 代表此方法为接受到消息后的处理方法
     */
    @RabbitHandler
    public void recieved(String msg) {
        System.out.println("[fanout.c] recieved message: " + msg);
    }
}
3.4 新增测试controller
RabbitMqController.java
@GetMapping("/sendFanout")
public Object sendFanout() {
    rabbitProducer.sendFanout();
    return "success";
}
3.5 观察输出
重新启动应用,调用sendFanout接口,通过控制台可以看到消息发送之后,a, b, c三个队列都收到了消息。
[fanout] send msg:2019-47-183 05:07:12
[fanout.c] recieved message: 2019-47-183 05:07:12
[fanout.b] recieved message: 2019-47-183 05:07:12
[fanout.a] recieved message: 2019-47-183 05:07:12
4. topic 主题交换机
利用topic模式可以实现模糊匹配,同样的,在RabbitConfig中配置topic队列跟交换器。
4.1 修改配置类
topicA的key为topic.msg 那么他只会接收包含topic.msg的消息
topicB的key为topic.#那么他只会接收topic开头的消息
topicC的key为topic.*.z那么他只会接收topic.x.z这样格式的消息
RabbitConfig.java
//=================== topic主题模式  ====================

    @Bean
    public Queue topiocA() {
        return new Queue("topic.a");
    }

    @Bean
    public Queue topicB() {
        return new Queue("topic.b");
    }

    @Bean
    public Queue topicC() {
        return new Queue("topic.c");
    }

    /**
     * 定义个topic交换器
     * @return
     */
    @Bean
    TopicExchange topicExchange() {
        // 定义一个名为fanoutExchange的fanout交换器
        return new TopicExchange("topicExchange");
    }

    /**
     * 将定义的topicA队列与topicExchange交换机绑定;
     * 并指定routingKey为topic.msg,将消息发给topic.msg匹配的Queue
     * @return
     */
    @Bean
    public Binding bindingTopicExchangeWithA() {
        return BindingBuilder.bind(topiocA()).to(topicExchange()).with("topic.msg");
    }

    /**
     * 将定义的topicB队列与topicExchange交换机绑定
     * @return
     */
    @Bean
    public Binding bindingTopicExchangeWithB() {
        return BindingBuilder.bind(topicB()).to(topicExchange()).with("topic.#");
    }

    /**
     * 将定义的topicC队列与topicExchange交换机绑定
     * @return
     */
    @Bean
    public Binding bindingTopicExchangeWithC() {
        return BindingBuilder.bind(topicC()).to(topicExchange()).with("topic.*.z");
    }
4.2 修改生产者
RabbitProducer.java
public void sendTopicTopicAB() {
    Date date = new Date();
    String dateString = new SimpleDateFormat("YYYY-mm-DD hh:MM:ss").format(date);
    dateString = "[topic.msg] send msg:" + dateString;
    System.out.println(dateString);
    // 注意 第一个参数是我们交换机的名称 ,第二个参数是routerKey topic.msg,第三个是你要发送的消息
    // 这条信息将会被 topic.a  topic.b接收
    this.rabbitTemplate.convertAndSend("topicExchange", "topic.msg", dateString);
}

public void sendTopicTopicB() {
    Date date = new Date();
    String dateString = new SimpleDateFormat("YYYY-mm-DD hh:MM:ss").format(date);
    dateString = "[topic.good.msg] send msg:" + dateString;
    System.out.println(dateString);
    // 注意 第一个参数是我们交换机的名称 ,第二个参数是routerKey ,第三个是你要发送的消息
    // 这条信息将会被topic.b接收
    this.rabbitTemplate.convertAndSend("topicExchange", "topic.good.msg", dateString);
}

public void sendTopicTopicBC() {
    Date date = new Date();
    String dateString = new SimpleDateFormat("YYYY-mm-DD hh:MM:ss").format(date);
    dateString = "[topic.m.z] send msg:" + dateString;
    System.out.println(dateString);
    // 注意 第一个参数是我们交换机的名称 ,第二个参数是routerKey ,第三个是你要发送的消息
    // 这条信息将会被topic.b、topic.c接收
    this.rabbitTemplate.convertAndSend("topicExchange", "topic.m.z", dateString);
}
4.3 添加队列消费者
接着针对三个主题队列编写对应的消息消费者。
TopicAConsumer.java
package com.louis.springboot.demo.mq;

import org.springframework.amqp.rabbit.annotation.RabbitHandler;
import org.springframework.amqp.rabbit.annotation.RabbitListener;
import org.springframework.stereotype.Component;

@Component
@RabbitListener(queues = "topic.a")
public class TopicAConsumer {

    /**
     * 消息消费
     * @RabbitHandler 代表此方法为接受到消息后的处理方法
     */
    @RabbitHandler
    public void recieved(String msg) {
        System.out.println("[topic.a] recieved message:" + msg);
    }
}
TopicBConsumer.java
package com.louis.springboot.demo.mq;

import org.springframework.amqp.rabbit.annotation.RabbitHandler;
import org.springframework.amqp.rabbit.annotation.RabbitListener;
import org.springframework.stereotype.Component;

@Component
@RabbitListener(queues = "topic.b")
public class TopicBConsumer {

    /**
     * 消息消费
     * @RabbitHandler 代表此方法为接受到消息后的处理方法
     */
    @RabbitHandler
    public void recieved(String msg) {
        System.out.println("[topic.b] recieved message:" + msg);
    }
}
TopicCConsumer.java
package com.louis.springboot.demo.mq;

import org.springframework.amqp.rabbit.annotation.RabbitHandler;
import org.springframework.amqp.rabbit.annotation.RabbitListener;
import org.springframework.stereotype.Component;

@Component
@RabbitListener(queues = "topic.c")
public class TopicCConsumer {

    /**
     * 消息消费
     * @RabbitHandler 代表此方法为接受到消息后的处理方法
     */
    @RabbitHandler
    public void recieved(String msg) {
        System.out.println("[topic.c] recieved message:" + msg);
    }
}
4.4 修改controller
RabbitMqController.java
@GetMapping("/sendTopicTopicAB")
public Object sendTopicTopicAB() {
    rabbitProducer.sendTopicTopicAB();
    return "success";
}

@GetMapping("/sendTopicTopicB")
public Object sendTopicTopicB() {
    rabbitProducer.sendTopicTopicB();
    return "success";
}

@GetMapping("/sendTopicTopicBC")
public Object sendTopicTopicBC() {
    rabbitProducer.sendTopicTopicBC();
    return "success";
}
4.5 重启测试
重启应用,调用sendTopicTopicAB接口,经过匹配,route key为“topic.msg”的消息被发送到了topic.a和topic.b。
[topic.msg] send msg:2019-12-183 06:07:22
[topic.b] recieved message:[topic.msg] send msg:2019-12-183 06:07:22
[topic.a] recieved message:[topic.msg] send msg:2019-12-183 06:07:22
调用sendTopicTopicB接口,经过匹配,route key为“topic.good.msg”的消息被发送到了topic.b。
[topic.good.msg] send msg:2019-15-183 06:07:23
[topic.b] recieved message:[topic.good.msg] send msg:2019-15-183 06:07:23
调用sendTopicTopicBC接口,经过匹配,route key为“topic.m.z”的消息被发送到了topic.b和topic.c。
[topic.m.z] send msg:2019-16-183 06:07:09
[topic.b] recieved message:[topic.m.z] send msg:2019-16-183 06:07:09
[topic.c] recieved message:[topic.m.z] send msg:2019-16-183 06:07:09