参考文章:https://blog.csdn.net/qq_37288477/article/details/86630428
父子通信:
1.父传子props
官网demo:https://cn.vuejs.org/v2/guide/components.html#%E9%80%9A%E8%BF%87-Prop-%E5%90%91%E5%AD%90%E7%BB%84%E4%BB%B6%E4%BC%A0%E9%80%92%E6%95%B0%E6%8D%AE
<!DOCTYPE html>
<html>
    <head>
        <meta charset="utf-8" />
        <title></title>
    </head>
    <body>
        <div id="app">
            <counter name='1' count='2'></counter>

            <blog-post title="My journey with Vue"></blog-post>
            <blog-post title="Blogging with Vue"></blog-post>
            <blog-post title="Why Vue is so fun"></blog-post>

            <blog-post v-for="post in posts" v-bind:title="post.title"></blog-post>

        </div>
        <script src="js/vue.js"></script>
        <script src="js/main.js"></script>
    </body>
</html>
Vue.component('counter',{
    template:`<div>
<input v-model="username" />{{username}}
<button v-on:click='add'>点击{{counter}}</button>
</div>`,
    props:['name','count'],
    data:function(){
        return {
            username:this.name,
            counter:this.count
        }
    },
    methods:{
        add:function(){
            this.counter++;
            console.log(this.counter)
        }
    }
})

Vue.component('blog-post', {
  props: ['title'],
  template: '<h3>{{ title }}</h3>'
})

new Vue({
    el:'#app',
    data:{
        posts: [
              { id: 1, title: 'My journey with Vue' },
              { id: 2, title: 'Blogging with Vue' },
              { id: 3, title: 'Why Vue is so fun' }
            ]
    }
})

通过props实现父到子传递
2.子传父
官网demo: https://cn.vuejs.org/v2/api/#vm-emit
vm.$emit( eventName, […args] )
-
参数:
{string} eventName[...args]
触发当前实例上的事件。附加参数都会传给监听器回调。
    <h3>子父通信</h3>
        <div id="app2">
            <welcome_ass v-on:welcome='say'></welcome_ass>
        </div>
Vue.component('welcome_ass',{
    template:`
        <button v-on:click="$emit('welcome',message)">
            Click me to be welcomed
        </button>
    `
    ,
    data:function(){
        return {
            message:{a:'1',b:'2'}
        }
    }
})

new Vue({
    el:'#app2',
    methods:{
        say:function(data){
            console.log(data)
        }
    }
})

点击子组件,父获取
兄弟组件通信:
vm.$on( event, callback ) 官网:https://cn.vuejs.org/v2/api/#vm-on
-
参数:
{string | Array<string>} event(数组只在 2.2.0+ 中支持){Function} callback
-
用法:
监听当前实例上的自定义事件。事件可以由
vm.$emit触发。回调函数会接收所有传入事件触发函数的额外参数。
mounted:官网https://cn.vuejs.org/v2/api/#mounted
-
类型:
Function -
详细:
实例被挂载后调用,这时
el被新创建的vm.$el替换了。如果根实例挂载到了一个文档内的元素上,当mounted被调用时vm.$el也在文档内。
    <h3>平行组件通信</h3>
        <div id="app3">
            <aaa></aaa>
            <bbb></bbb>
        </div>
var Event=new Vue();
Vue.component('aaa',{
    template:`
    <div>
        <button v-on:click='on_change'>点击</button>
    </div>
    `,
    methods:{
        on_change:function(){
            Event.$emit("test","111")
        }
    }
})

Vue.component('bbb',{
    template:`
        <div>
            <input v-model="val"/>{{val}}
        </div>
    `,
    data:function(){
        return{
            val:1
        }
    },
    mounted:function(){
        var me=this;
        Event.$on('test',function(msg){
            me.val=msg;
        })
    }
})

new Vue({
    el:'#app3'
})
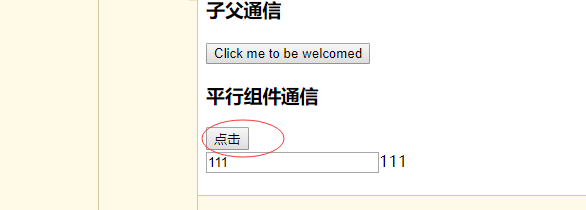
点击a组件按钮,b组件监听到并且将数据获取