全文检索ElasticSearch
1 ElasticSearch介绍
1.1.介绍
1、ElasticSearch是一个基于Lucene的高扩展的分布式搜索服务器,支持开箱即用。
2、ElasticSearch隐藏了Lucene的复杂性,对外提供Restful 接口来操作索引、搜索。
1.2.原理与应用
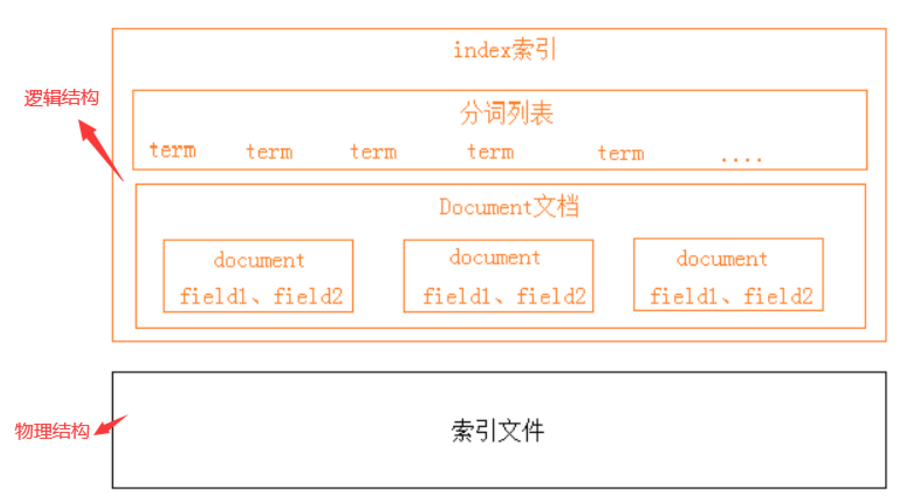
逻辑结构部分是一个倒排索引表:
1、将要搜索的文档内容分词,所有不重复的词组成分词列表
2、将搜索的文档最终以Document方式存储起来
3、每个词和docment都有关联。
2 ElasticSearch安装
2.1.windos的安装
下载ES: https://www.elastic.co/downloads/past-releases
解压:
bin:脚本目录,包括:启动、停止等可执行脚本
config:配置文件目录
data:索引目录,存放索引文件的地方 (没有的话自己创建)
logs:日志目录 (没有的话自己创建)
modules:模块目录,包括了es的功能模块
plugins :插件目录,es支持插件机制
2.2.配置文件
config目录下的elasticsearch.yml文件里配置参数
cluster.name: el
node.name: el_node_1
network.host: 0.0.0.0
http.port: 9200
transport.tcp.port: 9300
node.master: true
node.data: true
discovery.zen.ping.unicast.hosts: ["0.0.0.0:9300", "0.0.0.0:9301"]
discovery.zen.minimum_master_nodes: 1
node.ingest: true
bootstrap.memory_lock: false
node.max_local_storage_nodes: 2

path.data: D:IDEAElasticSearchelasticsearch-1data (换为你自己的路径)
path.logs: D:IDEAElasticSearchelasticsearch-1logs (换为你自己的路径)

http.cors.enabled: true
http.cors.allow-origin: /.*/
2.3.启动
进入bin目录,在cmd下运行:elasticsearch.bat
浏览器输入:http://localhost:9200
3 ES快速入门
3.1.创建索引库
ES的索引库是一个逻辑概念,它包括了分词列表及文档列表,同一个索引库中存储了相同类型的文档。它就相当于MySQL中的表,或相当于Mongodb中的集合。
索引(名词):ES是基于Lucene构建的一个搜索服务,它要从索引库搜索符合条件索引数据。
索引(动词):索引库刚创建起来是空的,将数据添加到索引库的过程称为索引。
1)使用postman发送:put http://localhost:9200/索引库名称
{ "settings":
  {
    "index":{
    "number_of_shards":1,   #设置分片的数量
    "number_of_replicas":0   #设置副本的数量
        }
   }
 }
3.2.创建映射
3.2.1.概念说明:
与关系数据库的对比
文档(Document)----------------Row记录
字段(Field)-------------------Columns 列
3.2.2.创建映射
发送:post http://localhost:9200/索引库名称/类型名称/_mapping
类型名称:可自定义,在ES6.0中要弱化类型的概念,给它起一个没有具体业务意义的名称。
创建映射相当于关系数据库中创建表结构
{
"properties":
  {
        "name":
        {
        "type": "text"
        },
        "description":
        {
        "type": "text"
        },
        "studymodel":
        {
         "type": "keyword"
        }
   }
}
3.3.创建文档
ES中的文档相当于MySQL数据库表中的记录(数据)。
发送:put 或Post http://localhost:9200/xc_course/doc/id
id: 自定义值,如果不指定则会自动生成id
{
  "name":"Bootstrap开发框架",
  "description":"Bootstrap",
  "studymodel":"201001"
}
3.4.搜索文档
1、根据课程id查询文档
发送:get http://localhost:9200/xc_course/doc/1
2、查询所有记录
发送 get http://localhost:9200/xc_course/doc/_search
3、查询名称中包括spring 关键字的的记录
发送:get http://localhost:9200/xc_course/doc/_search?q=name:bootstrap
4、查询学习模式为201001的记录
发送 get http://localhost:9200/xc_course/doc/_search?q=studymodel:201001
4 IK分词器
4.1.安装IK分词器
下载IK分词器:(Github地址:https://github.com/medcl/elasticsearch-analysis-ik)
解压,并将解压的文件拷贝到ES安装目录的plugins下的ik目录下;
4.2.ik分词器的两种模式
1.ik_max_word :最细粒度拆分;
2.ik_smart: 最粗粒度拆分;
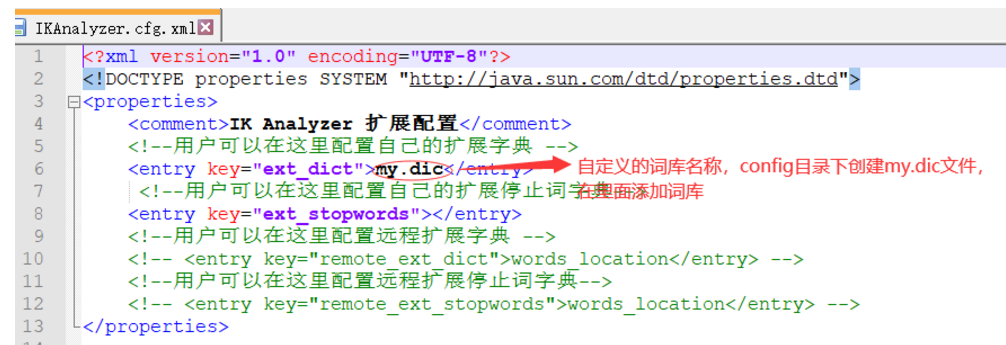
4.3.自定义词库
iK分词器自带一个main.dic的文件,此文件为词库文件
5 映射
1、查询所有索引的映射:
GET: http://localhost:9200/_mapping
2、更新映射
映射创建成功可以添加新字段,已有字段不允许更新。
3、删除映射
通过删除索引来删除映射。
5.1.常用映射类型
1、text
1)analyzer
通过analyzer属性指定分词器。
下边指定name的字段类型为text,使用ik分词器的ik_max_word分词模式。
"name": {
	"type": "text",
	"analyzer":"ik_max_word"
}
analyzer是指在索引和搜索都使用ik_max_word,如果单独想定义搜索时使用的分词器则可以通search_analyzer属性。
ik分词器建议是索引时使用ik_max_word将搜索内容进行细粒度分词,搜索时使用ik_smart提高搜索精确性:
"name": {
    "type": "text",
    "analyzer":"ik_max_word",
    "search_analyzer":"ik_smart"
}
2)index
通过index属性指定是否索引。
默认为index=true,即要进行索引,只有进行索引才可以从索引库搜索到,若不需要搜索的则需要指定index=false;
- keyword关键字字段
keyword字段为关键字字段,通常搜索keyword是按照整体搜索,所以创建keyword字段的索引时是不进行分词的,是需要全部匹配;
6 索引管理
6.1.搭建工程
添加依赖
<dependency>
    <groupId>org.elasticsearch.client</groupId>
    <artifactId>elasticsearch‐rest‐high‐level‐client</artifactId>
    <version>6.2.1</version>
</dependency>
<dependency>
    <groupId>org.elasticsearch</groupId>
    <artifactId>elasticsearch</artifactId>
    <version>6.2.1</version>
</dependency>
配置文件application.yml
server:
  port: ${port:40100}
spring:
  application:
    name: el-search-service
el:
  elasticsearch:
    hostlist: ${eshostlist:127.0.0.1:9200} #多个结点中间用逗号分隔
配置类:
@Configuration
public class ElasticsearchConfig {

    @Value("${xuecheng.elasticsearch.hostlist}")
    private String hostlist;

    @Bean
    public RestHighLevelClient restHighLevelClient(){
        //解析hostlist配置信息
        String[] split = hostlist.split(",");
        //创建HttpHost数组,其中存放es主机和端口的配置信息
        HttpHost[] httpHostArray = new HttpHost[split.length];
        for(int i=0;i<split.length;i++){
            String item = split[i];
            httpHostArray[i] = new HttpHost(item.split(":")[0], Integer.parseInt(item.split(":")[1]), "http");
        }
        //创建RestHighLevelClient客户端
        return new RestHighLevelClient(RestClient.builder(httpHostArray));
    }

    //项目主要使用RestHighLevelClient,对于低级的客户端暂时不用
    @Bean
    public RestClient restClient(){
        //解析hostlist配置信息
        String[] split = hostlist.split(",");
        //创建HttpHost数组,其中存放es主机和端口的配置信息
        HttpHost[] httpHostArray = new HttpHost[split.length];
        for(int i=0;i<split.length;i++){
            String item = split[i];
            httpHostArray[i] = new HttpHost(item.split(":")[0], Integer.parseInt(item.split(":")[1]), "http");
        }
        return RestClient.builder(httpHostArray).build();
    }

}
6.2.使用Java客户端
6.2.1.创建索引库
public class TestIndex {
    @Autowired
    RestHighLevelClient client;

    @Autowired
    RestClient restClient;
     /**
     * 创建索引库
     */
    @Test
    public void testCreateIndexx() throws IOException {
        //创建索引对象
        CreateIndexRequest createIndexRequest = new CreateIndexRequest("el_01");
        //设置参数
        createIndexRequest.settings(Settings.builder().put("number_of_shards","1").put("number_of_replicas","0"));
        //指定映射
        createIndexRequest.mapping("doc","{
" +
                "	"properties": {
" +
                "	   "name": {
" +
                "	   	"type": "text",
" +
                "	    "analyzer": "ik_max_word",
" +
                "	    "search_analyzer": "ik_smart"
" +
                "	   },
" +
                "	   "description": {
" +
                "	   	"type": "text",
" +
                "	    "analyzer": "ik_max_word",
" +
                "	    "search_analyzer": "ik_smart"
" +
                "	   },
" +
                "	   "pic": {
" +
                "	   	"type": "text",
" +
                "	   	"index": false
" +
                "	   },
" +
                "	   "studymodel": {
" +
                "	   	"type": "text"
" +
                "	   }
" +
                "	}
" +
                "}", XContentType.JSON);
       //操作索引的客户端
        IndicesClient indices = client.indices();
        //创建索引
        CreateIndexResponse createIndexResponse = indices.create(createIndexRequest);
        //得到响应
        boolean acknowledged = createIndexResponse.isAcknowledged();
        System.out.println(acknowledged);
    }

    /**
     * 添加文档
     */
    @Test
    public void testAddDoc() throws IOException {
        // 准备json串
        Map<String, Object> map = new HashMap<>();
        map.put("name","spring cloud实战课程");
        map.put("description","BootStrap是放松放松放松,李智是黑马程序员,此开发框架在实际中大量使用");
        map.put("studymodel","20200");
        map.put("pic","/img/");
        //创建添加索引的请求对象
        IndexRequest indexRequest = new IndexRequest("xc_course", "doc");
        //文档内容
        indexRequest.source(map);
        //通过client进行http请求
        IndexResponse index = client.index(indexRequest);
        DocWriteResponse.Result result = index.getResult();
        System.out.println(result);
    }
     /**
     * 查询文档
     */
    @Test
    public void testGetDoc() throws IOException {
        //查询的请求对象
        GetRequest getRequest = new GetRequest("xc_course", "doc", "iCzcUnQB0UogVLzdiAD9");
        GetResponse documentFields = client.get(getRequest);
        //得到文档内容
        Map<String, Object> sourceAsMap = documentFields.getSourceAsMap();
        System.out.println(sourceAsMap);
    }

    /**
     * 修改文档
     */
    @Test
    public void testUpdateDoc() throws IOException {
        //更新的请求对象
        UpdateRequest updateRequest = new UpdateRequest("xc_course", "doc", "iCzcUnQB0UogVLzdiAD9");
        Map<String, Object> map = new HashMap<>();
        map.put("name","spring");
        updateRequest.doc(map);
        UpdateResponse update = client.update(updateRequest);
        //得到文档内容
        RestStatus status = update.status();
        System.out.println(status);
    }
    /**
 * 删除索引库
 */
    @Test
    public void testDeleteIndex() throws IOException {
        //删除索引请求对象
        DeleteIndexRequest deleteIndexRequest = new DeleteIndexRequest("xc_course");
        //操作所有的客户端
        IndicesClient indices = client.indices();
        //删除索引
        DeleteIndexResponse delete = indices.delete(deleteIndexRequest);
        //得到响应
        boolean acknowledged = delete.isAcknowledged();
        System.out.println(acknowledged);
    }
   }