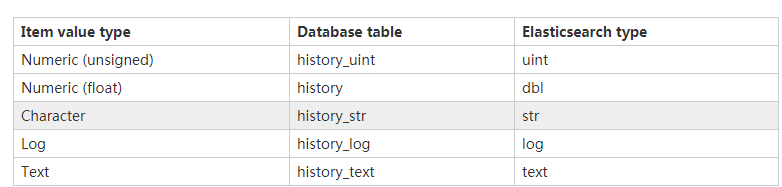
zabbix在3.4.5版本后开始支持将历史数据写入es;其实就是将zabbix 5张历史表的数据写入es的5个索引,字段还是一样的;
mysql表和es索引的对应关系如下:
配置其实很简单,以下是我按照顺序写一遍
1,配置zabbix server配置文件
打开配置文件,3.4.5版本后的zabbix多了配置es的两个参数,添加上;
HistoryStorageURL=http://es_address:9200
HistoryStorageTypes=uint,dbl,str,log,text
2, 配置zabbix前端文件
添加
$HISTORY['url'] = 'http://es_ip:9200';
$HISTORY['types'] = ['str', 'text', 'log', 'uint', 'dbl'];
前面修改为
global $DB , $HISTORY;
示例如下

3 , 创建es索引
共创建uint,dbk,str,log,text5个索引
curl -X PUT
 http://1。1.1.1:9200/uint
 -H 'content-type:application/json'
 -d '{
   "settings" : {
      "index" : {
         "number_of_replicas" : 1,
         "number_of_shards" : 5
      }
   },
   "mappings" : {
      "values" : {
         "properties" : {
            "itemid" : {
               "type" : "long"
            },
            "clock" : {
               "format" : "epoch_second",
               "type" : "date"
            },
            "value" : {
               "type" : "long"
            }
         }
      }
   }
}'


curl -X PUT
 http://1。1.1.1:9200/dbl
 -H 'content-type:application/json'
 -d '{
 "settings" : {
      "index" : {
         "number_of_replicas" : 1,
         "number_of_shards" : 5
      }
   },
   "mappings" : {
      "values" : {
         "properties" : {
            "itemid" : {
               "type" : "long"
            },
            "clock" : {
               "format" : "epoch_second",
               "type" : "date"
            },
            "value" : {
               "type" : "double"
            }
         }
      }
   }
}'

curl -X PUT
 http://1.1.1.1:9200/log
 -H 'content-type:application/json'
 -d '{
 "settings" : {
      "index" : {
         "number_of_replicas" : 1,
         "number_of_shards" : 5
      }
   },
   "mappings" : {
      "values" : {
         "properties" : {
            "itemid" : {
               "type" : "long"
            },
            "clock" : {
               "format" : "epoch_second",
               "type" : "date"
            },
            "value" : {
               "fields" : {
                  "analyzed" : {
                     "index" : true,
                     "type" : "text",
                     "analyzer" : "standard"
                  }
               },
               "index" : false,
               "type" : "text"
            }
         }
      }
   }
}'


curl -X PUT
 http://1.1.1.1:9200/text
 -H 'content-type:application/json'
 -d '{
 "settings" : {
      "index" : {
         "number_of_replicas" : 1,
         "number_of_shards" : 5
      }
   },
   "mappings" : {
      "values" : {
         "properties" : {
            "itemid" : {
               "type" : "long"
            },
            "clock" : {
               "format" : "epoch_second",
               "type" : "date"
            },
            "value" : {
               "fields" : {
                  "analyzed" : {
                     "index" : true,
                     "type" : "text",
                     "analyzer" : "standard"
                  }
               },
               "index" : false,
               "type" : "text"
            }
         }
      }
   }
}'

curl -X PUT
 http://1。1.1.1:9200/str
 -H 'content-type:application/json'
 -d '{
 "settings" : {
      "index" : {
         "number_of_replicas" : 1,
         "number_of_shards" : 5
      }
   },
   "mappings" : {
      "values" : {
         "properties" : {
            "itemid" : {
               "type" : "long"
            },
            "clock" : {
               "format" : "epoch_second",
               "type" : "date"
            },
            "value" : {
               "fields" : {
                  "analyzed" : {
                     "index" : true,
                     "type" : "text",
                     "analyzer" : "standard"
                  }
               },
               "index" : false,
               "type" : "text"
            }
         }
      }
   }
}'
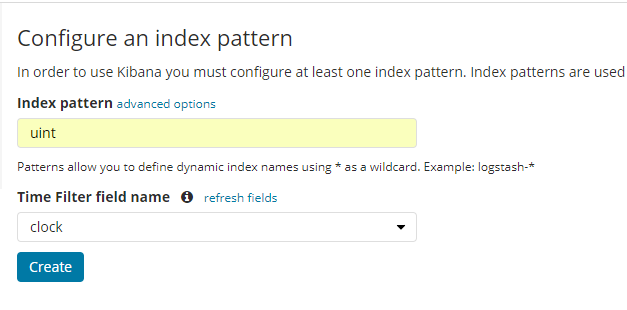
5 , 去kibana上创建索引
登录到kibana,创建如上两个索引,时间过滤字段这个地方写clock,kibana会提示的
6,此时重启zabbix server,zabbix web(httpd)
7, 稍等去kibana上和zabbix web上看新的数据是否正常

8,期间踩了两个坑
1,我是从zabbix 3.0升级过来的,操作系统是centos 6.7,升级后改完配置启动报错
cannot initialize history storage: cURL library support >= 7.28.0 is required for Elasticsearch history backendcurl -V看了下,版本是7.19比较低,要升级,然后yum,rpm,编译安装都试了,curl版本看着也升级上来了,但是启动server还是报错,网上说重新编译安装zabbix server即可,不过我是yum安装的,尝试重新yum安装了一次,还是报错。
只好重新搭建了一台centos7.x,其系统自带的curl版本是7.29,满足要求,然后安装相同版本的zabbix server,把配置都倒过去。启动,ok。
2,如果第3步在历史数据已经开始写入后再创建索引的话;也就是先配置好zabbix,启动后,数据会开始写入es,这时候再按照上述方法创建索引,就会报错,索引已经存在了,必须先stop zabbix,把这5个索引手动删了,再按照第三步执行才行
3,如果不按照3步创建索引的话,再es上写入的数据中的clock是Unix时间,kibana不会像上面图中那样展示,zabbix web也不会有数据显示
4, 补充下,历史数据写入es的话,除了5个history表不再写入新数据,两个trends表也不再写入新数据。