一、准备工作:
1、以防止安装依赖出错,首先给系统安装第三方源:rpm -Uvh http://apt.sw.be/redhat/el6/en/x86_64/rpmforge/RPMS/rpmforge-release-0.5.3-1.el6.rf.x86_64.rpm
2、安装lamp环境和rrdtool图形处理及其他所需依赖库:
1 yum -y install perl perl-Net-Telnet perl-Net-DNS perl-LDAP perl-libwww-perl perl-RadiusPerl perl-IO-Socket-SSL perl-Socket6 perl-CGI-SpeedyCGI perl-FCGI perl-CGI-SpeedCGI perl-Time-HiRes perl-ExtUtils-MakeMaker perl-RRD-Simple rrdtool rrdtool-perl curl fping echoping httpd httpd-devel gcc make wget libxml2-devel libpng-devel glib pango pango-devel freetype freetype-devel fontconfig cairo cairo-devel libart_lgpl libart_lgpl-devel mod_fastcgi screen

二、开始安装
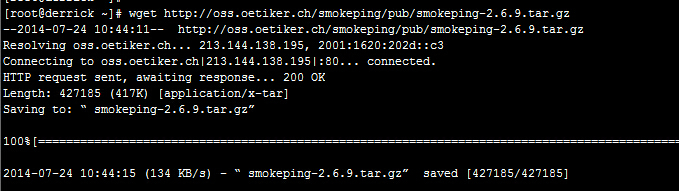
1、下载安装smokeping程序
1 wget http://oss.oetiker.ch/smokeping/pub/smokeping-2.6.9.tar.gz
1 tar -zxvf smokeping-2.6.9.tar.gz  #解压.tar.gz压缩包
2 cd smokeping-2.6.9  #进入解压包后的程序目录
3 ./configure -prefix=/usr/local/smokeping  #将smokeping程序安装在/usr/local/smokeping/ 路径下
##如果是第一次安装smokeping程序,一般会出现报错,说没有perl模块支持,需要安装模块后在执行安装程序##
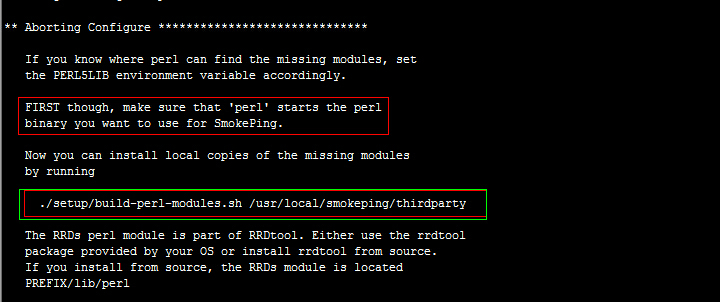
1 ./setup/build-perl-modules.sh /usr/local/smokeping/thirdparty #根据报错提示安装perl模块
###如果安装perl模块时出现
1 则需要下载安装perl-devel 和perl-ExtUtils-Embed Centos 系统可直接yum install perl-devel perl-ExtUtils-Embed -y (总之,提示少什么插件你就安装什么插件)安装后再执行./setup/build-perl-modules.sh /usr/local/smokeping/thirdparty2
2 ./configure –prefix=/usr/local/smokeping #perl 模块加载完成后再次执行安装程序
###### 此时,安装成功后,会提示编译,按照要求编译 #######

1 /usr/local/gmake install
##############至此,程序已经初步安装完成###################
三、配置smokeping
1、创建cache var data 三个目录和smokeping.log日志文件
1 cd /usr/local/smokeping
2 mkdir cache data var
3 touch /var/log/smokeping.log
2、给刚刚创建的文件和目录授予apache权限
1     cd /usr/local/smokeping
2     chown -R apache:apache cache data var
3     chown -R apache:apache /var/log/smokeping.log
执行完后ls 查看一下结果是否正确:

3、修改配置文件和自动生成文件(目的就是文件位置和config配置中一致)
1     cd /usr/local/smokeping/htdocs/
2     mv smokeping.fcgi.dist   smokeping.fcgi
3     cd /usr/local/smokeping/etc
4     mv config.dist  config
5     vim config
##找到cgiurl = http://some.url/smokeping.cgi 把some.url 改成本地IP或者域名##
##找到 ***Database*** 栏 把step(监测时间)和pings(ping次数)的值改成自己设定的#####都改为60就是60秒ping60次##


4、完成之后修改验证密码文件权限
1 chmod 600 /usr/local/smokeping/etc/smokeping_secrets.dist

四、修改apache配置
 1 vim /etc/httpd/conf/httpd.conf
 2 ####在DocumentRoot “/var/www/html” 这一行下添加如下代码:
 3 Alias /cache "/usr/local/smokeping/cache/"
 4 Alias /cropper "/usr/local/smokeping/htdocs/cropper/"
 5 Alias /smokeping "/usr/local/smokeping/htdocs/smokeping.fcgi"
 6 <Directory "/usr/local/smokeping">
 7 AllowOverride None
 8 Options All
 9 AddHandler cgi-script .fcgi .cgi
10 Order allow,deny
11 Allow from all
12 AuthName "Smokeping"
13 AuthType Basic
14 AuthUserFile /usr/local/smokeping/htdocs/htpasswd
15 Require valid-user
16 DirectoryIndex smokeping.fcgi
17 </Directory>

六、设置开机启动apache和smokeping进程 ,并关闭防火墙
1 echo "/usr/local/smokeping/bin/smokeping --logfile=/var/log/smokeping.log 2>&1  &" >>/etc/rc.local
2 chkconfig httpd on
3 chkconfig iptables off
七、启动httpd和smokeping
1 service httpd restart
2 /usr/local/smokeping/bin/smokeping  --logfile=/var/log/smokeping.log
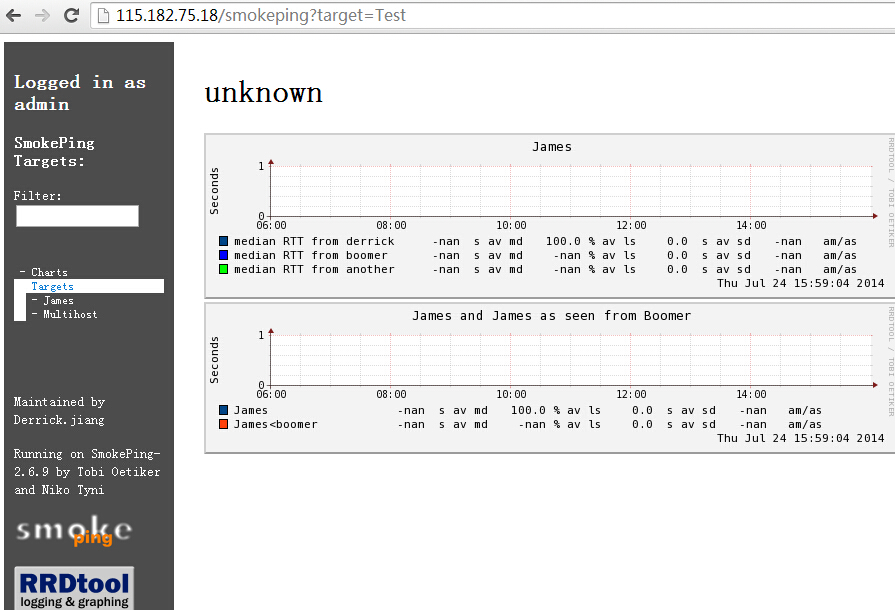
八、打开web界面测试
### 如果返回 “500”错误 说明selinux 选项没有关闭 ###
1 vim /etc/sysconfig/selinux
改成 Selinux=disable或者selinux=permissive
九、设置web用户名和密码
1 cd /usr/local/smokeping/htdocs
2 htpasswd -c /usr/local/smokeping/htdocs/htpasswd admin     #设置账号为admin 密码在回车后提示输入

十、同步主机时间和配置config 参数
1 cd /usr/local/smokeping/htdocs
2 htpasswd -c /usr/local/smokeping/htdocs/htpasswd admin     #设置账号为admin 密码在回车后提示输入
###至此,smokeping安装已经全部完毕,剩下的是添加smokeping插件并设置其监控参数 ####