参考:https://www.jianshu.com/p/f5941bcf3a2d
1.什么是OKIO
将JDK封装的IO操作再进行一层封装
好处:
(1)使用了segement片段管理的方式管理数据,以片段作为IO操作的单位,使IO操作吞吐率增加
(2)使用链表将Segment片段联系起来管理,对于移动指针就可以对数据进行管理,扩容方便
(3)使用SegmentPool对废弃的片段回收、复用和内存共享,从而减少内存的申请和减少了GC的频率,性能得到优化。
(4)封装了输出输入的超时处理,着在JDK原生io操作中没有
(5)具备了很多从字节到特定编码格式或者数据类型的转化方法,很方便
2.OKIO的简单使用
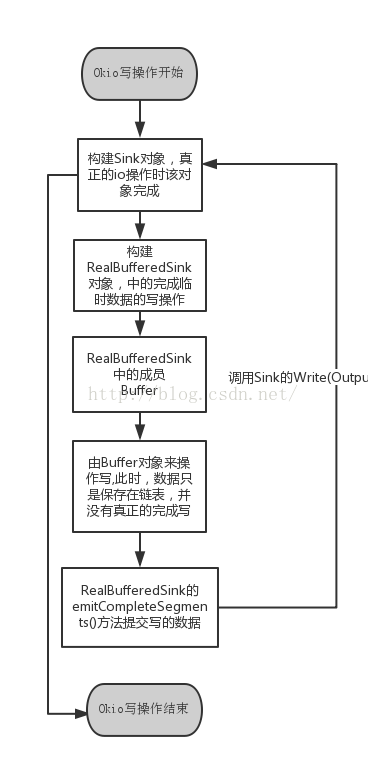
OKIO写流程图:
public static void main(String[] args) {
        File file = new File("hello.txt");
        try {
            readString(new FileInputStream(file));
        } catch (IOException e) {
            e.printStackTrace();
        }
    }

    public static void readString(InputStream in) throws IOException {
      BufferedSource source = Okio.buffer(Okio.source(in));  //创建RealBufferedSource输入流
      String s = source.readUtf8();  //以UTF-8读,就是通过执行回调(Okio.source(in)的read方法)往Buffer中写source输入流的数据,再返回Buffer存储size的全部字节
      System.out.println(s);
      source.close();
    }
  public static void writeString(OutputStream out){
    BufferedSink sink = Okio.buffer(Okio.sink(out));
            //创建RealBufferedSink输出流
    sink.writeLone("test");//里面往Buffer里面写“test”,再通过执行回调(Okio.sink(out)的write方法)将Buffer里面的数据写到输出流sink里
    sink.close();
  }
3.okio架构
Souce、Sink接口:
两接口分别定义了read()和wriete(),代表着输入流和输出流,
BufferedSource、BufferedSink接口:
分别继承了Source和Sink,维护者Buffer,分别定义了一堆针对各种类型的读和写操作方法。
RealBufferedSource、RealBufferedSink:
相当于一个操作的中介代理,内部都维护着一个Buffer,分别定义了进行具体操作。
Segment:
存储最大长度为8K字节数组,该数组为不可变字节序列,pos代表开始可以读的字节序号,limit代表可以写的字节序号,boolean shared代表该片段是否共享,boolean owner代表自己是否可以操作本片段(与shared互斥),通过per、next形成链表(Buffer构建出双向链表),方法当然有push()、pop()
压缩机制:
由于存储的结果就是Head-new1-new2-new3-这样子,新建new的前提仅仅是上一片段(例如new3)的limit到Segment_size_max小于要存储的字节数,如果很长时间会有一个segment只存了小部分数据,但是有很多segment,造成内存浪费。因此需要压缩方法compact(),具体做法:先将上一片段的数据从pos往前移,使pos从序号0开始,然后将本片段的数据写到上一片段上,从limit开始,然后将本片段抛出。
public void compact() {
    if (prev == this) throw new IllegalStateException();//如果上一节点是自己代表没有上一节点
    if (!prev.owner) return; // Cannot compact: prev isn't writable.//如果上一节点不可以操作,返回
    int byteCount = limit - pos;//记录当前片段存储的字节长度L1
    int availableByteCount = SIZE - prev.limit + (prev.shared ? 0 : prev.pos);//计算上一节点没有存储数据的长度L2(pos之前的长度+limit之后的长度,如果perv是共享的,那么就不能加入pos之前的长度)
    if (byteCount > availableByteCount) return; // Cannot compact: not enough writable space.//如果L1>L2,那么就不够位置存,返回
    writeTo(prev, byteCount);//将本部分数据写入上一节点
    pop();//弹出本节点
    SegmentPool.recycle(this);
  }
/** Moves {@code byteCount} bytes from this segment to {@code sink}. */
  public void writeTo(Segment sink, int byteCount) {//往sink部分写入this(Segment)长度为byteCount的数据
    if (!sink.owner) throw new IllegalArgumentException();
    if (sink.limit + byteCount > SIZE) {
      // We can't fit byteCount bytes at the sink's current position. Shift sink first.
      if (sink.shared) throw new IllegalArgumentException();
      if (sink.limit + byteCount - sink.pos > SIZE) throw new IllegalArgumentException();
      System.arraycopy(sink.data, sink.pos, sink.data, 0, sink.limit - sink.pos);//先将sink原本存储的数据往前移,pos设为1
      sink.limit -= sink.pos;
      sink.pos = 0;
    }

    System.arraycopy(data, pos, sink.data, sink.limit, byteCount);//将this(Segment)数据写入sink中,从limit开始
    sink.limit += byteCount;
    pos += byteCount;
  }
共享机制(减少数据复制带来的开销)
原理:将一个Segment分为[pos...pos+byteCount]和[pos+byteCount...limit]两部分,该方法只用在Buffer.wirte()上,注意的是byteCount参数的意义是两个Segment相同的部分,如果相同的部分超多SHARE_MINIMUM=1024字节,就共享一个Segment,看起来我们是new了一个Segment,但是里面的data[]引用还是原来的Segment,因此能够减少数据复制带来的内存开销,从而提高性能
public Segment split(int byteCount) {
    if (byteCount <= 0 || byteCount > limit - pos) throw new IllegalArgumentException();
    Segment prefix;

    // We have two competing performance goals:
    //  - Avoid copying data. We accomplish this by sharing segments.
    //  - Avoid short shared segments. These are bad for performance because they are readonly and
    //    may lead to long chains of short segments.
    // To balance these goals we only share segments when the copy will be large.
    if (byteCount >= SHARE_MINIMUM) {
      prefix = new Segment(this);
    } else {
      prefix = SegmentPool.take();
      System.arraycopy(data, pos, prefix.data, 0, byteCount);
    }

    prefix.limit = prefix.pos + byteCount;
    pos += byteCount;
    prev.push(prefix);
    return prefix;
  }
SegmentPool(减少cpu消耗(减少GC)+减少内存消耗):
该池通过一个segment变量将全部segment联系起来,存储最多8个segment的片段池,如果该池还未满,一旦segment废弃了就放到该池中,减少了GC。如果io操作需要新建segment的话就不用new申请内存空间了,直接从片段池中获取。
Buffer:
具体读写操作的执行类,内部维护着一个Segment head,通过该片段就可以获取整个链表的所有数据,long size代表已经存储的总字节数。实现了三个接口,读、写和Clone。
实现及好处:循环的双向链表实现,链表节点为Segment片段,而Segment维护着固定长度的字节数组。这样采取分片的链接方式,片中又通过数组存储,兼具读的连续性和写的可插入性,对比于单一的用链表或者数组,是比较折中的方式。还有个好处就是根据需求来改动分片的大小来权衡读写的业务操作。

clone():
/** Returns a deep copy of this buffer. */
  @Override public Buffer clone() {
    Buffer result = new Buffer();
    if (size == 0) return result;

    result.head = new Segment(head);
    result.head.next = result.head.prev = result.head;//1
    for (Segment s = head.next; s != head; s = s.next) {
      result.head.prev.push(new Segment(s));
    }
    result.size = size;
    return result;
  }
Segment(Segment shareFrom) {
    this(shareFrom.data, shareFrom.pos, shareFrom.limit);
    shareFrom.shared = true;
  }

  Segment(byte[] data, int pos, int limit) {
    this.data = data;
    this.pos = pos;
    this.limit = limit;
    this.owner = false;
    this.shared = true;
  }
该Clone拷贝方法为浅拷贝,但是我们注意到虽然拷贝新建了一个Buffer,但是该Buffer的head变量的构造由new Segment(head)构建,细看该构造器中最重要的字节数组data引用指向了新的data,没有重新分配新的内存空间,性能得到优化。Segment的shared共享标示参数设为true,结合Segment类很多设计到shared的方法,有很多好处。
同时注意到语句1,result.head.next = result.head.prev = result.head,这样就形成了循环的链表中循环的特性了,之前分析Segment类无论增加数据add Segment或者读取数据 popSegment都没有形成循环闭环的特性,原来闭环(循环)的特性在Buffer类中形成。
除此之外,Buffer进行写操作每次都必须先获取segment,语句2也是形成闭环的原因
Segment writableSegment(int minimumCapacity) {
    if (minimumCapacity < 1 || minimumCapacity > Segment.SIZE) throw new IllegalArgumentException();

    if (head == null) {
      head = SegmentPool.take(); // Acquire a first segment.
      return head.next = head.prev = head;//2
    }

    Segment tail = head.prev;
    if (tail.limit + minimumCapacity > Segment.SIZE || !tail.owner) {//需要的长度如果从limit上再追加大于了Segment的最大大小了
      tail = tail.push(SegmentPool.take()); // Append a new empty segment to fill up.//使得head.prev每次都指向新push的segment
    }
    return tail;
  }
全是读、写操作方法:
具体分为int(4)、long(8)、short(2)的等等数据类型的读和写,需要注意的是各种数据类型需要多少个字节存储,读和写的参数分为直接是字节数组或者是source、sink、输入流、输出流等等,大同小异。
utf-8编码输出:
如果为String数据类型作为输入或者输出时,编码格式可以选择,utf-8
帮助方法:
以md5、sha1、sha256数字摘要输出Buffer里面存储的数据。
ByteString
其实就是一个不可变的字节数组,以特定的编码格式进行解码,支持的解码方式有utf-8,base64和hex。
final字段科普
该字段其实就是不可变的意思,在Segment存储data还是ByteString里面data都设了该字段。
定义:
类不被拓展(继承或者实现)
所有域都是final的,所有域都是private
没有任何提供改变该类状态的方法
好处:当然是线程安全的,不用考虑同步的问题(final的语义:当构造函数结束时,final定义的值被保证当其他线程访问该对象时,该值是可见的)
坏处:需要创建大量类的对象(。。。)
Okio中的超时机制
超时机制:意义在于防止IO操作阻塞在某个异常上,okio的超时机制的基础就是采取同步超时TimeOut。
同步:TimeOut类
使用在以任何inputStream或者outPutStream作为输入流输出流参数构建时,使用同步超时机制。
其实通过对OKIO的简单使用,我们知道读写操作的具体操作都在构建输入输出流的的回调方法。
以下sink构建输出流代码为例(source(final InPutStream in)构建输入流在超时处理上也一样执行了语句1,timeOut.throwInReached(),不拓展了)
OKIO:
public static Sink sink(OutputStream out) {
  return sink(out, new Timeout());
}
private static Sink sink(final OutputStream out, final Timeout timeout) {
    if (out == null) throw new IllegalArgumentException("out == null");
    if (timeout == null) throw new IllegalArgumentException("timeout == null");

    return new Sink() {
      @Override public void write(Buffer source, long byteCount) throws IOException {
        checkOffsetAndCount(source.size, 0, byteCount);
        while (byteCount > 0) {
          timeout.throwIfReached();//1
          Segment head = source.head;
          int toCopy = (int) Math.min(byteCount, head.limit - head.pos);
          out.write(head.data, head.pos, toCopy);

          head.pos += toCopy;
          byteCount -= toCopy;
          source.size -= toCopy;

          if (head.pos == head.limit) {
            source.head = head.pop();
            SegmentPool.recycle(head);
          }
        }
      }

      @Override public void flush() throws IOException {
        out.flush();
      }

      @Override public void close() throws IOException {
        out.close();
      }

      @Override public Timeout timeout() {
        return timeout;
      }

      @Override public String toString() {
        return "sink(" + out + ")";
      }
    };
  }
TimeOut:
public void throwIfReached() throws IOException {
    if (Thread.interrupted()) {
      throw new InterruptedIOException("thread interrupted");
    }

    if (hasDeadline && deadlineNanoTime - System.nanoTime() <= 0) {
      throw new InterruptedIOException("deadline reached");
    }
  }
异步:AsyncTimeOut,
使用在socket作为输入输出流时,使用异步超时处理,之所以在socket上使用异步超时处理,因为socket自身性质决定,socket常常因为自身阻塞导致往下不执行。
okio:与其他inputStream不同的是,他不直接返回source,而是作为AsyncTime.source()的参数再进行一次封装,返回source
public static Source source(Socket socket) throws IOException {
    if (socket == null) throw new IllegalArgumentException("socket == null");
    AsyncTimeout timeout = timeout(socket);
    Source source = source(socket.getInputStream(), timeout);
    return timeout.source(source);
  }
AsyncTimeOut:我们发现这里才是执行的准确位置,语句1就是涉及到异步超时处理机制。
在开始读或者写之前执行enter(),该方法就是开启一个WatchDog线程,待分析。。。
public final Source source(final Source source) {
    return new Source() {
      @Override public long read(Buffer sink, long byteCount) throws IOException {
        boolean throwOnTimeout = false;
        enter();//1
        try {
          long result = source.read(sink, byteCount);
          throwOnTimeout = true;
          return result;
        } catch (IOException e) {
          throw exit(e);
        } finally {
          exit(throwOnTimeout);
        }
      }

      @Override public void close() throws IOException {
        boolean throwOnTimeout = false;
        try {
          source.close();
          throwOnTimeout = true;
        } catch (IOException e) {
          throw exit(e);
        } finally {
          exit(throwOnTimeout);
        }
      }

      @Override public Timeout timeout() {
        return AsyncTimeout.this;
      }

      @Override public String toString() {
        return "AsyncTimeout.source(" + source + ")";
      }
    };
  }